Smothered Pork Chops

Embark on a culinary journey that promises comfort, depth of flavor, and an undeniably satisfying meal. This recipe for Smothered Pork Chops is designed to be a star on any table, transforming humble pork chops into a dish that feels both elegant and incredibly approachable. Imagine succulent, perfectly seared pork enveloped in a velvety, rich onion gravy – a symphony of textures and tastes that will leave you wanting more.
We’ll guide you through each step with clarity and ease, ensuring even novice cooks can achieve restaurant-quality results. Get ready to fill your kitchen with intoxicating aromas and create a dinner that’s not just a meal, but an experience. This is more than just cooking; it’s about creating lasting memories around delicious food.
Why You Will Love This Recipe
- Exceptional Tenderness: The slow simmering in rich gravy ensures that every bite of pork chop is incredibly tender and juicy, melting in your mouth with unparalleled succulence.
- Deep Savory Flavor: The combination of caramelized onions, savory broth, fresh thyme, and a touch of cream creates a complex and deeply satisfying gravy that elevates the pork to new heights.
- One-Skillet Simplicity: Most of the magic happens in a single skillet, minimizing cleanup and allowing the flavors to meld beautifully as the pork and gravy cook together.
- Versatile Pairing: This dish is a perfect canvas for a variety of side dishes, from creamy mashed potatoes to fluffy rice or buttery noodles, making it adaptable to any preference.
- Comfort Food Classic: It’s the ultimate cozy meal, perfect for a chilly evening or any time you crave a hearty, soul-warming dish that feels like a hug in a bowl.
Ingredients You Need
The foundation of any outstanding dish lies in the quality of its ingredients. For these smothered pork chops, we’re focusing on a few key components that will ensure succulence and vibrant flavor. Opt for thick-cut, bone-in pork chops for the most tender and juicy results, as the bone helps insulate the meat during cooking, preventing it from drying out. Fresh, vibrant aromatics like yellow onions and garlic are essential for building the rich flavor base of the gravy, while fresh thyme adds a delicate herbal note that perfectly complements the pork.
Smothered Pork Chops

This Smothered Pork Chops recipe features thick, pan-seared chops finished in a rich onion gravy that’s built right in the same skillet. The pork stays tender and juicy, while the savory sauce clings to every bite, soaking into whatever you serve alongside it.
- 1 pound bone-in pork chops, 1-inch thick
- 1 teaspoon poultry seasoning or seasoning salt
- ¼ teaspoon freshly ground black pepper
- 2 tablespoons olive oil
- 2 tablespoons unsalted butter
- 1 tablespoon unsalted butter
- 1 large yellow onion, thinly sliced
- pinch salt
- 3 cloves garlic, minced
- ½ tablespoon chopped fresh thyme
- ½ cup low sodium chicken broth
- ¼ cup heavy cream
- chopped fresh parsley, for garnish
- 1Season pork chops with the seasoning salt and black pepper.
- 2Heat oil and butter in a large skillet over medium-high heat until the butter is melted. Add pork chops to skillet and sear for 5 minutes per side until golden brown. If the skillet isn't big enough, cook the pork chops in batches. Transfer the pork chops to a plate and keep them covered.
- 3Return skillet to heat and add a tablespoon of butter; melt over medium heat. Stir in sliced onions and add a pinch of salt. Cook onions for 10 to 12 minutes, or until very soft and caramelized, stirring frequently.
- 4Add garlic and fresh thyme; continue to cook for 30 seconds. Pour in chicken broth, and using a wooden spoon, scrape up the browned bits from the bottom of the pan. Whisk in heavy cream and simmer for 1 minute.
- 5Return pork chops and all the pork juices to the skillet. Reduce heat to medium-low and continue to cook for 3 more minutes or until the pork chops are completely cooked through, and the sauce has thickened.
- 6Remove from heat; garnish with parsley and serve.
Keywords: pork chops, smothered pork chops, gravy, skillet, dinner, comfort food
Quantities for each ingredient are detailed in the recipe card, ensuring you have precisely what you need for a perfect outcome. These carefully selected items come together to create a truly memorable dining experience.
Variations
Elevating this classic dish is wonderfully simple with a few creative twists. Consider a vegan rendition by substituting the pork chops with thick slices of king oyster mushrooms, seared to perfection and then simmered in a rich mushroom and vegetable broth gravy, incorporating nutritional yeast for a cheesy depth. This allows everyone to enjoy the comforting essence of the dish.
For those following a low-carb lifestyle, the gravy can be thickened using a cornstarch slurry or a roux made with almond flour instead of a traditional flour-based one. Serve the smothered pork chops over cauliflower mash or a bed of sautéed spinach to keep the carbohydrate count low while still enjoying a satisfying meal.
Another delightful variation involves infusing the gravy with a hint of spice. Add a pinch of red pepper flakes along with the garlic and thyme, or incorporate a touch of Dijon mustard into the broth mixture for a tangy kick. These subtle adjustments can transform the familiar flavor profile into something new and exciting, perfect for adventurous palates seeking a little extra zing.
You could also explore different herbs beyond thyme, such as rosemary or sage, which pair beautifully with pork. A splash of white wine added to the deglazing process before the broth can introduce another layer of nuanced flavor. Experimenting with these additions allows for a personalized touch that makes the recipe truly your own.
How to Prepare smothered pork chops
Step 1: Achieve the Perfect Sear on Your Pork Chops
Begin by preparing your pork chops for the initial searing. Ensure they are patted completely dry with paper towels; this crucial step aids in achieving a beautiful, golden-brown crust, which is vital for both flavor and texture. Generously season both sides of the thick-cut pork chops with your chosen seasoning salt (or poultry seasoning for a subtle herby note) and freshly ground black pepper.
In a large, heavy-bottomed skillet, such as cast iron, heat the olive oil and unsalted butter over medium-high heat. You’ll know the skillet is ready when the butter has melted and begins to shimmer, but before it starts to smoke. Carefully place the seasoned pork chops into the hot skillet, ensuring not to overcrowd the pan; if necessary, sear them in batches to allow each chop to develop a proper sear without steaming.
Allow the pork chops to sear undisturbed for approximately 5 minutes on each side. The goal here is to develop a deep, rich golden-brown color, creating a flavorful crust that locks in the juices. This searing process is not about cooking the pork chop through, but rather about building the foundational flavor for the entire dish. Once beautifully seared, remove the pork chops from the skillet and set them aside on a clean plate; they will finish cooking in the luscious gravy later.
Step 2: Caramelize the Onions to Sweet Perfection
In the same skillet where you seared the pork chops, you’ll now build the aromatic base for your gravy. If there is an excessive amount of rendered fat, you can carefully drain off all but about 1 to 2 tablespoons, though a little fat is beneficial for sautéing the onions. Reduce the heat to medium, add the tablespoon of unsalted butter, and let it melt, coating the bottom of the pan.
Add the thinly sliced large yellow onion to the skillet. Stir the onions to coat them in the melted butter and any remaining flavorful drippings from the pork. Add a pinch of salt to the onions; this helps to draw out their moisture and encourages them to soften and caramelize more effectively, contributing to their natural sweetness.
Cook the onions, stirring frequently, for 10 to 12 minutes, or until they become very soft, translucent, and a beautiful deep golden-brown color. This caramelization process is key to unlocking the inherent sweetness of the onions and developing a complex flavor profile for the gravy. Be patient during this stage, as slow cooking the onions is what transforms them from sharp to sweetly mellow.
Step 3: Infuse the Gravy with Garlic and Herbs
Once the onions have reached a delightful caramelized state, it’s time to introduce the aromatics that will further enhance the gravy’s depth. Add the minced fresh garlic to the skillet with the softened onions. Stir the garlic into the mixture and continue to cook for about 30 seconds, just until it becomes fragrant. Be careful not to burn the garlic, as this can impart a bitter taste to the sauce.
Next, stir in the chopped fresh thyme. The heat from the skillet will begin to release the essential oils from the thyme, perfuming the onion and garlic mixture with its distinctive earthy and slightly floral notes. Thyme is a classic pairing with pork and adds a sophisticated herbal layer to the rich gravy, making it truly irresistible.
Continue to stir the onion, garlic, and thyme mixture for another 30 seconds to a minute, allowing the flavors to meld together. This brief sautéing process helps to bloom the herbs and garlic, intensifying their aromas and ensuring they distribute their flavor evenly throughout the gravy that will soon be created. The fragrant combination at this stage is incredibly enticing.
Step 4: Deglaze and Create the Luscious Gravy Base
Now it’s time to deglaze the pan and capture all those wonderfully browned bits stuck to the bottom, which are packed with intense flavor. Pour the ½ cup of low-sodium chicken broth into the skillet. As you pour, use a wooden spoon or a heatproof spatula to vigorously scrape up all the browned bits from the bottom of the pan. This process is crucial for building a rich, savory gravy, as these fond bits are the essence of the dish’s flavor.
Once all the browned bits have been incorporated into the broth, bring the mixture to a gentle simmer. Let it bubble for a minute or two, allowing the broth to slightly reduce and further concentrate its flavor. This step ensures that you are creating a robust base for your gravy, full of savory depth that will complement the pork chops beautifully.
After the broth has simmered for a moment, whisk in the ¼ cup of heavy cream. The cream will emulsify with the broth and pan drippings, creating a velvety smooth and rich texture for the gravy. Continue to whisk gently as the mixture heats through, but avoid bringing it to a rolling boil once the cream is added, as this can cause it to separate. The gravy should begin to thicken slightly as it warms.
Step 5: Finish the Pork Chops in the Savory Gravy
Carefully return the seared pork chops to the skillet, nestling them down into the creamy onion gravy. Make sure each pork chop is partially submerged in the sauce, allowing it to absorb all the wonderful flavors as it finishes cooking. If there are any accumulated juices on the plate where the pork chops were resting, add those to the skillet as well; these juices are precious and add even more depth to the gravy.
Reduce the heat to medium-low. Cover the skillet, if possible, or at least ensure the gravy is gently bubbling around the chops. Continue to cook for 3 to 5 minutes, or until the pork chops are completely cooked through and reach an internal temperature of 145°F (63°C). Using an instant-read meat thermometer is the most reliable way to ensure the pork is cooked to the perfect temperature without becoming dry or overcooked.
The gentle simmering allows the pork to finish cooking in the flavorful gravy, ensuring it remains incredibly moist and tender. The gravy will also thicken further during this final cooking stage, coating the pork chops beautifully. Once the pork reaches the target temperature, carefully remove the skillet from the heat. Allow the dish to rest for a minute or two before serving to let the juices redistribute within the pork.
Step 6: Serve and Savor Your Masterpiece
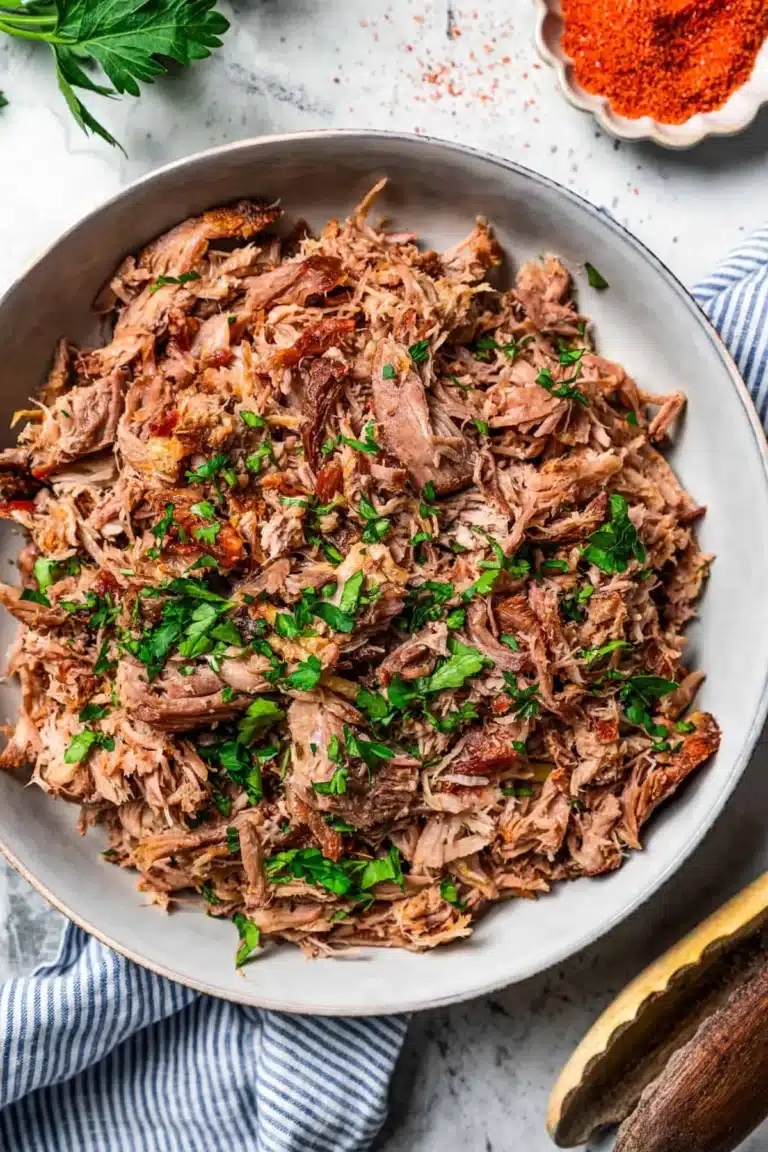
Transfer the smothered pork chops and a generous spoonful of the rich onion gravy onto serving plates. Garnish with a sprinkle of freshly chopped parsley for a pop of color and a hint of freshness. The vibrant green parsley not only enhances the visual appeal but also provides a subtle contrast to the deep, savory tones of the dish.
This is the moment to enjoy the fruits of your labor. The aroma alone is a testament to the deliciousness that awaits. Slice into the pork chop to reveal its juicy interior, perfectly complemented by the thick, luscious gravy.
This dish is incredibly satisfying on its own but truly shines when paired with complementary side dishes. Consider serving it alongside fluffy mashed potatoes, creamy polenta, or buttered egg noodles, which are perfect for soaking up every last drop of the delectable gravy. These classic pairings create a complete and comforting meal that is sure to impress.
Pro Tips for smothered pork chops
Thick Chops are Key: For the most tender and juicy results, always opt for thick-cut pork chops, at least 1 inch thick. Thinner chops tend to overcook quickly, leading to dryness, whereas thicker cuts allow for a good sear while remaining moist inside. The bone also adds additional flavor and helps to insulate the meat.
Don’t Skip the Sear: Achieving a beautiful golden-brown crust on the pork chops before they go into the gravy is paramount. This Maillard reaction creates complex flavors and locks in moisture. Ensure your skillet is hot enough and don’t overcrowd the pan; cook in batches if necessary for optimal browning.
Low and Slow for Onions: Patience is a virtue when caramelizing onions. Cook them over medium-low heat, stirring occasionally, until they are deeply golden and sweet. This slow process unlocks their natural sugars, creating a rich, complex flavor base for the gravy that simply cannot be rushed.
Taste and Adjust Seasoning: Before returning the pork chops to the gravy, taste it and adjust the seasoning as needed. You might want to add a little more salt, pepper, or even a pinch of red pepper flakes for a touch of heat. The broth and cream can dilute existing flavors, so a final taste test is always recommended.
Use a Thermometer for Perfect Doneness: Avoid the temptation to rely solely on visual cues. An instant-read meat thermometer is your best friend for perfectly cooked pork. Insert it into the thickest part of the chop, avoiding the bone, and aim for an internal temperature of 145°F (63°C) for juicy, tender pork. The meat will continue to cook slightly as it rests.
Serving Suggestions for smothered pork chops
Decoration
A final flourish of finely chopped fresh parsley adds a vibrant pop of green and a hint of herbaceous brightness that beautifully contrasts the rich, savory tones of the dish. This simple garnish elevates the presentation, making the smothered pork chops look as appealing as they taste. A few fresh thyme sprigs can also be artfully placed on top for an extra touch of elegance and to echo the flavors within the gravy.
Side Dishes
The classic accompaniment is undoubtedly creamy mashed potatoes, which are perfect for soaking up every last bit of the luxurious onion gravy. Alternatively, fluffy white rice or buttery egg noodles provide a wonderfully neutral base that allows the flavors of the pork and gravy to take center stage. For a lighter option, consider serving with a side of steamed green beans or roasted asparagus, which offer a fresh, crisp contrast to the richness of the meal. Easy lobster bisque can also be a surprising but delightful starter.
Creative Serving Ideas
Transform this comforting dish into a delightful sandwich by shredding the tender pork and mixing it with plenty of the gravy, then serving it on toasted slider buns or a hearty roll. For a more rustic presentation, serve the pork chops family-style directly from the skillet, allowing everyone to help themselves to extra gravy. You could also create individual bowls, layering a bed of rice or mashed potatoes with the smothered pork chop and a generous ladle of gravy for an impressive plating.
Consider pairing this dish with a refreshing drink such as iced tea or a light lager, which can help cut through the richness of the gravy. A simple side salad with a vinaigrette dressing also provides a welcome palate cleanser. These thoughtful additions ensure a well-rounded and highly enjoyable dining experience for all.
Preparation & Storage
Storing Leftovers
Once completely cooled, leftover smothered pork chops and their gravy can be stored in an airtight container in the refrigerator. They will keep well for 3 to 4 days, retaining much of their flavor and texture. Ensure the container is truly airtight to prevent the pork chops from drying out and to keep the gravy from absorbing any unwanted odors from other foods in the fridge.
It’s best to store the pork chops submerged in their gravy, as this helps to keep the meat moist and tender. Before storing, avoid the temptation to overcook the pork chops initially; slightly undercooking them by a minute or two in the final stage can be beneficial, as they will continue to cook a little when reheated.
When packing, make sure to seal the container tightly. If you find you have more gravy than pork chops, or vice versa, it’s still perfectly acceptable to store them together. The key is to create a protective barrier against the air.
Freezing
Smothered pork chops freeze remarkably well, making them an excellent candidate for meal prepping or keeping a comforting meal on hand for a busy weeknight. Allow the dish to cool completely before portioning it into freezer-safe containers or heavy-duty freezer bags. For best results, separate the pork chops and gravy into individual serving sizes to make reheating easier and more efficient.
Ensure that as much air as possible is removed from freezer bags before sealing to prevent freezer burn. You can also wrap individual portions tightly in plastic wrap, followed by a layer of aluminum foil, before placing them in a freezer bag or container. Properly stored, your smothered pork chops can last in the freezer for up to 2 to 3 months.
When freezing, consider placing the container flat in the freezer initially to ensure the gravy distributes evenly within the container, which can lead to more uniform thawing and reheating. Label each container with the date of freezing to keep track of your inventory. This makes selecting a meal much simpler.
Reheating
The best method for reheating smothered pork chops is gently on the stovetop. Place the desired portion of cooled leftovers into a skillet over low to medium-low heat. Add a tablespoon or two of water or chicken broth if the gravy seems too thick. Cover the skillet and let the pork chops heat through gradually, stirring occasionally, for about 5-10 minutes. This method helps to rehydrate the pork and maintain the gravy’s creamy consistency without drying out the meat.
Microwave reheating is also an option for convenience. Place the leftovers in a microwave-safe dish, cover with a damp paper towel, and heat on medium power in 30-second increments, stirring in between, until heated through. Be cautious not to overheat in the microwave, as this can quickly lead to tough, dry pork chops. The key is gentle, even heating.
For larger batches or to ensure even heating, the oven can be used. Transfer the leftovers to an oven-safe dish, cover tightly with foil, and bake at 325°F (160°C) for 15-20 minutes, or until heated through. This method is excellent for larger quantities and helps to maintain moisture.
Frequently Asked Questions
-
What kind of pork chops are best for smothered pork chops?
The best pork chops for this recipe are thick-cut, bone-in pork chops, ideally at least 1 inch thick. Bone-in chops offer more flavor and tend to stay moister during cooking because the bone acts as a natural insulator, protecting the meat from direct heat and preventing it from drying out. While boneless chops can be used, they require more careful monitoring to avoid overcooking, and the bone-in variety generally yields a more tender and succulent result. Look for chops with good marbling for optimal juiciness and flavor.
-
My pork chops came out dry. What did I do wrong?
Dry pork chops are almost always a result of overcooking. Pork is a lean meat and can quickly go from perfectly cooked to dry and tough. The most crucial step to prevent this is using an instant-read meat thermometer to check for doneness. The recommended internal temperature for pork chops is 145°F (63°C) when removed from the heat, followed by a 3-minute rest. Also, ensure you are using thick-cut chops as thinner ones cook much faster. Searing them properly helps to lock in juices, but the final cooking time is critical.
-
Can I make the gravy thicker if it’s too thin?
Yes, absolutely. If your gravy ends up thinner than you’d prefer, there are several simple ways to thicken it. The most common method is to create a slurry by whisking together 1 tablespoon of cornstarch or flour with 2 tablespoons of cold water until smooth, then gradually stirring this slurry into the simmering gravy and cooking for another minute or two until it thickens. Alternatively, you can reduce the gravy further by simmering it uncovered over low heat, allowing some of the liquid to evaporate and concentrate the flavors and consistency. For a richer, creamier thickening, you can also whisk in a little more heavy cream or even a small knob of cold butter at the end.