Gefüllte Mairübchen aus dem Ofen – Ein gesundes und einfaches Rezept – Muma’s Kitchen
Turnips, often known as “Mairübchen,” are a true highlight in German home cooking that frequently hide in the shadow of other root vegetables. During their peak season, these delicate, sweet vegetables offer a wonderful opportunity to diversify your weekly menu with something unique, colorful, and deeply satisfying.
This recipe for oven-baked stuffed turnips is not only simple to prepare, but it also delivers an incredible nutritional profile and complex flavors. It is the perfect choice for anyone looking for a light, yet substantial, meal that fits perfectly into a healthy dinner routine.
Why You Will Love This Recipe
- Quick Preparation: You can have these elegant stuffed vegetables on your table in under 45 minutes, making them a great option for busy weeknights.
- Nutrient-Dense: These turnips are packed with vitamins and minerals, while the inclusion of fiber-rich couscous makes for a wholesome, balanced meal.
- Visually Stunning: The vibrant colors of the roasted turnips and the golden-brown crust of the melted cheese make this an impressive dish to serve to guests.
- Highly Versatile: You can easily swap ingredients based on what you have in your pantry or fridge, allowing for endless culinary creativity throughout the season.
- Kid-Friendly: The mild, slightly sweet flavor profile of the turnips combined with gooey mozzarella cheese is a hit even with picky eaters.
Ingredients You Need
Quality ingredients are the key to unlocking the subtle, earthy sweetness of Mairübchen. Make sure your turnips are firm and your fresh herbs are vibrant to achieve the best possible depth of flavor in every bite.
Stuffed Kohlrabi from the Oven

Stuffed Kohlrabi from the Oven offer a variety of benefits. They are quick to prepare, healthy, and a true feast for the whole family. Baking in the oven preserves the tender flavor of the Kohlrabi, while the savory filling of couscous, cheese, and fresh herbs creates a perfect flavor composition. This recipe is ideal for vegetarians and also for anyone who wants to enrich their diet with seasonal vegetables.
- 1 bunch Kohlrabi
- 40g Couscous
- 30g flavorful mountain cheese, grated
- 70g Mozzarella
- 1 Egg
- 100ml Vegetable broth
- 30g mixed seeds (optional)
- 1 tsp Butter
- Salt
- Pepper
- 1Cut off the green tops of the Kohlrabi about 1 cm above the bulbs and set aside. Clean the bulbs thoroughly and halve them in the middle.
- 2Bring water to a boil in a large pot, salt it, and cook the Kohlrabi for 5 minutes over medium heat. Then let them cool.
- 3Pour hot water over the couscous and let it swell until soft.
- 4Chop the Kohlrabi leaves and cut the mozzarella into small cubes. Preheat oven to 200°C (390°F).
- 5Hollow out the Kohlrabi, leaving a 1 cm thick edge. Finely chop the scooped-out part.
- 6Mix the filling from couscous, mountain cheese, mozzarella, egg, and the chopped Kohlrabi. Season with salt and pepper.
- 7Fill the Kohlrabi with the mixture and place them in a baking dish.
- 8Mix the vegetable broth with the remaining Kohlrabi greens and stems and pour into the baking dish. Sprinkle with seeds and bake in the oven for 30 minutes until the filling is golden brown.
The Kohlrabi do not need to be peeled, as the greens contain many nutrients.
This dish is excellent for preparation in advance. Simply bake before serving.
Keywords: Kohlrabi, Stuffed Vegetables, Oven Baked, Vegetarian, German Cuisine, Couscous, Cheese, Healthy
- 1 bunch of mairübchen (turnips): the star of our dish, providing a sweet and earthy base.
- 40g couscous: acts as a light and fluffy sponge for all the savory juices.
- 30g würziger bergkäse: a flavorful mountain cheese that adds a sharp, alpine complexity.
- 70g mozzarella: provides that iconic, gooey melt we all crave in an oven-baked dish.
- 1 egg: works as the essential binding agent to keep the filling secure within the vegetable.
- 100ml vegetable broth: creates a gentle steaming environment at the bottom of your baking dish.
- 30g mixed seeds: adds a wonderful crunch and extra healthy fats to every serving.
- 1 tsp butter: ensures the turnip skins become tender and develop a rich mouthfeel.
- salt and pepper: essential seasonings to highlight the natural sweetness of the spring vegetables.
Please note that the specific measurements and quantities required for this recipe are conveniently outlined in the recipe card above for your ease of use.
Variations
The Vegan Twist: You can easily transform this recipe by using a high-quality vegan cheese alternative that melts well. Replace the egg with a flax-egg mixture and substitute the butter with a plant-based oil or vegan margarine for a completely cruelty-free meal.
Low Carb Adaptation: If you are looking to reduce your carbohydrate intake, simply replace the couscous with finely riced cauliflower or toasted pine nuts. This gives the stuffing a lovely texture without the grains, fitting perfectly into a keto-friendly lunch plan.
Mediterranean Fusion: Elevate the profile by adding chopped sun-dried tomatoes, black olives, or even a handful of fresh baby spinach to the filling. You could also serve it alongside a fresh breakfast-style yogurt sauce if you want to experiment with Middle Eastern flavor combinations.
How to Prepare gefüllte Mairübchen aus dem Ofen
Step 1: Preparing the Vegetables
The First Step: Begin by carefully removing the leafy greens about one centimeter above the bulb of the turnips. Keep these greens aside, as they are surprisingly flavorful and nutritious when added later in the process.
Cleaning Matters: Wash your turnips thoroughly under cold running water to ensure all grit and dirt are removed. Using a soft vegetable brush is highly recommended to get into the little crevices without damaging the skin.
Cutting Evenly: Cut each turnip cleanly in half, ensuring they are stable for the upcoming steps. Preparing your baked lemon chicken alongside this dish is a great way to maximize your oven efficiency.
Step 2: Pre-cooking the Turnips
The Blanching Process: Bring a large pot of salted water to a rolling boil on your stovetop. Carefully add the prepared turnip halves and let them simmer gently for about five minutes to soften their structure.
Cooling Down: Once they are slightly tender but still firm, remove them from the water immediately. Allowing them to cool naturally ensures they are easy to handle when you move on to the next phase.
Setting the Stage: Placing them on a clean kitchen towel allows any excess moisture to drain away. This is crucial because it prevents the final stuffing from becoming overly soggy in the oven.
Step 3: Preparing the Couscous Base
Hydrating the Grains: Pour your measured couscous into a heat-resistant bowl and cover it with hot water or vegetable stock. Let it sit covered for several minutes until all the liquid has been fully absorbed by the tiny grains.
Adding Flavor: Once the couscous is soft, fluff it up using a simple fork. Stir in your finely chopped turnip greens and the diced mozzarella to begin building the flavor profile for the interior of the vegetables.
Aromatic Depth: Adding a pinch of salt and cracked black pepper now ensures that the seasoning is evenly distributed throughout the mixture. You want the filling to taste great on its own before it even touches the turnips.
Step 4: Filling the Turnips
Careful Scooping: Using a small teaspoon, carefully scoop out the centers of your cooked turnip halves. Be mindful to leave a sturdy shell about one centimeter thick so that the vegetable doesn’t collapse during the baking process.
Refined Mixture: Chop the scooped-out turnip flesh into very fine pieces and mix them back into your couscous and cheese base. This minimizes food waste while simultaneously boosting the volume and texture of your filling.
Binding for Success: Crack the egg into the mixture and stir vigorously until everything is combined into a cohesive mass. This egg will set in the oven, ensuring your stuffed turnips stay beautifully intact when you plate them.
Step 5: The Final Bake
Arrange and Prep: Place your hollowed-out turnips into a preheated baking dish, ensuring they sit flat. Carefully spoon the mixture into the cavities, slightly mounding the top for a professional and inviting aesthetic.
The Flavor Bath: Pour the vegetable broth into the base of the dish, adding the remaining greens and stems for aromatics. This liquid will steam the turnips, keeping them incredibly moist and tender while the tops get crispy.
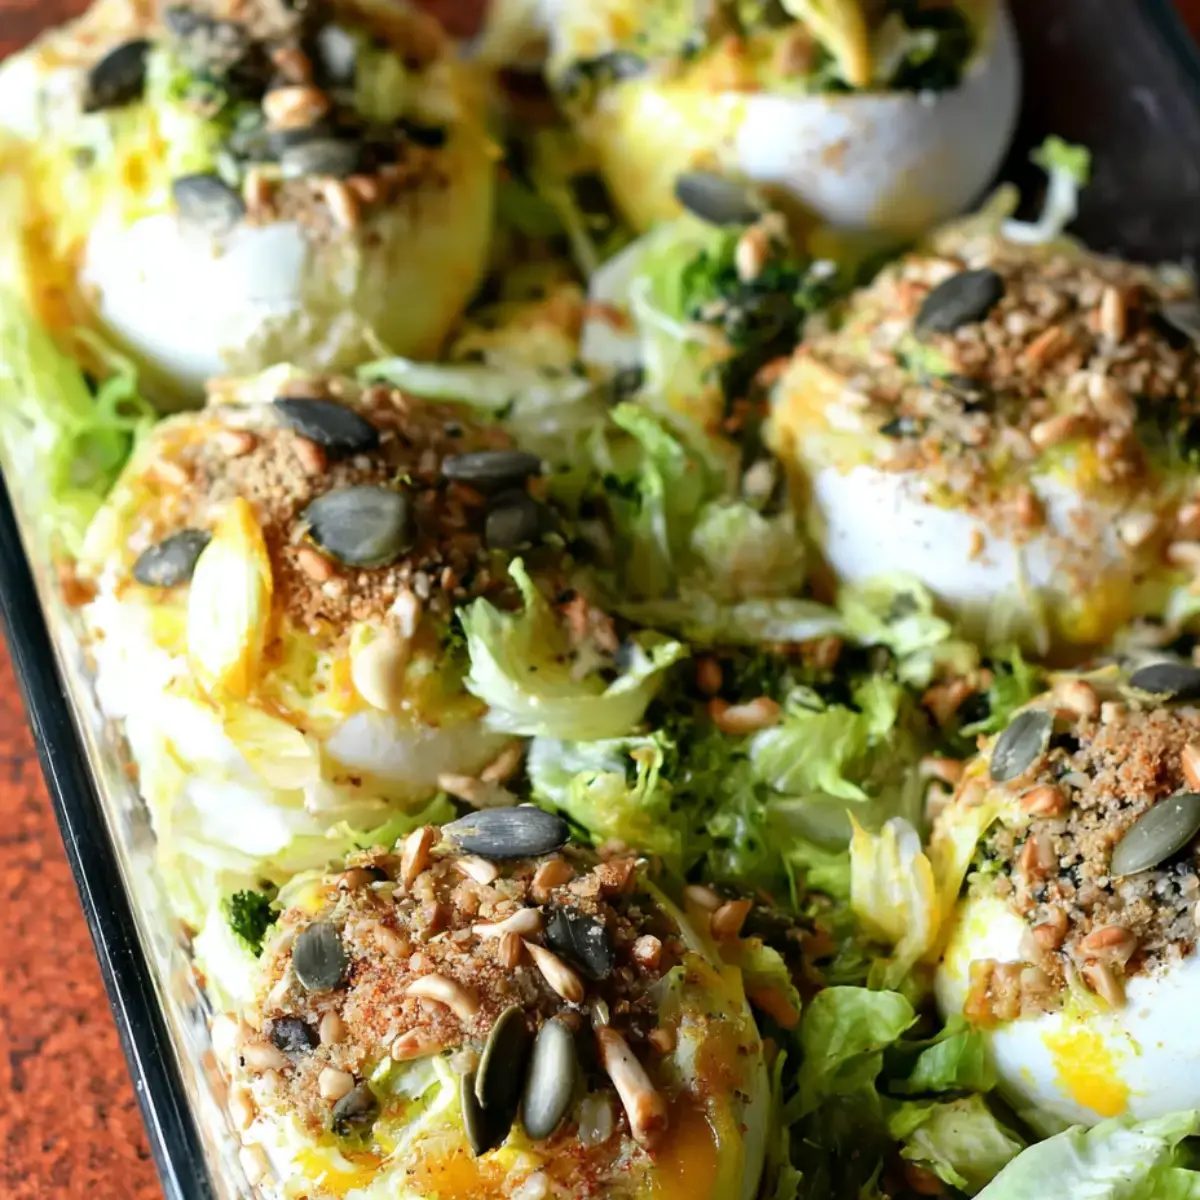
Gold and Crisp: Sprinkle the mixed seeds over the top for an added layer of texture and visual interest. Bake until the cheese is bubbling and the top is a deep, appetizing golden-brown, usually taking about 30 minutes in a 200°C oven.
Pro Tips for gefüllte Mairübchen aus dem Ofen
Tip: The Secret to Moisture. Never skip the vegetable broth at the bottom of the dish, as it prevents the bottom of the turnip from drying out or burning before the cheese on top has finished melting.
Tip: Texture Variety. Feel free to add crushed toasted walnuts or pine nuts to your filling mixture. The crunch provides a fantastic contrast to the creamy cheese and the soft, tender flesh of the Mairübchen.
Tip: Don’t Peel. The skin of a fresh turnip is incredibly thin and packed with essential nutrients, so there is no need to peel them. Just give them a good scrub, and the natural rustic appearance will enhance your final presentation.
Tip: Advanced Prep. You can hollow out and pre-boil the turnips a day in advance if you are hosting a dinner party. Simply store them in an airtight container, and fill them right before you are ready to pop them into the oven.
Serving Suggestions for gefüllte Mairübchen aus dem Ofen
Decoration
Garnish your finished dish with a handful of freshly chopped flat-leaf parsley or micro-greens. A light drizzle of high-quality olive oil right before serving adds a beautiful sheen and an extra touch of richness that ties all the flavors together perfectly.
Side Dishes
These stuffed turnips pair wonderfully with a crisp, acidic side salad featuring a lemon-vinaigrette dressing. If you prefer a heartier meal, consider serving them alongside a warm bowl of easy lobster bisque recipe for a truly luxurious surf-and-turf dining experience.
Creative Serving Ideas
Try serving each stuffed turnip half on a bed of wilted spinach or roasted root vegetable mash. This creates a restaurant-quality presentation that highlights the beauty of the vegetable, making it the undeniable star of your plate during any season.
Preparation & Storage
Storing Leftovers
Store any leftover stuffed turnips in a shallow, airtight container once they have reached room temperature. They will remain fresh in the refrigerator for up to two days, making them an excellent choice for a quick lunch the following day.
Freezing
While you can freeze them, be aware that the texture of the turnip may become slightly softer upon thawing due to the water content. It is best to freeze the filling and the turnips separately if you plan on preparing this in large batches for the future.
Reheating
The best way to reheat your leftovers is to place them back into a warm oven at 180°C for about 10–15 minutes. Avoid using the microwave if you want to maintain the lovely crispness of the cheese topping and the structural integrity of the vegetable.
Frequently Asked Questions
- Can I substitute turnips with other root vegetables?
Yes, you can certainly experiment with other root vegetables such as carrots or parsnips if you want to vary the flavor profile. Keep in mind that these vegetables might have different boiling times, so check for tenderness frequently during the pre-cooking stage to ensure they don’t overcook. - Is it possible to make the filling ahead of time?
Absolutely, the filling can be prepared and kept in the refrigerator for up to 24 hours before you stuff the turnips. This is a great way to save time during busy evenings, allowing you to just assemble and bake when you are ready to enjoy your meal. - How can I ensure the turnips stay perfectly tender?
The key is to avoid boiling them too long during the pre-cooking phase, as they will continue to soften significantly in the oven. Ensure your broth in the baking dish is sufficient to create steam, which helps cook the vegetables evenly while keeping them juicy and flavorful from the inside out.