Ultimate Homemade Potato Donuts Milk

When it comes to delicious treats, few can compare to the warm embrace of fresh, homemade potato donuts. Have you ever thought about how simple ingredients can come together to create something so delightful? The recipe for Homemade Potato Donuts Milk is a perfect testament to this idea.
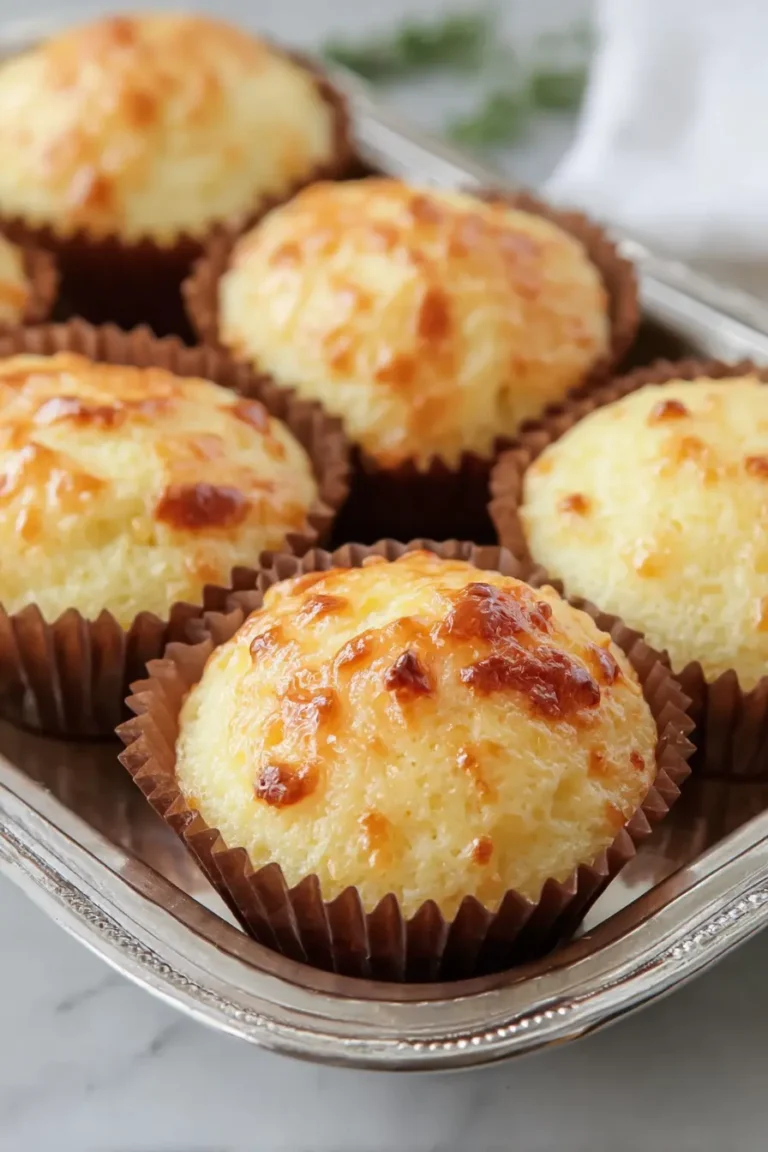
Imagine sinking your teeth into a fluffy, sweet donut, with a subtle hint of potato making it unique. What makes this treat even better is its versatility; you can enjoy them for breakfast, as an afternoon snack, or even at a festive gathering. The beauty of this recipe lies not just in its taste but also in its ease.
You don’t need to be a professional baker to whip up these tasty morsels. With a little time and some basic ingredients, you’ll have a batch of donuts that could outshine any bakery’s offerings. Plus, the addition of potatoes introduces a wonderful moisture and texture, making these donuts not only delicious but also incredibly satisfying.
Have you ever hesitated to make donuts at home, thinking it’s too complicated? The truth is, this recipe simplifies the process without compromising on flavor. You’ll feel a sense of accomplishment as you watch your dough rise and transform into golden-brown donuts that are sure to impress your family and friends. So, why wait? Dive into this exploration of Homemade Potato Donuts Milk—you won’t regret it. This delightful creation is a perfect addition to any breakfast spread or as a delightful dessert.
Why You Will Love This Recipe
- Delicious Flavor: The combination of potatoes and milk offers a unique, moist, and fluffy texture that sets these donuts apart from the ordinary.
- Simplicity: With straightforward steps and common ingredients, even novice bakers can achieve bakery-quality results at home, making the process enjoyable and stress-free.
- Versatility: Perfect for any time of day, these donuts can be enjoyed as a hearty breakfast, a satisfying afternoon snack, or a delightful dessert.
- Family-Friendly: Both kids and adults will adore these tasty bites, making them a guaranteed hit at family gatherings or a special weekend treat.
- Customizable: It’s incredibly easy to add your favorite flavors or toppings, allowing for a personal twist on this classic recipe to suit any preference or occasion.
Ingredients You Need
The quality of your ingredients plays a pivotal role in the final outcome of these delightful potato donuts. Opting for fresh, wholesome ingredients will ensure the best possible flavor and texture. Think about the fluffy mashed potatoes forming the base, the richness of the whole milk, and the subtle sweetness from the sugar, all coming together harmoniously. These simple components, when chosen with care, elevate the entire baking experience.
Homemade Potato Donuts Milk

Delicious and fluffy homemade potato donuts that are perfect for any occasion, featuring a unique twist with potatoes for added moisture.
- 4 medium potatoes, peeled and quartered
- 120 ml milk (for mashing potatoes)
- 500 ml whole milk
- 56 g active dry yeast
- 100 g granulated sugar
- 10 g salt
- 115 g unsalted butter, melted
- 2 large eggs
- 1.05 kg all-purpose flour
- 360 ml vegetable oil, plus
- 30 ml for bowl oiling and frying
- 120 g powdered sugar
- 22–30 ml milk (for icing)
- 1Start by gathering all your ingredients.
- 2Place the peeled and quartered potatoes in a pot of cold water and bring it to a boil. Cook until tender, about 15–20 minutes.
- 3Drain the potatoes and mash them with 120 ml of milk until smooth. Let the mashed potatoes cool to room temperature.
- 4Combine cooled mashed potatoes with 310 ml of warm milk, sugar, and salt in a large bowl. Mix well.
- 5Incorporate melted butter into the potato mixture, then beat the eggs in a separate bowl and add them in.
- 6In a small bowl, combine 180 ml of warm milk with active dry yeast. Stir and let sit until dissolved, about 5-10 minutes.
- 7Pour the activated yeast mixture into the potato mixture and stir until unified.
- 8Gradually add all-purpose flour while kneading the dough until it is smooth and elastic, about 5-10 minutes.
- 9Shape the kneaded dough into a ball and place it in an oiled bowl. Cover and let rise in a warm area until doubled.
- 10Deflate the dough and cover again to rise for a second time until doubled.
- 11Heat 360 ml of vegetable oil in a skillet to 180–190°C.
- 12Roll out the dough to about 1.25 cm thickness and cut out donuts.
- 13Fry each donut for approximately 2 minutes per side until golden brown.
- 14Transfer the fried donuts to a paper towel-lined plate.
- 15In a bowl, whisk powdered sugar with 22–30 ml of milk until smooth.
Keywords: Baking, Family-Friendly, Homemade Donuts, Potato Donuts, Sweet Treats
- potatoes: 4 medium, peeled and quartered
- milk (for mashing potatoes): 120 ml
- whole milk: 500 ml
- active dry yeast: 56 g
- granulated sugar: 100 g
- salt: 10 g
- unsalted butter, melted: 115 g
- large eggs: 2
- all-purpose flour: 1.05 kg
- vegetable oil, for frying: 360 ml, plus 30 ml for bowl oiling
- powdered sugar: 120 g
- milk (for icing): 22–30 ml
Quantities for each ingredient are detailed within the provided recipe card for your convenience.
Variations
The magic of Homemade Potato Donuts Milk extends beyond its basic form, offering a canvas for endless creativity. Imagine infusing them with warm spices for a comforting autumn treat. A dash of cinnamon and nutmeg in the dough can transport you straight to cozy evenings, perfect for a breakfast that feels like a hug.
For those seeking a lighter, more vibrant option, consider a citrus glaze. A zest of lemon or orange mixed into the icing can cut through the richness, offering a refreshing burst of flavor. This simple addition can transform a traditional donut into something elegant and bright, ideal for a spring brunch or a special afternoon tea. You can find inspiration for such delightful fruit-based ideas in our easy berry tart recipe.
And for the chocolate lovers, the possibilities are truly limitless. A rich dark chocolate ganache, a swirl of milk chocolate frosting, or even a dusting of cocoa powder can elevate these donuts to decadent dessert status. Think about pairing them with a cup of coffee, perhaps from our drinks section, for an indulgent moment. This adaptability ensures that these potato donuts can be tailored to suit any mood, occasion, or craving, making them a truly special homemade treat.
How to Prepare Homemade Potato Donuts Milk
Step 1: Prepare the Potatoes
Begin your culinary journey by gathering all the necessary ingredients, ensuring everything is measured and ready to go. This preparation step is crucial for a smooth baking process. The first task is to peel and quarter your medium-sized potatoes, setting them up for the cooking stage.
Place the prepared potato pieces into a pot and cover them with cold water. Bringing this water to a boil is the initial step in softening the potatoes. This process typically takes about 15 to 20 minutes, depending on the size of your potato quarters.
You are aiming for potatoes that are fork-tender, meaning a fork can be easily inserted and removed without resistance. This tenderness is essential for achieving a smooth, lump-free mash later on, which is key to the donut’s texture. Ensure you don’t overcook them to the point of becoming mushy and watery, as this can affect the dough consistency.
Step 2: Mash the Potatoes
Once the potatoes have reached the desired tenderness, carefully drain all the water from the pot. It’s important to drain them thoroughly to avoid adding excess moisture to your donut dough. The goal is a smooth, creamy consistency that will seamlessly integrate into the batter.
In the same pot, add 120 ml of milk to the drained, hot potatoes. Using a hand mixer or a potato masher, begin mashing the potatoes until they are completely smooth and free of any lumps. For an ultra-silky texture, you can pass the mashed potatoes through a fine-mesh sieve, though this is an optional step.
Allow this mashed potato mixture to cool down to room temperature before proceeding. Adding hot potatoes to the other ingredients, especially the yeast, can kill the yeast and prevent the dough from rising properly. Patience here will pay off significantly in the final texture of your donuts.
Step 3: Mix the Dough Base
In a large mixing bowl, combine the cooled mashed potatoes with 310 ml of warm whole milk. The milk should be warm to the touch, not hot, as this helps to activate the yeast and create a supple dough. Stir these ingredients together thoroughly with a spoon or spatula.
Next, incorporate 100g of granulated sugar and 10g of salt into the potato and milk mixture. Stir until the sugar and salt are well dissolved and evenly distributed throughout the base. This mixture forms the flavor foundation and helps to balance the sweetness of the donuts.
The combination of potato, milk, sugar, and salt creates a rich, flavorful base that is characteristic of these special donuts. Ensuring everything is well combined at this stage will make the subsequent steps much smoother and more effective for a perfect dough consistency.
Step 4: Incorporate Butter and Eggs
Now it’s time to add richness and structure to your donut dough. Pour in the 115g of melted unsalted butter into the potato mixture. Stir vigorously until the butter is fully incorporated, ensuring no streaks of pure butter remain. The melted butter adds a wonderful tenderness and a subtle richness to the donuts.
In a separate small bowl, beat the two large eggs. Once lightly beaten, add the eggs to the main potato mixture. Whisk them in thoroughly, making sure they are completely blended with the other ingredients. The eggs act as a binder, contributing to the dough’s structure and helping to create that signature fluffy texture.
This stage brings together the wet ingredients that will form the foundation of your delicious donuts. A well-emulsified mixture at this point is key to developing a dough that is both manageable and yields perfect results. You can think of this as building the perfect scaffolding for your sweet creations.
Step 5: Activate the Yeast
To ensure your donuts achieve that desired airy, light texture, proper yeast activation is paramount. In a small bowl, combine 180 ml of warm whole milk with 56g of active dry yeast. The milk should be lukewarm, similar to a comfortable bath temperature, to best encourage yeast activity.
Gently stir the mixture and then let it stand undisturbed for about 5 to 10 minutes. During this time, you should observe the yeast dissolving and a frothy, foamy layer forming on the surface of the milk. This bubbly layer is a visual confirmation that your yeast is alive and active, ready to work its magic on the dough.
If you don’t see this frothy layer, your yeast may be old or the milk might have been too hot or too cold, which can kill the yeast. In such a case, it’s best to discard the mixture and start again with fresh yeast and properly warmed milk to ensure successful dough rising, a critical component for fluffy donuts.
Step 6: Combine All Dough Ingredients
Once your yeast mixture has bloomed and is nicely frothy, it’s time to unite it with the rest of your ingredients. Pour the activated yeast mixture directly into the large bowl containing the potato, milk, sugar, salt, butter, and egg base. Stir everything together gently but thoroughly with your spoon or spatula.
Continue stirring until all the wet ingredients are harmoniously blended. This combination creates the liquid base for your donut dough. It should look smooth and uniform, ready to accept the flour that will give it structure. This unifying step ensures that the yeast is distributed evenly throughout the mixture.
The consistency at this stage should be quite liquid. It might seem a little too wet, but this is precisely what you want before you start adding the dry ingredients. This fluid base is ideal for ensuring all the flavors meld together beautifully and provide a good environment for the gluten to develop later during kneading.
Step 7: Knead the Dough
Now, it’s time to bring the dough together by gradually adding the flour. Start by adding about half of the 1.05 kg of all-purpose flour to the wet mixture. Mix it in with your spoon or spatula until it’s just combined. The dough will start to thicken considerably at this point.
Begin to incorporate the remaining flour bit by bit, stirring as you go. Once the dough becomes too stiff to mix with a spoon, turn it out onto a lightly floured surface. Continue adding small amounts of flour as needed, and begin the kneading process. You are aiming for a smooth, elastic dough that springs back when gently pressed.
Kneading is essential for developing the gluten structure in the flour, which gives the donuts their characteristic chewy yet tender texture. This process typically takes about 5 to 10 minutes of continuous kneading. You can also use a stand mixer with a dough hook for about 7-8 minutes on a medium-low speed.
Step 8: The First Rise
After the dough has been successfully kneaded into a smooth, elastic ball, it’s time for its first rise. Lightly grease a clean, large bowl with approximately 30 ml of vegetable oil. This prevents the dough from sticking to the bowl as it expands.
Shape the kneaded dough into a large, round ball and place it into the oiled bowl. Turn the dough ball over once to ensure it’s coated in a thin layer of oil. Cover the bowl tightly with a clean, thick kitchen towel or plastic wrap to trap moisture and warmth.
Place the covered bowl in a warm, draft-free area of your kitchen. This could be near a preheated oven (turned off), on top of a refrigerator, or in a slightly warm (but not hot) oven. Allow the dough to rise until it has doubled in size, which usually takes about 1 to 1.5 hours, depending on the ambient temperature.
Step 9: The Second Rise
Once the dough has completed its first impressive rise, gently punch it down to release the trapped air. This process, known as degasing, helps to create a more even texture in the final donuts and prepares the dough for its second expansion. It also makes the dough easier to handle in the next steps.
Cover the bowl again with the clean kitchen towel or plastic wrap. Let the dough rest and rise for a second time in a warm spot until it has again doubled in size. This second rise is crucial for achieving exceptionally light and fluffy donuts, similar to what you might find in a dedicated dessert shop.
This second stage of rising can also take approximately 1 to 1.5 hours. Proper rising ensures that the yeast has produced enough gas bubbles to give the donuts their signature airy structure. The patience exercised during these rising periods is key to the final success of your homemade potato donuts.
Step 10: Prepare for Frying
As the dough undergoes its final rise, it’s time to prepare your frying station. Choose a large, heavy-bottomed skillet or a deep fryer for this step. Pour approximately 360 ml of vegetable oil into the skillet, ensuring there’s enough depth for the donuts to float freely.
Heat the oil over medium-high heat until it reaches a temperature of 180–190°C (350–375°F). It’s essential to maintain this temperature range for successful frying; if the oil is too cool, the donuts will absorb excess grease, becoming heavy and greasy. If it’s too hot, the donuts will brown too quickly on the outside and remain uncooked inside.
You can use a kitchen thermometer to accurately monitor the oil temperature, or you can test it by dropping a small piece of dough into the oil. If it sizzles immediately and floats to the top, turning golden brown within a minute, the oil is ready. This precise temperature control is fundamental to achieving perfectly fried donuts, akin to those from a specialist bakery.
Step 11: Shape the Donuts
Once your dough has completed its second rise and is beautifully puffed, it’s time to shape your donuts. Lightly flour a clean work surface. Gently turn the risen dough out onto the floured surface. Avoid deflating the dough too much; you want to retain as much of that lovely airiness as possible.
Using a rolling pin, gently roll out the dough to an even thickness of about 1.25 cm (½ inch). Take care not to roll it too thin, as this will result in flat donuts. Once rolled, use a large round cookie cutter (about 7-8 cm or 3 inches in diameter) to cut out your donut shapes. You can also use two cutters: a larger one for the donut shape and a smaller one for the center hole.
If you’ve cut out the centers separately, you can reroll the scraps (gently!) and cut out more donuts or fry them as donut holes. Don’t overcrowd the cutting surface; work in manageable sections. This careful shaping ensures uniform donuts that will fry evenly and look beautiful.
Step 12: Fry the Donuts
With your oil at the correct temperature (180–190°C), carefully lower the shaped donuts into the hot oil. Do not overcrowd the pan; fry in batches to maintain the oil temperature and ensure the donuts cook evenly. This is a critical step for achieving that perfect golden crust.
Fry each donut for approximately 2 minutes per side. You’ll notice them puff up and begin to float. Use a slotted spoon or spider strainer to gently flip them over, ensuring even browning on both sides. The goal is a beautiful, rich golden-brown color, indicating they are cooked through.
The aroma filling your kitchen at this stage will be incredible! Watching these transform from pale dough to golden delights is incredibly satisfying. The slight potato texture makes them uniquely tender, a characteristic that makes this recipe stand out. Remember to maintain the oil temperature between batches by adjusting the heat as needed.
Step 13: Drain and Repeat
Once a batch of donuts has achieved that perfect golden hue, carefully remove them from the hot oil using your slotted spoon or spider strainer. Immediately transfer the fried donuts to a plate or baking sheet lined with paper towels. This step is essential for absorbing any excess oil, ensuring your donuts are crisp on the outside and tender on the inside, not greasy.
Allow the donuts to cool slightly on the paper towels before moving them to a wire rack. Continue the frying process with the remaining donut shapes and any donut holes you may have. Ensure the oil temperature is maintained between 180–190°C for each subsequent batch, adjusting the heat as needed to prevent overheating or underheating.
This diligent process ensures that every donut you make is cooked to perfection. The slight downtime between batches while draining can be used to check your oil temperature and make any necessary adjustments. The reward for your careful attention will be a spectacular batch of homemade potato donuts.
Step 14: Prepare the Icing
While the donuts are cooling slightly, prepare the simple, sweet glaze that will perfectly complement their rich flavor. In a medium-sized bowl, combine 120g of powdered sugar. Gradually add 22–30 ml of milk, whisking continuously until you achieve a smooth, pourable consistency. You can adjust the amount of milk slightly to reach your desired thickness; a thicker glaze will coat more heavily, while a thinner glaze will create a lighter coating.
Whisk vigorously to ensure there are no lumps of powdered sugar remaining. The glaze should be smooth and glossy. For a more flavorful icing, you can add a splash of vanilla extract or even a hint of almond extract to the mixture. This simple glaze adds that final touch of sweetness that makes these donuts truly irresistible.
Once the glaze is ready, and the donuts have cooled just enough so they are not piping hot but still warm, you can begin dipping or drizzling. The warmth of the donut helps the glaze set beautifully. This sweet topping is the perfect counterpoint to the subtle earthiness of the potato in the donut itself. It’s a classic combination that never disappoints.
Pro Tips for Homemade Potato Donuts Milk
Ensure Yeast Viability: Always check the expiration date on your active dry yeast and perform a bloom test by mixing it with warm milk and a pinch of sugar. If it becomes frothy within 5-10 minutes, it’s active and ready to use.
Potato Consistency is Key: Mash your potatoes until they are completely smooth and lump-free. Any lumps can create dense spots in the donuts or interfere with the dough’s texture. Cooling them to room temperature is also vital to avoid killing the yeast.
Don’t Overwork the Dough: While kneading is essential for gluten development, overworking the dough can lead to tough donuts. Knead just until the dough is smooth and elastic. The goal is a tender result, and excessive kneading can counteract that.
Oil Temperature Control: Maintain the frying oil temperature between 180–190°C (350–375°F) diligently. Use a kitchen thermometer for accuracy. Fry in batches to prevent the oil from cooling too much. This ensures evenly cooked, golden-brown donuts without being greasy.
Cooling Before Glazing: Allow the donuts to cool for at least a few minutes on a wire rack after frying before dipping them in the glaze. Glazing while too hot can cause the icing to melt away completely or become too runny.
Serving Suggestions for Homemade Potato Donuts Milk
Decoration
The possibilities for decorating these Homemade Potato Donuts Milk are as vast as your imagination. A classic approach is a simple dusting of powdered sugar, which creates an elegant, understated finish. For a touch more sweetness and visual appeal, a basic glaze made from powdered sugar and milk is a wonderful option; you can even add a drop of vanilla extract for extra aroma. Consider adding colorful sprinkles to the glaze for a festive touch, perfect for celebrations or to simply brighten up a dull day.
Chocolate lovers will rejoice with a rich chocolate glaze or a drizzle of melted dark or milk chocolate. You could also get creative with melted white chocolate for a contrasting look. For a more sophisticated presentation, try a light dusting of cinnamon sugar or a sprinkle of toasted nuts (like slivered almonds or chopped pecans) onto the wet glaze. These additions not only enhance the visual appeal but also add delightful textural and flavor dimensions to each bite.
Don’t shy away from experimenting with fruit-based decorations, either. A raspberry coulis drizzled artfully over the donuts or a scattering of fresh berries can add a burst of color and a refreshing tang. Think about using edible flowers for a truly gourmet presentation, or even creating simple patterns with contrasting glazes. Each decoration method turns a simple donut into a miniature work of art, perfect for sharing or enjoying yourself.
Side Dishes
While these Homemade Potato Donuts Milk are a complete treat on their own, they pair wonderfully with a variety of side dishes that can enhance the overall dining experience. For a balanced breakfast or brunch, consider serving them alongside a fresh fruit salad. The crisp, juicy nature of fruits like berries, melon, or citrus slices provides a refreshing contrast to the soft, sweet donut.
A side of creamy yogurt or a dollop of whipped cream can also be a delightful accompaniment. This adds another layer of texture and richness, making the donut experience even more decadent. If you’re serving these as part of a larger meal, think about savory options that can balance the sweetness, such as a light omelet or a savory breakfast sausage. This creates a well-rounded meal that satisfies various cravings.
For a truly indulgent experience, a scoop of high-quality vanilla bean ice cream served alongside a warm donut is simply divine. The contrast between the warm, soft donut and the cold, creamy ice cream is a classic dessert pairing that never fails to impress. Whatever you choose to serve them with, these donuts are sure to be the star of the show, transforming any meal into a special occasion.
Creative Serving Ideas
Elevate your Homemade Potato Donuts Milk from a simple treat to a memorable culinary presentation with a few creative serving ideas. Instead of a standard plate, consider serving them on a rustic wooden board or a tiered cake stand for a more elegant display. This adds a touch of sophistication, making them ideal for special gatherings or holiday brunches.
For a fun, family-friendly presentation, create a “donut bar” where guests can choose their own toppings. Offer small bowls of sprinkles, mini chocolate chips, chopped nuts, different colored glazes, and fresh fruit. This interactive approach allows everyone to customize their donuts to their liking, making the experience personal and engaging. It’s a fantastic way to cater to diverse preferences.
Another unique idea is to incorporate them into a dessert platter. Arrange the donuts alongside mini funfetti cookies, small fruit tarts, and perhaps some chocolate truffles. This creates a visually stunning and deliciously varied dessert spread that will undoubtedly impress your guests. You could even serve them with a side of our easy lobster bisque for a surprising, yet delightful, sweet-and-savory contrast that challenges traditional pairings.
Preparation & Storage
Storing Leftovers
To keep your delicious Homemade Potato Donuts Milk fresh and enjoyable for as long as possible, proper storage is key. The best method for short-term storage is to place the cooled donuts in an airtight container at room temperature. Ensure the container is well-sealed to prevent the donuts from drying out or absorbing unwanted odors from the kitchen.
If you intend to keep them for more than two days, refrigerating them might be an option, but be aware that this can sometimes alter their texture, potentially making them a little less fluffy. If you choose to refrigerate, wrap them individually in plastic wrap before placing them in an airtight container to maintain as much moisture as possible. This method is ideal for extending their shelf life slightly while preserving their flavor.
Always make sure the donuts are completely cool before storing them. Storing warm donuts can lead to condensation inside the container, making them soggy. These guidelines will help you savor the delightful taste of your homemade donuts over a few days, ensuring they remain a pleasant treat.
Freezing
Homemade Potato Donuts Milk freeze remarkably well, making them an excellent choice for preparing ahead of time or for enjoying weeks later. For optimal results, it’s best to freeze the donuts after they have been completely cooled and, if desired, glazed or sugared. However, unfrosted donuts tend to freeze slightly better as the glaze can sometimes become sticky or uneven upon thawing.
Wrap each cooled donut individually and tightly in plastic wrap, ensuring no air can penetrate. Once individually wrapped, place the donuts into a heavy-duty, airtight freezer bag or a freezer-safe container. Squeeze out as much air as possible from the freezer bag before sealing it. Proper individual wrapping prevents freezer burn and maintains the donut’s texture.
These well-wrapped donuts can be stored in the freezer for up to 2 to 3 months. When you’re ready to enjoy them, simply remove them from the freezer and allow them to thaw at room temperature for a few hours, or overnight in the refrigerator. This ensures you can have a taste of homemade goodness whenever the craving strikes.
Reheating
If you’ve stored your Homemade Potato Donuts Milk at room temperature or they’ve been frozen and thawed, a quick reheating can bring them back to their freshly baked glory. For a gentle rewarming, preheat your oven to a moderate temperature of around 180°C (350°F). Arrange the donuts in a single layer on a baking sheet.
Heat them in the preheated oven for approximately 5 to 10 minutes, or until they are warmed through to your liking. Be careful not to overbake them, as this can dry them out. This method is particularly effective for restoring a slight crispness to the exterior and a warm, soft interior, reminiscent of their initial fresh state.
Alternatively, you can reheat them more quickly in a toaster oven or even for a very short duration in a microwave, though the microwave might result in a slightly softer texture. For those that were frozen, ensure they are fully thawed before reheating. This simple reheating process makes your homemade donuts enjoyable again, even days after they were first baked.
Frequently Asked Questions
- Can I make the dough for Homemade Potato Donuts Milk a day in advance?
Absolutely! You can prepare the donut dough up to 24 hours in advance. After the first rise, gently punch down the dough, wrap it tightly in plastic wrap, and refrigerate it. The cold temperature will slow down the yeast’s activity, but the dough will still rise. When you’re ready to use it, take it out of the refrigerator about 1-2 hours before you plan to shape and fry it, allowing it to come to room temperature and complete its final rise.
- What is the best way to ensure my donuts are fluffy and not dense?
Fluffiness in Homemade Potato Donuts Milk is achieved through several key steps. Firstly, ensure your yeast is fresh and properly activated; this is the primary leavening agent. Secondly, allow the dough adequate time for both the first and second rises in a warm environment until it has visibly doubled in size. Finally, be careful not to overwork the dough during kneading, as excessive gluten development can lead to toughness rather than tenderness. Proper frying temperature is also crucial; too low and they become greasy, too high and they burn before cooking through.
- Are there any common pitfalls to avoid when making these potato donuts?
Several common pitfalls can be avoided with attention to detail. One is using ingredients that are too hot, especially the milk, which can kill the yeast and prevent the dough from rising. Another is not allowing sufficient rising time; rushing this process will result in dense, heavy donuts. Overfrying or underfrying is also common; maintaining the correct oil temperature is paramount for that perfect golden-brown crust and evenly cooked interior. Lastly, don’t be tempted to add too much extra flour during kneading, as this can make the dough too stiff, leading to dry donuts.