Garlic Parmesan Pull-Apart Bread: 5 Ways to Blissful Flavor
Garlic Parmesan Pull-Apart Bread: 5 Ways to Blissful Flavor is a feast for the senses, combining the comforting aroma of baked bread with the irresistible essence of garlic and parmesan. Have you ever craved a side dish that steals the spotlight at the dinner table? Look no further! This recipe not only satisfies that craving but also brings family and friends together, gathering around the table to enjoy its delightful flavors.
What makes Garlic Parmesan Pull-Apart Bread truly special is its simplicity. Even if you’re a novice cook, you can master this recipe with ease. Its deliciousness speaks for itself, inviting you to dive into a world of savory indulgence. Imagine the satisfying crunch of the crust followed by the soft, warm interior filled with a blend of garlic and parmesan. This bread goes beyond mere sustenance; it’s an experience.
Why You Will Love This Recipe
- Incredible Flavor: The combination of garlic and parmesan creates a flavor explosion that is truly irresistible.
- Easy to Make: With straightforward steps, this recipe is great for cooks of all skill levels.
- Customizable: You can easily add your favorite herbs and spices to make it your own.
- Perfect for Sharing: Its pull-apart nature makes it an ideal dish for gatherings and family dinners.
- Versatile Uses: Enjoy it as an appetizer, side, or snack—it’s perfect for any occasion.
Ingredients You Need
The foundation of this extraordinary Garlic Parmesan Pull-Apart Bread lies in the quality of its simple ingredients. Using fresh, high-quality components will elevate the final taste and texture, ensuring a truly memorable culinary experience. Choosing the best produce and dairy makes a noticeable difference, transforming an ordinary bread into a sensational dish that guests will rave about long after the meal is over.
Garlic Parmesan Pull-Apart Bread

A delightfully buttery and cheesy pull-apart bread infused with garlic, perfect for sharing. This recipe combines the comforting aroma of baked bread with the irresistible essence of garlic and parmesan, making it a feast for the senses.
- 1 loaf of bread (preferably a round artisan bread for best results)
- 4 cloves of garlic, minced (freshly minced for greater aroma and flavor)
- 1/2 cup of unsalted butter, melted
- 1 teaspoon of salt (balances the flavors)
- 1/2 teaspoon of black pepper (offers a subtle heat)
- 1 cup of grated parmesan cheese (freshly grated is best for melting)
- 2 tablespoons of chopped parsley (adds a vibrant, fresh touch)
- 1Preheat your oven to 375°F (190°C). Gather all your ingredients and tools.
- 2Take your loaf of bread and carefully cut it into squares, making sure not to cut all the way through to the bottom crust to create a pull-apart effect.
- 3In a bowl, mix the melted butter, minced garlic, salt, and black pepper until well combined.
- 4Drizzle the garlic butter mixture generously between the cuts of the bread, ensuring every crevice is filled.
- 5Sprinkle the grated parmesan cheese and chopped parsley over the top of the loaf.
- 6Wrap the bread tightly in aluminum foil.
- 7Place the wrapped bread in the preheated oven and bake for 15 minutes.
- 8Carefully unwrap the foil and bake the bread uncovered for an additional 10 minutes, until the crust is golden brown.
- 9Remove the bread from the oven and let it cool for a few minutes before serving warm.
Keywords: Cheesy Bread, Easy Bread Recipe, Garlic Bread, Party Bread, Pull-Apart Bread, Appetizer, Side Dish, Snack
- loaf of bread: a round artisan bread is ideal for its structure and ability to hold the butter mixture.
- garlic cloves: freshly minced garlic provides a vibrant and aromatic punch that powdered garlic cannot replicate.
- unsalted butter: melted, this acts as the luscious carrier for the garlic and seasoning, ensuring every nook and cranny is infused with flavor.
- grated parmesan cheese: freshly grated parmesan melts beautifully and offers a sharp, nutty, and savory depth.
- chopped parsley: fresh parsley adds a burst of color and a hint of herbaceous freshness that balances the richness.
- salt: essential for enhancing all the other flavors and bringing the garlic and cheese notes to the forefront.
- black pepper: freshly ground black pepper adds a subtle warmth and complexity to the overall flavor profile.
The exact quantities for these delightful ingredients are readily available in the recipe card.
Variations
For those with a desire to explore beyond the classic, consider a “Spicy Kick” variation. This involves incorporating a pinch of red pepper flakes into the melted butter mixture. The subtle heat will awaken the palate and add an exciting dimension to the familiar garlic and parmesan notes. It transforms the bread into something unexpected and thrilling, perfect for those who enjoy a little zest in their life.
Another delightful adaptation is the “Herbed Delight” version. Instead of just parsley, consider infusing the butter with a medley of fresh herbs like rosemary, thyme, or even a touch of chives. Finely chop these herbs and mix them into the melted butter along with the garlic. The aromatic complexity from these herbs will create a more sophisticated and fragrant pull-apart bread experience.
Finally, for a truly decadent twist, try the “Cheesy Extravaganza” variation. While parmesan is excellent, consider adding other complementary cheeses. A sprinkle of shredded mozzarella will lend a wonderfully gooey, stringy texture, while a touch of sharp cheddar can introduce a more robust flavor. Layer these cheeses between the cuts before baking for an incredibly rich and satisfying bread.
How to Prepare Garlic Parmesan Pull-Apart Bread
Step 1: Prepare the Oven and Ingredients
Begin by preheating your oven to a precise 375 degrees Fahrenheit (190 degrees Celsius). This crucial first step ensures that your bread will bake evenly, achieving that sought-after golden-brown crust and perfectly melty interior from the moment it enters the oven. Having the oven at the correct temperature is fundamental for achieving the ideal texture and preventing uneven cooking, which can lead to some parts being overdone while others remain undercooked.
Simultaneously, gather all the necessary ingredients and your essential kitchen tools. This includes mincing the fresh garlic, melting the butter, grating the parmesan cheese, and chopping the fresh parsley. Having everything prepped and within easy reach before you start assembling the bread significantly streamlines the entire process. This organized approach not only makes the preparation smoother but also minimizes the chance of any crucial ingredient being forgotten or added out of order, contributing to a flawless execution of the recipe.
The goal here is efficiency and accuracy, setting a solid foundation for the deliciousness to come. This preliminary preparation ensures that once you begin the assembly phase, you can focus entirely on infusing the bread with flavor without any interruptions or last-minute scrambling for supplies. A well-prepared mise en place is a hallmark of successful baking and cooking.
Step 2: The Art of Cutting the Bread
Take your chosen loaf of bread, ideally a round artisan variety for its sturdy structure and pleasing shape, and begin the careful process of cutting. Using a sharp serrated knife is highly recommended, as it will slice through the crust without crushing the soft interior. The goal is to create a grid-like pattern of cuts across the entire surface of the bread.
The critical technique here is to cut down into the bread, making sure to stop just before you reach the bottom crust. You want to create distinct segments that can be pulled apart later, but the loaf must remain intact at its base. This ensures that the buttery garlic mixture can seep down into every single crevice, maximizing the flavor infusion throughout the entire loaf. Imagine the molten cheese and butter flowing through these channels as it bakes.
This methodical cutting is what gives the bread its characteristic “pull-apart” quality, making it incredibly interactive and fun to share. The depth of your cuts will determine how easily the bread separates into individual portions, so aim for consistency. Each cut is an invitation for the flavors to penetrate deeply, promising a truly sensational bite with every pull. The visual appeal of these cuts also hints at the deliciousness that awaits.
Step 3: Crafting the Irresistible Garlic Butter Mixture
In a medium-sized mixing bowl, combine the pre-measured melted unsalted butter with the freshly minced garlic. The warmth of the butter will begin to gently release the potent aroma of the garlic, creating an intoxicating fragrance that hints at the incredible flavors to come. This combination is the very soul of the bread’s savory appeal.
Next, introduce the salt and the freshly ground black pepper to the butter and garlic mixture. Stir everything together thoroughly until it is completely homogenous. The salt is crucial for enhancing all the individual flavors, ensuring that the garlic isn’t overpowering and that the natural sweetness of the butter is perfectly balanced. The black pepper adds a subtle, pleasant warmth that complements the richness without being spicy.
Whisk this mixture until it emulsifies slightly and all the ingredients are well integrated. The consistency should be pourable but rich. This flavorful emulsion is what will be generously drizzled into the cuts of the bread, ensuring that every bite is packed with that signature garlicky, buttery goodness that makes this bread so beloved. The vibrant aroma at this stage is truly a testament to the power of simple, quality ingredients.
Step 4: Generously Drizzling the Flavor Infusion
Now comes the exciting part: infusing the bread with the luscious garlic butter mixture. Using a spoon or a basting brush, carefully and generously drizzle the prepared garlic butter mixture into each and every one of the cuts you made in the bread. Don’t be shy; the more butter that seeps into the bread, the more flavorful and moist the final result will be.
Work methodically, ensuring that the buttery liquid flows down through all the layers. Gently lift each segment of bread slightly to allow the mixture to penetrate deeper into the loaf. This step is paramount because it ensures that the flavor is not just on the surface but permeates every part of the bread, from crust to crumb. You want to aim for an even distribution, so no piece is left wanting for that delicious garlic butter essence.
The visual of the golden butter soaking into the bread is a beautiful preview of the delightful texture and taste that awaits. This deliberate application of the flavor base is what transforms a simple loaf into an extraordinary experience. Imagine the way this butter will mingle with the cheese and the bread as it bakes, creating pockets of pure bliss. It’s this attention to detail in flavor infusion that truly elevates the dish.
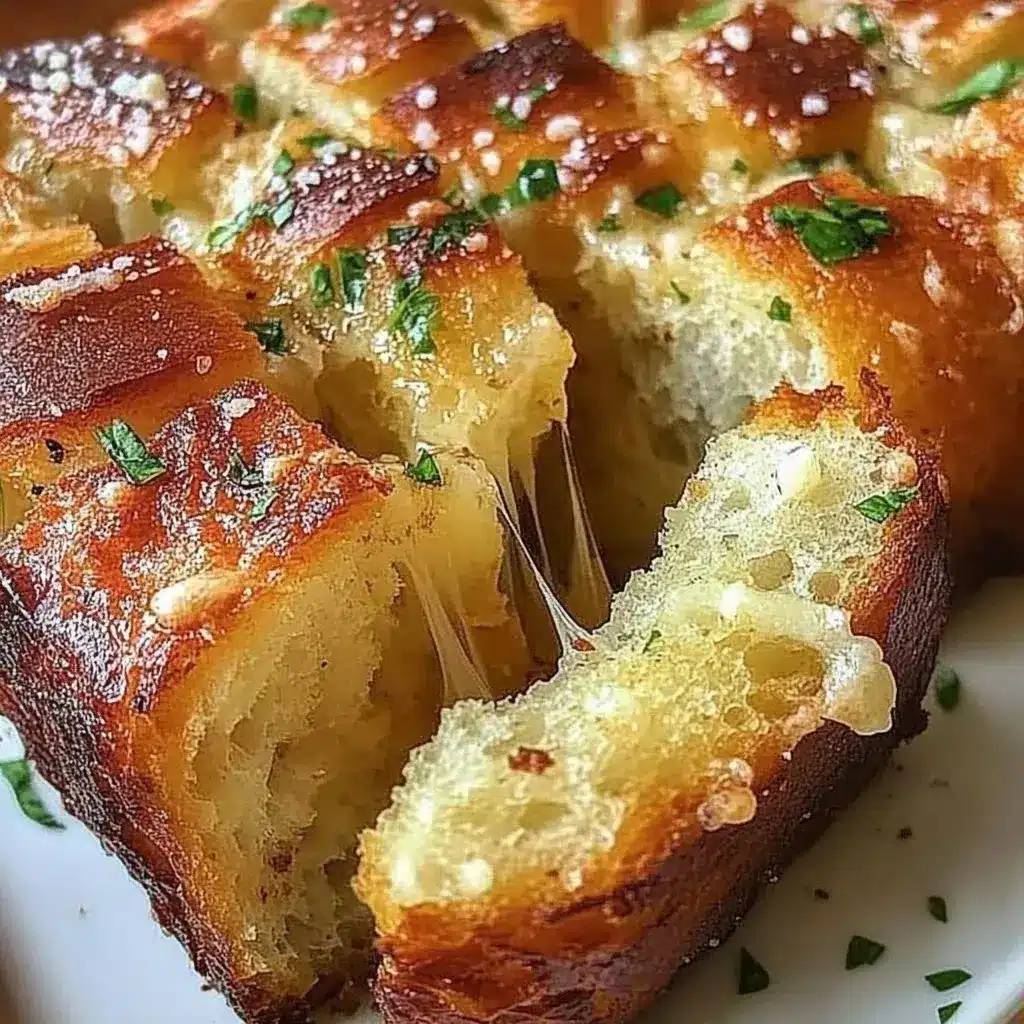
Step 5: The Grand Topping of Cheese and Parsley
With the garlic butter mixture now nestled within the bread, it’s time to add the delightful toppings that will create that irresistible crust and vibrant finish. Begin by generously sprinkling the freshly grated parmesan cheese over the entire top surface of the bread loaf. Ensure you cover as much of the exposed bread as possible, allowing the cheese to settle into the crevices between the cuts as well.
Following the parmesan, evenly distribute the chopped fresh parsley over the cheese. The vibrant green of the parsley not only adds a beautiful visual contrast to the golden cheese but also provides a fresh, herbaceous counterpoint to the richness of the butter and garlic. This combination of savory cheese and fresh herbs creates a visually appealing and aromatically enticing bread that promises incredible flavor.
Take a moment to admire the beautiful arrangement of cheese and parsley. This step is where the bread truly begins to look like a masterpiece, ready to be baked to golden perfection. The way the ingredients cling to the bread hints at the delightful textures and tastes that will emerge from the oven, making it an irresistible addition to any meal. It’s a simple yet impactful addition that guarantees a crowd-pleasing outcome.
Step 6: The Crucial Foil Wrap
Now that the bread is beautifully adorned with garlic butter, parmesan, and parsley, it’s time to prepare it for its initial bake. Carefully wrap the entire loaf of bread tightly in aluminum foil. Ensure that the foil creates a secure seal, trapping in all the moisture and steam that will be generated during the baking process. This is a critical step for achieving the perfect texture.
The purpose of this foil wrap is to allow the bread to steam gently from the inside, ensuring that the interior becomes wonderfully soft, tender, and infused with all the flavors you’ve added. It prevents the top of the bread from browning too quickly before the inside has had a chance to warm through and become gooey. This steaming method is essential for that classic pull-apart bread texture that is both yielding and incredibly satisfying.
Make sure the foil is cinched well around the base of the bread. This containment is key to keeping all those delicious melted butter, garlic, and cheese juices from escaping. This technique ensures that every inch of the bread will be wonderfully moist and flavorful, creating a comforting and deeply satisfying eating experience. It’s a simple step that yields remarkable results for the bread’s internal texture.
Step 7: The First Bake – Melting the Magic
Carefully place the foil-wrapped bread onto a baking sheet. Transfer the baking sheet into the preheated oven set at 375°F (190°C). Allow the bread to bake for precisely 15 minutes. During this initial baking period, the magic truly begins to happen within the foil’s confines.
The trapped heat and steam will work in unison to thoroughly melt the parmesan cheese, allowing it to ooze and mingle with the garlic butter mixture. This process ensures that the bread’s interior becomes incredibly soft, tender, and saturated with all the delicious flavors. The 15-minute duration is crucial for achieving this internal transformation without allowing the exterior to overcook or dry out.
Resist the urge to peek too early; let the foil do its important job of creating a steamy, flavorful environment for the bread. This period is dedicated to ensuring the core of the bread reaches a perfect, gooey consistency, setting the stage for the final crisping stage. It’s about building that internal deliciousness that makes pull-apart bread so irresistible.
Step 8: Unveiling and Achieving the Perfect Crisp
After the initial 15 minutes of baking, it’s time for the bread to reveal its delicious transformation. Carefully remove the baking sheet from the oven and, using oven mitts, gently unwrap the aluminum foil. Be cautious of the hot steam that will escape. The bread should now appear softened and fragrant, with the cheese beginning to melt beautifully.
Once unwrapped, return the bread to the oven, this time placing it directly on the oven rack or keeping it on the baking sheet. Bake for an additional 10 minutes, uncovered. This second phase of baking is essential for achieving that coveted golden-brown, slightly crispy crust. The direct heat will caramelize the cheese and toast the exposed bread surfaces, adding a wonderful textural contrast to the soft interior.
Keep a close eye on the bread during this final baking period to prevent it from becoming too dark or burnt. The goal is a beautiful, toasted appearance that signals perfect doneness. This combination of steamed interior and crisped exterior is what makes Garlic Parmesan Pull-Apart Bread such a textural delight, offering the best of both worlds in every single bite.
Step 9: The Patient Pause – Letting Flavors Settle
Once the bread has reached its desired golden-brown perfection and has completed its final baking stage, carefully remove it from the oven. Place the hot loaf onto a serving platter or a cooling rack. While the temptation to dive in immediately will be strong, it’s important to let the bread cool slightly for a few minutes, perhaps 5 to 10 minutes, before serving.
This brief resting period is more than just a waiting game; it allows the intensely hot, melted cheese and butter mixture to settle slightly. This cooling phase helps the flavors to meld together even more cohesively. It also prevents you from burning your mouth on molten cheese, allowing the flavors to be fully appreciated when you do start pulling the bread apart. The bread will continue to cook slightly from its residual heat.
This pause is a small but significant step in ensuring the best possible eating experience. It allows the internal structure of the bread to firm up just enough to hold its shape as pieces are pulled away, rather than falling apart into a messy heap. Patience here will be rewarded with a more enjoyable and perfectly textured Garlic Parmesan Pull-Apart Bread.
Step 10: The Grand Reveal – Serve and Enjoy!
Finally, the moment you’ve been waiting for has arrived! Present the warm, golden-brown Garlic Parmesan Pull-Apart Bread on a beautiful serving platter, a rustic wooden board, or a basket lined with a checkered cloth. The aroma wafting from it will undoubtedly draw everyone to the table with anticipation.
Encourage your guests, or your family, to begin the delightful ritual of pulling apart the bread. Each segment should separate easily, revealing the gooey, melted cheese and the luscious garlic butter within. This interactive element is a huge part of the charm and enjoyment of this dish, making it perfect for sharing and fostering a sense of togetherness.
Serve it immediately while it’s still warm for the absolute best texture and flavor experience. The contrast between the slightly crisp crust and the impossibly soft, cheesy interior is divine. This bread is best enjoyed fresh from the oven, offering a comforting and utterly satisfying culinary moment that is sure to be a memorable part of your meal. Enjoy every delicious pull!
Pro Tips for Garlic Parmesan Pull-Apart Bread
Use High-Quality Ingredients: The difference between good and exceptional Garlic Parmesan Pull-Apart Bread often lies in the quality of the ingredients. Opt for freshly minced garlic over powdered for a more potent and authentic flavor. Use good quality, freshly grated Parmesan cheese, as it melts significantly better than pre-shredded varieties which often contain anti-caking agents. The butter should also be of good quality for the richest flavor. These simple choices will make a noticeable impact on the final taste.
Don’t Cut All the Way Through: It’s essential to remember the “pull-apart” aspect of this bread. When cutting the loaf, be careful not to slice all the way down to the bottom crust. The bread needs to remain connected at its base to hold together during baking and serving. This creates the individual pockets for the butter and cheese to seep into, ensuring flavor throughout every piece, while still allowing for easy separation.
Seal the Foil Tightly: The aluminum foil wrap is crucial for achieving a tender, moist interior. Make sure to seal it snugly around the loaf to trap all the steam generated during the initial baking phase. This steaming process allows the cheese to melt thoroughly and the bread to become incredibly soft and infused with flavor. If the foil is loose, the steam will escape, and the bread may not achieve the desired gooey texture.
Watch the Browning Carefully: While a golden-brown crust is desirable, overbaking can lead to a dry texture. Pay close attention to the bread during the final 10 minutes of baking when it’s unwrapped. The cheese should be melted and slightly bubbly, and the exposed bread surfaces should be toasted to a lovely golden hue. If it starts to brown too quickly, you can loosely tent it with foil.
Experiment with Herbs and Spices: While parsley is classic, don’t hesitate to get creative with other herbs. Fresh rosemary, thyme, or chives can add wonderful layers of flavor. A pinch of red pepper flakes can introduce a subtle heat for those who enjoy a bit of spice. Consider adding a touch of garlic powder in addition to fresh garlic for an extra punch of garlicky goodness, ensuring your bread is as flavorful as you desire.
Serving Suggestions for Garlic Parmesan Pull-Apart Bread
Decoration
To elevate the visual appeal of your Garlic Parmesan Pull-Apart Bread, consider a final flourish of fresh herbs. A light dusting of chopped fresh parsley is a classic and effective choice, adding a vibrant green contrast to the golden cheese. If you’re feeling adventurous, finely chopped chives or a sprinkle of microgreens can offer a more refined and elegant garnish. Ensure these garnishes are added just before serving to maintain their freshness and vibrant color.
The way the cheese has melted and slightly caramelized on top can be a decorative element in itself. You can also strategically place a few small sprigs of fresh rosemary or thyme on top, especially if these herbs were incorporated into the butter mixture, to subtly hint at the flavors within. A light drizzle of high-quality olive oil or even a balsamic glaze can add an artistic touch, providing subtle sheen and another layer of flavor complexity.
Consider the serving platter or board you use; a rustic wooden board enhances the homemade charm, while a stoneware platter offers a more polished presentation. The bread’s golden-brown hue against a complementary background will naturally draw attention. Sometimes, the simplest presentation is the most effective, allowing the bread’s inviting aroma and appearance to speak for itself.
Side Dishes
This delightful bread is a perfect companion for a wide array of dishes, truly acting as a versatile flavor enhancer. It pairs exceptionally well with hearty soups and stews; imagine dipping chunks of this cheesy bread into a rich lobster bisque or a comforting tomato basil soup. The bread’s ability to soak up broths and creamy textures makes these pairings exceptionally satisfying. It’s the ultimate dunking vessel.
For a lighter meal, consider pairing it with fresh salads. A crisp green salad with a light vinaigrette can provide a refreshing contrast to the bread’s richness. It also complements pasta dishes beautifully, especially those with creamy or tomato-based sauces, acting as an excellent substitute for plain bread or garlic bread. The cheesy goodness adds an extra dimension of flavor that enhances the entire dining experience, making it feel more complete and indulgent.
Furthermore, this bread is an indispensable addition to any charcuterie or appetizer spread. Its shareable nature and irresistible flavor make it a natural centerpiece. Serve it alongside dips like spinach artichoke dip, marinara sauce, or even a simple pesto for an interactive and crowd-pleasing appetizer experience. It’s a guaranteed hit that encourages communal enjoyment and conversation around the table. The versatility makes it a go-to for many different dining occasions.
Creative Serving Ideas
Think outside the typical dinner table and consider this bread as a star appetizer for parties or game nights. Arrange the pull-apart pieces in a festive manner on a platter, perhaps shaped like a star or a holiday symbol, depending on the occasion. For a sports event, you could even serve it in a mini football helmet or team-colored dish to enhance the theme.
Another creative idea is to offer it as a late-night snack option during gatherings. Its comforting and satisfying nature makes it perfect for warding off hunger as the evening progresses. Pair it with a selection of dips that cater to different tastes, ensuring there’s something for everyone. This flexibility makes it incredibly adaptable to various social settings and guest preferences.
For a more unique presentation, consider serving individual portions. You could cut smaller loaves or even individual rolls and bake them in muffin tins or ramekins, creating perfectly portioned pull-apart bread servings. This method is excellent for buffet-style events or when you want to ensure each guest has their own delightful portion. It adds a touch of individual care and presentation to this already beloved dish, making it even more special.
Preparation & Storage
Storing Leftovers
If, by some small miracle, you find yourself with leftover Garlic Parmesan Pull-Apart Bread, proper storage is key to maintaining its deliciousness. For short-term storage, wrap the remaining bread tightly in aluminum foil or plastic wrap. This helps to keep it from drying out and preserves its moisture. Store it at room temperature if you plan to consume it within the next day or two.
For longer storage, it’s best to refrigerate the bread. Once it has cooled completely, place it in an airtight container or wrap it securely in multiple layers of plastic wrap and then aluminum foil. Stored in the refrigerator, the bread should remain palatable and enjoyable for up to a week. Ensure the container or wrapping creates a good seal to prevent it from absorbing other odors from the refrigerator.
Before reheating, it’s always a good idea to check the bread for any signs of spoilage, such as mold or an off smell, although with proper storage, this is unlikely within the recommended timeframes. The goal is to preserve that wonderfully soft interior and the savory garlic parmesan flavor for later enjoyment.
Freezing
Garlic Parmesan Pull-Apart Bread freezes remarkably well, making it an excellent candidate for make-ahead meals or snacks. To freeze the bread, ensure it has cooled completely after baking. Wrap the cooled loaf tightly and thoroughly in plastic wrap, making sure there are no exposed areas. Then, double-wrap it with heavy-duty aluminum foil to provide an extra layer of protection against freezer burn.
Alternatively, you can place the plastic-wrapped and foil-wrapped loaf into a freezer-safe airtight container or a heavy-duty freezer bag. Remove as much air as possible from the bag before sealing it. Properly stored, the bread can maintain its quality in the freezer for up to three months. Freezing allows you to have this delightful bread on hand whenever a craving strikes or when you need a quick side dish for an impromptu meal.
When you decide to use your frozen bread, it’s best to plan ahead. Thawing is the first step towards enjoying it again. This ensures that the bread thaws evenly and retains its best texture when reheated. Proper freezing techniques are your best friend for preserving its deliciousness for future enjoyment.
Reheating
To reheat leftover Garlic Parmesan Pull-Apart Bread, the oven is your best friend. Preheat your oven to a moderate temperature of 350°F (175°C). If the bread is completely thawed, place it directly on a baking sheet or back into its original foil if you still have it. If it was frozen, allow it to thaw in the refrigerator overnight before reheating, or you can reheat it directly from frozen, though it may take slightly longer.
Bake the bread for approximately 10 to 15 minutes, or until it is heated through and has regained some of its original crispness. The exact time will depend on the size of the remaining portion and your oven. For a softer reheated bread, you can re-wrap it loosely in foil for the first part of the reheating time and then unwrap it for the last few minutes to crisp up the top. This method helps to ensure it doesn’t dry out.
If you’re only reheating a small portion, a toaster oven can also work effectively. Just keep a close eye on it to prevent burning. The goal is to achieve a warm, soft interior with a pleasantly toasted exterior, bringing back the delightful texture and flavor of freshly baked bread. Enjoying reheated pull-apart bread is almost as satisfying as enjoying it fresh.
Frequently Asked Questions
-
Can I prepare Garlic Parmesan Pull-Apart Bread ahead of time?
Yes, you absolutely can prepare this bread ahead of time, which is a fantastic option for busy hosts or meal preppers. You can assemble the bread up to a few hours in advance. This involves cutting the bread, preparing the garlic butter mixture, and generously coating the bread with it, then topping with cheese and parsley. Once assembled, cover it tightly with plastic wrap and refrigerate. When you’re ready to bake, simply remove it from the refrigerator, unwrap it, and bake according to the recipe instructions, possibly adding a few extra minutes to the baking time to ensure it heats through properly. This makes it incredibly convenient for entertaining.
-
Can I freeze this bread, and how should I do it?
Absolutely, this Garlic Parmesan Pull-Apart Bread freezes beautifully, making it a great item to have on hand. After baking and allowing the bread to cool completely, wrap it very securely in plastic wrap, ensuring there are no air gaps. Then, double-wrap it with heavy-duty aluminum foil for an added layer of protection against freezer burn. For even better storage, you can place the wrapped bread into a freezer-safe airtight container or a sturdy freezer bag, pressing out as much air as possible before sealing. Properly frozen, it can retain its excellent quality for up to three months. This allows you to enjoy this delightful bread long after you’ve baked it, perfect for unexpected guests or a quick side dish.
-
How long does Garlic Parmesan Pull-Apart Bread typically last, and how should leftovers be stored?
When stored correctly, leftover Garlic Parmesan Pull-Apart Bread can remain delicious for a reasonable period. If you plan to consume the leftovers within one to two days, storing the bread tightly wrapped in aluminum foil or plastic wrap at room temperature is sufficient. For longer preservation, it is best to refrigerate the bread. Once cooled, wrap it securely in plastic wrap and then in foil, or place it in an airtight container. In the refrigerator, it can last for up to a week. Always check for freshness before reheating or consuming, although with proper storage, spoilage is unlikely within these timeframes.