Philadelphia Torte ohne Backen – Muma’s Kitchen
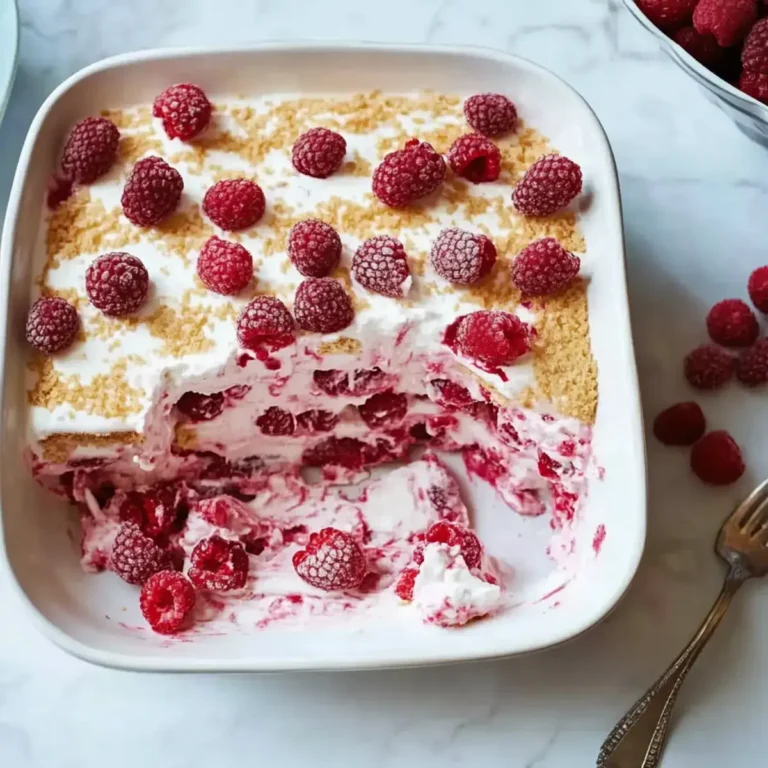
Die Philadelphia Torte ohne Backen ist ein wahrer Klassiker, der mit seiner cremigen Konsistenz und fruchtigen Frische besticht. Sie ist die ideale Wahl für warme Tage, da sie vollständig ohne Ofen auskommt und sich somit perfekt für die heiße Jahreszeit eignet.
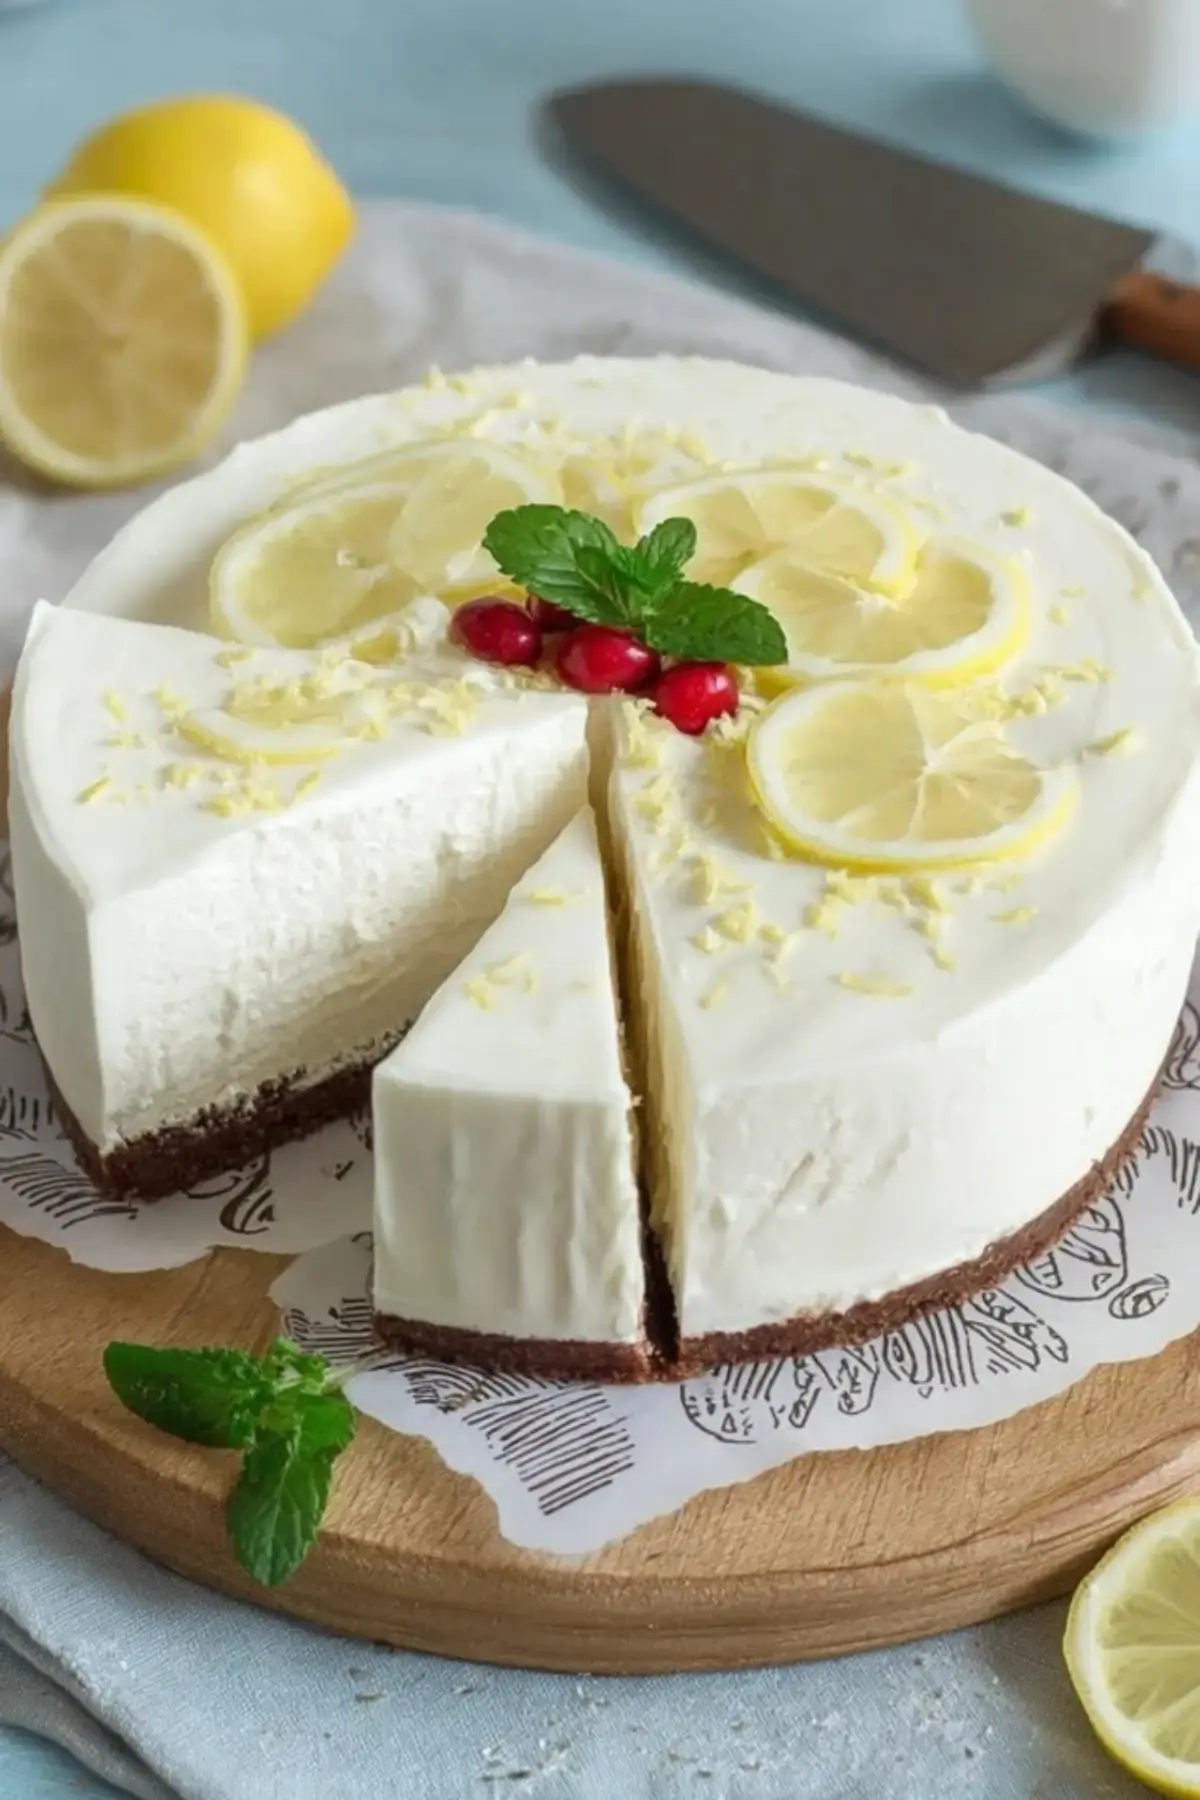
Die Kombination aus einem knusprigen Keksboden, einer luftig-leichten Frischkäsecreme und einem glänzenden Fruchtguss macht diese Torte zu einem optischen und geschmacklichen Highlight, das einfach jeden begeistert.
Why You Will Love This Recipe
- Effortless Preparation: This delightful torte requires absolutely no baking, making it a stress-free dessert option, especially during warmer months.
- Creamy & Luscious Texture: The star of the show is the velvety-smooth cream cheese filling, offering a rich yet light mouthfeel that is utterly irresistible.
- Fruity Freshness: A vibrant fruit topping or inclusion provides a burst of natural sweetness and a refreshing counterpoint to the creamy base, ensuring a balanced flavor profile.
- Visually Stunning: With its glossy fruit glaze and colorful fruit arrangement, this no-bake cheesecake is as beautiful to look at as it is delicious to eat, perfect for any occasion.
- Highly Customizable: Easily adapt the base ingredients or fruit toppings to suit your preferences, making it a versatile dessert that can be enjoyed year-round.
Ingredients You Need
Selecting high-quality ingredients is paramount to achieving the exquisite taste and texture of the Philadelphia Torte ohne Backen. Fresh, full-fat cream cheese forms the luxurious base, while good quality butter biscuits provide the essential crumbly foundation. The choice of fruit juice for the glaze and fresh fruit toppings will significantly influence the final flavor profile, so opt for something that complements the creaminess.
No-Bake Philadelphia Cake
A classic no-bake refrigerator cake, this Philadelphia Cake impresses with its creamy texture, fruity freshness, and simple preparation. Especially on warm days, this no-bake cake is the perfect choice as no oven is needed. With a combination of a crispy base, airy cream cheese filling, and fruity jelly, the No-Bake Philadelphia Cake convinces both visually and in taste. The cake is quick to make, versatile, and ideal for birthdays, family celebrations, or just as a refreshing cake in between.
- 200 g Butter cookies
- 100 g Butter (melted)
- 300 g Cream cheese (Philadelphia)
- 200 ml Cream
- 100 g Sugar
- 1 packet Vanilla sugar
- 1 tbsp Lemon juice
- 6 sheets Gelatin
- 250 ml Fruit juice (e.g., orange or multivitamin)
- 1 packet Cake glaze
- 200 g Fruits (e.g., mandarins or berries)
- 1Finely crush the butter cookies, either in a mixer or with a rolling pin. Mix the crumbs thoroughly with the melted butter until a uniform mass is formed.
- 2Press the cookie-butter mixture into a springform pan and spread it evenly as a base. Then, chill the pan for at least 30 minutes to firm up the base.
- 3Whip the cream until stiff and set aside. Make sure it is nice and cold so it whips better.
- 4Whisk the cream cheese with sugar, vanilla sugar, and lemon juice until smooth. This forms the base of the no-bake Philadelphia Cake.
- 5Prepare the gelatin according to package instructions and let it cool slightly. Then, carefully stir it into the cream cheese mixture to avoid lumps.
- 6Gently fold the whipped cream into the cream cheese mixture to create an airy and creamy mass.
- 7Spread the cream evenly over the chilled cookie base and smooth the surface. Chill the cake again for at least 2 hours to allow it to set.
- 8Prepare the cake glaze with fruit juice according to instructions and let it cool slightly. Carefully spread it over the set cream.
- 9Decoratively arrange the fruits on the cake or mix them directly into the glaze. Chill the no-bake Philadelphia Cake again until the glaze is completely firm.
Keywords: no-bake, cheesecake, Philadelphia, cream cheese, fruit, dessert, German
- butter biscuits: the foundation for a wonderfully crunchy base, these biscuits are finely crushed and bound together to create a stable layer for the creamy filling.
- butter (melted): this essential binder transforms the biscuit crumbs into a cohesive and firm base, ensuring the torte holds its shape beautifully.
- cream cheese (Philadelphia): the soul of the torte, this provides an unparalleled creamy, rich, and slightly tangy flavor that defines this classic dessert.
- heavy cream: whipped to perfection, this adds an airy lightness to the cream cheese mixture, creating a delicate and melt-in-your-mouth texture.
- granulated sugar: balances the tanginess of the cream cheese and enhances the overall sweetness of the filling, ensuring a delightful dessert.
- vanilla sugar: infuses the filling with a warm, sweet aroma that complements the cream cheese and adds an extra layer of deliciousness.
- lemon juice: a small amount of fresh lemon juice cuts through the richness of the cream cheese, adding a subtle brightness and preventing the torte from being too heavy.
- gelatin sheets: these are crucial for setting the creamy filling, ensuring a firm yet yielding consistency that slices cleanly and holds its form.
- fruit juice (e.g., orange or multi-vitamin): this forms the base for the glossy glaze, imparting a fruity flavor and a beautiful sheen to the top of the torte.
- tortenguss (glaze mix): a simple mixture that creates a stable, transparent, and visually appealing topping, protecting the fruit and adding a final touch of sweetness.
- fresh fruits (e.g., mandarins or berries): these add a burst of color, flavor, and freshness, providing a delightful contrast to the rich cream and a beautiful garnish.
The precise quantities for each ingredient are readily available in the accompanying recipe card, ensuring you have all the necessary details for a perfect bake. This ensures that you can recreate this delightful treat with ease and precision every single time.
Variations
For those seeking a vibrant and refreshing twist, consider a tropical-themed variation. Instead of the usual berries or mandarins, opt for ripe mangoes, passion fruit pulp, or even finely diced pineapple. The exotic sweetness of these fruits will create a delightful contrast with the creamy cheesecake filling, offering a taste of paradise in every bite. A drizzle of passion fruit coulis just before serving would elevate this tropical delight even further.
To cater to dietary preferences, a delightful vegan adaptation is entirely achievable. Utilize a high-quality vegan cream cheese alternative and a plant-based whipped cream for the filling. For the base, a mixture of crushed digestive biscuits or oats with melted coconut oil will provide a delicious and sturdy foundation. The fruit glaze can be thickened using agar-agar, a fantastic vegan gelatin substitute, ensuring the torte sets beautifully.
For a sophisticated and slightly decadent version, infuse the cream cheese filling with a hint of dark chocolate or coffee. Finely chopped chocolate can be gently melted and folded into the cream cheese mixture, or a shot of strong espresso can be stirred in for a mocha-inspired treat. You could also elevate the biscuit base by adding a tablespoon of cocoa powder or finely ground toasted nuts for an extra layer of complexity and texture.
How to Prepare Philadelphia Torte ohne Backen
Step 1: Crafting the Perfect Biscuit Base
The journey to an exquisite Philadelphia Torte ohne Backen begins with the foundation – a perfectly prepared biscuit base. This initial step is crucial for providing structure and a delightful crunch that contrasts beautifully with the creamy filling. Begin by gathering your preferred butter biscuits; classic butter cookies or even digestive biscuits work wonderfully. The key is to achieve a fine, consistent crumb that will bind together effectively.
The most efficient method for crushing the biscuits is by using a food processor, which yields a uniform texture in mere seconds. Alternatively, place the biscuits in a sturdy zip-top bag, seal it tightly, and then use a rolling pin to crush them thoroughly. The goal is to achieve a consistency resembling coarse sand, ensuring no large chunks remain that could create an uneven base. Once pulverized, transfer the biscuit crumbs to a mixing bowl.
Next, melt unsalted butter gently. You can do this in a small saucepan over low heat or in short bursts in the microwave. Be careful not to overheat the butter, as it should be liquid but not boiling. Pour the melted butter over the biscuit crumbs. Using a spoon or your hands, mix the crumbs and butter until every particle is moistened, creating a clumpy, damp sand-like consistency. This ensures the butter acts as an effective binder for the crumbs.
Step 2: Setting the Foundation
With your crumbly mixture ready, it’s time to press it into the springform pan. This step requires a bit of finesse to ensure an even and compact base. Select a springform pan, ideally one with a removable base, as this will make releasing the finished torte much easier. A standard 24-26 cm (9-10 inch) pan is perfect for this recipe.
Pour the butter-biscuit mixture into the prepared springform pan. Using the bottom of a glass or a flat-bottomed measuring cup, press the crumbs firmly and evenly across the base of the pan. Ensure you work from the center outwards, applying consistent pressure to create a dense layer. This compaction is vital for a sturdy base that won’t crumble when the torte is sliced. You can also extend the crumb mixture slightly up the sides of the pan to create a subtle rim, which helps contain the filling.
Once the base is firmly pressed, it needs time to set and firm up. Place the springform pan in the refrigerator for at least 30 minutes. This chilling period allows the butter to solidify, binding the crumbs together and creating a robust crust. For an even firmer base, you can opt to place it in the freezer for about 15-20 minutes. The colder the base is when you add the filling, the better it will hold its shape.
Step 3: Whipping the Creamy Filling
While the biscuit base is chilling, you can prepare the star of the show: the luscious cream cheese filling. This element requires a delicate touch to achieve the perfect airy and smooth consistency that is the hallmark of a great Philadelphia Torte. Start by ensuring all your dairy ingredients – the heavy cream and the cream cheese – are well-chilled. Cold ingredients whip up much better and achieve a stable, voluminous texture.
In a clean, dry bowl, pour the cold heavy cream. Using an electric mixer (handheld or stand mixer), whip the cream on medium-high speed. Continue whipping until stiff peaks form. This means that when you lift the beater, the cream should hold its shape and stand upright without collapsing. Be careful not to over-whip, as this can turn the cream into butter.
In a separate large bowl, combine the cream cheese, granulated sugar, vanilla sugar, and fresh lemon juice. Use the electric mixer on a medium speed to beat these ingredients together until they are smooth, creamy, and well combined. Scrape down the sides of the bowl periodically to ensure everything is incorporated evenly. The mixture should be light in color and free of lumps. The lemon juice adds a subtle brightness that balances the richness of the cream cheese.
Step 4: Incorporating Gelatin and Folding
Gelatin is the key to achieving the signature set of this no-bake torte. It provides the structure that allows the creamy filling to hold its shape when sliced. Follow the instructions on your gelatin package carefully, as methods can vary slightly. Typically, you will need to soak the gelatin sheets in cold water for about 5-10 minutes until they become soft and pliable. This process rehydrates the gelatin and prepares it for melting.
Once softened, gently squeeze out any excess water from the gelatin sheets. Place the squeezed gelatin into a small saucepan with a tablespoon or two of warm water or a small amount of the fruit juice you’ll be using for the glaze. Heat this mixture gently over very low heat, stirring constantly, until the gelatin is completely dissolved and the liquid is clear. Avoid boiling the gelatin, as this can diminish its setting power. Let the dissolved gelatin cool slightly for a minute or two – it should be warm but not hot.
Now, very gradually pour the slightly cooled, dissolved gelatin into the cream cheese mixture while the mixer is running on low speed. This ensures the gelatin is evenly distributed throughout the cream cheese mixture without creating clumps. Once the gelatin is incorporated, stop the mixer. Gently fold the whipped cream into the cream cheese mixture. Use a spatula and a folding motion, scooping from the bottom of the bowl and bringing it up and over the cream. This maintains the airiness of the whipped cream, resulting in a lighter, fluffier final texture.
Step 5: Assembling and Chilling the Torte
With the creamy filling ready and the biscuit base perfectly chilled, it’s time to bring the torte together. Carefully remove the springform pan with the set biscuit base from the refrigerator. Gently pour the light and airy cream cheese mixture over the chilled biscuit base. Use your spatula to spread the filling evenly across the surface, ensuring it reaches all the edges. Aim for a smooth and level top, as this will provide a beautiful canvas for the glaze and fruit.
Once the filling is smooth and even, cover the springform pan loosely with plastic wrap. It’s important not to let the plastic wrap touch the surface of the cream. Place the torte back into the refrigerator to chill and set. For the best results, allow the torte to chill for at least 2 to 4 hours. Ideally, for a perfectly firm and sliceable torte, it should chill overnight. This extended chilling time allows the gelatin to fully set the cream cheese filling.
While the torte is chilling, you can prepare your chosen fruit and the glaze. Wash and prepare your fruits, slicing or arranging them as desired for decoration. The fruit will be placed on top of the set cream cheese layer before the glaze is applied. This step is where you can truly personalize the appearance of your torte, creating a visually appealing masterpiece.
Step 6: Glazing and Finishing Touches
The final stage involves creating the glossy fruit glaze and adding the decorative fruit topping, transforming your chilled torte into a showstopper. Prepare the tortenguss (glaze mix) according to the package instructions. Typically, this involves heating the tortenguss powder with the specified amount of fruit juice in a saucepan until it thickens and becomes clear. It’s important to let the glaze cool slightly before pouring it over the torte. If it’s too hot, it might melt the cream cheese layer, but if it’s too cool, it might set too quickly.
Once the glaze has cooled to a lukewarm temperature, carefully pour it over the chilled, set cream cheese filling. You can gently tilt the pan to help distribute the glaze evenly, or use the back of a spoon to guide it. If you are using whole fruits as decoration, arrange them artfully on top of the cream cheese layer *before* pouring the glaze. Alternatively, you can pour the glaze first and then artfully place the fruit on top of the set glaze. Both methods yield beautiful results.
After the glaze has been applied, return the torte to the refrigerator for at least another 30-60 minutes, or until the glaze is completely set and firm to the touch. This final chilling period ensures that the glaze is perfectly glossy and stable. Once set, carefully remove the sides of the springform pan. Your stunning Philadelphia Torte ohne Backen is now ready to be admired and, most importantly, enjoyed! You can find further details on decorating and presentation in the serving suggestions section.
Pro Tips for Philadelphia Torte ohne Backen
Chill Everything Thoroughly: For the most stable and voluminous whipped cream, ensure your heavy cream, the mixing bowl, and the beaters are all thoroughly chilled before you begin whipping. This cold environment is crucial for achieving stiff peaks and preventing the cream from becoming watery or grainy. A well-chilled cream is the secret to a light and airy filling.
Dissolve Gelatin Properly: Never add dry gelatin directly to liquids, and be cautious not to boil it once it’s rehydrated. Gentle warming is key to dissolving it completely without compromising its setting ability. Make sure to stir it continuously until it forms a clear, syrupy liquid. Integrating it gradually into the cream cheese mixture while beating also helps ensure even distribution and prevents the formation of small, unpleasant gelatinous lumps within the filling.
Patience is Key with Chilling: Resist the temptation to shorten the chilling times. The 2-4 hours (or ideally overnight) for the main filling to set, and the additional time for the glaze, are essential for the torte to achieve its proper structure. Rushing this process will result in a torte that is too soft, difficult to slice cleanly, and may not hold its shape when served. Proper chilling guarantees a professional finish.
Taste and Adjust Sweetness: While the recipe provides a sugar guideline, the sweetness of cream cheese can vary. Before folding in the whipped cream, taste a small amount of the cream cheese mixture and adjust the sugar level if necessary. Remember that the fruit topping will also add sweetness, so aim for a balanced flavor in the filling itself. A tiny pinch of salt can also enhance the overall flavor profile and balance the sweetness.
Experiment with Crust Flavors: Don’t be limited to plain butter biscuits for the base. Consider adding finely ground nuts like almonds or hazelnuts for added flavor and texture. A tablespoon or two of unsweetened cocoa powder can transform the base into a chocolatey delight, which pairs wonderfully with certain fruit toppings like raspberries or cherries. These small additions can elevate the entire dessert experience.
Serving Suggestions for Philadelphia Torte ohne Backen
Decoration
The visual appeal of your Philadelphia Torte ohne Backen can be significantly enhanced with thoughtful decoration. After applying the glaze, arrange fresh fruits artfully on top. Consider a concentric circle of berries like raspberries and blueberries, or create a vibrant fan pattern with thinly sliced strawberries and kiwi. Edible flowers, such as violets or pansies, can add an elegant touch. A light dusting of powdered sugar or a drizzle of melted white chocolate can also provide beautiful contrast.
Side Dishes
This delightful torte pairs wonderfully with a variety of accompaniments that complement its creamy and fruity nature. A dollop of freshly whipped cream or a spoonful of tangy Greek yogurt can add another layer of texture and flavor. A side of fresh fruit salad, especially one featuring complementary seasonal fruits, can further enhance the fruity experience. For a beverage pairing, consider a chilled glass of sparkling wine, a refreshing iced tea, or a light, fruity dessert wine.
Creative Serving Ideas
For an elegant dessert presentation, serve individual portions of the torte in pretty glasses or small ramekins. You can layer the biscuit base crumbs, cream cheese filling, and fruit topping in clear glasses for a visually striking individual dessert. Another idea is to serve warm slices with a drizzle of warm berry compote or a scoop of vanilla bean ice cream for a comforting contrast in temperature and flavor. This can transform the no-bake torte into a warm-weather treat with a delightful twist.
Preparation & Storage
Storing Leftovers
Any remaining Philadelphia Torte ohne Backen should be stored in an airtight container in the refrigerator. Ensure the container is properly sealed to prevent the torte from drying out or absorbing odors from other foods in the fridge. Due to the fresh cream and cream cheese components, it is best consumed within 2 to 3 days of preparation. Over time, the texture may slightly soften, but it will remain delicious.
Freezing
While this no-bake torte is best enjoyed fresh, it can be frozen for longer storage. However, it’s important to note that the texture of the cream cheese filling may change slightly upon thawing. To freeze, ensure the torte is fully set and then wrap it tightly in several layers of plastic wrap, followed by a layer of aluminum foil. It can be stored in the freezer for up to 1-2 months. For best results, thaw it slowly in the refrigerator overnight before serving.
Reheating
This torte is designed to be served chilled and does not require reheating. If you have frozen and thawed the torte, it should be served cold. Reheating would compromise the delicate texture of the cream cheese filling and the glaze. The joy of this dessert lies in its cool, refreshing quality, making it perfect for warm days when an oven is the last thing you want to turn on.
Frequently Asked Questions
-
How long does it take for the Philadelphia Torte ohne Backen to set properly?
The Philadelphia Torte ohne Backen requires adequate chilling time to achieve its perfect, firm consistency. While the biscuit base typically needs about 30 minutes in the refrigerator to set firmly, the main cream cheese filling needs significantly longer. For optimal results, allowing the torte to chill in the refrigerator for a minimum of 4 hours is recommended. However, for the most stable and sliceable torte, overnight chilling is highly advised, as this gives the gelatin ample time to fully activate and set the creamy mixture.
-
Can I make this no-bake torte without using gelatin, and what are the alternatives?
Absolutely! If you prefer to avoid gelatin or are looking for a vegetarian or vegan option, there are excellent alternatives available. Agar-agar is a popular plant-based gelling agent derived from seaweed that works wonderfully in no-bake desserts. You will need to adjust the quantity according to the specific agar-agar product’s instructions, as its gelling strength can vary. Another option, particularly for a slightly softer set, is to increase the amount of cream cheese and potentially incorporate some cornstarch into the filling, though this may alter the texture slightly. For a fully vegan version, ensure you use plant-based cream cheese and whipped cream alternatives.
-
What is the best way to store leftover Philadelphia Torte ohne Backen, and how long does it typically stay fresh?
Storing leftover Philadelphia Torte ohne Backen correctly is essential to maintain its freshness and texture. Once the torte is cut, cover any remaining portions tightly with plastic wrap or place them in an airtight container. It should then be stored in the refrigerator. Properly stored, the torte generally remains fresh and delicious for about 2 to 3 days. Beyond this period, while still safe to eat, the quality of the texture might begin to degrade slightly, so it’s best to enjoy it within this timeframe for the optimal taste experience.