Garlic Butter Scallops – An Easy Seared Scallops Recipe!
Embark on a culinary journey that promises an explosion of flavors and an experience akin to dining at the finest establishments, all from the comfort of your own kitchen. This recipe for Garlic Butter Seared Scallops is not just a meal; it’s an elegant statement, a quick yet impressive dish that will undoubtedly become a staple in your repertoire.
Imagine succulent, tender scallops, kissed by the heat of a searing hot pan, developing a beautiful golden-brown crust that gives way to a sweet, delicate interior. Bathed in a luxurious, aromatic garlic butter sauce, each bite is a testament to the power of simple, high-quality ingredients expertly prepared.
Why You Will Love This Recipe
- Speedy Preparation: This impressive dish is ready in a mere 10 minutes, making it perfect for weeknight dinners or spontaneous entertaining.
- Restaurant-Quality Taste: Achieve that sought-after golden sear and rich, buttery flavor that typically only comes from a professional kitchen.
- Simplicity at its Finest: With just a handful of core ingredients, this recipe proves that elegance doesn’t require complexity.
- Versatility: While exquisite on its own, these scallops serve as a fantastic centerpiece or addition to various dinner creations.
- Impressive Presentation: The beautiful golden sear and glistening sauce make these scallops a visually stunning dish that is sure to wow your guests.
Ingredients You Need
The magic of this Garlic Butter Seared Scallops recipe lies in its reliance on fresh, high-quality components. When working with such elegant seafood, selecting the best ingredients available is paramount to achieving truly exceptional results. Opting for dry-packed scallops, for instance, ensures a superior sear, while fresh garlic and good quality butter form the aromatic backbone of the dish.
Garlic Butter Seared Scallops
These garlic butter scallops are ready in just 10 minutes! Perfectly seared and coated in a rich, garlicky butter sauce. If you’ve been wondering how to cook scallops, this is the recipe to try. An Easy Seared Scallops Recipe. Seared scallops in garlic butter are one of the easiest restaurant-quality dinners you can make at home, and they cook in just minutes.
- 1 pound fresh bay or sea scallops, dry packed
- Salt and freshly ground black pepper, to taste
- ¼ teaspoon sweet paprika
- 4 tablespoons unsalted butter, divided
- 4 to
- 5 garlic cloves, minced
- ⅓ cup dry white wine, or use chicken or vegetable broth
- 1 tablespoon lemon juice
- 2 tablespoons chopped fresh parsley
- Lemon slices, for garnish
- 1Prep the scallops: Use paper towels to thoroughly dry the scallops. Remove any attached side-muscle on the scallop by pinching and tearing it away from the scallop.
- 2Heat the butter: Set a large skillet over high heat and add 2 tablespoons of butter; cook until it sizzles.
- 3Cook: Season the scallops with salt, pepper, and paprika. Add them to the skillet in a single layer, leaving space between each one. Cook for 2 minutes, or until browned. Do not move them around.
- 4Flip and finish: Flip the scallops, reduce the heat to medium-high, and cook for another 1½ to 2 minutes, or until golden brown. Work in batches if needed to avoid overcrowding the pan. Remove the cooked scallops from the pan and set aside.
- 5Make the garlic butter sauce: Add the remaining butter to the pan, then stir in the garlic and cook for 1 minute, stirring constantly to prevent the butter from burning. Pour in the wine and cook for 2 minutes to reduce it slightly. Squeeze lemon juice into the skillet; stir, and taste the sauce for seasonings. Adjust accordingly.
- 6Finish and serve: Return the scallops to the pan, then spoon the sauce over them. Remove from the burner, garnish with parsley and lemon slices, and serve.
Keywords: scallops, seafood, garlic butter, quick dinner, pan-seared, shellfish, lemon
The precise quantities for each ingredient are detailed in the accompanying recipe card, ensuring you have everything you need for perfect execution.
Variations
While the classic Garlic Butter Seared Scallops are undeniably divine, the beauty of home cooking lies in personalization and adaptation. Experimenting with different flavor profiles can lead to exciting new variations that cater to diverse tastes and dietary preferences.
For a vibrant, zesty twist, consider a citrus-infused version. After searing the scallops and preparing the garlic butter sauce, incorporate the zest and juice of an additional lemon or even a lime into the sauce before returning the scallops. A sprinkle of fresh cilantro or a pinch of red pepper flakes can add another layer of complexity and a hint of warmth, transforming the dish into something truly unique and refreshing, perfect for a warm evening meal.
If you’re looking for a lighter, more herbaceous option, a white wine and herb variation is ideal. Instead of traditional white wine, use a crisp Sauvignon Blanc or Pinot Grigio, and after the initial reduction, stir in a generous tablespoon of finely chopped fresh dill and a teaspoon of fresh chives. This subtle infusion of fresh herbs complements the natural sweetness of the scallops beautifully, offering a delicate yet flavorful alternative that pairs wonderfully with a crisp salad or steamed asparagus.
For those seeking a bit of heat, a spicy chorizo and paprika variation offers a bold and flavorful departure. After searing the scallops, render some finely diced chorizo in the same pan until crispy, then remove the chorizo bits and sauté the garlic in the rendered fat. Deglaze with a splash of sherry or dry white wine, and then stir in a good pinch of smoked paprika for depth and color before finishing the sauce with butter and the seared scallops. This hearty version is wonderfully satisfying and provides a delightful contrast to the delicate seafood.
How to Prepare Garlic Butter Seared Scallops
Step 1: Preparing the Scallops for Searing
The foundation of perfectly seared scallops begins with meticulous preparation. Take your pound of fresh, dry-packed bay or sea scallops and place them on a clean paper towel-lined plate or tray. Gently pat each scallop thoroughly with another paper towel, ensuring every surface is as dry as possible.
This crucial step is what prevents the scallops from steaming rather than searing, guaranteeing that coveted golden-brown crust. While you’re drying them, also take a moment to inspect each scallop for a small, tough, rectangular side muscle, often called the ‘foot’ or ‘adductor muscle’. If present, gently pinch this muscle between your fingers and pull it away from the main body of the scallop; it’s quite easy to remove and can become unpleasantly chewy if left intact.
Once dried and any side muscles are removed, you’re ready for the next stage of seasoning. This initial preparation is simple but absolutely vital for achieving that restaurant-quality finish that makes these scallops so special. A well-prepared scallop is a happy scallop, ready to transform into culinary gold.
Step 2: Achieving the Perfect Sear
Now it’s time to introduce your scallops to the heat and achieve that beautiful, caramelized exterior. Place a large, heavy-bottomed skillet, preferably cast iron or stainless steel, over high heat. Allow it to get thoroughly hot; you’ll know it’s ready when a drop of water sizzles and evaporates instantly. Add 2 tablespoons of unsalted butter to the hot skillet; it should melt quickly and begin to sizzle.
Season your meticulously dried scallops generously with salt, freshly ground black pepper, and the ¼ teaspoon of sweet paprika. Don’t be shy with the seasoning; it will enhance their natural sweetness. Carefully place the seasoned scallops into the hot, sizzling butter in a single layer. It is absolutely imperative that you do not overcrowd the pan; if necessary, work in batches to ensure each scallop has ample space and direct contact with the hot surface.
Resist the urge to move or stir the scallops for the first 2 minutes. This allows a crust to form. They should begin to turn golden brown around the edges and develop a beautiful sear. This patience is key to unlocking their full flavor potential.
Step 3: The Flip and Finish
After those initial 2 minutes of searing on the first side, it’s time to reveal the golden masterpiece you’ve created. Using tongs or a spatula, carefully flip each scallop over. You should see a gorgeous, deep golden-brown sear on the underside. Reduce the heat slightly to medium-high to prevent burning the butter while still maintaining enough heat for the second side to sear.
Cook the scallops on the second side for another 1½ to 2 minutes. The exact time will depend on the thickness of your scallops, but they should be opaque throughout and firm to the touch, yet still tender. Overcooking is the nemesis of tender scallops, so watch them closely. If you are cooking in batches, remove the first batch of perfectly seared scallops from the pan and set them aside on a clean plate while you cook the remaining ones.
The goal is a tender, succulent interior with that irresistible seared crust. This quick searing process locks in moisture and flavor, making each scallop a burst of oceanic delight. Once all your scallops are seared, remove them from the pan and set them aside briefly while you prepare the exquisite sauce that will elevate them further.
Step 4: Crafting the Luscious Garlic Butter Sauce
With the scallops seared to perfection and set aside, the stage is set for the aromatic garlic butter sauce. In the same skillet, add the remaining 2 tablespoons of unsalted butter. Keep the heat at medium-high. Once the butter has melted and begins to foam, add your minced garlic cloves. Stir the garlic constantly for about 1 minute until it’s fragrant and just beginning to turn a pale golden color. Be very careful not to burn the garlic, as this will impart a bitter taste to your sauce; it should be aromatic, not browned.
Once the garlic is fragrant, pour in the ⅓ cup of dry white wine. If you prefer not to use alcohol, a good quality chicken or vegetable broth makes an excellent substitute. Allow the wine (or broth) to bubble and simmer for about 2 minutes, scraping up any flavorful browned bits from the bottom of the pan with your spatula. This process, known as deglazing, infuses the sauce with incredible depth of flavor.
As the wine reduces slightly and the flavors meld, stir in 1 tablespoon of fresh lemon juice. The brightness of the lemon juice cuts through the richness of the butter and garlic, creating a beautifully balanced sauce. Taste the sauce at this point and adjust the seasonings with salt and pepper as needed. The sauce should be fragrant, slightly thickened, and utterly delicious.
Step 5: Bringing It All Together
The final act in this culinary performance is to unite the perfectly seared scallops with their glorious garlic butter sauce. Gently return the seared scallops to the skillet containing the shimmering, aromatic sauce. Ensure the heat is low at this point to avoid overcooking the delicate seafood.
Using a spoon, gently baste the scallops with the sauce, allowing the rich, garlicky butter to coat each piece beautifully. Let them warm through in the sauce for about 30 seconds to a minute; this allows them to absorb some of the incredible flavors. The aim is to heat them through without cooking them further, preserving their tender texture.
Once the scallops are coated and warmed, remove the skillet from the heat immediately. Stir in the 2 tablespoons of chopped fresh parsley, which adds a burst of fresh color and herbaceous notes. The residual heat will gently wilt the parsley, releasing its aroma.
Step 6: Serving with Flair
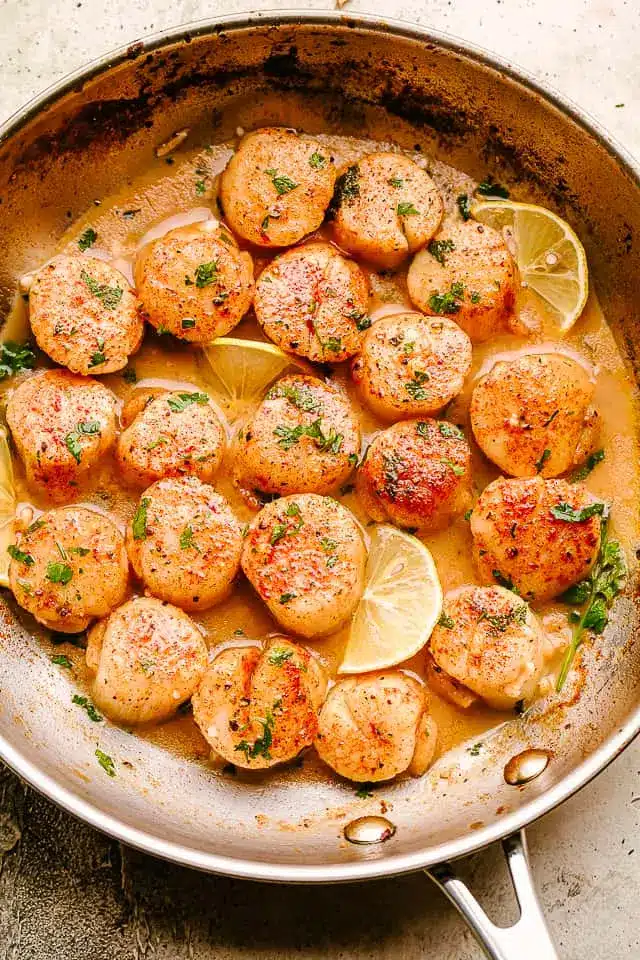
Your magnificent Garlic Butter Seared Scallops are now ready to be served. Garnish generously with fresh lemon slices for an extra touch of brightness and visual appeal, and perhaps an additional sprinkle of fresh parsley. These scallops are best enjoyed immediately, while they are at their peak of tenderness and flavor, showcasing the incredible texture achieved through the proper searing technique.
The rich, luscious sauce clinging to each plump scallop creates an unforgettable dining experience. This dish is a testament to how simple techniques and quality ingredients can create something truly extraordinary, perfect for impressing guests or simply treating yourself to an exquisite meal. Serve them as is, or alongside your favorite dinner accompaniments for a complete and elegant presentation.
Pro Tips for Garlic Butter Seared Scallops
The Dryness is Key: This cannot be stressed enough; thoroughly patting your scallops dry with paper towels is the most critical step for achieving a perfect sear. Moisture is the enemy of a good crust, leading to steaming rather than browning. Think of it as preparing a steak; dryness is paramount for that beautiful Maillard reaction.
High Heat is Your Friend: Scallops require a very hot pan to sear properly. A screaming hot skillet ensures that the outside sears quickly before the inside overcooks. If your pan isn’t hot enough, the scallops will release their moisture and end up gray and rubbery instead of golden and tender.
Don’t Overcrowd the Pan: This is a common mistake that leads to steamed scallops. Give each scallop ample space in the pan. If you’re cooking more than a pound, it’s far better to cook them in two batches than to cram them all in. Proper spacing allows hot air to circulate, promoting that essential sear.
Respect the Cook Time: Scallops cook incredibly fast, usually only a few minutes per side. Overcooking them by even a minute can turn them tough and rubbery. Watch for that opaque appearance and firm-yet-yielding texture. They should still have a slight translucence in the very center before you deem them done.
Quality Matters: When working with a recipe that has few ingredients, the quality of each one shines through. Opt for “dry-packed” scallops whenever possible. These have not been treated with a solution and will sear much better than “wet-packed” scallops, which tend to release more water.
Serving Suggestions for Garlic Butter Seared Scallops
Decoration
Elevate the visual appeal of your Garlic Butter Seared Scallops with thoughtful garnishes. A scattering of finely chopped fresh parsley is classic and adds a vibrant green contrast to the golden scallops and sauce. Lemon slices, artfully arranged on the plate or alongside the scallops, offer a zesty aroma and a bright visual cue.
For a touch of elegance, consider microgreens, which provide a delicate, fresh crunch and a sophisticated look. A drizzle of balsamic glaze can add a touch of deep color and a subtle sweet-tart counterpoint, though use it sparingly so as not to overpower the delicate scallop flavor.
Side Dishes
These exquisite scallops pair beautifully with a variety of side dishes that complement their richness without overwhelming them. A simple side of al dente pasta, perhaps tossed with a little olive oil and garlic, or a lemon butter sauce like the one from our easy lobster bisque recipe, would be sublime. Creamy risotto, whether plain, Parmesan, or infused with saffron, provides a luxurious bed for the scallops.
Steamed or roasted vegetables such as asparagus, broccoli, or green beans offer a fresh, crisp counterpoint. For a lighter option, consider serving them over a bed of cauliflower mash or a vibrant quinoa pilaf. A simple, fresh green salad with a light vinaigrette also makes an excellent accompaniment, cutting through the richness of the butter sauce.
Creative Serving Ideas
Transform your Garlic Butter Seared Scallops into an even more memorable dish with creative serving concepts. Serve them atop crispy polenta cakes, which offer a delightful textural contrast and absorb the delicious sauce beautifully. Another option is to incorporate them into a more substantial dinner by placing them over a lemon-herb infused couscous or a bed of wilted spinach.
For a sophisticated appetizer, serve two or three scallops on individual small plates, perhaps with a tiny dollop of lemon aioli or a single piece of grilled asparagus. You could also create a stunning surf and turf by pairing them with a perfectly cooked small steak or a portion of grilled chicken, showcasing a dual protein delight that is sure to impress.
Preparation & Storage
Storing Leftovers
Ideally, scallops are best enjoyed immediately after cooking to savor their delicate texture and sweet flavor. However, if you find yourself with leftovers, it’s important to store them properly to maintain their quality for as long as possible.
Allow the cooked scallops and any remaining sauce to cool down to room temperature before transferring them to an airtight container. Refrigerate the container promptly. It is recommended to consume leftover scallops within 1 to 2 days; their texture can degrade with longer storage, becoming somewhat softer or chewier.
Freezing
Freezing cooked scallops is generally not recommended, as their delicate texture is prone to becoming mushy and rubbery upon thawing. The searing process that gives them their desirable crust can be compromised by the ice crystal formation during freezing.
If you absolutely must freeze them, ensure they are completely cooled and stored in a freezer-safe airtight container or a heavy-duty freezer bag. Remove as much air as possible to prevent freezer burn. However, be prepared for a significant change in texture and flavor when you eventually reheat them, making it an option only if fresh preparation isn’t possible.
Reheating
Reheating cooked scallops requires a gentle approach to avoid further cooking and toughening them. The best method is to gently warm them in their sauce over low heat on the stovetop. Place the container of leftover scallops and sauce in a small saucepan over very low heat, stirring occasionally, until just warmed through.
Avoid high heat or prolonged cooking, as this will make them tough. If the sauce has thickened too much, you can add a splash of water, broth, or white wine to loosen it. Another option is to reheat them briefly in a microwave on a low power setting, but be extremely vigilant, as they can go from perfectly warmed to overcooked in mere seconds.
Frequently Asked Questions
-
What is the best type of scallop to use for searing, and why?
For the absolute best results when searing scallops, it is highly recommended to use “dry-packed” sea scallops. These are natural scallops that have not been treated with any sodium tripolyphosphate (STP) solution, which is a preservative often used to increase water retention in “wet-packed” scallops. Dry-packed scallops contain less water, allowing them to achieve a beautiful golden-brown crust much more effectively when seared. Wet-packed scallops, conversely, tend to release excess moisture during cooking, resulting in a steamed rather than seared texture and a less desirable flavor profile. While bay scallops can also be seared, sea scallops are generally preferred for their larger size and meatier texture, which holds up wonderfully to the high-heat searing process.
-
How can I tell if my scallops are overcooked, and what is the ideal texture?
Overcooked scallops are notoriously tough, rubbery, and have a dense, chewy texture that is quite unpleasant. Visually, overcooked scallops will appear completely opaque and firm, often with a slightly shriveled or leathery appearance. The ideal texture for seared scallops is one that is tender, succulent, and moist on the inside, with a delicate flakiness that yields easily to a fork. They should still retain a slight translucence in the very center when perfectly cooked, indicating they are done but not past their prime. The searing process should create a beautifully caramelized, golden-brown crust on the exterior, which contrasts wonderfully with the tender interior. To avoid overcooking, it’s crucial to use high heat and cook them for a very short amount of time, typically only a few minutes per side, and to remove them from the heat immediately once they reach the perfect stage.
-
Can I substitute chicken or vegetable broth for white wine in the garlic butter sauce, and how might this affect the flavor?
Yes, you can absolutely substitute chicken or vegetable broth for the dry white wine in the garlic butter sauce, and it’s a very common and effective adaptation, especially for those who prefer to avoid alcohol or are looking for a non-alcoholic option. The primary role of the wine in the sauce is to deglaze the pan, picking up the flavorful browned bits left from searing the scallops, and to add a layer of acidity and complexity that balances the richness of the butter and garlic. Using broth will still achieve the deglazing function and add a savory depth, but it will result in a slightly different flavor profile. The sauce might be a bit less bright and nuanced than one made with wine, and it won’t have the subtle wine notes. To compensate for the lack of acidity, you might want to add an extra squeeze of lemon juice or a tiny splash of white wine vinegar towards the end of cooking the sauce to help brighten the flavors and achieve a more balanced taste that complements the scallops beautifully.