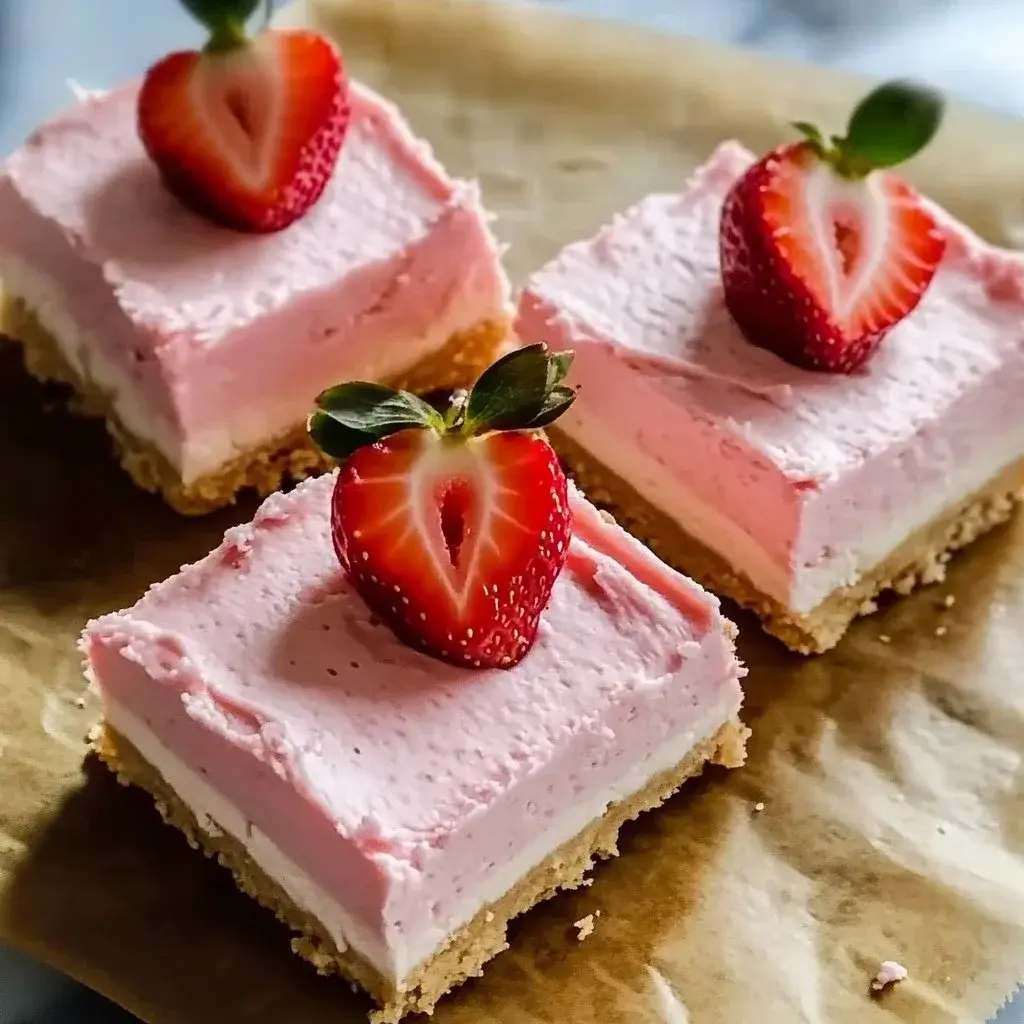
Irresistible Strawberry Mousse Cheesecake Bars
Have you ever craved a dessert that beautifully balances creamy textures and bright fruit flavors? If so, look no further than Strawberry Mousse Cheesecake Bars. This delightful recipe is perfect for summertime gatherings or for anyone who simply loves the taste of strawberries, combined with a luscious cheesecake filling.
The creamy, airy mousse effortlessly complements the buttery graham cracker crust, making every bite a delicious experience that will have everyone asking for seconds. What truly sets Strawberry Mousse Cheesecake Bars apart is their versatility, allowing for enjoyment at any occasion. They can be served as a fancy dessert for a dinner party or a chilled treat for a hot afternoon, offering a delightful escape from the ordinary.
Why You Will Love This Recipe
- Effortless Preparation: These bars come together with straightforward steps, making them accessible even for novice bakers who might be intimidated by more complex desserts.
- Delightful Flavor Profile: The harmonious blend of rich, tangy cream cheese and sweet, vibrant strawberry mousse creates a symphony of tastes that is both refreshing and satisfying.
- Make-Ahead Convenience: You can prepare these bars in advance, allowing the flavors to meld beautifully and saving you precious time on the day of your event, ensuring a stress-free hosting experience.
- Elegant Presentation: With their beautiful layers and potential for fresh fruit garnish, these bars offer a visually appealing dessert that is sure to impress guests without requiring advanced decorating skills.
- Customizable Appeal: The base recipe is wonderfully adaptable, allowing you to experiment with different fruit purees or crust variations to suit specific tastes and dietary needs, ensuring everyone can enjoy a slice of this delectable treat.
Strawberry Mousse Cheesecake Bars uniquely combine two beloved dessert concepts into one incredibly satisfying treat. The juxtaposition of the airy, melt-in-your-mouth mousse against the rich, creamy cheesecake base creates an unparalleled textural experience for your palate. Furthermore, the inherent flexibility of this recipe means you can easily personalize it to your heart’s content.
Imagine swapping out the classic strawberries for the tartness of raspberries, the subtle sweetness of blueberries, or the vibrant tang of blackberries; the possibilities for tailored flavor profiles are nearly endless. This adaptability ensures that your Strawberry Mousse Cheesecake Bars can be a perfectly customized delight for any occasion, from a casual weekend indulgence to a sophisticated soirée. The colorful appearance also contributes significantly to their appeal, making them a vibrant centerpiece on any dessert table, especially during festive celebrations.
When selecting ingredients for these Strawberry Mousse Cheesecake Bars, prioritize quality for the best possible outcome. Using fresh, ripe strawberries will impart the most vibrant flavor and beautiful color to your mousse. Similarly, ensuring your cream cheese is at room temperature is paramount for achieving a smooth, lump-free cheesecake filling, which is crucial for the overall texture and appearance of the finished bars.
The foundation of this delightful dessert relies on a few key components that work in harmony to create a balanced and appealing treat. These include a crisp graham cracker crust, a rich and creamy cheesecake layer, and a light, airy strawberry mousse topping. Each element plays a vital role, contributing to the overall success and deliciousness of the bars.
Strawberry Mousse Cheesecake Bars
These Strawberry Mousse Cheesecake Bars offer a delightful balance of creamy cheesecake and light strawberry mousse atop a buttery graham cracker crust. Perfect for any occasion, they are easy to make and can be prepared in advance. A truly impressive yet simple dessert!
- 1 1/2 cups graham cracker crumbs
- 1/4 cup unsalted butter, melted
- 2 cups cream cheese, softened
- 1 cup powdered sugar
- 1 teaspoon vanilla extract
- 1 cup heavy cream
- 1/2 cup strawberry puree
- 1 tablespoon gelatin (optional)
- Fresh strawberries for garnish
- 1Gather all ingredients, ensuring cream cheese is softened.
- 2Preheat oven to 350°F (175°C).
- 3Mix graham cracker crumbs with melted butter and press into an 8x8 inch baking pan to form the crust.
- 4Bake the crust for about 10 minutes until golden brown. Let it cool completely.
- 5Beat softened cream cheese until smooth, then gradually add powdered sugar and vanilla extract.
- 6In a separate bowl, whip heavy cream to stiff peaks.
- 7Gently fold the whipped cream into the cream cheese mixture.
- 8If using gelatin, dissolve it in warm water and then fold it into the strawberry puree before adding to the cream cheese mixture.
- 9Pour the cheesecake filling over the cooled crust and spread evenly.
- 10Chill in the refrigerator for at least 4 hours, or until set.
- 11Slice the chilled cheesecake into bars and garnish with fresh strawberries. Serve chilled.
Keywords: Cheesecake Bars, Easy Dessert Recipe, No-Bake Dessert, Strawberry Mousse, Summer Dessert
- graham cracker crumbs: These form the base of the dessert, providing a slightly sweet and crunchy foundation that contrasts beautifully with the soft filling.
- unsalted butter, melted: This helps bind the graham cracker crumbs together, creating a cohesive and sturdy crust that holds its shape.
- cream cheese, softened: The heart of the cheesecake layer, providing a rich, tangy, and creamy texture that is smooth and luxurious.
- powdered sugar: This adds sweetness to the cream cheese filling, ensuring a perfectly balanced flavor that is not overly sweet.
- vanilla extract: A classic flavor enhancer that adds depth and warmth to the cheesecake layer, complementing the fruitiness of the strawberry mousse.
- heavy cream: Whipped to perfection, this adds an airy, light, and mousse-like quality to the cheesecake filling, making it incredibly decadent and enjoyable.
- strawberry puree: Made from fresh strawberries, this provides the signature fruity flavor and vibrant pink hue to the mousse layer, creating a beautiful visual and taste contrast.
- gelatin (optional): Used for setting the mousse, this ingredient helps achieve a firmer set, making the bars easier to cut and handle, though they are still delicious without it.
- fresh strawberries for garnish: These add a final touch of freshness and visual appeal, making the bars look as beautiful as they taste.
It’s important to note that the precise quantities for each ingredient are detailed within the provided recipe card, ensuring you have all the information needed for accurate preparation.
Variations
One exciting variation is the creation of a Vegan Strawberry Mousse Cheesecake Bar. For this adaptation, you would substitute the cream cheese with a blend of soaked cashews and full-fat coconut cream, creating a rich and creamy base. The heavy cream can be replaced with more coconut cream, and for the crust, use vegan graham crackers or a simple almond flour and coconut oil mixture.
Another delightful option is a Low-Carb Strawberry Mousse Cheesecake Bar. To achieve this, opt for a crust made from almond flour and butter, sweetened with a sugar substitute like erythritol or xylitol. The filling would use cream cheese and a low-carb sweetener, and the strawberry puree could be gently sweetened with the same sugar substitute, ensuring a delicious treat that fits a ketogenic or low-carbohydrate lifestyle.
For a touch of elegance and added flavor, consider a White Chocolate Strawberry Mousse Cheesecake Bar. In this version, finely chopped white chocolate can be melted and folded into the cream cheese mixture, adding a subtle sweetness and luxurious creaminess. The strawberry puree would then be incorporated into this white chocolate-infused cheesecake base, creating a decadent and sophisticated dessert experience that is perfect for special occasions.
How to Prepare Strawberry Mousse Cheesecake Bars
Step 1: Preparing the Foundation
Begin by preheating your oven to a moderate 350 degrees Fahrenheit (175 degrees Celsius). This consistent temperature is crucial for achieving a perfectly baked crust that is both golden and firm. Ensure your baking pan, ideally an 8×8 inch square pan, is readily available and prepared for the crust mixture.
In a medium mixing bowl, combine the graham cracker crumbs with the melted unsalted butter. Use a fork or your fingertips to ensure the crumbs are evenly coated with the butter, creating a texture that will hold together when pressed. This even coating is vital for a crust that won’t crumble apart when you slice the bars later.
Firmly press this buttery graham cracker mixture into the bottom of your prepared baking pan. Use the flat base of a glass or a measuring cup to ensure an even and compact layer. A well-pressed crust provides a stable base for the creamy cheesecake filling and mousse, preventing any separation during chilling or serving.
Step 2: Baking and Cooling the Crust
Place the pan with the pressed graham cracker crust into the preheated oven. Bake for approximately 10 to 12 minutes, or until the edges of the crust begin to turn a light golden brown. This baking time ensures that the butter is fully incorporated and the crumbs are toasted, enhancing their flavor and texture.
Once baked, carefully remove the crust from the oven. It’s imperative to allow the crust to cool completely before proceeding to the next step. Placing it on a wire rack will expedite the cooling process and prevent residual heat from affecting the cheesecake filling when it’s added.
A completely cooled crust not only maintains its structure but also prevents the cheesecake filling from melting or becoming oily when it comes into contact with a still-warm base. Patience at this stage is key to achieving the perfect texture for your Strawberry Mousse Cheesecake Bars.
Step 3: Crafting the Creamy Cheesecake Layer
In a separate large mixing bowl, add your softened cream cheese. Ensure the cream cheese is at room temperature; this is non-negotiable for achieving a smooth, lump-free filling. Beat the cream cheese with an electric mixer on medium speed until it is completely smooth and creamy, scraping down the sides of the bowl as needed to ensure uniformity.
Gradually add the powdered sugar to the beaten cream cheese. Continue mixing on low speed initially to prevent the sugar from dusting everywhere, then increase to medium speed. Mix until the sugar is fully incorporated and the mixture is light and fluffy, achieving a consistency that is both sweet and velvety. This step is fundamental for a decadent cheesecake texture.
Next, incorporate the vanilla extract into the cream cheese and sugar mixture. Beat until just combined, ensuring the vanilla’s aromatic essence is evenly distributed throughout the filling. This simple addition elevates the overall flavor profile, adding a layer of warmth and complexity that complements the fruit and cream cheese beautifully.
Step 4: Whipping the Airy Mousse Component
In a clean, dry bowl (preferably a metal or glass one that has been chilled), pour the cold heavy cream. Using an electric mixer with the whisk attachment, begin whipping the cream on medium speed. As it starts to thicken, gradually increase the speed to high.
Continue whipping until stiff peaks form. This means that when you lift the whisk, the cream holds its shape and the peaks stand straight up without collapsing. Be cautious not to over-whip, as this can cause the cream to become grainy and buttery, compromising the delicate mousse texture.
The goal here is to incorporate as much air as possible into the cream, which is what gives the mousse its signature lightness and ethereal quality. This airy texture will create a delightful contrast with the denser cheesecake layer.
Step 5: Gently Folding and Incorporating Flavors
Now comes the delicate process of combining the whipped cream with the cream cheese mixture. Take about a third of the whipped cream and gently fold it into the cream cheese mixture using a rubber spatula. This initial addition helps to lighten the cream cheese base, making it easier to incorporate the remaining whipped cream without deflating it.
Once the first addition is mostly incorporated, gently fold in the remaining whipped cream in two more additions. Use a cutting and folding motion, scraping down the sides and bottom of the bowl and bringing the mixture up and over. The key is to be gentle and deliberate, preserving the airiness of the whipped cream.
The result should be a uniform, fluffy, and homogenous mixture that is airy and light. Avoid overmixing, as this can deflate the whipped cream and result in a denser filling. The visual appeal should be a smooth, light-colored batter, ready to embrace its fruity counterpart.
Step 6: Infusing with Strawberry Essence
If you are using gelatin to help set the mousse, now is the time to prepare it. In a small bowl, sprinkle the gelatin over a tablespoon or two of cold water and let it sit for about 5 minutes until it blooms and thickens. Then, gently heat it (either in a microwave for a few seconds or over a double boiler) until it is fully dissolved and liquid again.
In a separate bowl, combine your strawberry puree with the dissolved gelatin (if using). Stir gently until the gelatin is evenly distributed throughout the puree. This ensures that the gelatin will work effectively to set the mousse layer, providing a pleasant firmness.
Gently fold this strawberry puree mixture into the lightened cream cheese and whipped cream batter. Again, use a careful folding motion to incorporate the strawberry flavor and color without deflating the mousse. The goal is to achieve a beautiful, even pink hue and a delightful strawberry essence throughout the mixture.
Step 7: Assembling and Chilling for Perfection
Pour the prepared strawberry cheesecake mousse mixture evenly over the cooled graham cracker crust in your baking pan. Use your spatula to gently spread the mixture to the edges, ensuring an even layer from corner to corner. A smooth, even surface will contribute to a more professional and appealing final presentation of the bars.
Cover the pan tightly with plastic wrap. It’s a good idea to press the plastic wrap directly onto the surface of the filling to prevent a skin from forming. Place the pan in the refrigerator and allow it to chill for a minimum of 4 to 6 hours, or preferably overnight. This extended chilling period is essential for the mousse to set properly and develop its final texture and flavor.
During this chilling phase, the ingredients meld together, the flavors deepen, and the mousse firm up, achieving the perfect consistency for slicing and serving. Patience during this stage is rewarded with beautifully set bars that are a pleasure to eat and behold.
Step 8: Slicing and Garnishing for Presentation
Once the Strawberry Mousse Cheesecake Bars have chilled and set completely, it’s time for the final reveal. Carefully remove the plastic wrap. If you lined your pan with parchment paper (with overhangs), this will make lifting the entire block out of the pan much easier. Otherwise, you can slice directly in the pan.
Using a sharp knife, slice the cheesecake into your desired bar shapes. For clean cuts, it is highly recommended to dip the knife in hot water and wipe it dry between each cut. This technique prevents the mousse from sticking to the knife and ensures sharp, neat edges for each bar, enhancing their visual appeal.
Garnish the top of each bar with fresh strawberries. You can use whole strawberries, sliced strawberries, or even a few delicate strawberry fans for an elegant touch. The vibrant red of the fresh strawberries not only adds a pop of color but also hints at the delicious flavor contained within each bar.
Step 9: Serving and Enjoying Your Creation
Serve your beautiful Strawberry Mousse Cheesecake Bars chilled. They are best enjoyed cold, as this enhances their refreshing quality and perfect texture. The contrast between the cool, creamy filling and the crunchy crust is truly delightful and makes for a perfect dessert, especially on warmer days.
These bars are incredibly versatile and can be served at a variety of occasions, from casual picnics to more formal gatherings. Their elegant yet simple presentation makes them a crowd-pleaser every time. Prepare to receive compliments on your baking skills!
Watch as your Strawberry Mousse Cheesecake Bars disappear quickly from the dessert table. Their irresistible combination of flavors and textures makes them an instant favorite, leaving guests satisfied and eager for more.
Pro Tips for Strawberry Mousse Cheesecake Bars
- Ensure Cream Cheese is Softened: Always allow your cream cheese to come to room temperature before you begin mixing. This is paramount for achieving a smooth, lump-free cheesecake filling. Cold cream cheese will result in a lumpy texture that is difficult to correct, so plan ahead and leave it out on the counter for at least an hour.
- Don’t Overmix the Whipped Cream: While you want stiff peaks, over-whipping can turn your heavy cream grainy and buttery, ruining the delicate mousse texture. Stop whipping as soon as the peaks stand straight up; it’s better to slightly under-whip than to over-whip.
- Allow Ample Chilling Time: These bars need sufficient time to set properly in the refrigerator, typically at least 4-6 hours, or ideally overnight. Rushing this process will result in bars that are too soft to slice cleanly and may not hold their shape, compromising the overall experience.
- Cool the Crust Completely: Before adding the cheesecake filling, ensure the graham cracker crust is entirely cool. Pouring the filling onto a warm crust can cause the butter to melt, leading to a soggy and separated base, which is undesirable for the structural integrity and taste of the finished product.
- Use Fresh, Ripe Strawberries: For the most vibrant flavor and color, opt for fresh, ripe strawberries. While frozen strawberries can be used in a pinch, they often release more liquid when thawed and pureed, which can affect the mousse’s setting consistency.
The Best Part: Consider adding a hint of citrus zest, like lemon or lime, to the cream cheese mixture. This brightens the flavors and cuts through the richness, adding another delightful layer of complexity to the overall taste profile of the bars. A small amount can make a significant difference.
For a Smoother Crust: If you prefer a very fine and uniform crust, pulse your graham crackers in a food processor until they reach a fine crumb consistency. This ensures a tightly packed and stable base that complements the creamy topping perfectly, providing an excellent textural contrast.
Garnish Creatively: Beyond fresh strawberries, consider a light dusting of powdered sugar, a few fresh mint leaves, or even a drizzle of melted white chocolate or a strawberry reduction for an extra touch of elegance. These small additions can elevate the presentation significantly.
Serving Suggestions for Strawberry Mousse Cheesecake Bars
Decoration
The visual appeal of Strawberry Mousse Cheesecake Bars is almost as important as their taste. Fresh strawberries are the quintessential garnish, adding a burst of color and a hint of their natural sweetness. Consider slicing them into elegant fans or quarters, or arranging whole, small berries artistically on top of each bar for a professional finish.
A light dusting of powdered sugar can add a touch of sophistication, especially if you’ve served them at a more formal event. For a touch of contrasting color and added richness, a delicate drizzle of melted white chocolate or a dark chocolate ganache can also be quite striking, creating a beautiful visual contrast against the pink mousse.
A few fresh mint leaves strategically placed on each bar can provide a refreshing aroma and a vibrant green accent that beautifully complements the pink hues of the strawberry mousse. This adds a sophisticated final touch that shows attention to detail.
Side Dishes
While these bars are a dessert in themselves, they pair wonderfully with certain accompaniments that enhance the overall dining experience. A dollop of freshly whipped cream, either lightly sweetened or plain, offers an extra layer of creamy indulgence that complements the existing mousse texture perfectly.
For those who enjoy a classic pairing, a small scoop of high-quality vanilla bean ice cream can be served alongside a bar. The contrast in temperature and the classic flavor combination is always a winner. Alternatively, a small serving of fresh berries, such as raspberries or blueberries, can add a refreshing counterpoint to the richness of the cheesecake bars.
A chilled glass of sparkling wine or a sophisticated non-alcoholic option like sparkling lemonade can also serve as an excellent accompaniment. The effervescence and slight tang cut through the sweetness and richness, cleansing the palate and making each bite of the dessert even more enjoyable.
Creative Serving Ideas
Think beyond just individual bars. For a more playful presentation, cut the cheesecake into smaller, bite-sized squares and arrange them on a decorative platter. These “cheesecake bites” are perfect for parties where guests can mingle and enjoy a small, sweet treat without needing a fork.
You could also transform these bars into a delightful trifle by layering crumbled crust pieces with the strawberry mousse cheesecake filling and some fresh berries in individual parfait glasses. This layered approach offers a different textural experience and a visually stunning presentation.
For a truly unique serving idea, consider using cookie cutters to create fun shapes from the set cheesecake block before slicing it into bars. This is particularly wonderful if you’re making these for a children’s party or a themed event, adding an element of whimsical charm to your dessert.
Preparation & Storage
Storing Leftovers
Proper storage is key to maintaining the quality and deliciousness of your Strawberry Mousse Cheesecake Bars. Once they have been completely chilled and sliced, it is best to store any leftovers in an airtight container in the refrigerator. Ensure the container is well-sealed to prevent the bars from absorbing any odors from other foods in the fridge.
If you don’t have an airtight container readily available, you can cover the dish tightly with plastic wrap, pressing it down to minimize air exposure. Alternatively, you can individually wrap each bar in plastic wrap before placing them in a container. This extra layer of protection helps preserve their texture and prevents them from drying out.
When stored correctly, Strawberry Mousse Cheesecake Bars can typically be enjoyed for up to 3 to 4 days. Beyond this timeframe, the texture might begin to change, and the freshness may diminish, so it’s ideal to consume them within this window for the best eating experience.
Freezing
Yes, Strawberry Mousse Cheesecake Bars freeze exceptionally well, making them an excellent candidate for making ahead or for preserving any extra portions. To freeze them, ensure the bars are completely set and chilled. It is often easiest to freeze them before slicing, but individual slicing and wrapping works well too.
If freezing the entire block, wrap it tightly in several layers of plastic wrap, ensuring no air can get to it. Then, place the wrapped block into a heavy-duty freezer bag or an airtight freezer-safe container. This double protection is crucial for preventing freezer burn.
If freezing individual bars, slice them as you normally would and then wrap each one securely in plastic wrap. Place the individually wrapped bars into a freezer-safe bag or container. This method allows you to easily thaw and enjoy just one or two bars at a time without having to unfreeze the entire batch.
When stored properly in the freezer, Strawberry Mousse Cheesecake Bars can maintain their quality for up to three months. Beyond this period, while they may still be safe to eat, their texture and flavor might begin to degrade.
Reheating
Reheating Strawberry Mousse Cheesecake Bars is generally not recommended, as they are best served chilled and the process of reheating can negatively impact their delicate mousse texture. Microwaving, in particular, can cause the bars to become overly soft, mushy, or even melt, fundamentally altering their intended consistency.
The ideal way to enjoy frozen Strawberry Mousse Cheesecake Bars is through a slow thawing process. Remove the bars from the freezer and place them in the refrigerator. Allow them to thaw overnight, or for at least several hours, until they have reached a fully chilled, yet thawed state. This method preserves the integrity of the mousse and the crust, ensuring they retain their delightful texture.
If you are simply looking to serve them from refrigerated storage, there is no reheating necessary. They are ready to be enjoyed straight from the fridge. The primary goal is to maintain their cool, creamy, and refreshing qualities, which are best achieved without any application of heat.
Frequently Asked Questions
-
How long can I keep Strawberry Mousse Cheesecake Bars?
You can store Strawberry Mousse Cheesecake Bars in the refrigerator for up to 3-4 days for the best flavor and texture. Ensuring they are kept in an airtight container is crucial to maintain their freshness and prevent them from drying out or absorbing other odors from the refrigerator. For optimal enjoyment, aim to consume them within this timeframe, as the texture might begin to change slightly with prolonged storage.
-
Can I freeze Strawberry Mousse Cheesecake Bars?
Yes, absolutely! These bars freeze very well. It’s best to wrap each bar securely in plastic wrap, then place them in a freezer-safe bag or container for up to three months. This method helps to prevent freezer burn and maintain the quality of the bars. When you’re ready to enjoy them, simply transfer the frozen bars to the refrigerator and allow them to thaw overnight before serving.
-
Can I substitute other fruits for strawberries?
Certainly! The beauty of this recipe lies in its versatility. You can use other fruits like raspberries, blueberries, mangoes, or even a mixed berry puree to create delicious variations of Strawberry Mousse Cheesecake Bars. Just ensure that the fruit puree you use is of a similar consistency to the strawberry puree for the best results in setting and flavor integration. Experimenting with different fruits will yield unique and equally delightful desserts.