Irresistible Fluffernutter Bars with Gooey Marshmallow Delight

As I stood in my kitchen, the sweet aroma of melting chocolate and peanut butter engulfed me like a comforting hug. Today, I am thrilled to share my take on Fluffernutter Bars, a delightful dessert that marries rich layers of luscious peanut butter cups, cloud-like marshmallow fluff, and chewy cookie dough into one irresistible treat.
Not only are these bars a massive crowd-pleaser at family gatherings, but they also come together in a snap, making them perfect for those last-minute cravings when you want something homemade. With each bite, you will experience the perfect balance of indulgent sweetness and texture—no one will resist reaching for another! Are you ready to bring a bit of nostalgia and a whole lot of joy into your kitchen?
Why You Will Love This Recipe
- Decadent Layers: Gooey marshmallow and rich chocolate transform these bars into a truly heavenly dessert experience.
- Quick Preparation: You can whip these up with just a handful of pantry staples in less than thirty minutes of active time.
- Versatile Flavors: The recipe is highly adaptable, allowing you to swap ingredients to suit your specific dietary preferences or cravings.
- Kid-Approved: These bars are a fun, nostalgic treat that brings joy to both children and adults at any social gathering.
- Perfect Texture: Combining a soft, chewy cookie base with molten chocolate and fluff creates a contrast that feels sophisticated yet cozy.
Ingredients You Need
To ensure your Fluffernutter Bars reach their full potential, it is essential to prioritize high-quality ingredients like real butter and fresh vanilla. Using the right type of peanut butter is also crucial for maintaining the structural integrity of your cookie base. Please refer to the specific quantities provided in the recipe notes below for the best results.
Irresistible Fluffernutter Bars
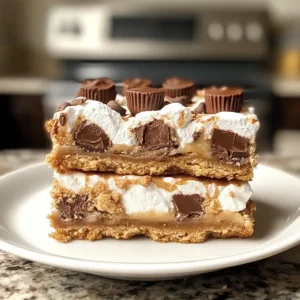
Indulgent Fluffernutter Bars featuring rich layers of peanut butter cookie dough, creamy marshmallow fluff, and decadent peanut butter cups.
- 1 cup Butter, softened
- 1 cup Peanut Butter (avoid natural varieties)
- 1 cup Brown Sugar, packed
- 1 large Egg
- 1 teaspoon Vanilla Extract
- 2 cups All-Purpose Flour
- 1 cup Peanut Butter Cups, regular-sized
- 1 cup Chocolate Chips
- 1 cup Marshmallow Creme/Fluff
- 1Preheat your oven to 350°F (175°C) and line an 8 x 11 inch baking pan with parchment paper.
- 2In a large bowl, cream together softened butter and brown sugar for about 3 minutes until light and fluffy.
- 3Add the egg, peanut butter, and vanilla extract to the mixture and beat until fully combined.
- 4Gradually mix in the flour until just combined, then fold in the chocolate chips.
- 5Press two-thirds of the dough evenly into the prepared baking pan.
- 6Layer the peanut butter cups evenly across the cookie base.
- 7Spread the marshmallow fluff over the peanut butter cups evenly.
- 8Crumble the remaining cookie dough over the marshmallow fluff layer and press down lightly.
- 9Bake for about 25 minutes until the top is golden brown and a toothpick comes out clean.
- 10Let the bars cool in the pan for at least one hour before slicing.
Keywords: Fluffernutter Bars, Peanut Butter Dessert, Marshmallow Bars, Easy Baking, Dessert Bars
- butter: provides the necessary richness and moisture to create a tender, delicious cookie base.
- peanut butter: helps bind the ingredients together while infusing a deep, nutty flavor that defines this dessert.
- brown sugar: contributes essential caramel-like sweetness and ensures the bars stay chewy rather than crisp.
- egg: serves as the primary structural binder that keeps your bars from crumbling when you cut them.
- vanilla extract: adds a complex aromatic quality that elevates the overall flavor profile of the dough.
- all-purpose flour: acts as the foundation of your cookie layer to hold all the indulgent fillings together.
- peanut butter cups: offer a sweet, chocolaty surprise within the bars for that classic candy-bar appeal.
- chocolate chips: increase the chocolate intensity and provide small pools of molten sweetness in every bite.
- marshmallow creme: creates the signature gooey, cloud-like texture that makes these bars so incredibly iconic.
Variations
Vegan Adaptations: You can easily transform this recipe by using plant-based butter sticks and replacing the egg with a flax egg or commercial replacer. Ensure your marshmallow creme and chocolate chips are also certified vegan to keep the recipe strictly plant-based.
Low Carb Options: For those managing sugar intake, consider using a high-quality brown sugar substitute and sugar-free chocolate chips. You may also swap the flour for almond flour, though keep in mind the texture will be slightly more crumbly than the traditional version.
Nutty Crunch: Add a handful of toasted walnuts or pecans into the cookie dough to introduce a sophisticated earthy crunch. This simple addition complements the sweetness of the marshmallow fluff while providing a satisfying contrast to the soft dough.
How to Prepare Fluffernutter Bars
Step 1: Preheat the Oven
Begin your baking journey by preheating your oven to 350°F (175°C). Precise temperature control is vital to ensure that your bars bake evenly without burning the edges.
While the oven is reaching its temperature, take the time to prepare your 8 x 11 inch baking pan. Lining it with high-quality parchment paper ensures that you can lift the finished bars out of the pan with ease.
Step 2: Cream the Butter and Sugar
In a large mixing bowl, combine your softened butter and packed brown sugar. Use a hand mixer or stand mixer set to medium speed to beat the ingredients together for approximately three minutes.
You are looking for a mixture that becomes pale and significantly fluffy. This aeration process is the secret to achieving a light, tender cookie base for your Fluffernutter Bars.
Step 3: Incorporate Eggs and Peanut Butter
Once the butter mixture is light, add the egg, peanut butter, and pure vanilla extract. Continue to beat the mixture on medium speed until the texture is smooth and fully emulsified.
Remember to scrape down the sides of the mixing bowl with a rubber spatula. This guarantees that all ingredients are fully incorporated, resulting in a consistent flavor throughout every single bar.
Step 4: Add the Dry Ingredients
Gradually pour in the all-purpose flour, mixing only until the white streaks disappear into the dough. Overworking the flour at this stage can lead to tough, dense bars, so take your time and be gentle.
After the flour is mixed in, fold in your chocolate chips by hand. This final step prepares the foundation for the delicious, chocolaty layers to come.
Step 5: Assemble the Layers
Take approximately two-thirds of your cookie dough and press it firmly into the bottom of your parchment-lined pan. Use a flat spatula or the palm of your hand to create an even, level surface that reaches all the corners.
Next, arrange your peanut butter cups across the dough in a uniform pattern. Press them slightly into the surface to ensure they stay anchored during the baking process.
Step 6: Apply the Gooey Center
Spread the marshmallow creme over the layer of peanut butter cups using an offset spatula. Try to distribute it as evenly as possible to ensure that every slice contains a generous helping of marshmallow.
Take the remaining third of your cookie dough and crumble it over the top of the fluff. Press lightly to flatten the surface, which will help create a beautiful, golden-brown crust during the bake.
Step 7: Bake and Cool
Place your pan into the center of the preheated oven and bake for roughly 25 minutes. You will know they are ready when the top is golden brown and a toothpick inserted into the center comes out relatively clean.
Allow the bars to cool completely in the pan for at least one hour before attempting to slice them. Cooling is a critical step that allows the marshmallow and chocolate layers to set, ensuring your bars have the perfect, clean-cut appearance.
Pro Tips for Fluffernutter Bars
Temperature Matters: Ensure your butter is softened to room temperature, not melted, before you begin the creaming process. This maintains the structural integrity of the dough and prevents the bars from spreading too thin.
Ingredient Quality: Use high-quality, full-fat peanut butter for the best results. Natural peanut butter tends to have too much oil separation, which can result in a greasy, unstable bottom layer.
The Cooling Rule: Never be tempted to slice these bars while they are still warm, as the marshmallow fluff will be too gooey to hold its shape. A full hour of cooling is the minimum time needed to ensure you get those beautiful, distinct layers.
Parchment Paper Pro-tip: Leave a slight overhang of parchment paper on the sides of your pan when lining it. This creates convenient “handles” that make lifting the entire block of bars out of the pan a simple task.
Serving Suggestions for Fluffernutter Bars
Decoration
For a beautiful presentation, you can drizzle a little melted chocolate over the top of the cooled bars. A light dusting of sea salt also helps cut through the intense sweetness of the marshmallow.
Side Dishes
Serve these bars alongside a refreshing glass of cold milk or a drink like a hot cup of black coffee. The acidity and bitterness of the coffee balance the sugar perfectly, making the dessert feel much more sophisticated.
Creative Serving Ideas
Try placing a square of these bars next to a scoop of salted caramel ice cream on a dessert plate. This combination of textures and temperatures creates a restaurant-quality experience right at your own dining table.
Preparation & Storage
Storing Leftovers
To keep your bars fresh, store them in an airtight container at room temperature for up to three days. Keeping the container sealed prevents the cookie portion from drying out and maintains the soft texture of the marshmallow.
Freezing
If you want to keep them longer, wrap each bar individually in plastic wrap and then place them into a freezer-safe bag. They will stay perfect in the freezer for up to three months, providing a quick treat whenever you need one.
Reheating
If you prefer your dessert warm, place a bar on a microwave-safe plate and heat it on low power for fifteen seconds. This softens the chocolate and brings the marshmallow back to its signature gooey, molten state.
Frequently Asked Questions
- Can I use natural peanut butter for this recipe?
It is highly recommended that you stick to regular commercial peanut butter for these bars. Natural varieties contain oils that separate, which can cause your cookie dough base to become greasy and fall apart during the baking process. - How can I prevent my marshmallow fluff from sticking to everything?
The secret is to grease your spatula or your fingers with a tiny amount of neutral oil or non-stick cooking spray before you touch the marshmallow. This simple trick makes spreading the sticky fluff an effortless task instead of a messy ordeal. - Are these bars suitable for a breakfast treat?
While they are technically a dessert, they are undeniably popular for special brunch occasions! Because they contain peanut butter, they feel slightly more substantial than typical sugary treats, making them a fun addition to a weekend morning spread alongside fresh fruit or yogurt.