Texas Roadhouse Grilled Shrimp Recipe

Embark on a culinary journey with this exquisite Texas Roadhouse Grilled Shrimp recipe, designed to bring a taste of your favorite steakhouse right into your home kitchen. This dish is a symphony of succulent shrimp, bathed in a rich, garlicky, buttery marinade and kissed by the flames of the grill.
It’s more than just a meal; it’s an experience that promises to tantalize your taste buds and impress your guests, whether you’re hosting a casual barbecue or a more intimate dinner gathering. The simplicity of its preparation belies the depth of flavor it offers, making it a go-to for any occasion.
Why You Will Love This Recipe
- Exceptional Flavor Profile: The harmonious blend of garlic, butter, lemon, and subtle spices creates an irresistible taste that perfectly complements the natural sweetness of the shrimp, ensuring every bite is a delight.
- Quick and Easy Preparation: Despite its restaurant-quality taste, this recipe requires minimal effort and time, making it an ideal choice for busy weeknights or spontaneous entertaining. You’ll be amazed at how swiftly you can whip up this gourmet dish.
- Versatile Serving Options: These grilled shrimp are incredibly adaptable, serving beautifully as a stunning appetizer, a delightful main course paired with your favorite sides, or even as a star ingredient in tacos or salads. Their adaptability makes them a valuable addition to your recipe repertoire.
- Grill Master’s Dream: Achieving that perfect smoky char and tender texture is simple with this recipe, whether you’re using an outdoor grill or a grill pan indoors. The grilling process imparts a unique depth of flavor that elevates the shrimp beyond compare.
- Crowd-Pleasing Appeal: This dish consistently earns rave reviews, proving to be a universal favorite among families and friends alike. Its vibrant appearance and delicious taste make it a guaranteed hit at any gathering, big or small.
Ingredients You Need
The foundation of any spectacular dish lies in the quality of its ingredients. For this Texas Roadhouse Grilled Shrimp recipe, we’re focusing on fresh, vibrant components that will sing on the grill. Sourcing the freshest large or jumbo shrimp is paramount to achieving that succulent texture and sweet flavor profile.
The marinade is where the magic truly happens, transforming simple elements into a flavor powerhouse that infuses the shrimp with an unforgettable zest. Each component, from the rich butter and bright lemon to the aromatic garlic and warming spices, plays a crucial role in creating a balanced and deeply satisfying taste experience that is quintessentially Texas Roadhouse.
Texas Roadhouse Grilled Shrimp
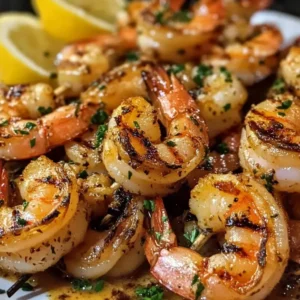
Texas Roadhouse Grilled Shrimp Recipe is a mouthwatering dish that elevates any meal with its rich flavors and simple preparation. This recipe features succulent shrimp marinated in a zesty garlic butter sauce, perfect for backyard barbecues, cozy family dinners, or festive gatherings. With the ability to serve these shrimp as an appetizer or a main course, they are incredibly versatile and sure to please any crowd. Grilling enhances the natural sweetness of the shrimp while adding a smoky char, making each bite a delightful experience. Pair them with fresh salads, rice, or tacos for a complete meal that's both satisfying and delicious.
- 1.5 lbs large or jumbo shrimp, peeled and deveined
- 1/2 cup unsalted butter, melted
- 1/4 cup olive oil
- 4-5 cloves garlic, minced
- 2 tablespoons fresh lemon juice
- 1 tablespoon light brown sugar
- 1 teaspoon paprika
- Salt and pepper to taste
- 1Thaw shrimp if frozen; pat dry.
- 2In a bowl, mix melted butter, olive oil, garlic, lemon juice, brown sugar, paprika, salt, and pepper until combined.
- 3Marinate shrimp in the mixture for at least 30 minutes.
- 4Skewer shrimp and preheat grill to medium-high heat.
- 5Grill shrimp for about 2-4 minutes per side until pink and opaque.
- 6Serve with fresh parsley and lemon wedges.
Keywords: Grilled Shrimp, Texas Roadhouse, Seafood, Grill, Barbecue, Garlic Butter, Easy Recipe, Appetizer, Main Course
- large or jumbo shrimp, peeled and deveined: Opt for shrimp that are substantial in size; this ensures they remain juicy and flavorful even after grilling, providing a satisfying bite.
- unsalted butter, melted: The rich, creamy base that carries the aromatic flavors and helps create a luxurious coating for the shrimp.
- olive oil: Adds a touch of fruity complexity and helps to create a well-emulsified marinade that evenly coats the shrimp.
- cloves garlic, minced: The pungent, savory backbone of the marinade, providing that essential garlicky punch characteristic of this recipe.
- fresh lemon juice: Introduces a bright, zesty acidity that cuts through the richness of the butter and awakens the palate, balancing the flavors beautifully.
- light brown sugar, packed: A subtle hint of sweetness that caramelizes slightly on the grill, adding depth and enhancing the savory notes without overpowering the shrimp.
- paprika: Contributes a mild sweetness and a beautiful reddish hue, adding visual appeal and a gentle warmth to the overall flavor profile.
- salt and pepper to taste: Essential for bringing out and harmonizing all the other flavors, ensuring each shrimp is perfectly seasoned.
- fresh parsley, chopped: Used as a vibrant garnish, adding a burst of freshness and a touch of herbaceous brightness that complements the richness of the marinade.
- lemon wedges: Served alongside, these provide an optional extra squeeze of bright citrus to be added just before eating, allowing for personalized flavor adjustment.
The precise quantities for these ingredients are detailed within the recipe card for your convenience, ensuring you have all the necessary information for a perfect execution.
Variations
While the classic Texas Roadhouse Grilled Shrimp recipe is undeniably delicious, its inherent adaptability allows for exciting variations that cater to different dietary needs and flavor preferences. These modifications ensure that everyone can enjoy a taste of this beloved dish.
Consider a vibrant vegan twist by substituting the shrimp with large, firm king oyster mushroom stems, sliced lengthwise to mimic the texture. The marinade can be recreated using vegan butter and a touch of vegetable broth for added depth, ensuring a plant-based alternative that’s equally captivating.
For those following a low-carb lifestyle, this recipe remains remarkably suitable. The marinade itself is naturally low in carbohydrates, and by serving the grilled shrimp alongside a crisp salad, steamed vegetables like broccoli or asparagus, or a cauliflower rice pilaf, you can maintain a delicious and satisfying meal without the carby accompaniments.
Another delightful variation involves introducing a touch of heat. A pinch of cayenne pepper or a sprinkle of red pepper flakes added to the marinade can transform the dish into a spicy delight. This adds an extra layer of complexity and a pleasant warmth that many palates will appreciate, making the shrimp an exciting kick to any meal.
How to Prepare Texas Roadhouse Grilled Shrimp Recipe
Step 1: Thaw the Shrimp and Prepare Them for Marinating
The initial step in creating these delectable grilled shrimp involves ensuring your shrimp are perfectly thawed if they were previously frozen. The most gentle and recommended method for thawing is to transfer the frozen shrimp from their packaging into a colander and place it in the refrigerator. This slow thawing process helps maintain the shrimp’s texture and prevents them from becoming watery or mushy. This can be done overnight for optimal results, ensuring the shrimp are completely defrosted by the time you’re ready to prepare them.
For those needing a quicker solution, a sealed bag of shrimp can be submerged in cold water. This method speeds up the thawing process significantly, typically taking about 20 to 30 minutes. Regardless of the thawing method used, it is crucial to ensure the shrimp are completely thawed before proceeding. Once thawed, it’s essential to address their preparation: they should be peeled, and the digestive tract, or ‘vein,’ deveined. You can choose to leave the tails on for easier handling while grilling and a more attractive presentation, or remove them entirely for a cleaner eating experience.
After peeling and deveining, rinse the shrimp under cool running water to remove any residual ice or debris. Following the rinse, gently but thoroughly pat the shrimp dry with paper towels. This drying step is absolutely critical for two main reasons: it helps the marinade adhere better to the surface of the shrimp, and it promotes better searing on the grill, leading to a more desirable texture and flavor. Properly dried shrimp will absorb the marinade more effectively and develop a lovely char rather than steaming in their own moisture.
Step 2: Crafting the Luscious Marinade
The heart and soul of this recipe lies in its exquisite marinade, a blend of rich, savory, and bright ingredients that will imbue the shrimp with unparalleled flavor. Begin by selecting a medium-sized mixing bowl, one that is sufficiently spacious to comfortably hold all the marinade components and allow for easy whisking. Ensure the bowl is clean and dry before you start adding the ingredients to prevent any unwanted flavors from interfering with the delicate balance of the marinade.
Into this bowl, pour the melted unsalted butter. The butter provides a luxurious base, carrying the other flavors and contributing to the tender, succulent texture of the grilled shrimp. Next, add the olive oil, which introduces a subtle fruity note and helps to emulsify the marinade, ensuring a smooth and consistent coating. Following the fats, introduce the finely minced garlic. Using fresh garlic is highly recommended for the most potent and authentic flavor; aim for about 4 to 5 cloves, or roughly 1.5 tablespoons, ensuring they are minced to a fine consistency so their flavor disperses evenly.
Now, it’s time for the bright, zesty element: fresh lemon juice. Squeeze the juice from about one medium-sized lemon, ensuring you strain out any seeds. This acidity will not only add a refreshing tang but also help to tenderize the shrimp slightly. Incorporate the Worcestershire sauce, which adds a complex layer of umami and savory depth. Then, stir in the light brown sugar, packed firmly into its measuring spoon; this ingredient provides a hint of caramelization and a touch of sweetness that beautifully balances the savory and acidic notes.
Completing the marinade are the dried herbs and spices. Add the dried parsley, or if you have fresh parsley on hand, use about a tablespoon of finely chopped fresh parsley for a brighter, more vibrant flavor. Sprinkle in the paprika, which lends a mild sweetness and a lovely rosy hue. Follow with the onion powder for an additional savory dimension. Finally, season with salt and freshly ground black pepper to your taste, ensuring all the flavors are harmoniously brought together. A pinch of cayenne pepper or red pepper flakes can be added at this stage if you desire a hint of heat; this is entirely optional but can add an exciting kick. Whisk all these ingredients together vigorously until the mixture is thoroughly combined and emulsified, creating a rich, aromatic sauce ready to transform your shrimp.
Step 3: Marinating the Shrimp for Maximum Flavor Infusion
With the luscious marinade prepared, the next crucial step is to introduce the shrimp to this flavorful bath. Gently place the dried, prepared shrimp into the bowl containing the whisked marinade. Ensure that each individual shrimp is nestled within the marinade, allowing it to coat every surface. Use a spoon or your hands to gently toss the shrimp, ensuring they are thoroughly and evenly coated with the aromatic mixture. The goal here is to ensure that every single shrimp benefits from the infusion of garlic, butter, lemon, and spices.
Once the shrimp are fully submerged and coated in the marinade, cover the bowl tightly with plastic wrap. This seals in the freshness and prevents any odors from escaping into your refrigerator. Now, the marinating process can begin. Place the covered bowl in the refrigerator. It is essential to allow the shrimp to marinate for a sufficient period to absorb the flavors. The recommended marinating time is at least 30 minutes, which allows the initial infusion of taste and aroma.
However, it’s equally important not to over-marinate the shrimp, especially given the presence of lemon juice. Prolonged exposure to acidic ingredients can begin to ‘cook’ the shrimp, resulting in a mushy or tough texture after grilling. Therefore, it is advisable to limit the marinating time to no longer than 2 hours. This optimal window ensures that the shrimp are deeply flavored and perfectly tender without compromising their delicate texture. Planning ahead is key to achieving this perfect balance of flavor and texture.
Step 4: Skewering for Even Cooking and Easy Handling
Preparing the shrimp for the grill involves skewering them, a technique that ensures they cook evenly and are easy to manage during the grilling process. If you are using wooden skewers, it is imperative to soak them in water for at least 30 minutes prior to use. This simple step prevents the wooden skewers from burning or igniting on the hot grill. You can soak them in a tall glass filled with water or a baking dish. Metal skewers do not require soaking and are a reusable alternative.
Once your skewers are ready (soaked if wooden), carefully thread the marinated shrimp onto them. Aim to thread approximately 4 to 6 shrimp per skewer. It’s important not to pack the shrimp too tightly together on the skewer. Leaving a small amount of space between each shrimp allows for even heat circulation around all sides of the shrimp as they cook. This even cooking is vital for achieving that perfect pink, opaque color and succulent texture throughout, preventing some shrimp from being overcooked while others remain undercooked.
Ensure that the shrimp are threaded onto the skewer in a relatively straight line for uniform cooking. You can arrange them slightly curved or flat, depending on your preference and the shape of the shrimp. The goal is to have them lie flat on the grill grates. If any excess marinade clings to the shrimp after skewering, you can allow some of it to drip off before placing them on the grill, though a little bit of marinade clinging to the surface is perfectly acceptable and beneficial for flavor.
Step 5: Preheat Your Grill for Optimal Searing
Achieving the perfect grilled shrimp requires your grill to be at the correct temperature. Preheat your outdoor grill to a medium-high heat setting. This typically translates to a temperature range of approximately 375°F to 450°F (190°C to 230°C). A grill that is too cool will result in shrimp that steam rather than sear, lacking that desirable char and smoky flavor. Conversely, a grill that is excessively hot can lead to burnt exteriors and undercooked interiors.
Once the grill has reached the desired temperature, it’s time to address the grates. Thoroughly clean the grill grates using a stiff wire grill brush. This removes any residual food particles from previous cooking sessions, which can cause sticking and impart unwanted flavors. Clean grates are essential for preventing the delicate shrimp from adhering to the surface and tearing when you attempt to turn them.
After cleaning, it’s vital to lightly oil the grill grates. This step creates a non-stick surface, further preventing the shrimp from sticking. A common and effective method is to use a wadded-up paper towel or a grill-safe basting brush dipped in a high smoke point oil, such as canola oil, vegetable oil, or grapeseed oil. Carefully wipe the oiled paper towel or brush across the hot grill grates. Do this quickly and cautiously, as oil on a hot grill can ignite. This simple preparation will ensure your shrimp glide effortlessly across the grates, developing beautiful grill marks and a perfect sear.
Step 6: Grilling the Shrimp to Perfection
Now that your grill is preheated and the grates are clean and oiled, it’s time to place the skewered shrimp onto the hot surface. Carefully remove the skewers from any remaining marinade, allowing any excess to drip off briefly, though a bit of cling is beneficial for flavor. Arrange the shrimp skewers on the preheated grill grates in a single layer. Ensure there is enough space between each skewer to allow for proper heat circulation and easy turning. Avoid overcrowding the grill, as this can lower the grill’s temperature and lead to uneven cooking.
The grilling time for shrimp is remarkably short due to their delicate nature. You will typically need to grill the shrimp for about 2 to 4 minutes per side. The exact time will depend on the size of your shrimp and the precise temperature of your grill. Keep a close eye on them during this process, as overcooked shrimp quickly become tough and rubbery.
You’ll know the shrimp are nearing doneness when they begin to turn pink and opaque. This visual cue is your primary indicator. As one side cooks, you will observe the shrimp curling slightly into a “C” shape. Once the first side has reached this stage and shows a slight char, it’s time to flip them. Using tongs or a spatula, carefully turn each skewer to expose the other side of the shrimp to the heat. Continue grilling for another 2 to 4 minutes, or until the shrimp are uniformly pink, opaque, and have developed appealing grill marks.
The ultimate test for perfectly cooked shrimp is their internal temperature. For safety and optimal texture, shrimp should reach an internal temperature of 145°F (63°C). You can use an instant-read meat thermometer to check the thickest part of a few shrimp. Once they have reached this temperature and are beautifully cooked, remove the skewers from the grill immediately. The residual heat will continue to cook them slightly, so it’s best to remove them just as they reach perfection to prevent overcooking.
Step 7: Serving Your Masterpiece
The moment of truth has arrived! Once the skewers of perfectly grilled shrimp have been removed from the heat, it’s important to allow them a brief resting period. This short pause, usually just a minute or two, allows the juices within the shrimp to redistribute, ensuring maximum moisture and tenderness. While they rest, you can prepare your garnishes and serving platters.
Generously sprinkle the grilled shrimp with freshly chopped parsley. The vibrant green of the parsley not only adds a beautiful visual contrast to the pink shrimp but also imparts a fresh, herbaceous flavor that complements the richness of the marinade. This finishing touch elevates the presentation and adds another layer of sensory delight to the dish.
Arrange the shrimp skewers attractively on a serving platter. Alongside the shrimp, place fresh lemon wedges. These are not just for decoration; they offer your guests the opportunity to add an extra squeeze of bright, tangy lemon juice just before they indulge, allowing them to customize the flavor to their personal preference. Serve the Texas Roadhouse Grilled Shrimp immediately while they are warm and at their peak of deliciousness, ensuring an unforgettable dining experience.
Pro Tips for Texas Roadhouse Grilled Shrimp Recipe
To ensure your Texas Roadhouse Grilled Shrimp recipe turns out impeccably every single time, consider these expert tips that go beyond the basic instructions. These small details can make a significant difference in the final texture, flavor, and overall success of your dish, transforming it from good to truly outstanding.
Select the Right Shrimp: Always opt for large or jumbo shrimp for this recipe. Smaller shrimp tend to overcook much more quickly and can become tough or dry on the grill. The larger size provides a more substantial bite and holds up better to the heat, ensuring a juicier result. Look for shrimp that are firm, have a sweet aroma, and are translucent, indicating peak freshness.
Master the Marinating Time: While marinating is crucial for flavor, over-marinating can be detrimental. The acidity in the lemon juice can begin to break down the protein in the shrimp, leading to a mushy texture. Stick to the recommended 30 minutes to 2 hours of marinating time to achieve optimal flavor infusion without sacrificing the shrimp’s integrity. This balance is key to that signature tender, succulent bite.
Skewer with Care: When threading shrimp onto skewers, avoid overcrowding. Leave a small, consistent gap between each shrimp. This allows hot air to circulate freely around each piece, promoting even cooking and preventing some shrimp from steaming while others sear. For wooden skewers, remember the essential soaking step to prevent them from burning to a crisp.
Monitor Grill Temperature Vigilantly: A medium-high heat (375-450°F or 190-230°C) is crucial. Too low, and you won’t get a good sear; too high, and the shrimp will burn on the outside before cooking through. If your grill runs hotter, adjust accordingly, and be prepared to reduce the heat if necessary. Consistent temperature control is your best friend here.
Don’t Neglect the Rest: Just like with steak or chicken, allowing the grilled shrimp to rest for a minute or two after coming off the grill helps the juices settle. This ensures that when you bite into the shrimp, you get a burst of moist flavor, rather than having all the juices run out onto the plate. This simple step contributes significantly to the succulence of the final dish.
Serving Suggestions for Texas Roadhouse Grilled Shrimp Recipe
Decoration
Elevate the visual appeal of your grilled shrimp with thoughtful garnishes. A generous sprinkle of freshly chopped flat-leaf parsley adds a vibrant green contrast against the pink shrimp and bright lemon wedges, introducing a fresh, herbaceous note. Thinly sliced scallions or chives can also provide a delicate oniony flavor and a touch of green. For a touch of elegance and a hint of spice, a few thinly sliced red chili peppers can be artfully arranged around the shrimp, offering a visual warning of their potential heat and adding a pop of color.
Side Dishes
Pairing your Texas Roadhouse Grilled Shrimp with the right sides can transform a simple meal into a complete culinary experience. A classic choice is fluffy rice, whether it’s plain white rice, fragrant jasmine rice, or nutty brown rice, which serves as an excellent canvas to soak up any extra marinade. Creamy garlic mashed potatoes offer a comforting and rich counterpoint, their velvety texture beautifully complementing the grilled shrimp.
A fresh, crisp garden salad with a light vinaigrette provides a refreshing balance to the richness of the shrimp and marinade. Grilled vegetables such as asparagus, zucchini, or bell peppers add color, texture, and a healthy dimension to the meal. For a more casual and fun approach, consider serving them in tacos with your favorite toppings like avocado, salsa, and a dollop of sour cream. Toasted garlic bread is also a popular choice, perfect for mopping up any delectable leftover marinade.
Creative Serving Ideas
Beyond the traditional, consider serving these grilled shrimp as a sophisticated appetizer at your next gathering. Arrange them elegantly on a platter with accompanying dipping sauces, such as a zesty remoulade or a spicy cocktail sauce. For a light and refreshing main course, toss them with mixed greens, cherry tomatoes, cucumber, and a lemon-herb dressing to create a vibrant shrimp salad. Another delightful option is to incorporate them into a seafood pasta dish, adding them at the very end to ensure they remain tender and succulent.
You could also present them as part of a vibrant surf and turf experience, grilling them alongside your favorite steak or chicken. For a truly impressive presentation, consider serving them atop a bed of creamy risotto or a flavorful quinoa pilaf. The versatility of these grilled shrimp allows them to be the star of a casual barbecue or an elegant dinner party, making them a culinary chameleon that fits any occasion.
Preparation & Storage
Storing Leftovers
If you are fortunate enough to have any leftover Texas Roadhouse Grilled Shrimp, storing them properly is key to maintaining their quality and flavor. The best method is to place the cooled cooked shrimp in an airtight container. Ensure the container is sealed tightly to prevent air from entering, which can lead to drying out or spoilage. If you have a significant amount of leftover marinade clinging to the shrimp, it’s generally best to scrape off any excess before storing.
Once properly sealed, these leftovers can be safely stored in the refrigerator. They will retain their best quality for up to 3 days. It’s advisable to consume them within this timeframe to ensure optimal taste and safety. Avoid leaving cooked shrimp at room temperature for extended periods, as this can promote bacterial growth. Always check for any signs of spoilage, such as an off smell or slime, before reheating.
Freezing
For longer-term storage, freezing is an excellent option to preserve the deliciousness of your grilled shrimp. To freeze them effectively, it’s recommended to flash-freeze them first. Spread the cooled cooked shrimp in a single layer on a baking sheet lined with parchment paper. This prevents them from sticking together in a large clump. Place the baking sheet in your freezer until the shrimp are frozen solid, which usually takes about 1 to 2 hours.
Once frozen solid, transfer the shrimp from the baking sheet into a heavy-duty freezer-safe bag or an airtight freezer container. Remove as much air as possible from the bag before sealing it. Properly packaged, these shrimp can be stored in the freezer for up to 3 months. Beyond this period, while still safe to consume, their quality may begin to degrade, affecting texture and flavor.
Reheating
When you’re ready to enjoy your frozen or refrigerated grilled shrimp, reheating them properly is crucial to avoid compromising their texture. The goal is to warm them through without overcooking them, which can lead to a tough, rubbery consistency. Several methods can be employed, depending on your preference and available equipment.
One effective method is to use your oven. Preheat your oven to a moderate temperature, around 350°F (175°C). Place the shrimp on a baking sheet, and reheat them for approximately 10 minutes, or until they are heated through. Keep a close eye on them during this process to prevent overcooking. For a quicker reheating option, the microwave can be used. Place the shrimp on a microwave-safe plate and heat them in short intervals, starting with 30 seconds, checking for warmth, and continuing in 30-second bursts until they are just heated through. Be very careful not to overheat them in the microwave.
Alternatively, you can reheat the shrimp on the stovetop. Heat a skillet over medium heat and add a small amount of oil or butter to prevent sticking. Add the shrimp to the skillet and sauté them gently for about 2 to 3 minutes, or until they are warmed through. This method can help to slightly crisp them up if desired. Regardless of the reheating method chosen, always prioritize gentleness and short heating times to preserve the shrimp’s tender, succulent texture.
Frequently Asked Questions
-
What is the best way to marinate shrimp for this recipe?
The key to marinating shrimp for this Texas Roadhouse recipe is to use a balanced blend of flavors that enhances, rather than overpowers, the shrimp’s natural taste. Combine melted unsalted butter, olive oil, freshly minced garlic, bright lemon juice, savory Worcestershire sauce, and a touch of light brown sugar for subtle caramelization. Essential seasonings like paprika, salt, and freshly ground black pepper tie all the flavors together. It’s crucial to marinate for at least 30 minutes to allow flavors to penetrate, but avoid exceeding 2 hours, as the acidity from the lemon can begin to break down the shrimp’s protein, potentially resulting in a mushy texture. This optimal marinating window ensures the shrimp are deeply flavorful and perfectly tender.
-
Can I use frozen shrimp for this Texas Roadhouse Grilled Shrimp Recipe?
Absolutely, you can successfully use frozen shrimp for this recipe, and it’s often a convenient option. The most important step when using frozen shrimp is to ensure they are fully thawed before you begin the marinating and grilling process. The best method for thawing is to place the frozen shrimp in a colander and let them defrost overnight in the refrigerator. For a quicker alternative, you can place the shrimp in a sealed plastic bag and submerge it in cold water for about 20-30 minutes until thawed. Once thawed, make sure to peel and devein them as per the recipe instructions and pat them thoroughly dry with paper towels before marinating. This ensures they absorb the marinade effectively and grill properly, just as fresh shrimp would.
-
How do I know when my grilled shrimp is done?
Several visual and textural cues indicate when your grilled shrimp are perfectly cooked. The most prominent sign is a change in color: shrimp will transition from a translucent gray to a vibrant pink or opaque white. They will also begin to curl into a characteristic “C” shape; if they curl into a tight “O” shape, they are likely overcooked. You can also gently press a shrimp with your finger; it should feel firm to the touch. For the most accurate confirmation, use an instant-read meat thermometer inserted into the thickest part of a shrimp. The ideal internal temperature for cooked shrimp is 145°F (63°C). Removing them from the grill just as they reach this temperature will prevent them from overcooking due to residual heat.