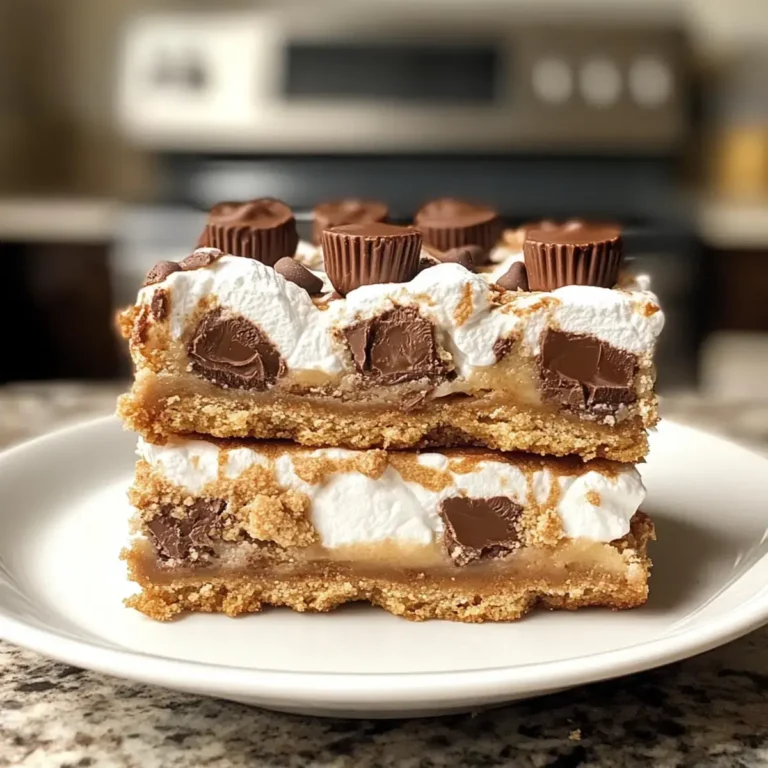
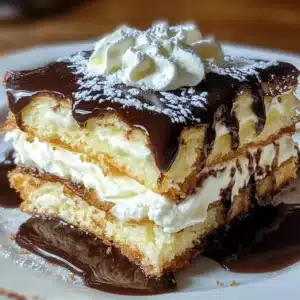
Easy Eclair Cake Dessert

The Easy Eclair Cake Dessert is a truly delightful treat that brings joy and satisfaction in every single bite. Have you ever tasted a dessert that feels like a warm hug in every spoonful? This recipe is that comforting embrace for dessert lovers everywhere, combining a light, airy base with a rich, creamy center.
The scrumptious combination of velvety filling and a golden crust makes it a standout choice for any gathering or weekend celebration. What is more, it is incredibly easy to prepare, making it a perfect selection for both novice bakers and seasoned chefs alike. With simple pantry ingredients and straightforward steps, you can whip up this indulgent masterpiece in no time at all.
Why You Will Love This Recipe
- Quick Preparation: The hands-on time for this recipe is minimal, allowing you to focus on enjoying your time with guests rather than being stuck in the kitchen.
- Crowd-Pleasing Flavors: The blend of classic vanilla cream and chocolate drizzle is universally loved, ensuring that your dessert will be the first thing to disappear from the table.
- Effortless Elegance: This cake looks incredibly sophisticated when sliced, yet it requires no complex piping skills or professional baking techniques to achieve that beautiful presentation.
- Make-Ahead Convenience: Since this dessert actually tastes better after spending time in the refrigerator, it is the ultimate stress-free option for planning parties or holidays.
- Reliable Texture: Every layer is engineered to provide a balanced bite, alternating between the soft, pastry-like crust and the ultra-smooth, cloud-like filling.
Ingredients You Need
Creating a high-quality dessert begins with selecting fresh ingredients that work harmoniously together. We recommend using room-temperature eggs and high-quality cream cheese to ensure the filling reaches the perfect consistency without any lumps. Follow this guide to ensure your pantry is stocked before you begin your baking journey.
Easy Eclair Cake Dessert
A delightful and indulgent treat that brings the classic flavor of eclairs into an easy-to-make layered cake format, perfect for any gathering.
- 240 millilitres water
- 113 grams unsalted butter, melted
- 125 grams plain flour
- 4 large eggs
- 226 grams cream cheese, softened
- 2 box
- 96 grams vanilla instant pudding mix
- 480 millilitres heavy whipping cream
- 240 millilitres Italian sweet cream coffee creamer
- 226 grams whipped topping, thawed
- Chocolate syrup, for drizzling
- 1In a medium saucepan, melt butter and water together over medium heat until it boils.
- 2Remove from heat and stir in flour until well combined.
- 3Add eggs one at a time, mixing thoroughly after each addition.
- 4Spread the dough evenly in a prepared 23x33 cm baking dish.
- 5Bake in a preheated oven at 200°C for 25-30 minutes until golden brown.
- 6In a bowl, whisk together pudding mix, heavy whipping cream, and coffee creamer until thick.
- 7Chill the pudding mixture in the refrigerator until set.
- 8Mix softened cream cheese with the chilled pudding mixture until smooth.
- 9Spread the filling evenly over the cooled crust.
- 10Top with thawed whipped topping and drizzle with chocolate syrup.
- 11Refrigerate until fully set, ideally overnight.
Keywords: Creamy Dessert, Easy Eclair Cake, No-Bake Dessert, Party Dessert, Simple Dessert
- water: provides the necessary moisture to create the steam needed for an airy crust.
- unsalted butter: melted into the water to provide a rich, golden flavor profile to the base.
- plain flour: acts as the structural foundation for the pastry layer.
- large eggs: essential for leavening, helping the dough rise and create internal air pockets.
- cream cheese: softened to room temperature to ensure a silky, smooth filling.
- vanilla instant pudding mix: provides the thick, custard-like texture and sweet vanilla flavor.
- heavy whipping cream: adds a luxurious, dense richness to the whipped filling.
- italian sweet cream coffee creamer: infuses the pudding mixture with a deeper, milky sweetness.
- whipped topping: adds a final layer of airy sweetness that perfectly complements the denser pudding base.
- chocolate syrup: used as a finishing drizzle to provide that classic eclair aesthetic and flavor.
Please refer to the detailed quantities provided in the recipe card above to ensure your dessert turns out perfectly balanced. Remember that measurement accuracy is the key to achieving the right consistency for your cream filling.
Variations
The Chocolate Lover’s Dream: You can easily transform the base flavor by swapping out the vanilla instant pudding for a decadent chocolate version. This simple change creates a double-chocolate experience that pairs perfectly with a dusting of cocoa powder or extra shaved chocolate on top.
A Fruity Infusion: For those who prefer a brighter taste, try incorporating a layer of thinly sliced fresh strawberries or bananas directly onto the crust before adding the filling. The natural fruit sugars cut through the richness of the cream, creating a refreshing bite that feels lighter on the palate.
Low Carb or Dietary Alternatives: If you are looking for a lighter or low-carb version, you can substitute the flour with an almond flour blend and use sugar-free pudding mixes. These swaps allow you to maintain the iconic structure of the eclair cake while adhering to your specific nutritional preferences or lifestyle goals.
How to Prepare Easy Eclair Cake
Step 1: Preparing Your Kitchen Workspace
Success starts with preparation: Before you turn on your oven, ensure that all your ingredients are measured and laid out on your counter. This organized approach prevents mid-recipe panic and ensures that every component is ready to be incorporated at the right time.
Check your tools: You will need a heavy-bottomed saucepan for the crust and a sturdy mixing bowl for the filling. Having these clean and dry makes the process move significantly faster and helps maintain the integrity of your ingredients.
Step 2: Mastering the Pastry Base
The foundation of the cake: Begin by combining the water and butter in your saucepan over medium heat until it reaches a gentle, rolling boil. Immediately remove it from the heat and vigorously stir in the flour until the mixture pulls away from the sides of the pan.
Adding the eggs: This is a crucial moment for your dough. Add your eggs one by one, ensuring you whisk the mixture until it is completely smooth after each addition before moving on to the next egg.
Uniform spreading: Transfer your dough to a greased baking dish, spreading it as evenly as possible with a spatula. A consistent thickness across the pan ensures that your pastry bakes evenly and avoids burnt edges.
Step 3: Achieving the Golden Crust
The baking process: Place your dish into a preheated 200°C oven and let it bake for about 25 to 30 minutes. You are looking for a beautiful golden-brown color and a puffed appearance that signals the dough has risen properly.
Cooling is vital: Resist the urge to press down on the puffiness; allow the crust to cool completely on a wire rack. Cooling prevents the heat from the crust from melting your creamy filling, which is essential for maintaining the distinct layers of the cake.
Step 4: Crafting the Silky Filling
Mixing the magic: In a large mixing bowl, combine your vanilla pudding mix, heavy whipping cream, and the Italian sweet cream coffee creamer. Whisk these ingredients together until you achieve a thick, stable consistency that holds its shape.
The cream cheese infusion: In a separate bowl, whip your softened cream cheese until it is light and fluffy before gently folding in the prepared pudding mixture. This two-stage mixing process ensures your filling is incredibly smooth and free of any unwanted cream cheese chunks.
Step 5: Final Assembly and Chilling
Layering like a pro: Once your crust is entirely cool, carefully spread your cream filling over the top in an even layer. Use a flat-edged spatula to ensure you reach all the corners of the dish for a clean look.
The topping finale: Spread the thawed whipped topping over the filling, creating a smooth white surface ready for decoration. Finish the masterpiece by drizzling your favorite chocolate syrup in artistic lines across the top.
The waiting game: Refrigerate the cake for several hours, ideally overnight, to let the flavors meld together perfectly. This chill time allows the pastry to soften slightly from the moisture of the filling, resulting in that classic, tender texture we all adore.
Pro Tips for Easy Eclair Cake
Temperature Matters: Always use softened cream cheese, as cold cheese will result in lumpy filling. If you forget to take it out of the fridge, place the sealed package in a bowl of warm water for ten minutes to soften it quickly.
Don’t Rush the Cooling: Never spread your filling onto a warm crust. If the crust is warm, the butter in the filling will melt, turning your beautiful cake into a soggy, runny mess that won’t slice properly.
Quality Creamer: The choice of coffee creamer adds a unique depth to this treat. Using a high-quality, flavorful Italian sweet cream version significantly elevates the taste compared to using plain milk or water.
The Perfect Drizzle: To achieve professional-looking chocolate lines, use a squeeze bottle for the syrup. If you don’t have one, simply pour the syrup into a small plastic bag, snip off a tiny corner, and pipe it across the cake with precision.
Serving Suggestions for Easy Eclair Cake
Decoration
Enhance the visual appeal of your dessert by adding fresh garnishes just before serving. A dusting of powdered sugar or a few fresh mint leaves provides a vibrant pop of color that looks beautiful against the chocolate drizzle. You can also press toasted almond slices around the edges for an added sophisticated crunch.
Side Dishes
Since this cake is quite rich and creamy, it pairs wonderfully with a side of tart fruit. Fresh raspberries, blackberries, or even sliced strawberries served on the side help cleanse the palate between bites. The acidity of the fruit perfectly balances the sweetness of the pudding and whipped cream.
Creative Serving Ideas
Consider serving individual portions in small glass dishes to showcase the distinct layers. If you are hosting a formal brunch or afternoon tea, this presentation style looks exceptionally elegant. Alternatively, serve it alongside a steaming cup of dark roast coffee to contrast with the light, sweet profile of the eclair layers.
Preparation & Storage
Storing Leftovers
Keep your leftover eclair cake covered tightly with plastic wrap or in an airtight container to prevent it from absorbing other fridge odors. It is best to store it in the back of the refrigerator where the temperature remains most consistent. When stored properly, it will retain its texture and flavor for up to five days.
Freezing
Believe it or not, this dessert freezes surprisingly well. Cut the cake into individual servings and wrap each piece in plastic wrap, followed by a layer of aluminum foil. This double-wrapping protects the cream from freezer burn, allowing you to enjoy a slice of happiness whenever a craving strikes.
Reheating
This specific cake is designed to be served cold, so there is no need to reheat it. Simply transfer a frozen slice to the refrigerator the night before you plan to eat it. It will thaw slowly and perfectly, maintaining the structural integrity of the cream layers.
Frequently Asked Questions
- Can I prepare this dessert ahead of time? Yes, this recipe is actually ideal for making in advance. The flavors benefit significantly from sitting in the refrigerator overnight, as this allows the crust to soften slightly and the filling to set into a perfect, sliceable consistency.
- What is the best way to ensure the crust doesn’t collapse? The most important step is to bake it until it is truly golden brown and puffed. Additionally, avoid opening the oven door during the first 20 minutes of baking, as the rush of cool air can cause the pastry to deflate before it has properly set.
- Can I use chocolate pudding instead of vanilla? Absolutely, and many people prefer the richer chocolate profile. You can swap the vanilla pudding mix for chocolate, or even use a mix of both for a marbled effect that looks stunning when you cut into the cake.