Fresh Berry Tart – Light and Easy Berry Dessert!
Embarking on the creation of a delightful dessert doesn’t always require hours in the kitchen or a pantry stocked with exotic ingredients. Sometimes, the most satisfying treats are born from simplicity and readily available components.
This particular berry tart embodies that very philosophy, offering a burst of fresh, vibrant flavors atop a wonderfully crisp and buttery crust. It’s the kind of dessert that impresses without demanding extensive effort, making it a perfect addition to any occasion, from a casual afternoon tea to a more festive gathering.
Why You Will Love This Recipe
- Effortless Elegance: This tart looks incredibly sophisticated, yet it requires minimal prep time, making it ideal for busy bakers or those new to pastry.
- Speedy Preparation: With just a few key ingredients and a straightforward assembly, you can have this beautiful dessert ready for the oven in under 15 minutes.
- Versatile Berry Blend: Whether you prefer the sweetness of strawberries, the tartness of raspberries, or the subtle tang of blueberries, you can customize the berry mix to your heart’s content.
- Crisp, Buttery Crust: The use of puff pastry ensures a light, flaky, and golden-brown crust that perfectly complements the juicy fruit filling.
- Minimal Ingredients: This recipe focuses on quality over quantity, using just a handful of staple ingredients that highlight the natural sweetness of the berries.
Ingredients You Need
The beauty of this easy berry tart lies in its carefully selected ingredients, each playing a crucial role in achieving that perfect balance of flavors and textures. We emphasize using fresh, high-quality components whenever possible, as they truly shine in such a simply prepared dessert. While the list is short, the impact of each element is significant, from the flaky pastry to the vibrant burst of the berries.
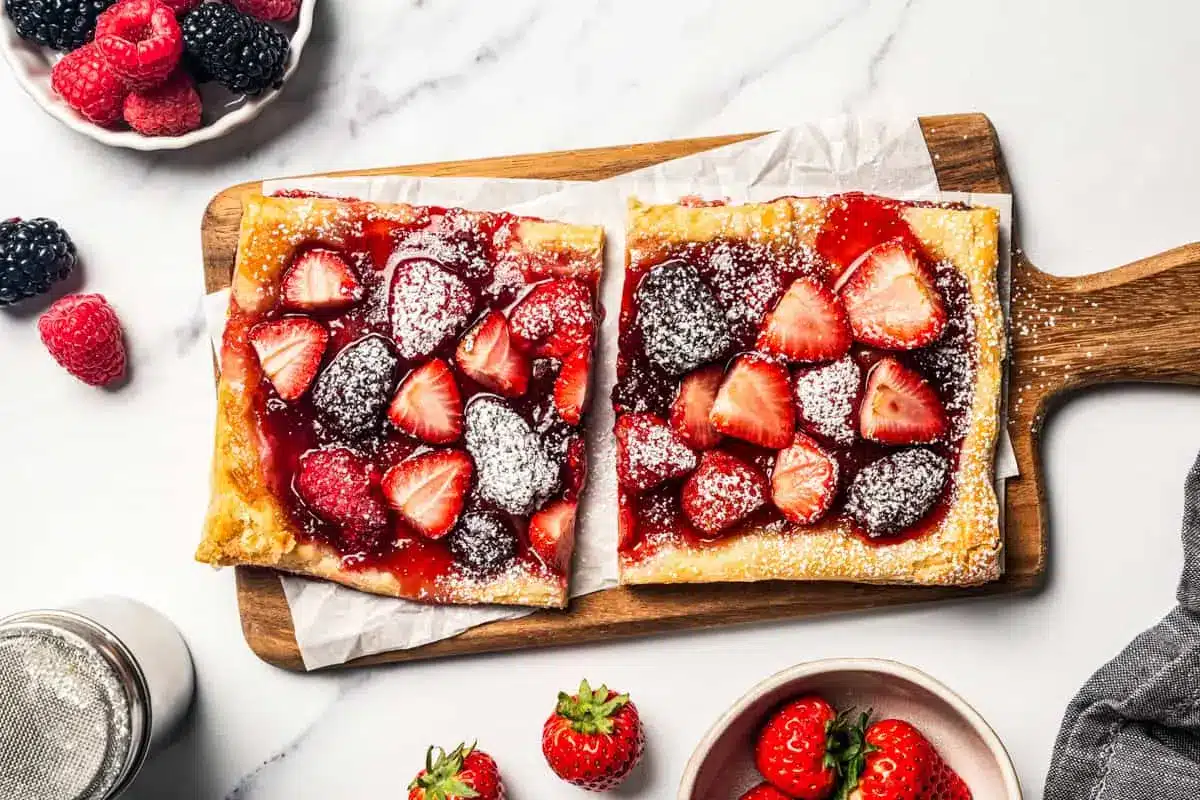
Easy Berry Tart
This easy berry tart needs only 5 ingredients and takes 10 minutes to prepare for the oven. It has a crisp, buttery puff pastry crust covered with strawberry jam and sugar-coated berries.
- 1 sheet puff pastry, thawed, cut in half
- 2 cups mixed fresh berries
- ¼ cup granulated sugar
- 4 tablespoons strawberry jam, divided
- powdered sugar
- 1Preheat the oven to 400ºF. Line a baking sheet with parchment paper.
- 2Combine the berries and sugar in a mixing bowl; lightly stir, then let stand for 5 minutes.
- 3Place the puff pastry dough on the previously prepared baking sheet and cut it in half.
- 4Spread 2 tablespoons of strawberry jam right down the middle of each pastry sheet.
- 5Evenly divide the berries and arrange them over the strawberry jam, down the middle of each pastry sheet.
- 6Bake for 18 to 20 minutes, or until golden brown.
- 7Remove and let the tart stand for a few minutes. Dust with powdered sugar, cut and serve.
Keywords: berry tart, puff pastry, easy dessert, quick dessert, summer dessert
The precise quantities for each ingredient can be found in the recipe card above, ensuring you have exactly what you need for this delightful creation.
Variations
While the classic berry combination is undeniably delicious, this easy berry tart serves as a fantastic canvas for culinary creativity. Exploring different flavor profiles can transform this simple dessert into something entirely new and exciting, catering to diverse palates and dietary preferences.
For those seeking a vegan option, the substitution is quite straightforward. You can opt for a vegan puff pastry, which is readily available in most supermarkets, ensuring the buttery flakiness remains intact. Instead of butter, a plant-based spread can be used if you were to make a homemade crust, though the store-bought pastry is often the simplest route. The jam can also be checked for vegan suitability, as most fruit jams are naturally vegan. This allows for a delightful plant-based treat that’s just as impressive.
If you are following a low-carb lifestyle, this tart can still be adapted with a few smart choices. A pre-made almond flour or coconut flour pie crust would be an excellent alternative to puff pastry. For the filling, you can use your favorite low-carb berries like raspberries, blackberries, or blueberries in moderation, and sweeten them with a sugar substitute such as erythritol or stevia. A touch of lemon zest can add brightness without extra sugar, making it a guilt-free indulgence.
Another exciting variation involves incorporating creamy elements. Consider spreading a thin layer of mascarpone cheese or cream cheese mixed with a little sweetener and vanilla extract onto the puff pastry before adding the berries. This adds a rich, decadent layer that pairs beautifully with the tartness of the fruit and the crispness of the pastry. Alternatively, a swirl of lemon curd offers a zesty, tangy counterpoint to the sweet berries, creating a sophisticated flavor profile that is both refreshing and satisfying.
How to Prepare easy berry tart
Step 1: Preparing Your Baking Station and Oven
The journey to a perfectly baked berry tart begins with meticulous preparation of your workspace and preheating the oven to the correct temperature. This initial step ensures that once you start assembling, everything flows seamlessly, leading to optimal baking results.
Begin by preheating your oven to a robust 400°F (200°C). This high heat is crucial for achieving that signature puff and golden crispness in the pastry. Simultaneously, line a sturdy baking sheet with parchment paper. Parchment paper is indispensable here; it prevents the tart from sticking to the baking sheet and makes for an incredibly easy cleanup, allowing you to enjoy your dessert without the dread of scrubbing baked-on sugar.
Having your baking sheet and oven ready means that as soon as your tart is assembled, it can go directly into the heat, minimizing any delay that could affect the pastry’s texture. This ensures an even bake and allows the puff pastry to perform its magical expansion without any waiting period. It’s a small but vital detail that contributes significantly to the final success of your tart.
Step 2: Macerating the Berries for Optimal Flavor Release
This step is where the magic truly begins to happen with your fruit. Macerating is a culinary technique that involves gently coating fresh fruit with sugar, which then draws out the natural juices, intensifying their flavor and creating a luscious syrup. This process also slightly softens the berries, making them more tender and palatable within the baked tart.
In a medium-sized mixing bowl, combine your chosen assortment of fresh berries. Whether you’re using a vibrant mix of strawberries, raspberries, blueberries, and blackberries, or focusing on just one or two varieties, ensure they are gently washed and patted dry. Add the granulated sugar to the bowl with the berries, and with a soft spatula or spoon, gently stir. The goal is to lightly coat each berry without crushing them, preserving their beautiful shape and integrity.
Allow the berries to sit undisturbed for approximately 5 minutes. During this short period, you will observe the sugar beginning to dissolve, interacting with the natural moisture in the fruit. This interaction causes the berries to release their delicious, syrupy juices. This natural syrup will later infuse the tart with an even more profound berry flavor and add a beautiful glaze to the filling as it bakes.
Step 3: Preparing the Puff Pastry Base
The foundation of your easy berry tart is its glorious puff pastry crust, and preparing it is wonderfully straightforward, especially when using pre-made pastry. The key is to handle it gently to maintain its delicate layers, which are essential for that signature airy crispness.
Carefully unroll your thawed puff pastry sheet onto the parchment-lined baking sheet you prepared earlier. If your puff pastry is in a block form, gently roll it out to a roughly rectangular shape, aiming for an even thickness. Do not overwork the dough, as this can toughen it and hinder the puffing process. The goal is a sheet that is easy to handle and uniform in thickness.
Next, take a sharp knife and cut the puff pastry sheet in half lengthwise. This will create two individual tart bases, allowing for two beautifully presented tarts, or one larger tart divided into two easy-to-serve portions. Position these pastry halves on the baking sheet, ensuring there is a little space between them if you are making two separate tarts, to allow for expansion during baking without them touching.
Step 4: Assembling the Tart: Jam and Berries
This is the stage where your berry tart truly starts to take shape, layering the sweet jam and the juicy, sugar-coated berries onto the prepared pastry bases. The order and even distribution are key to a visually appealing and flavorful final product.
Using a spoon, carefully spread approximately two tablespoons of strawberry jam evenly down the center of each puff pastry half. Aim to create a neat strip of jam, leaving a border of about an inch around the edges of the pastry. This border will allow the puff pastry to rise beautifully around the filling, creating a rustic yet elegant edge.
Next, gently spoon the macerated berries, along with any released juices, over the jam layer on each pastry half. Divide the berry mixture as evenly as possible between the two halves, ensuring they are piled attractively down the middle. Again, keep the berries concentrated in the center, respecting the jam border. The beautiful colors of the berries against the red jam will already look inviting.
Step 5: Baking to Golden Perfection
The oven is where the transformation truly happens, turning simple ingredients into a wonderfully puffed, golden-brown masterpiece. This stage requires careful monitoring to ensure the pastry cooks through and the berries achieve a delightful, slightly caramelized sweetness.
Carefully place the baking sheet with the assembled berry tarts into the preheated 400°F (200°C) oven. Bake for approximately 18 to 20 minutes. During this time, keep an eye on the tarts. You are looking for the puff pastry to puff up significantly, becoming a deep golden brown and looking exceptionally flaky. The berries should be tender and bubbling enticingly, their juices creating a glossy sheen.
If you notice that one side of the puff pastry is puffing up much more dramatically than the other, a simple intervention can fix this. As soon as you spot uneven puffing, gently prick the overly puffed section with the tip of a fork or a thin knife. This will allow the excess air to escape, helping to create a more even rise across the entire tart. This is a common occurrence with puff pastry and easily remedied.
Step 6: Resting and Final Touches
Once the baking is complete and your tart is a vision of golden pastry and bubbling berries, a brief resting period is essential before adding the final flourish. This allows the tart to set slightly, making it easier to handle and serve beautifully.
Carefully remove the baking sheet from the oven using oven mitts. Let the berry tarts rest directly on the baking sheet for a few minutes. This resting time is important; it allows the internal structure of the puff pastry to stabilize and prevents the hot jam and berry juices from immediately running out when cut. This brief pause also helps to slightly firm up the pastry and prevent it from becoming soggy as it cools.
After the short rest, transfer the tarts to a wire rack to cool further. Once the tarts have cooled to a warm or room temperature, it’s time for the final decorative touch. Generously dust the tops of the tarts with powdered sugar. Use a fine-mesh sieve for an even, delicate coating. This adds a final hint of sweetness and a beautiful, snowy finish that makes the vibrant berries pop. Slice and serve, and prepare for compliments!
Pro Tips for easy berry tart
The Best Berries: While mixed berries offer a delightful variety, selecting berries that are in season will always yield the most vibrant flavor. For instance, summer berries like strawberries and raspberries tend to be sweeter and juicier during their peak season, resulting in a more intense flavor profile in your tart. Ensure they are fresh and firm for the best texture.
Jam Versatility: While strawberry jam is a classic and pairs beautifully with most berries, don’t hesitate to experiment with other flavors. A good quality raspberry jam can add a lovely tartness, while apricot or even a citrus-flavored jam can provide an unexpected yet delicious twist. The key is to choose a jam that complements, rather than overpowers, the fresh berries.
Pastry Handling: Puff pastry can be a bit temperamental, especially in warm environments. If you find it becoming soft or sticky while you’re working with it, don’t hesitate to pop it back into the refrigerator for a few minutes. Chilled pastry is easier to cut and handle, and it will puff up better in the oven. Avoid stretching the dough, as this can compromise the layers.
Preventing Soggy Bottoms: To further enhance the crispness of your tart’s crust, you can consider a light pre-bake of the puff pastry. After scoring your border, you can prick the central area (where the jam and berries will go) with a fork multiple times. Bake the pastry for about 5-7 minutes at 400°F until it just starts to puff and lightly color, then remove from the oven, add the jam and berries, and continue baking. This helps to create a barrier and ensures a crispier base.
Sweetness Adjustment: The amount of sugar for macerating the berries can be adjusted based on the sweetness of your fruit and your personal preference. If your berries are particularly sweet, you might use slightly less sugar. Conversely, if they are on the tarter side, a little extra sugar can help balance the flavors. Always taste a berry before adding sugar to gauge its natural sweetness.
Serving Suggestions for easy berry tart
Decoration
Elevate the visual appeal of your easy berry tart with simple yet striking decorative touches. A light dusting of powdered sugar is the classic and most effective way to finish; use a fine-mesh sieve for an even, snow-like effect that contrasts beautifully with the vibrant berry colors.
For an extra pop of visual interest and a hint of freshness, consider adding a few fresh mint leaves strategically placed on top of the tart just before serving. A light drizzle of melted white chocolate or dark chocolate can also add an elegant swirl, providing a delightful visual and flavor contrast. Edible flowers, if available and safe for consumption, can impart an incredibly charming and sophisticated look, turning your tart into a true centerpiece.
Side Dishes
This delightful berry tart is a star on its own, but it pairs wonderfully with a few complementary sides that enhance the dessert experience. A dollop of freshly whipped cream is a timeless accompaniment, its light sweetness and airy texture perfectly balancing the tart’s fruity and pastry components.
Consider serving a small scoop of vanilla bean ice cream alongside each slice for a classic hot-and-cold dessert contrast. For a slightly more sophisticated pairing, a quenelle of lemon sorbet can provide a refreshing, palate-cleansing counterpoint to the sweetness of the tart. A side of fresh, unsweetened Greek yogurt can also offer a creamy, tangy balance for those who prefer a less sweet dessert.
Creative Serving Ideas
Transform your easy berry tart into a more interactive and fun dessert experience with a few creative serving ideas. For a brunch or afternoon tea setting, serve individual tartlets made from smaller puff pastry squares, making them perfect for self-service and individual enjoyment.
You can also present the tart as part of a dessert board, alongside other small sweets like mini cookies, macarons, or a selection of artisanal cheeses. This creates a beautiful display and allows guests to customize their dessert plate. For a special occasion, consider a deconstructed presentation: serve slices of the tart with separate bowls of whipped cream, berry coulis, and perhaps a scattering of toasted nuts, allowing diners to assemble their perfect bite.
Preparation & Storage
Storing Leftovers
If by some chance you have any berry tart left over, proper storage is key to maintaining its quality. The tart is best enjoyed fresh, as the puff pastry will naturally lose some of its crispness over time. However, leftovers can still be quite enjoyable with a little care.
Allow the tart to cool completely to room temperature. Once cooled, place it in an airtight container. You can store the container in the refrigerator for up to 2 to 3 days. It’s important to ensure the container is truly airtight to prevent the tart from drying out or absorbing unwanted odors from other foods in the refrigerator.
Freezing
While freezing a fully baked puff pastry tart is not ideal, as it can significantly impact the texture of the pastry, there are ways to freeze components or the whole tart with varying degrees of success. Freezing the whole baked tart will likely result in a less crisp crust upon reheating.
If you must freeze the baked tart, ensure it is completely cooled. Wrap it tightly in plastic wrap, followed by a layer of aluminum foil to protect it from freezer burn. Freeze for up to 1 to 2 months. For the best results, consider freezing the tart before baking; prepare the tart up to the point of assembly, wrap individual portions tightly, and freeze. Then, bake from frozen, adding a few extra minutes to the baking time.
Reheating
To revive the crispness of your leftover berry tart, reheating is the best approach. The oven is your best friend for this task, as it will help to restore some of that delightful flaky texture.
Preheat your oven to a moderate temperature, around 300°F (150°C). Place the leftover tart on a baking sheet, and warm it in the oven for about 5 to 10 minutes. This gentle reheating process will help to re-crisp the pastry and warm the berry filling without overcooking it. Avoid using a microwave, as this will make the pastry soft and chewy.
Frequently Asked Questions
-
Can I make this easy berry tart ahead of time?
While the tart is best enjoyed fresh due to the delicate nature of puff pastry, you can prepare some elements in advance to save time. The berries can be washed, dried, and macerated with sugar up to a few hours before assembly. Store them in the refrigerator in a covered container. The puff pastry can be thawed according to package directions earlier in the day. However, the actual assembly and baking should ideally be done closer to serving time to ensure the pastry remains as crisp as possible. If you must bake it ahead, follow the storage and reheating instructions carefully.
-
What is the best way to ensure my puff pastry bakes up light and flaky?
Achieving a perfectly puffed pastry relies on a few key factors. Firstly, ensure your puff pastry is properly thawed but still chilled; working with cold dough is crucial. Secondly, avoid overworking the dough, as this can develop the gluten too much and prevent proper puffing. When assembling, the border you leave around the edges allows the pastry to rise unimpeded. If one side puffs more than the other during baking, gently prick it with a fork to deflate the excess air. Finally, baking at the correct high temperature, like the 400°F recommended, is essential for rapid expansion.
-
Can I use frozen berries instead of fresh berries for this tart?
Yes, you can absolutely use frozen berries, but it requires a bit of extra attention to avoid a soggy crust. First, thaw the frozen berries completely in a colander set over a bowl so that the excess liquid can drain away. Once thawed, gently pat the berries very dry with paper towels. It’s also advisable to reduce or even skip the macerating step where they sit with sugar, as frozen berries release more moisture. Instead, toss them with sugar just before adding them to the tart, and be prepared for a potentially slightly longer baking time to ensure all the moisture evaporates and the pastry cooks through.