How to Make Banana Chips
Embark on a delightful culinary journey with these incredibly easy baked banana chips. Imagine the satisfying crunch of your favorite store-bought snack, but crafted in your own kitchen with wholesome ingredients. This recipe transforms simple bananas into a perfectly portable, light, and irresistibly tasty treat, ideal for satisfying those midday cravings or adding a sweet flourish to your day.
The inspiration for these homemade wonders struck during a quest for dried mangoes, leading to an unexpected yet brilliant discovery. Sliced ripe bananas, briefly bathed in lemon juice, and baked low and slow in the oven yielded a creation so delightful, it rivals the excitement of discovering a new favorite wine or a hidden gem of a restaurant. Get ready to discover a new favorite snack that’s both nourishing and incredibly moreish.
Why You Will Love This Recipe
- Effortless Preparation: With minimal ingredients and straightforward steps, you can whip up a batch of these delightful chips in no time, perfect for busy schedules.
- Healthy Alternative: Say goodbye to greasy, processed snacks and embrace a guilt-free option bursting with natural sweetness and goodness, a true testament to the joy of wholesome eating.
- Versatile Snacking: These banana chips are perfect for on-the-go enjoyment, school lunchboxes, or as a charming addition to yogurt parfaits and breakfast bowls, showcasing their adaptability for any occasion.
- Customizable Flavor: While wonderfully delicious on their own, they provide a fantastic canvas for creative seasoning, allowing you to experiment with sweet or savory spices to suit your palate.
- Cost-Effective: Making your own banana chips significantly cuts down on expenses compared to purchasing pre-packaged alternatives, making them an economical yet satisfying choice for frequent snackers.
Ingredients You Need
The beauty of these baked banana chips lies in their simplicity and the quality of the ingredients used. Opting for ripe yet firm bananas ensures the best texture and natural sweetness, while freshly squeezed lemon juice is crucial for preserving their appealing color and adding a subtle bright note. It’s these few, well-chosen elements that come together to create a truly exceptional snack, a testament to the power of minimal, high-quality components.
Baked Banana Chips
Deliciously sweet, guilt-free baked banana chips make a perfectly portable, light, and tasty snack to have on hand in case a craving strikes!
- 10 ripe but firm bananas, thinly sliced
- Freshly squeezed lemon juice (1 lemon is plenty)
- 1Preheat the oven to 200ºF. Cover a sheet pan with foil and lightly grease it with cooking spray.
- 2Toss the banana slices in lemon juice.
- 3Arrange the bananas in a single layer on the prepared baking sheet.
- 4Bake for 1 hour; check to see if the tops are firm and starting to turn color. If so, flip the slices with a metal spatula and continue to bake for 1 hour longer or until desired crispness.
- 5Remove from the oven and transfer the banana chips to a wire rack to cool completely. The longer they cool, the crunchier they will get.
- 6Store in an airtight container.
Keywords: banana chips, baked, snack, fruit, healthy, easy
The full list of ingredients and precise quantities are detailed within the recipe card, ensuring you have all the necessary information for a successful bake.
Variations
Elevate your baked banana chips by exploring exciting flavor profiles that cater to diverse tastes and dietary needs. Consider a dessert-inspired twist by dusting the banana slices with a sprinkle of cinnamon and a whisper of nutmeg before baking, transforming them into a warm, spiced delight reminiscent of apple pie. This simple addition infuses a comforting aroma and a cozy flavor that’s perfect for cooler evenings.
For those following a low-carb lifestyle, a clever modification involves a light coating of unsweetened cocoa powder mixed with a tiny pinch of cayenne pepper. This creates a sophisticated, subtly spicy chocolate chip alternative that’s both intriguing and satisfying, offering a complex flavor profile without the sugar. The hint of heat adds an unexpected depth that complements the natural banana sweetness beautifully.
Another delightful variation is a savory approach, perfect for those who enjoy a sweet and salty contrast. Before baking, toss the banana slices with a light dusting of smoked paprika and a pinch of garlic powder. This unexpected combination yields chips with a smoky, savory edge that is surprisingly addictive and makes for a unique appetizer or party snack, a far cry from the usual sweet offerings and a wonderful addition to any lunch spread.
How to Prepare baked banana chips
Step 1: Preheat Oven and Prepare Baking Sheet
Begin by preheating your oven to a gentle 200°F (95°C). This low temperature is key to drying out the banana slices without burning them, ensuring a perfect crispness. It’s a crucial first step that sets the stage for the entire process, allowing for a slow, even dehydration.
Next, prepare a large baking sheet by lining it with aluminum foil or parchment paper. This not only prevents the banana slices from sticking but also makes the inevitable cleanup process significantly easier. A light spritz of cooking spray over the lining adds an extra layer of assurance against adhesion, giving you peace of mind.
Ensure the lining covers the entire surface of the baking sheet to catch any potential drips or sugars that might release during baking. This thoughtful preparation step minimizes post-baking chores, allowing you more time to enjoy your delicious creation. The goal is to create a non-stick surface that facilitates easy removal of the finished chips.
Step 2: Prepare the Bananas
Select 10 ripe but still firm bananas for this recipe. Overly ripe or bruised bananas can become mushy during the baking process, compromising the desired crisp texture. Firmness is essential for achieving those satisfyingly crunchy slices that are characteristic of well-made banana chips. Firm bananas will hold their shape better during the low-and-slow dehydration process.
Peel the bananas and slice them into even rounds, aiming for a thickness of approximately ¼ inch. Consistency in thickness is paramount; it ensures that all the banana slices bake at the same rate, preventing some from becoming burnt while others remain undercooked. A mandoline slicer can be incredibly helpful here for achieving uniform slices quickly and safely.
Once sliced, place the banana rounds into a medium-sized bowl. This step is where we prepare them for their flavor and color-preserving bath. The uniformity of the slices directly impacts the evenness of the final product, so take a moment to ensure they are as similar in thickness as possible before proceeding.
Step 3: The Lemon Juice Treatment
Pour freshly squeezed lemon juice over the banana slices in the bowl. You’ll need enough to lightly coat all the slices, which typically comes from about one whole lemon. The lemon juice serves a dual purpose: it helps to prevent the bananas from browning excessively during baking, and it adds a subtle, refreshing tang that complements the natural sweetness.
Gently toss the banana slices to ensure each piece is lightly coated with the lemon juice. Be careful not to over-mix or break the delicate banana slices during this step. A gentle folding motion with a spatula works best to distribute the juice evenly without causing damage to the fruit’s structure.
Allow the banana slices to sit in the lemon juice for no more than 10 minutes. Prolonged soaking can make the bananas too soft and may affect the final texture. This brief marination period is sufficient to achieve the desired benefits without compromising the integrity of the chips. This quick bath is a critical step for preserving their appealing visual quality.
Step 4: Arrange and Begin Baking
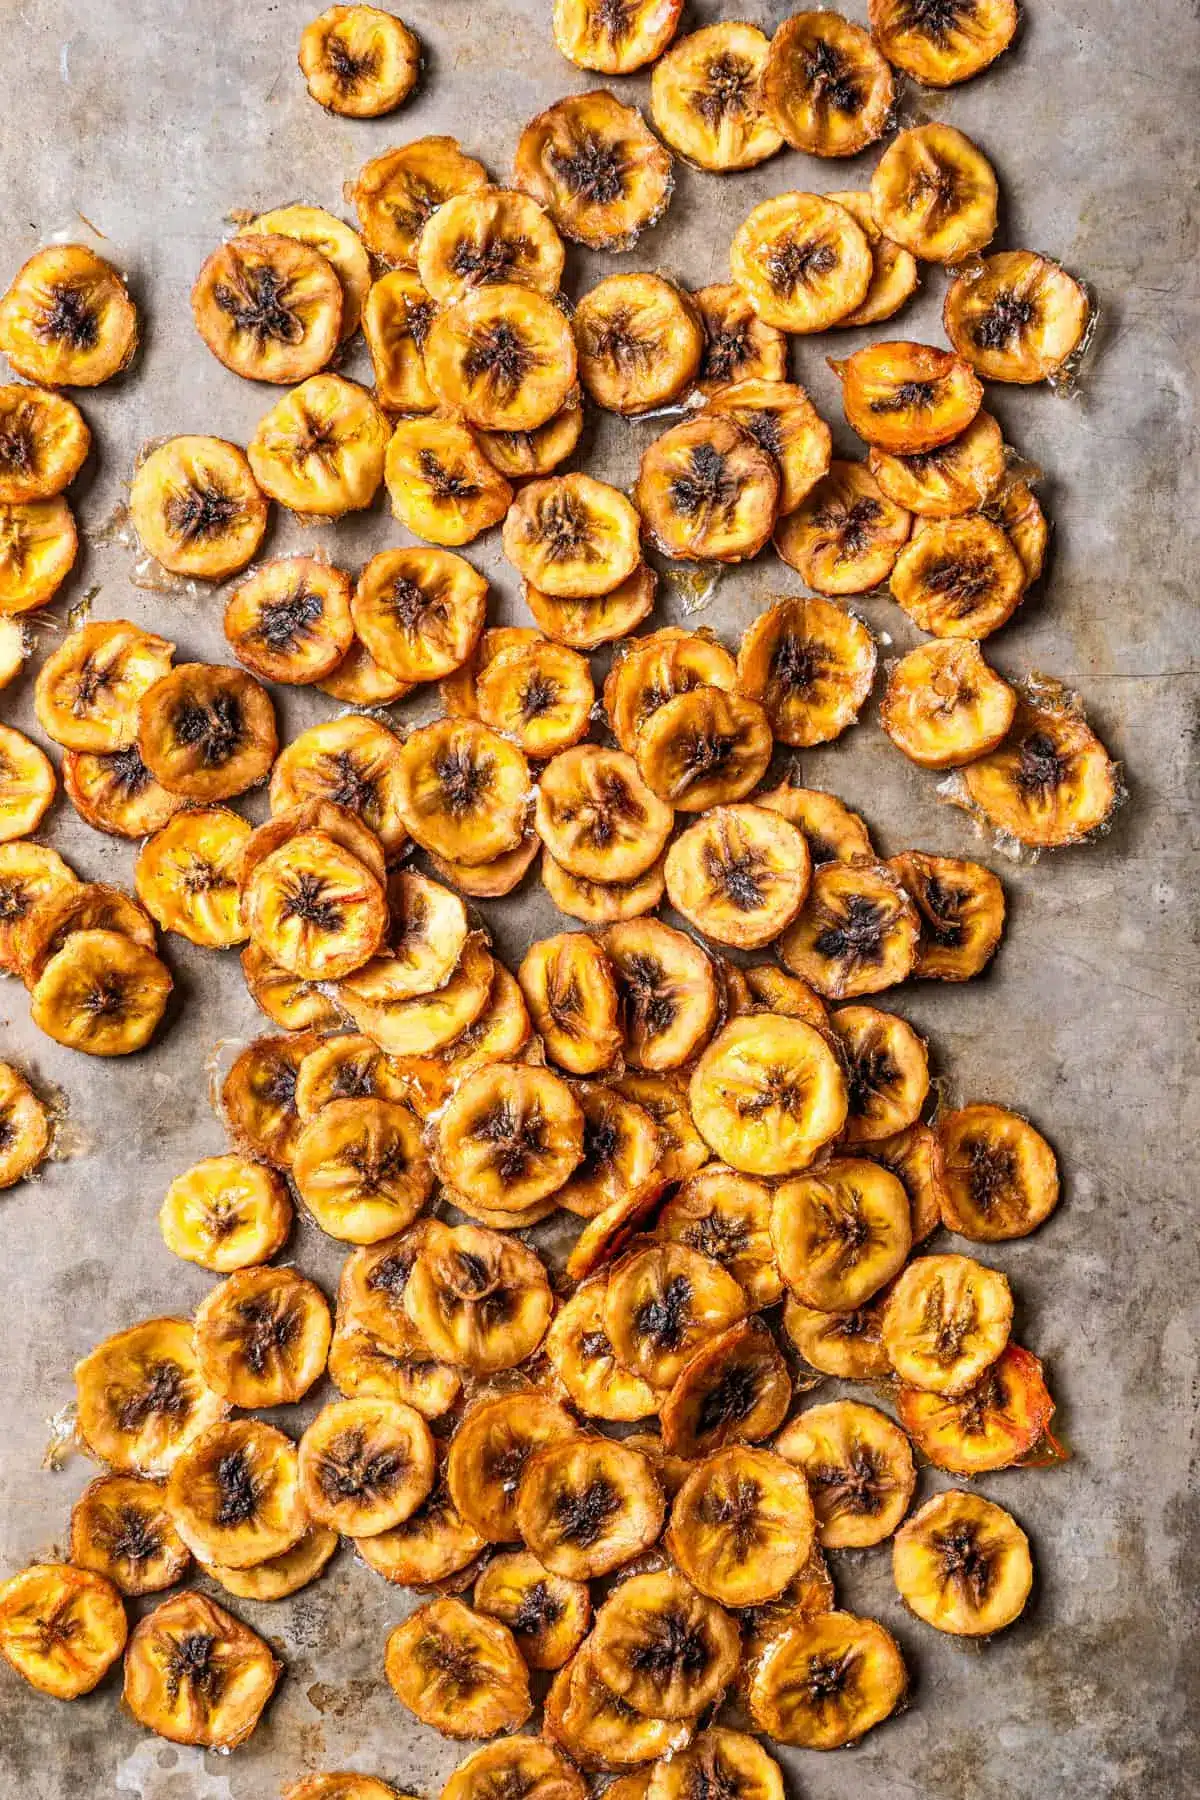
Carefully arrange the lemon-coated banana slices in a single layer on the prepared baking sheet. It’s crucial that the slices do not overlap, as this will prevent them from drying out properly and achieving the desired crispness. If your baking sheet is not large enough to accommodate all the slices in a single layer, use a second baking sheet.
Ensure there is a small amount of space between each banana slice. This airflow is essential for the dehydration process, allowing the hot air in the oven to circulate freely around each chip. Proper spacing contributes significantly to achieving an even crispness across all the banana chips. This meticulous arrangement is a cornerstone of successful baking.
Once arranged, place the baking sheet into the preheated oven. The initial baking time is set for 1 hour. During this time, the bananas will begin to soften and lose moisture. Keep an eye on them as the baking progresses, noting any changes in their appearance and texture.
Step 5: Flipping and Continued Baking
After the first hour of baking, carefully remove the baking sheet from the oven. At this stage, the banana slices should feel firm to the touch on top and may be starting to show slight browning around the edges. Use a metal spatula to gently flip each banana slice over. This ensures that both sides of the chips dry out evenly, promoting uniform crispness.
If any slices appear to be sticking to the foil or parchment paper, continue baking for an additional 20 to 30 minutes before attempting to flip. This allows them to dry out sufficiently to release easily. Forcing them off too soon can lead to torn chips or a less-than-ideal texture.
Return the baking sheet to the oven and continue baking for another 1 to 2 hours, or until the banana chips reach your desired level of crispness. The exact duration will depend on the thickness of your slices and your oven’s specific temperature calibration. It’s essential to check on them periodically during this extended baking phase.
Step 6: Cooling for Maximum Crunch
Once the banana chips have achieved the desired crispness, carefully remove the baking sheet from the oven. Immediately transfer the hot chips from the baking sheet to a wire cooling rack. Placing them on a rack allows air to circulate freely around all sides of the chips, which is crucial for them to cool completely and develop their final, satisfying crunch.
It’s important to let the banana chips cool entirely before storing them. As they cool, they will continue to crisp up. If you attempt to store them while they are still warm, any residual moisture can lead to sogginess, negating all your efforts. Patience during the cooling phase is key to achieving the perfect texture.
The longer the chips cool on the wire rack, the crunchier they will become. You can test a chip for crispness after about 30 minutes, but allowing them to cool for a couple of hours will yield the best results. This final cooling step is where the magic truly happens, transforming them into the perfect crunchy snack.
Pro Tips for baked banana chips
Even Slicing is Key: For the most uniform baking and crisping, invest time in slicing your bananas to an even thickness. A mandoline slicer is an excellent tool for this, ensuring consistency that directly translates to a superior final product. This meticulousness prevents some chips from burning while others remain chewy.
Patience is a Virtue: Don’t rush the baking process. The low oven temperature is designed for slow dehydration, which is essential for achieving that perfect crispness without scorching. If your chips still feel a bit soft, return them to the oven for 10-15 minute increments, checking frequently to avoid over-baking. This patient approach guarantees a delightful crunch.
Monitor Your Oven: Every oven is unique, and temperatures can fluctuate. Keep a close eye on your banana chips as they bake, especially during the latter stages. You may need to remove some “done” chips from the baking sheet sooner than others to prevent them from burning. This vigilance ensures an even batch.
Don’t Over-Soak in Lemon Juice: While lemon juice is essential for color and a hint of flavor, a brief dip is all that’s needed. Soaking for too long can make the bananas overly soft and affect their ability to crisp up properly in the oven. Stick to the recommended short marination time for optimal results.
Scale Up for Storage: These baked banana chips store incredibly well, making it worthwhile to scale up the recipe. If you find yourself craving this healthy snack often, doubling or tripling the batch is a smart move. Properly stored, they can last for weeks, ensuring a ready supply of your homemade delight.
Serving Suggestions for baked banana chips
Decoration
Elevate the visual appeal of your baked banana chips by arranging them artfully on a platter. Consider fanning them out like delicate petals or creating small, attractive mounds. For an extra touch, a light dusting of edible gold glitter or a few strategically placed fresh mint leaves can add a sophisticated flair, making them suitable for more elegant gatherings.
Side Dishes
These crunchy chips are a superb accompaniment to a variety of dishes. They add a delightful textural contrast when served alongside creamy soups, like a velvety lobster bisque, or as a surprising addition to a cheese board, offering a sweet counterpoint to savory cheeses and crackers. They also pair wonderfully with light, flaky baked chicken, providing a sweet crunch that enhances the overall meal.
Creative Serving Ideas
Think beyond just snacking; these chips can be a star ingredient in various culinary creations. Crush them and use them as a unique coating for fried chicken or fish, imparting a subtle sweetness and crispness. They also make a fantastic topping for ice cream sundaes, parfaits, or even as a garnish for pancakes and waffles, adding an exciting layer of texture and flavor. For a truly innovative approach, incorporate them into a homemade trail mix, combining them with nuts, seeds, and dried fruits for an energizing and satisfying blend.
Preparation & Storage
Storing Leftovers
Once your baked banana chips have cooled completely, transfer them to an airtight container. Storing them in a container that seals well is crucial for maintaining their crispness and preventing them from absorbing moisture from the air. Properly stored, these chips can last at room temperature for up to three weeks, making them an excellent make-ahead snack.
Ensure the container is completely dry before adding the chips. Any residual moisture can compromise their texture. Avoid storing them in humid environments. For optimal freshness, check the seal of your container regularly to ensure it remains airtight. This simple step maximizes their shelf life and preserves their delightful crunch.
If you notice any signs of softening, it typically indicates exposure to moisture. You can sometimes revive slightly softened chips by briefly returning them to a warm, low oven (around 200°F or 95°C) for 10-15 minutes to help re-crisp them. This is a useful trick to salvage them if storage conditions weren’t perfect.
Freezing
While these banana chips are designed for room temperature storage and can last for a considerable time, freezing is generally not the preferred method for maintaining their signature crunch. Freezing can introduce moisture upon thawing, potentially leading to a softer, less appealing texture. It’s best to enjoy them at room temperature where their crispness is preserved.
If you must freeze them for an extended storage period, do so with caution. Ensure they are in an absolutely airtight container or a heavy-duty freezer bag, removing as much air as possible. Consider placing a small silica gel packet (food-grade) inside the container to help absorb any latent moisture during the freezing process. This can mitigate some of the textural degradation.
When you decide to thaw frozen banana chips, allow them to come to room temperature gradually within their sealed packaging. This slow thawing process can help minimize condensation. Once thawed, assess their texture; if they’ve become a bit soft, a brief stint in a low oven (as mentioned in the storage section) might help restore some crispness.
Reheating
If your baked banana chips have lost some of their crispness, reheating them is a simple and effective way to bring them back to their former glory. Preheat your oven to a low temperature, around 200°F (95°C). This gentle heat is perfect for drying out any absorbed moisture without overcooking or burning the chips.
Spread the chips in a single layer on a baking sheet lined with parchment paper. This ensures even exposure to the heat and prevents sticking. Avoid overcrowding the pan; it’s better to reheat in batches if you have a large quantity. Proper spacing allows hot air to circulate effectively around each chip.
Bake for approximately 10 to 15 minutes, or until they feel crisp again. Keep a close watch on them, as they can go from perfectly crisp to burnt very quickly at this low temperature. Once they’ve regained their desired crunch, remove them from the oven and let them cool on a wire rack for a few minutes before enjoying them once more. This quick revival method extends their enjoyment.
Frequently Asked Questions
-
Can I use green bananas instead of ripe ones for baking?
While you can technically bake green bananas, they will not yield the same sweet and satisfying results as ripe ones. Green bananas contain more starch and less sugar, which means they will bake up firmer and less sweet, potentially with a more starchy flavor. The ideal bananas for this recipe are ripe but still firm; they should have some brown spots but not be overly soft or mushy. Using firmer, riper bananas ensures a better texture and natural sweetness for your chips, contributing to that desirable crunch without becoming tough or unpalatable. Overly ripe bananas, on the other hand, might turn mushy in the oven, so finding that perfect balance is key to achieving the best possible outcome for your baked banana chips.
-
Why are my banana chips not getting crispy after baking?
Several factors can contribute to banana chips not achieving the desired crispness. Firstly, uneven slicing thickness is a common culprit; thicker slices will take longer to dehydrate and may remain soft while thinner ones over-bake. Ensuring all slices are consistently ¼-inch thick is crucial for even drying. Secondly, insufficient baking time is another primary reason; the low oven temperature requires patience, and sometimes an additional hour or more of gentle baking is needed to fully dehydrate the fruit. Finally, humidity can play a role; if the chips are not cooled completely in a dry environment or are stored too soon in a not-quite-airtight container, they can absorb moisture and lose their crispness. For optimal crispness, ensure they are baked until they feel firm and brittle, and then cooled thoroughly on a wire rack.
-
Can I add other flavors or seasonings to my banana chips?
Absolutely! These baked banana chips serve as a wonderful canvas for a variety of delicious seasonings. For a sweet twist, consider dusting the banana slices with cinnamon, nutmeg, or even a touch of ground ginger before baking; this creates a warm, spiced flavor profile reminiscent of fall desserts. A sprinkle of unsweetened cocoa powder can impart a delightful chocolatey note, especially when paired with a pinch of cayenne for a subtly spicy kick. For a savory option, try tossing them with smoked paprika, garlic powder, or a hint of chili powder for a unique sweet-and-salty combination that’s surprisingly addictive. Experimenting with these additions allows you to personalize your chips and create exciting new flavor experiences that go beyond the traditional sweet snack, making them even more versatile for different occasions and preferences.