Easy Blackberry Earl Grey Tarts

The allure of desserts lies not just in their sweetness but in the stories they tell. Take, for instance, the delightful Blackberry Earl Grey Tarts. Have you ever found yourself yearning for a treat that’s both simple and elegant, bursting with flavor yet easy to make? This recipe encapsulates all those qualities beautifully.
Infused with the aromatic notes of Earl Grey tea and the luscious sweetness of ripe blackberries, these tarts are a perfect celebration of flavors. What makes this particular recipe stand out is its harmonious blend of textures and tastes, offering a truly unique and satisfying dessert experience.
Why You Will Love This Recipe
- Exceptional Flavor Profile: The sophisticated blend of tart blackberries and aromatic Earl Grey tea creates a taste sensation that is both comforting and intriguing, elevating the humble fruit tart to new heights.
- Remarkable Simplicity: Despite their elegant appearance and complex flavors, these tarts are surprisingly easy to assemble, making them an accessible project for bakers of all skill levels.
- Versatile Presentation: These tarts are perfectly sized for individual servings, making them ideal for elegant dinner parties, charming afternoon teas, or delightful personal treats that guests will adore.
- Customizable Delight: This recipe serves as a wonderful canvas for your culinary creativity, allowing for easy adaptations with different fruits or additional flavor infusions to suit your preferences.
- Audience Pleaser: Their beautiful appearance and delicious, well-balanced flavors ensure that these Blackberry Earl Grey Tarts are a hit with both adults and children, making them a reliable choice for any gathering.
Ingredients You Need
Crafting these exquisite tarts begins with selecting high-quality ingredients that will ensure a superior taste and texture. Fresh, plump blackberries provide the burst of fruity sweetness, while good quality Earl Grey tea leaves impart a subtle, sophisticated aroma that complements the fruit beautifully. The buttery, crisp pastry is the perfect foundation for this delightful filling, bringing together simple components for an extraordinary outcome.
Blackberry Earl Grey Tarts
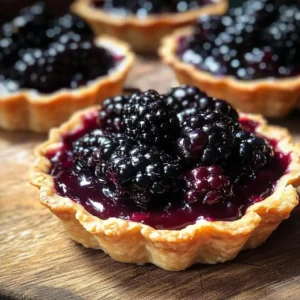
Deliciously simple tarts filled with sweet blackberries and infused with the aromatic flavor of Earl Grey tea, perfect for any occasion. This recipe offers a harmonious blend of textures and tastes, with a buttery, flaky crust cradling a juicy blackberry filling accented with hints of citrus and earthy tea.
- 1 ½ cups all-purpose flour (Substitute gluten-free flour for a gluten-free option.)
- ½ cup unsalted butter, chilled and diced (Use dairy-free butter for dairy-free option.)
- ¼ cup sugar
- ¼ teaspoon salt
- 1 large egg yolk (Use a flax egg for vegan option.)
- 2 tablespoons ice water
- 1 cup blackberries (Fresh blackberries preferred.)
- ½ cup sugar (For the filling.)
- 1 tablespoon Earl Grey tea leaves
- 1 tablespoon cornstarch
- 1 tablespoon lemon juice
- 1Gather all your ingredients.
- 2In a mixing bowl, combine the flour, sugar, and salt.
- 3Mix in the chilled, diced butter until the mixture resembles coarse crumbs.
- 4In a small bowl, mix the egg yolk and ice water, then stir into the dough until it comes together.
- 5Roll out the dough to approximately ¼ inch thickness and fit into tart pans.
- 6Prick the bottom with a fork to ensure even baking.
- 7In a separate bowl, combine blackberries, sugar, Earl Grey tea leaves, cornstarch, and lemon juice.
- 8Evenly distribute the blackberry filling into the prepared tart shells.
- 9Bake the tarts in a preheated oven at 350°F (175°C) for 25-30 minutes until golden brown.
- 10Let the tarts cool completely in the pans before serving.
Keywords: Baking, Blackberry, Dessert Recipe, Earl Grey, Tarts
- all-purpose flour: the foundation for a tender, flaky crust.
- unsalted butter, chilled and diced: essential for creating that desirable flakiness in the pastry.
- sugar: provides sweetness to the crust and balances the tartness of the berries.
- salt: enhances all the other flavors and balances the sweetness.
- egg yolk: enriches the dough, contributing to its tenderness and binding properties.
- ice water: helps to bring the dough together without developing too much gluten, ensuring a tender crust.
- blackberries: the star of the filling, offering a sweet and slightly tart fruity burst.
- sugar (for the filling): sweetens the blackberries and helps create a syrupy consistency.
- Earl Grey tea leaves: infuses the filling with a unique, aromatic, and slightly citrusy note.
- cornstarch: acts as a thickener for the blackberry filling, preventing it from becoming too watery.
- lemon juice: brightens the flavor of the blackberries and adds a touch of acidity.
The precise quantities for each ingredient are conveniently located within the recipe card provided above.
Variations
The beauty of these Blackberry Earl Grey Tarts lies in their adaptability. You can easily transform them into a vegan delight by substituting the butter with high-quality coconut oil or a plant-based butter alternative. For the egg yolk, a flax egg (one tablespoon of ground flaxseed mixed with three tablespoons of water, left to sit for five minutes) works wonderfully as a binder.
For those following a low-carb lifestyle, consider creating a nut-based crust. Almond flour or finely ground walnuts can be used in place of traditional flour, often requiring a bit more binder like coconut flour or a touch of psyllium husk. The filling can be sweetened with a sugar substitute like erythritol or stevia, ensuring the delightful flavor profile remains intact.
You can also experiment with other fruits that pair well with Earl Grey. Imagine a tart filled with a mix of raspberries and blueberries, or perhaps thinly sliced pears infused with a hint of cardamom. The Earl Grey essence is remarkably versatile, making these tarts a perfect base for various seasonal flavor combinations and dietary needs.
How to Prepare Blackberry Earl Grey Tarts
Step 1: Crafting the Perfect Tart Shell
The foundation of any great tart is its crust, and for these Blackberry Earl Grey Tarts, we aim for a delicate balance of crispness and tenderness. Begin by ensuring all your dough ingredients are chilled, especially the butter and water. This is a crucial step that prevents the butter from melting too quickly, which is essential for achieving that signature flaky texture that makes homemade tarts so irresistible.
In a large mixing bowl, combine the all-purpose flour, a quarter cup of sugar, and a quarter teaspoon of salt. Whisk these dry ingredients together thoroughly to ensure they are evenly distributed. This initial mixing ensures that the leavening and flavorings are uniform throughout the dough, setting the stage for a perfectly baked crust.
Next, introduce the chilled, diced unsalted butter to the flour mixture. Using a pastry blender, your fingertips, or even a food processor on a pulse setting, work the butter into the flour until the mixture resembles coarse crumbs with some pea-sized pieces of butter still visible. These pockets of butter will melt during baking, creating steam that separates the dough layers and results in a wonderfully flaky crust.
In a separate small bowl, whisk together one egg yolk and two tablespoons of ice water until well combined. Gradually add this wet mixture to the flour and butter mixture, stirring with a fork or spatula just until the dough begins to come together. Be careful not to overmix, as this can develop the gluten too much, leading to a tough crust. The dough should be shaggy but hold together when squeezed.
Turn the dough out onto a lightly floured surface and gently bring it together into a cohesive ball. Flatten it into a disc, wrap it tightly in plastic wrap, and refrigerate for at least 30 minutes. This chilling period allows the gluten to relax and the fat to firm up again, making the dough easier to roll out and contributing significantly to the final texture of your tart shells. Proper chilling is paramount for a professional-quality crust.
Step 2: Shaping and Preparing the Tart Shells for Baking
Once the dough has had sufficient time to chill and firm up, it’s time to roll it out and prepare it for its delicious filling. Lightly flour your work surface and a rolling pin to prevent sticking. Take the chilled dough disc and begin rolling it out from the center outwards, rotating the dough occasionally to ensure an even thickness.
Aim for a thickness of about one-quarter of an inch. The goal is to create a circle of dough that is large enough to generously line your tart pans or a single larger tart pan. Don’t worry if the edges are a little rough or uneven; this often adds to the rustic charm of homemade tarts. Perfection isn’t necessary; the delicious outcome will speak for itself.
Carefully transfer the rolled-out dough into your chosen tart pans. You can gently drape it over the rolling pin to help move it, or carefully fold it in half or quarters and then unfold it into the pan. Gently press the dough into the bottom and up the sides of the tart pan, ensuring it fits snugly into all the crevices. Trim away any excess dough that extends beyond the rim of the pan; this can be re-rolled for decorative elements if desired.
Using a fork, prick the bottom of the tart shells all over. This step is incredibly important as it allows steam to escape during baking, preventing the crust from puffing up unevenly or forming large air bubbles. This ensures a flat, even base for your blackberry filling, creating a professional and appealing final product. A well-pricked crust is key to a successful tart.
If you have made extra dough, you can use cookie cutters to create decorative shapes like leaves or small berries to place on top of the filling before baking, or simply arrange strips for a lattice top. These small touches can elevate the visual appeal of your tarts significantly, turning them into true works of art. Prepare your tart shells and set them aside while you move on to the flavorful filling.
Step 3: Creating the Aromatic Blackberry Earl Grey Filling
Now for the heart of our tarts – the luscious blackberry and Earl Grey filling. In a medium-sized mixing bowl, combine one cup of fresh blackberries. It’s best to use plump, ripe berries that are still relatively firm to hold their shape during baking and release a wonderful juice. If your berries are slightly larger, a gentle crush with your fingertips can help release their juices and create a more integrated filling.
To the blackberries, add half a cup of sugar. This sweetness will balance the natural tartness of the fruit and create a delightful syrupy consistency as it bakes. Be sure to use a granulated sugar that will dissolve well and contribute to the overall flavor of the filling without being overpowering. The amount of sugar can be slightly adjusted based on the sweetness of your berries.
The distinctive aromatic element comes from one tablespoon of Earl Grey tea leaves. For the best flavor infusion, use loose-leaf Earl Grey tea. You can either sprinkle the leaves directly into the filling, or for a smoother texture, you can place the leaves in a tea infuser or a small piece of cheesecloth tied with kitchen twine and submerge it in the filling mixture. This allows the tea to impart its bergamot-infused essence without leaving loose leaves.
Next, incorporate one tablespoon of cornstarch into the mixture. This common pantry staple is essential for thickening the juices released by the blackberries during baking, transforming them into a rich, jam-like consistency that coats the berries beautifully. Ensure the cornstarch is evenly distributed to prevent any clumps from forming and to guarantee a smooth, luscious filling texture.
Finally, add one tablespoon of fresh lemon juice. This brightens the flavors of the blackberries, cuts through the sweetness, and adds a subtle tang that complements the Earl Grey notes perfectly. Stir all the filling ingredients together very gently. The aim is to coat the blackberries evenly with the sugar, tea leaves, cornstarch, and lemon juice without mashing the berries excessively, preserving their delightful texture.
This mixture should be vibrant, fragrant, and ready to be spooned into your prepared tart shells. The combination of the deep purple berries and the subtle dark flecks of tea leaves creates a visually appealing filling that promises a burst of flavor. The scent of bergamot and fresh berries is truly intoxicating at this stage.
Step 4: Assembling and Baking the Tarts to Golden Perfection
With your tart shells prepared and your flavorful filling ready, it’s time to bring everything together for the baking process. Carefully spoon the blackberry and Earl Grey filling into each of your prepared tart shells. Distribute the filling evenly, ensuring that each tart receives a generous portion of berries and that the filling reaches close to the rim without overflowing. The vibrant color of the filling is already a promise of the deliciousness to come.
If you’ve opted for decorative elements like lattice strips or cut-out shapes, now is the time to arrange them over the filling. This adds an extra touch of elegance and visual appeal to your finished tarts. Gently press any decorative elements into the edges of the crust to secure them.
Preheat your oven to 350°F (175°C). It’s highly recommended to place your filled tart pans on a sturdy baking sheet before they go into the oven. This makes it much easier and safer to transfer the tarts in and out of the hot oven, and it also catches any potential drips from the filling, keeping your oven clean. The baking sheet provides a stable base for even heat distribution.
Bake the tarts for approximately 25 to 30 minutes, or until the crust is beautifully golden brown and the blackberry filling is bubbling merrily. The bubbling filling indicates that the cornstarch has activated and thickened the juices, creating that wonderful jam-like consistency. Keep an eye on the tarts during the last few minutes of baking to ensure the crust doesn’t over-brown.
Once baked to perfection, carefully remove the baking sheet with the tarts from the oven. The aroma filling your kitchen at this point will be absolutely divine, a rich blend of sweet berries and fragrant Earl Grey tea. Allow the tarts to cool completely in their pans on a wire rack. This cooling period is essential, as it allows the filling to set further and makes the tarts much easier to handle and serve without them falling apart.
Patience during the cooling phase is key to achieving clean slices and a beautiful presentation. The warm, fragrant steam escaping as they cool is a delightful preview of the taste sensation that awaits. Enjoy the anticipation of this exquisite dessert.
Step 5: Cooling and Final Touches for Serving
The triumphant moment of baking is complete, and your Blackberry Earl Grey Tarts are ready for their final transformation before gracing your table. It is absolutely crucial to allow the tarts to cool completely in their pans. This may seem like a test of patience, especially with the enticing aroma wafting through your kitchen, but it’s a vital step for the structural integrity of the tarts.
As the tarts cool, the blackberry filling will continue to thicken and set. This process ensures that when you slice into them, you get clean portions with the luscious filling contained within, rather than a runny mess. The heat retained in the crust also helps to fully crisp it up, achieving that perfect textural contrast.
Once the tarts have cooled to room temperature, you can carefully remove them from their pans. If they were baked in individual tartlet pans with removable bottoms, this should be quite straightforward. For larger tarts, you might need to gently loosen the edges with a thin knife or offset spatula before inverting them onto a serving plate or cutting them directly in the pan.
Before serving, consider adding a few final touches to enhance their visual appeal and flavor. A light dusting of powdered sugar can mimic a gentle snowfall and add a touch of sweetness without altering the primary flavors. Fresh mint sprigs placed artfully on top provide a vibrant green contrast and a refreshing aromatic note.
Alternatively, a dollop of lightly sweetened whipped cream or a scoop of vanilla bean ice cream served alongside can add a creamy element that beautifully complements the tart and fruity filling. These finishing touches are simple but make a significant difference in presenting your Blackberry Earl Grey Tarts as a truly special dessert.
The ultimate reward is savoring these beautiful creations. Whether served warm or at room temperature, the combination of the crisp, buttery crust, the sweet and slightly tart blackberry filling, and the unique floral notes of Earl Grey tea creates a memorable dessert experience. Each bite is a delightful symphony of flavors and textures.
Pro Tips for Blackberry Earl Grey Tarts
Chill is Key for Flaky Crusts: Always ensure your butter and water are ice-cold when making the tart dough. This prevents the butter from melting prematurely during mixing and baking, leading to superior flakiness as the butter creates steam pockets that separate the dough layers.
Don’t Overwork the Dough: Handle the tart dough as little as possible once the wet ingredients are added. Overmixing develops gluten, which can result in a tough, bread-like crust instead of the desired tender and flaky texture. Mix just until the dough comes together.
Prick for Even Baking: Remember to thoroughly prick the bottom of your tart shells with a fork before adding the filling. This simple step allows steam to escape during baking, preventing the crust from puffing up unevenly and ensuring a flat, stable base for your delicious filling.
Taste Your Berries: Blackberries can vary significantly in sweetness and tartness. Taste your fresh berries before adding sugar to the filling. Adjust the sugar amount accordingly to achieve the perfect balance between sweet and tart, ensuring the final dessert isn’t overwhelmingly sweet or sour.
Consider Loose Leaf for Best Infusion: While pre-ground tea can be used in a pinch, loose-leaf Earl Grey tea offers a more intense and authentic flavor. If you prefer a smoother filling without tea leaf fragments, consider steeping the loose leaves in a small amount of hot water or milk, then straining and adding the infused liquid to your filling mixture.
Serving Suggestions for Blackberry Earl Grey Tarts
Decoration
To elevate the presentation of your Blackberry Earl Grey Tarts, consider a light dusting of powdered sugar over the cooled tarts, creating a delicate, frosted appearance reminiscent of a winter scene. Fresh mint leaves, when placed strategically on top of each tart, provide a vibrant splash of color and a refreshing aroma that complements the fruity filling beautifully.
For a more elaborate touch, you could gently warm some apricot jam with a tablespoon of water and brush it over the blackberry filling once the tarts are baked. This glaze adds a beautiful sheen and a subtle layer of sweetness. Edible flowers, such as violas or pansies, can also add a whimsical and elegant touch, transforming your tarts into miniature works of edible art.
If you’ve created a lattice top, a light brushing of egg wash before baking will give it a lovely golden-brown sheen. Even a simple scattering of toasted slivered almonds around the edge of the tart can add a pleasing crunch and visual texture, complementing the soft berries and flaky crust.
Side Dishes
These tarts are delightful served alongside a dollop of freshly whipped cream. For an extra layer of flavor, infuse the cream with a touch of vanilla extract or even a hint of lemon zest. This adds a creamy richness that perfectly balances the bright, fruity notes of the blackberries and the fragrant Earl Grey.
A scoop of high-quality vanilla bean ice cream is another classic and universally loved accompaniment. The cool, creamy texture and classic flavor provide a wonderful contrast to the warm or room-temperature tart. For those seeking a more adventurous pairing, consider a scoop of lavender or a subtle citrus-flavored ice cream, which can echo the floral and bright notes in the tart.
For a more sophisticated dessert experience, pair these tarts with a delicate dessert wine or a light, fruity liqueur. The complexity of a good wine can enhance the nuanced flavors of the Earl Grey and blackberries, creating a truly memorable culinary moment.
Creative Serving Ideas
Transform your Blackberry Earl Grey Tarts into individual dessert servings by baking them in muffin tins or small tartlet molds. This makes them perfect for elegant buffets, parties, or for portioning out for a delightful afternoon treat. Each guest receives their own perfectly sized portion of this delightful creation.
Consider a deconstructed approach: serve the crisp tart shells alongside a generous bowl of the blackberry Earl Grey filling and a side of whipped cream. Guests can then assemble their own tarts, allowing for a fun and interactive dessert experience. This is particularly engaging for children and adds a playful element to any gathering.
Another creative idea is to incorporate the tarts into a larger dessert spread. They can be part of a dessert platter featuring a variety of smaller sweets, or even served alongside a slice of a richer cake or a fruit salad for a diverse sweet offering. Their elegant appearance makes them a welcome addition to any dessert table, providing a lighter, fruit-forward option.
Preparation & Storage
Storing Leftovers
To keep your delicious Blackberry Earl Grey Tarts fresh for as long as possible, it’s essential to store them properly. Once they have completely cooled to room temperature, transfer any leftover tarts into an airtight container. Ensure the container is well-sealed to prevent the crust from becoming stale or absorbing unwanted odors from the refrigerator.
Store the container in the refrigerator. The cool environment will help to maintain the crispness of the crust and prevent the filling from spoiling. Properly stored, these tarts can typically last for up to three days. They retain their best flavor and texture within this timeframe, making them a convenient treat to enjoy over a few days.
Avoid stacking the tarts too high in the container if possible, especially if they have decorative toppings, to prevent any crushing or damage to their appearance. If stacking is unavoidable, place a layer of parchment paper between layers to protect the toppings.
Freezing
Blackberry Earl Grey Tarts freeze exceptionally well, making them an excellent make-ahead dessert option. For the best results, ensure the tarts are fully baked and have cooled completely before you attempt to freeze them. Freezing them while still warm can lead to condensation and a soggy crust upon thawing.
Individually wrap each tart tightly in plastic wrap. Make sure there are no gaps where air can penetrate. Once individually wrapped, place the tarts in a single layer in a freezer-safe container or a heavy-duty freezer bag. This double layer of protection helps to prevent freezer burn.
Label the container with the date and contents. Frozen tarts can be stored for up to two months. They maintain their quality and flavor quite well when properly frozen, offering a convenient and delicious dessert solution whenever the craving strikes.
Reheating
When you’re ready to enjoy your frozen or refrigerated Blackberry Earl Grey Tarts, reheating can bring back that delightful freshly-baked warmth and crispness. If reheating from frozen, allow the tarts to thaw in the refrigerator overnight first. This gradual thawing helps to maintain the integrity of the crust and filling.
To reheat, preheat your oven to a moderate temperature, around 350°F (175°C). Place the thawed tarts on a baking sheet, just as you did when baking them, to catch any potential drips. Heat for about 5-10 minutes, or until the tart is warmed through and the crust is crisp again.
If you are reheating tarts that have only been refrigerated, the reheating time might be slightly shorter. The goal is to warm them gently without overcooking or drying them out. Serve immediately after reheating for the best texture and flavor experience. The aroma of warm berries and Earl Grey is simply irresistible.
Frequently Asked Questions
- Can I prepare the Blackberry Earl Grey Tarts ahead of time?
Absolutely! These tarts are fantastic for making ahead. You can prepare the dough a day or two in advance and keep it refrigerated, or even bake the tarts completely and store them in an airtight container in the refrigerator for up to three days. This makes them an ideal choice for entertaining, as you can have the dessert ready to go without last-minute stress. The flavors often meld beautifully overnight, so they can be just as delicious, if not more so, the next day.
- What are the best substitutions if I can’t find specific ingredients?
If you need a gluten-free option, a high-quality 1:1 gluten-free flour blend can be used in place of all-purpose flour for the crust; ensure it contains xanthan gum. For a vegan tart, replace the unsalted butter with a plant-based butter alternative or solid coconut oil, and substitute the egg yolk with a flax egg (1 tbsp ground flaxseed + 3 tbsp water, rested for 5 minutes). If you don’t have Earl Grey tea, a fragrant black tea like Darjeeling or even a floral tea like chamomile could be an interesting substitute, though the distinct bergamot note will be missing. For the blackberries, other berries like raspberries or blueberries, or even a mix, work wonderfully.
- How can I ensure my tart crust is perfectly flaky and not tough?
The key to a flaky crust lies in keeping the ingredients cold and minimizing the handling of the dough. Use ice-cold butter, ice-cold water, and try to work the dough as little as possible once the wet ingredients are added. Overmixing develops gluten, leading to a tough texture. Chilling the dough before rolling and again after lining the tart pans also helps the gluten relax and the fat to firm up, contributing significantly to flakiness. Pricking the base before baking also helps prevent puffing and promotes even cooking of the crust, ensuring it becomes crisp rather than dense.