White Chocolate Coconut Cake Balls

Creamy, crowd-pleasing Coconut Cake Balls are a make-ahead dessert with soft vanilla cake centers, a smooth white chocolate shell, and a sweet coconut finish.
They are simple to portion, easy to chill ahead, and perfect for parties, gifting, or holiday trays, making them a truly versatile sweet treat.
What makes these delightful little spheres so captivating is the exquisite interplay of textures and flavors that unfold with every single bite.
The centers remain wonderfully soft and rich, a testament to the perfect blend of crumbled cake and luscious frosting, offering a comforting chewiness.
Why You Will Love This Recipe
- Effortless Assembly: These cake balls come together with surprising ease, transforming simple ingredients into elegant confections.
- Make-Ahead Magic: Prepare them days in advance and store them chilled, making them a stress-free addition to any event or gathering.
- Crowd-Pleasing Appeal: The classic combination of vanilla cake, creamy white chocolate, and sweet coconut is a universally adored flavor profile.
- Visually Stunning: Their pristine white coating and snowy coconut finish make them look as beautiful as they taste, perfect for any dessert spread.
- Versatile Delight: Whether for a festive holiday platter, a birthday celebration, or a simple afternoon treat, these cake balls fit every occasion.
Ingredients You Need
Crafting these delightful Coconut Cake Balls begins with selecting high-quality ingredients that will ensure a perfect balance of flavor and texture.
The foundation of a great cake ball lies in the quality of the cake mix and the richness of the binding agent, while the coating should be smooth and the finishing touches fragrant and sweet.
These components work in harmony to create a dessert that is both comforting and sophisticated, guaranteed to impress.
Coconut Cake Balls
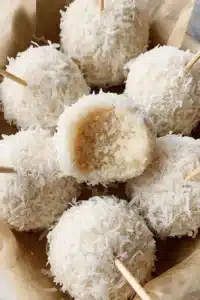
Creamy, crowd-pleasing Coconut Cake Balls are a make-ahead dessert with soft vanilla cake centers, a smooth white chocolate shell, and a sweet coconut finish. They are simple to portion, easy to chill ahead, and perfect for parties, gifting, or holiday trays.
- 11 ounces high-quality white chocolate chips
- 4 large egg whites
- 16 ounces vanilla frosting
- 1 box white cake mix
- 1 1/4 cups water
- 7 ounces sweetened shredded coconut or coconut flakes
- 3/4 cup neutral vegetable oil (such as Wesson)
- A small amount of additional vegetable oil (for smoothing the melted chocolate)
- 1Preheat the oven to 350°F (175°C). Lightly coat a 9x13-inch baking pan with non-stick spray.
- 2In a large mixing bowl, combine the white cake mix, egg whites, 3/4 cup vegetable oil, and water. Whisk until the batter is fully blended and no lumps remain.
- 3Transfer the batter to the prepared pan and spread it into an even layer. Bake for about 35 minutes, or until a toothpick inserted in the center emerges clean.
- 4Remove the cake from the oven and allow it to cool slightly. Using a fork, break the cake apart into fine crumbs, making sure any larger pieces are thoroughly broken up.
- 5Add the vanilla frosting gradually to the cake crumbs, stirring well after each addition until the mixture is evenly combined and holds together.
- 6Shape the mixture into balls, using about 1 to 2 tablespoons for each one. Arrange the formed cake balls on a parchment-lined baking sheet.
- 7Place the baking sheet in the freezer and chill the cake balls for 45 minutes so they become firm and easier to coat.
- 8While the cake balls are chilling, place the white chocolate chips in a microwave-safe bowl with a small amount of vegetable oil. Microwave in 20-second intervals, stirring after each interval, until the chocolate is smooth and just melted.
- 9Remove the chilled cake balls from the freezer. Dip each one into the melted white chocolate, using a spoon or skewer to turn and coat it completely.
- 10Immediately roll each chocolate-covered cake ball in the sweetened coconut, pressing gently so the flakes adhere well to the surface.
- 11Set the coated cake balls aside for 5 to 10 minutes, or until the chocolate has hardened. Serve once fully set.
Keywords: Coconut Cake Balls, White Chocolate, Coconut, Make-ahead, Dessert, Party Food, Holiday Treat
The exact quantities and specific details for each ingredient are thoughtfully outlined within the comprehensive recipe card provided, ensuring you have all the precise measurements needed for success.
Variations
While the classic Coconut Cake Ball is undeniably delicious, the beauty of this recipe lies in its adaptability, allowing for creative twists to suit various dietary needs and flavor preferences.
One exciting variation is to infuse a subtle citrus note into the cake centers before mixing with frosting, perhaps by adding a teaspoon of lemon zest. This brightens the vanilla undertones and adds a sophisticated dimension, especially when paired with the sweet white chocolate and coconut, creating a refreshing contrast.
For those seeking a low-carb or keto-friendly option, consider using a sugar-free white cake mix alternative and a low-carb frosting. You would then likely use a sugar-free white chocolate or a dark chocolate alternative for the coating, and unsweetened shredded coconut for the final roll.
Another delightful approach is a “tropical twist” variation. Incorporate a tablespoon or two of finely chopped pineapple into the cake crumbs before adding the frosting; this will add a burst of moisture and a hint of tangy sweetness that complements the coconut beautifully.
You could also explore different types of coatings. A dark chocolate coating offers a rich, bitter counterpoint to the sweet cake and coconut, while a milk chocolate coating brings a creamier, sweeter experience. For a more advanced decorator, consider adding a swirl of colored white chocolate or even using different flavored extracts in the coating itself, like a hint of almond or passionfruit.
For a fun, festive touch, think about adding a few drops of food coloring to the melted white chocolate to create pastel-colored cake balls for spring holidays or vibrant hues for themed parties. The possibilities for customization are truly endless with this adaptable base recipe.
How to Prepare Coconut Cake Balls
Step 1: Baking the Perfect Cake Base
Begin this delightful culinary journey by preheating your oven to the specified temperature of 350 degrees Fahrenheit (175 degrees Celsius). It is crucial to ensure your baking pan, typically a 9×13-inch rectangular pan, is thoroughly greased with non-stick spray or butter and a light dusting of flour.
In a large mixing bowl, combine the contents of the white cake mix with the specified amount of egg whites, neutral vegetable oil, and water. Whisk these ingredients together with vigor until you achieve a smooth, homogenous batter, free from any lumps or streaks of dry mix; this thorough blending is key to an even bake.
Pour the meticulously prepared batter into the greased baking pan, spreading it into an even layer. This ensures consistent thickness across the cake, which is vital for uniform crumbling later. Bake for approximately 35 minutes, or until a toothpick inserted into the center of the cake emerges clean, signifying it is perfectly cooked through and ready for the next stage.
Once baked, remove the cake from the oven and allow it to cool just enough to be handled comfortably; it should not be piping hot, but still slightly warm. This slight warmth is beneficial as it keeps the cake pliable and easier to break down into fine crumbs, which is essential for achieving smooth cake balls.
Now comes the fun part of breaking down the cake. Using a fork or even your hands, crumble the cake thoroughly in a large bowl. The finer and more uniform your crumbs are, the smoother and more cohesive your cake ball centers will be. Larger chunks can lead to uneven texture and make shaping more challenging.
Aim for a texture resembling coarse sand or breadcrumbs. This detailed crumbling process directly impacts the final consistency of the cake ball mixture, ensuring a pleasant mouthfeel rather than a lumpy one. Patience here yields superior results later in the process.
Take your time to ensure every piece of cake is broken down. This step is more critical than it might seem; think of it as preparing the raw material for your delicious creations. The more you refine these crumbs, the better the frosting will bind, and the smoother the final cake balls will be.
Once you have achieved a fine crumb consistency, set the bowl aside. This prepared cake base is now ready to be transformed into the delightful centers of your coconut cake balls, awaiting its binding ingredient and further shaping.
Step 2: Binding and Shaping the Centers
With your finely crumbled cake base ready, it’s time to introduce the binding agent. Gradually add the vanilla frosting to the cake crumbs. The frosting not only binds the crumbs together but also adds sweetness and a rich, creamy texture to the cake ball centers.
Mix the frosting into the crumbs thoroughly. It’s important to do this gradually, adding a little at a time and mixing well after each addition. You are aiming for a mixture that holds together easily when pressed in your hand, without being overly wet or sticky.
The ideal consistency is moist and rich, yet firm enough to be shaped without falling apart. If the mixture feels too dry and crumbly, add a tablespoon more of frosting at a time until the desired consistency is reached. Conversely, if it’s too wet, you can add a few more fine cake crumbs if you have any leftover, or a small amount of additional frosting is usually manageable if added carefully.
Once the mixture has the right consistency, it’s time to scoop and shape. Use a cookie scoop or a tablespoon to portion out the mixture. Aim for consistent portion sizes, typically about 1 to 2 tablespoons each, depending on your desired final size of the cake balls. Uniformity is key for even chilling and coating.
Roll each portion between your palms to form smooth, round balls. Gently apply pressure to compact the mixture, but avoid overworking it, which can make the centers dense. Place these shaped balls onto a baking sheet lined with parchment paper; this prevents sticking and makes them easy to transfer.
Ensure there is a little space between each cake ball on the baking sheet. This allows for even air circulation when they are chilled, and prevents them from sticking to each other. A well-organized baking sheet now will make the next step of chilling much more efficient.
As you shape each ball, try to make them as uniform in size and shape as possible. This attention to detail will pay off later when you are dipping them in chocolate, ensuring a more professional and appealing final product.
Once all the mixture has been shaped into balls, give each one a final gentle roll to ensure a smooth surface. This careful shaping ensures that the cake balls will hold their form beautifully, creating a delightful visual and textural experience for whoever enjoys them.
Step 3: Chilling for Optimal Dipping
This step is absolutely crucial for successful cake ball making, and it involves chilling the shaped balls until they are firm. Place the baking sheet with the shaped cake balls into the freezer. You want them to become quite firm, which typically takes about 45 minutes to an hour, or until they are solid enough to handle without deforming.
The purpose of this freezing step is twofold: firstly, it ensures that the cake balls maintain their perfect round shape when they are dipped into the warm melted chocolate. Without this chilling period, the warmer cake ball mixture can start to melt or soften the chocolate too quickly, leading to a messy, uneven coating.
Secondly, chilling makes the cake balls much easier to handle and dip. They become solid little units that can be easily submerged into the chocolate coating without crumbling or breaking apart. This makes the dipping process much cleaner and more efficient, reducing frustration and potential waste.
While the cake balls are chilling, you can begin to prepare your white chocolate coating. This involves carefully melting high-quality white chocolate chips with a small amount of additional vegetable oil. The oil helps to thin the chocolate, making it more fluid and easier to work with for dipping.
Melt the chocolate in short intervals in the microwave, stirring thoroughly after each interval. It is critical to avoid overheating white chocolate, as it can easily seize up and become thick or grainy. Gentle, slow melting with frequent stirring is the key to a smooth, dippable consistency.
Alternatively, you can use a double boiler method, gently heating the chocolate over simmering water, stirring constantly until smooth. Whichever method you choose, ensure the chocolate is perfectly smooth and pourable before you begin the dipping process.
The texture of the melted chocolate should be like thick syrup, allowing you to dip the cake ball and have the excess chocolate drip off cleanly. If it’s too thick, add another tiny bit of oil; if it’s too thin, you might have overdone the oil, but it can sometimes be rectified by adding a few more white chocolate chips.
Once the cake balls are sufficiently firm and the chocolate is perfectly melted and smooth, you will be ready for the most visually rewarding part of the process: coating them.
Step 4: The Art of Coating
Now that your cake balls are firm from their time in the freezer and your white chocolate is smoothly melted, it’s time to coat them. Retrieve the baking sheet from the freezer and ensure the cake balls are indeed solid to the touch.
Carefully dip each chilled cake ball into the melted white chocolate. You can use a fork, a toothpick, or a specialized dipping tool to achieve this. Submerge the cake ball completely in the chocolate, ensuring it is fully covered.
Allow the excess chocolate to drip back into the bowl. This is a crucial step for achieving a neat, clean coating. Gently tap the fork or tool on the side of the bowl to help the excess chocolate flow off. A smooth, even coating is the goal here, not a thick, gloppy one.
Once the excess chocolate has dripped off, carefully place the coated cake ball back onto the parchment-lined baking sheet. If you used a toothpick, you can gently roll it off the toothpick and onto the parchment paper, smoothing the small indentations left by the toothpick.
If you are adding the shredded coconut, do this immediately after dipping the cake ball into the chocolate, while the coating is still wet. Have your bowl of sweetened shredded coconut ready and within easy reach.
Gently roll the still-wet chocolate-covered cake ball in the coconut. Press lightly so the coconut adheres well to the surface, creating that signature snowy finish. Ensure an even coating of coconut all around the cake ball.
If you are not adding coconut immediately, allow the chocolate coating to set slightly before attempting to roll in coconut, or you might smudge the coating. However, rolling while wet ensures the best adhesion of the coconut flakes.
Arrange the finished coconut-covered cake balls on the parchment-lined baking sheet, ensuring they do not touch each other. This spacing is important to prevent them from sticking together as the chocolate hardens.
Repeat this process for all the cake balls, working relatively quickly to ensure the chocolate remains at the optimal dipping temperature. If the chocolate starts to thicken, you may need to gently re-warm it in short bursts, always stirring carefully.
Step 5: Setting and Finishing Touches
Once all your cake balls have been meticulously dipped and rolled in coconut, it’s time to let them set. Arrange them neatly on the parchment-lined baking sheet, making sure they have enough space between them to avoid sticking together as the white chocolate coating hardens.
Allow the cake balls to sit at room temperature for about 5 to 10 minutes, or until the chocolate coating is fully hardened. This process allows the chocolate to firm up, creating a lovely shell that holds the cake ball together and provides a satisfying textural contrast.
If your kitchen is particularly warm, or you’re short on time, you can speed up this setting process by placing the baking sheet back into the refrigerator for about 15-20 minutes. However, be mindful that refrigeration can sometimes cause condensation on the chocolate coating, so if you refrigerate, let them come to room temperature slightly before serving for the best appearance.
As the chocolate hardens, you’ll notice the pristine white coating become solid and opaque, sealing in the delicious cake center. The shredded coconut will adhere beautifully, giving each cake ball its signature festive appearance.
Once the coating is completely firm, your Coconut Cake Balls are ready to be enjoyed. You can serve them immediately, or they can be carefully transferred to an airtight container for storage, either at room temperature (if the coating is very firm and the environment is cool) or in the refrigerator.
The final result should be a collection of perfectly formed, delectable treats that look as good as they taste. The creamy white chocolate shell, combined with the sweet coconut and soft vanilla cake interior, creates a harmonious blend of flavors and textures that is truly irresistible.
Inspect each cake ball to ensure the coating is smooth and the coconut is evenly distributed. Any that appear less than perfect can be enjoyed by the baker as a quality control measure, of course!
Step 6: Presentation and Enjoyment
With your Coconut Cake Balls perfectly set and looking absolutely stunning, the final step is the most enjoyable – presenting and savoring these delightful creations. Arrange them attractively on a serving platter, perhaps a tiered stand or a decorative tray, to showcase their beautiful appearance.
If you’ve made different sizes or variations, consider arranging them in a way that highlights their unique characteristics. The snowy white exterior and delightful coconut texture make them a focal point on any dessert table, attracting guests with their inviting look.
These cake balls are designed to be eaten by hand, making them an ideal choice for parties, buffets, or gatherings where ease of serving is paramount. Guests can simply pick one up and enjoy the burst of flavor and texture without the need for plates or cutlery.
For an extra touch of elegance, you could garnish the platter with a few fresh mint leaves or edible flowers, or even a light dusting of powdered sugar that mimics snowfall. Small details can elevate the presentation from simple to spectacular.
When serving, ensure they are at an optimal temperature. If they have been chilled for storage, allow them to sit at room temperature for about 10-15 minutes before serving to soften slightly, ensuring the cake center is at its best texture. Overly cold cake balls can have a firmer center than desired.
The moment of enjoyment is what this entire process builds towards. Take a bite and experience the delightful crunch of the white chocolate shell, followed by the soft, sweet cake center, all enhanced by the fragrant shredded coconut. It’s a symphony of tastes and textures that rarely fails to bring a smile.
Whether you are sharing them with loved ones, gifting them to friends, or simply treating yourself, these Coconut Cake Balls offer a moment of pure indulgence. Their deliciousness is matched only by the joy they bring to any occasion.
Pro Tips for Coconut Cake Balls
- Finely Crumble the Cake: For the smoothest cake ball centers, ensure your baked cake is crumbled as finely as possible. Using a food processor can achieve an incredibly fine and uniform crumb, which results in a more cohesive and pleasing texture when mixed with frosting.
- Chill Thoroughly: Don’t skimp on the chilling time! Freezing the shaped cake balls until they are rock solid is essential for clean dipping and maintaining their shape. This prevents them from softening and potentially crumbling when submerged in warm chocolate.
- Tempering White Chocolate: White chocolate can be finicky. Melt it gently in short intervals (20-30 seconds), stirring thoroughly between each. Avoid overheating, as it can seize. Adding a small amount of vegetable oil or paramount cream helps achieve a smooth, dippable consistency that dries with a nice sheen.
- Work in Batches: If you’re making a large batch, work with only a portion of the cake balls at a time. Keep the rest in the freezer while you dip and coat a few. This ensures that the cake balls remain perfectly chilled until they are dipped, and the chocolate doesn’t start to set up too much between batches.
- Coconut Adhesion: Roll the cake balls in the sweetened shredded coconut immediately after dipping them in the melted chocolate, while the coating is still wet. This ensures the coconut sticks well. If the chocolate coating starts to set, you might need to gently re-melt your chocolate or add a tiny bit more oil.
- Smooth Dipping Technique: Use a dipping tool, a fork, or a skewer to carefully submerge the cake ball. Lift it out, allowing excess chocolate to drip back into the bowl. A gentle tap of the tool on the bowl’s rim can help with this. Then, place it on parchment paper to set.
- Storage Savvy: Store these cake balls in an airtight container. If you stack them, place parchment paper between layers to prevent sticking. They are best kept in a cool place or the refrigerator to maintain the integrity of the chocolate coating.
Serving Suggestions for Coconut Cake Balls
Decoration
Elevate the visual appeal of your Coconut Cake Balls with thoughtful decorative touches. Beyond the classic shredded coconut, consider a delicate drizzle of contrasting chocolate, perhaps dark or milk chocolate, over the white coating for a striking effect.
Edible glitter or shimmering edible dust can add a touch of magic, especially for festive occasions like holidays or birthdays. Small, colorful sprinkles can also be applied immediately after dipping for a playful and vibrant look.
For a more refined presentation, top each cake ball with a tiny edible flower or a small piece of candied fruit just before the chocolate sets. You can also press a single toasted coconut flake into the top center of each ball for a subtle, elegant accent.
Side Dishes
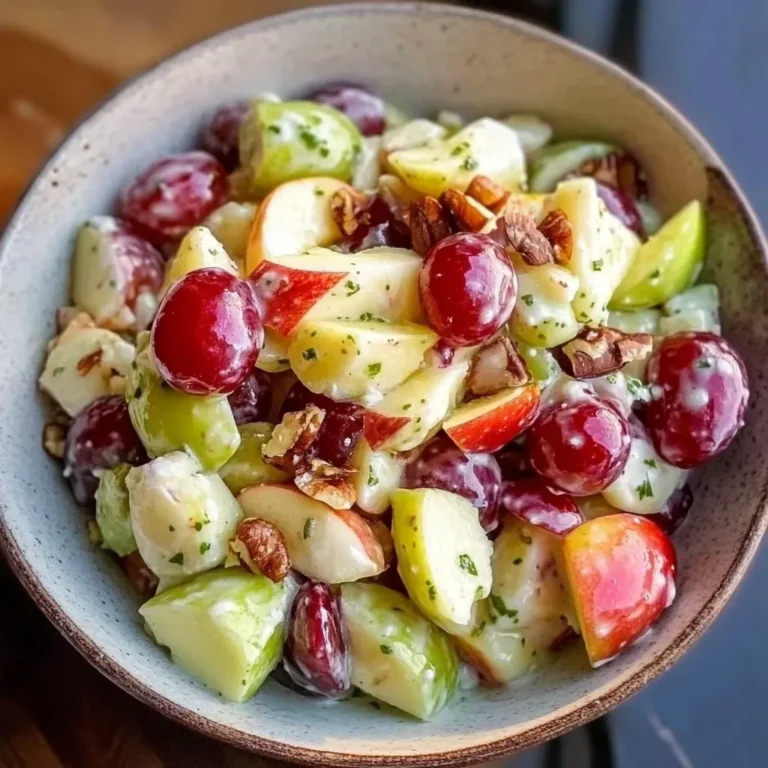
Coconut Cake Balls pair wonderfully with a variety of accompaniments that complement their sweet, creamy profile. A fresh fruit salad, featuring berries, melon, and tropical fruits like mango and pineapple, offers a refreshing contrast to the richness of the cake balls.
Consider serving them alongside a simple vanilla or buttermilk panna cotta, which provides a smooth, cool texture that harmonizes with the cake balls. A light lemon or key lime tart can also offer a pleasant tartness that balances the sweetness.
For a more robust dessert experience, they can be a perfect addition to a dessert board featuring other small treats like mini cheesecakes, funfetti cookies, or rich brownies. This offers guests a delightful array of textures and flavors to explore.
Creative Serving Ideas
Transform these delightful cake balls into charming favors by packaging them in small cellophane bags tied with a ribbon. This makes them a perfect take-home treat for wedding guests, party attendees, or as part of a corporate gift basket.
Create a stunning dessert table centerpiece by arranging the cake balls in varying heights using cake stands or decorative boxes. You can also spear them onto decorative skewers and insert them into a floral arrangement or a faux cake base for a unique display.
For holiday gatherings, theme the decoration of your cake balls. For Christmas, add a touch of green food coloring to a small amount of white chocolate for festive swirls, or use red and green sprinkles. For Easter, pastel colors and edible bunny sprinkles work wonderfully.
Consider a “cake ball flight” by offering a selection of different flavor variations or coatings alongside the classic coconut. This allows guests to sample a range of delicious possibilities, adding an element of surprise and discovery to your dessert offering.
Preparation & Storage
Storing Leftovers
Proper storage is key to keeping your Coconut Cake Balls fresh and delicious. Once the chocolate coating has fully hardened, store the cake balls in an airtight container. This prevents them from absorbing unwanted odors from the refrigerator and keeps them from drying out.
If you plan to stack the cake balls within the container, it is highly recommended to place a layer of parchment paper or wax paper between each layer. This prevents the chocolate coating from sticking to the layer above and maintains their pristine appearance.
These cake balls can be stored in the refrigerator for up to 4 to 5 days. The cool temperature helps maintain the firmness of the chocolate coating and keeps the cake center from becoming too soft.
Freezing
For longer-term storage, Coconut Cake Balls freeze beautifully, making them an excellent candidate for advance preparation. Ensure they are completely set and the chocolate coating is firm before freezing them.
Place the cake balls in a single layer on a baking sheet and freeze them until solid, which typically takes about 1 to 2 hours. Once frozen, transfer them to a freezer-safe airtight container or a heavy-duty freezer bag. You can also wrap individual cake balls in plastic wrap before placing them in the container for an extra layer of protection.
Stored properly, Coconut Cake Balls can be kept in the freezer for up to 2 months. The key is to minimize exposure to air to prevent freezer burn and maintain their quality.
Reheating
Reheating is not typically necessary for Coconut Cake Balls, as they are intended to be enjoyed as a chilled or room-temperature treat. The beauty of their storage is that they are often ready to serve directly from the refrigerator or freezer.
If the cake balls have been refrigerated, it is best to let them sit at room temperature for about 10 to 15 minutes before serving. This allows the cake center to soften slightly, achieving the perfect tender texture without compromising the firmness of the chocolate coating.
If they have been frozen, it is ideal to allow them to thaw gradually in the refrigerator overnight before bringing them to room temperature for about 15-20 minutes prior to serving. This gradual thawing process helps to prevent condensation from forming on the chocolate, which can mar the appearance.
Avoid using a microwave to reheat them, as this can cause the chocolate coating to melt unevenly and the cake center to become mushy. The gentle warming at room temperature is the most effective way to ensure they are at their best for enjoyment.
Frequently Asked Questions
-
Can I use a different type of cake mix for these Coconut Cake Balls?
Yes, you can certainly experiment with other cake mix flavors for your Coconut Cake Balls, although the outcome will vary significantly. A yellow cake mix will also work well, providing a slightly different flavor profile and color to the cake ball center. Red velvet cake mix could be used for a festive touch, but be aware that the color might slightly bleed into the frosting mixture. Angel food cake mix might be too light and airy to bind effectively with frosting, and chocolate cake mix would create a chocolate cake ball, which would be delicious but would deviate from the classic white cake base. Always ensure the cake mix is baked and cooled according to package directions before crumbling and mixing with frosting.
-
My white chocolate coating seized up and became thick. What did I do wrong, and how can I prevent this?
Seized white chocolate typically occurs due to overheating or the introduction of even a small amount of moisture. When melting white chocolate, it’s crucial to do so gently and gradually. Use short bursts in the microwave (20-30 seconds), stirring thoroughly between each burst, or a double boiler over simmering water, ensuring no steam or water droplets come into contact with the chocolate. White chocolate is particularly sensitive to moisture, which causes the sugar and cocoa butter to clump together, resulting in a grainy, thick texture. Adding a small amount of neutral oil or paramount cream can help to smooth out seized chocolate and make it dippable again, but it’s best to avoid overheating in the first place.
-
How do I get a perfectly smooth, even coating on my cake balls, and what can I do if the coconut isn’t sticking well?
To achieve a perfectly smooth and even coating, ensure your cake balls are very firm from freezing, and your white chocolate is melted to a fluid, dippable consistency (like thick syrup). Dip the chilled cake ball completely, lift it, and let the excess chocolate drip off by gently tapping the tool on the side of the bowl. For the coconut to stick well, roll the cake balls in the shredded coconut immediately after dipping, while the chocolate coating is still wet. If the coconut isn’t sticking, your chocolate might be setting too quickly, or it might be too thick. Ensure you’re using sweetened shredded coconut, as its texture and slight stickiness help it adhere better than unsweetened varieties. You can also try lightly pressing the coconut onto the chocolate if it’s already a bit firm, but this is less ideal for an even coating.
Share this Recipe if You liked it: Pinterest Facebook Messenger WhatsApp