Irresistible Banana Pudding Ice Cream – A Delicious Summer Treat

There’s nothing quite like the sweet scent of bananas ripening on the countertop, a signal that dessert time is near! As summer warms up, I find myself craving something cool and creamy, and this Banana Pudding Ice Cream is my go-to treat.
It’s a delightful mashup of rich banana pudding and classic ice cream, offering a nostalgic nod to Southern flavors we all love. Imagine the combination of smooth custard, ripe bananas, and that irresistible crunch of Nilla wafers—all blended into a delightful frozen dessert ready to please any crowd.
Why You Will Love This Recipe
- Nostalgic Comfort: This classic Southern dessert brings back fond memories with every bite, offering a taste of childhood and simpler times.
- No-Churn Simplicity: Perfect for novice cooks and seasoned bakers alike, you can whip this up quickly without the need for an ice cream maker, saving you time and effort.
- Irresistible Flavor Combination: The harmonious blend of creamy banana, sweet vanilla pudding, and the satisfying crunch of Nilla wafers creates a flavor explosion that is incredibly difficult to resist.
- Creative Variations: The base recipe is fantastic on its own, but it also serves as a canvas for your culinary creativity; mix in fresh berries, a drizzle of caramel, or even a hint of cinnamon to customize your treat.
- Crowd-Pleasing Delight: Whether you’re hosting a lively summer party, a cozy family movie night, or simply want to treat yourself, this ice cream consistently impresses and satisfies everyone who tastes it.
Ingredients You Need
The secret to this incredibly satisfying Banana Pudding Ice Cream lies in the quality and simplicity of its ingredients. We’re aiming for that perfect balance of creamy, sweet, and slightly crunchy, reminiscent of the beloved Southern dessert it’s inspired by. Each component plays a crucial role in achieving that melt-in-your-mouth texture and comforting flavor profile that makes this treat so special.
Banana Pudding Ice Cream
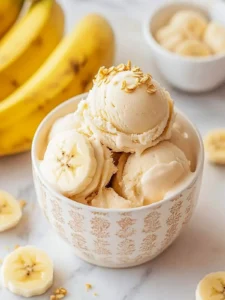
Enjoy this delicious Banana Pudding Ice Cream that combines rich banana pudding with creamy ice cream for a delightful summer treat. It's a no-churn recipe that's simple to make and perfect for any occasion.
- 4 large Ripe Bananas
- 1 box Instant Vanilla Pudding Mix
- 2 cups Heavy Whipping Cream
- 1 cup Milk
- 1 cup Nilla Wafers
- 1In a mixing bowl, take your ripe bananas and blend them until smooth.
- 2Add the instant vanilla pudding mix, heavy whipping cream, and whole milk to the banana puree. Whisk until everything is beautifully combined and smooth.
- 3Gently fold in the crushed Nilla wafers.
- 4Pour the mixture into a freezer-safe container, smoothing out the top.
- 5Place the container in the freezer and let it freeze for at least 4 hours until firm.
Keywords: banana, pudding, ice cream, no-churn, dessert, summer, creamy, nostalgic, southern
- ripe bananas: use bananas with brown spots for the best natural sweetness and flavor.
- instant vanilla pudding mix: this is essential for achieving that rich creaminess; steer clear of cook-and-serve varieties for a smooth, no-fuss texture.
- heavy whipping cream: adds a lush, decadent texture to the ice cream, making it incredibly smooth and rich.
- milk: whole milk is preferred for its fat content, which contributes to a creamier consistency; low-fat can be used but may slightly alter the final texture.
- nilla wafers: these classic cookies are crucial for delivering that iconic, delightful crunch that mimics traditional banana pudding.
The exact quantities for these delightful ingredients are readily available in the recipe card section of this guide, ensuring your measurements are perfect for a flawless outcome.
Variations
Elevate your Banana Pudding Ice Cream experience by exploring a world of delicious variations. This recipe is a fantastic starting point, but with a few simple additions, you can transform it into something truly unique and tailored to your personal taste preferences.
Fruity Fiesta: For a refreshing and vibrant twist, consider folding in fresh berries like strawberries, raspberries, or blueberries. Their natural tartness and bright flavors offer a beautiful counterpoint to the sweetness of the banana and vanilla, and the visual appeal they add is simply stunning, making each scoop a colorful delight.
Chocolate Lover’s Dream: Indulge your sweet tooth by adding a generous swirl of rich chocolate sauce or hot fudge. You can also mix in chocolate chips or chunks of your favorite chocolate bar for an extra layer of decadent flavor and satisfying texture that pairs wonderfully with banana.
Nutty Crunch Explosion: For those who love a bit of texture and depth, incorporate finely chopped nuts such as pecans, walnuts, or even almonds. Toasting the nuts lightly beforehand can further enhance their flavor, adding a sophisticated nutty dimension to the creamy banana base.
Dairy-Free Delight: Easily adapt this recipe for a dairy-free diet by substituting the heavy whipping cream with full-fat canned coconut cream (chill the can and scoop out the thick cream) and using your preferred plant-based milk, such as almond or oat milk. This variation still delivers incredible creaminess with a subtle tropical hint.
Spiced Elegance: Introduce warmth and complexity by adding a pinch of cinnamon, nutmeg, or even a touch of cardamom to the base mixture before freezing. These spices complement the banana beautifully, adding a cozy, comforting aroma and flavor that is particularly delightful during cooler months or any time you crave a hint of warmth.
Caramel Swirl Sensation: Create a luscious caramel ripple by gently swirling thick caramel sauce into the ice cream mixture just before it goes into the freezer. This creates pockets of pure caramel bliss within the creamy banana base, making each bite a delightful surprise.
How to Prepare Banana Pudding Ice Cream
Step 1: Blend the Bananas
Begin by selecting your ripe bananas; the browner, the better, as they offer superior sweetness and a smoother puree. Peel the bananas and break them into chunks. Place these banana chunks into a high-powered blender or food processor. The goal here is to achieve an utterly smooth, lump-free consistency, akin to a thick purée or applesauce.
This step is foundational, as the pureed banana forms the very heart of your no-churn ice cream, contributing to both flavor and texture. Take your time to ensure there are no stringy bits or unblended pieces remaining. A well-blended banana base will result in a creamier, more homogenous ice cream that truly embodies the essence of banana pudding.
Step 2: Combine the Creamy Elements
Once your bananas are perfectly pureed, it’s time to introduce the other core components of the ice cream base. In a large mixing bowl, add the banana purée you’ve just prepared. Next, carefully measure and add the instant vanilla pudding mix, the heavy whipping cream, and the whole milk to the bowl.
Now, grab a whisk and begin combining these ingredients. Whisk vigorously and consistently for about 1 to 2 minutes, ensuring that everything is thoroughly integrated. You are looking for a smooth, cohesive mixture that has thickened slightly due to the pudding mix activating. There should be no pockets of dry pudding mix or separate layers of cream and milk.
The resulting mixture should be uniform in color and consistency, resembling a thick, luscious custard. This amalgamation is the key to achieving the signature creamy texture of your Banana Pudding Ice Cream without the need for churning. Ensure that every ingredient is fully incorporated for optimal flavor distribution throughout the final frozen dessert.
Step 3: Fold in the Crunchy Wafers
With the creamy base perfectly blended, it’s time to introduce the iconic texture that defines banana pudding. Take your Nilla wafers and gently crush them. You can do this by placing them in a zip-top bag and gently rolling over them with a rolling pin, or by pulsing them a few times in a food processor, aiming for a coarse crumb rather than a fine powder.
Now, add these crushed Nilla wafers to your creamy banana-pudding mixture in the bowl. Using a spatula or a large spoon, gently fold the wafers into the base. The key here is to fold, not stir vigorously, as you want to distribute the wafer pieces evenly without breaking them down too much. This folding action preserves their satisfying crunch within the ice cream.
The goal is to have visible pieces of wafer throughout the mixture, ensuring that each spoonful of ice cream delivers that delightful textural contrast. Don’t overmix; a few gentle folds will suffice to ensure the wafers are dispersed. This step is crucial for recreating the beloved texture of classic banana pudding in a frozen format.
Step 4: Prepare for Freezing
Carefully pour the entire mixture, now containing the integrated crushed Nilla wafers, into a freezer-safe container. A loaf pan, a plastic or metal airtight container, or even a disposable aluminum baking pan will work perfectly for this purpose. Ensure the container has a lid or that you have plastic wrap to cover it securely.
Once the mixture is in the container, take your spatula and gently smooth out the top surface. This creates an even layer, which will promote more uniform freezing and make scooping easier later on. If you desire an extra layer of wafer crunch on top, this is the opportune moment to sprinkle a few more crushed Nilla wafers over the smoothed surface of the ice cream mixture.
This visual appeal adds an extra touch of charm and promises an even more delightful textural experience. Ensuring the surface is level before freezing is a small step that significantly contributes to the overall presentation and ease of serving your homemade Banana Pudding Ice Cream.
Step 5: Freeze to Perfection
Place the sealed container of your Banana Pudding Ice Cream mixture into the freezer. Allow it to freeze undisturbed for a minimum of 4 hours. This initial freezing period is crucial for the ice cream to firm up to a scoopable consistency. For the absolute best results and a perfectly firm texture, it’s often recommended to let it freeze overnight.
After the initial freezing time has passed, you might find the ice cream is quite firm. To achieve the most pleasant scooping experience and that signature creamy texture, remove the container from the freezer and let it sit at room temperature for approximately 5 to 10 minutes. This brief tempering period softens the ice cream just enough to be easily scooped, preventing hard, icy chunks and allowing the flavors to meld.
Be mindful not to let it sit out for too long, as it can become too soft. The perfect moment is when it yields slightly to the pressure of a scoop, indicating it’s ready to be served and enjoyed. This simple step ensures your homemade ice cream has the ideal consistency every time.
Step 6: Optional Garnishes and Serving
Before you dive into your delicious creation, consider adding a few optional garnishes to enhance both the appearance and the flavor. Freshly sliced ripe bananas add a vibrant pop of color and an extra burst of banana goodness that perfectly complements the ice cream base.
A drizzle of warm caramel sauce offers a decadent, indulgent touch, adding another layer of sweetness and a beautiful visual swirl. For those who enjoy a classic pairing, a dollop of freshly whipped cream provides a light, airy contrast to the rich ice cream. These thoughtful additions can transform your homemade ice cream into a restaurant-quality dessert.
Serve your Banana Pudding Ice Cream in chilled bowls or cones, ensuring you have captured a good mix of the creamy base and the crunchy wafer pieces. Each scoop promises a delightful journey through nostalgic flavors and satisfying textures, making it a truly memorable treat for any occasion.
Pro Tips for Banana Pudding Ice Cream
Choose Ripe Bananas: For the absolute best flavor and natural sweetness, select bananas that are heavily spotted with brown. These are at their peak ripeness, meaning they will blend into a smoother purée and contribute a more intense, delicious banana essence to your ice cream.
Instant Pudding is Key: It’s essential to use instant vanilla pudding mix for this recipe. Avoid the cook-and-serve varieties, as their altered starch content can create a gummy or overly thick texture that compromises the desired smooth consistency of your no-churn ice cream. The instant version is specifically formulated to thicken quickly without heat.
Prevent Freezer Burn: To maintain the optimal freshness and texture of your Banana Pudding Ice Cream, press a layer of plastic wrap directly onto the surface of the ice cream before sealing the container tightly with its lid. This creates an airtight barrier that significantly reduces the risk of ice crystals forming and developing freezer burn over time.
The Art of Softening: If your ice cream freezes particularly hard, don’t despair! Allow the container to sit at room temperature for about 5 to 10 minutes before attempting to scoop. This short tempering period softens the ice cream just enough to achieve that wonderfully creamy, scoopable consistency without melting it excessively.
Embrace Customization: This recipe is a fantastic base for your culinary creativity. Feel free to experiment with additional mix-ins, such as fresh berries for a fruity twist, chocolate chips for extra indulgence, or even a swirl of caramel sauce for added richness. Don’t be afraid to make it your own!
Serving Suggestions for Banana Pudding Ice Cream
Decoration
To elevate the visual appeal of your Banana Pudding Ice Cream, consider a few decorative touches. Freshly sliced ripe bananas, arranged artfully on top, offer a natural and appealing garnish that highlights the main flavor. A delicate drizzle of caramel sauce or melted chocolate adds a touch of elegance and extra richness, creating attractive swirls that beckon diners.
A light dusting of crushed Nilla wafers provides a textural contrast and a visual nod to the classic dessert. For a final flourish, a dollop of freshly whipped cream, perhaps lightly sweetened and crowned with a fresh mint leaf or a maraschino cherry, adds a classic, inviting finish that makes the dessert look complete and utterly irresistible.
Side Dishes
While Banana Pudding Ice Cream is a star in its own right, it pairs wonderfully with several complementary side dishes. Light and crisp sugar cookies or shortbread offer a delicate crunch that contrasts beautifully with the ice cream’s creamy texture without overpowering its flavor. Fresh fruit salads, especially those featuring berries or other complementary fruits, provide a refreshing counterpoint and add a vibrant, healthy element to the dessert spread.
For a more decadent pairing, consider serving it alongside warm, gooey brownies or a slice of homemade pound cake. The warmth of the cake or brownie against the cold ice cream creates a delightful temperature play, and their rich flavors harmonize perfectly with the banana and vanilla notes. An iced coffee or a sweet, creamy latte can also serve as a wonderful beverage pairing, turning the dessert into a complete treat experience.
Creative Serving Ideas
Move beyond the standard scoop and explore more creative ways to serve your Banana Pudding Ice Cream. Consider layering the ice cream with extra crushed Nilla wafers and sliced bananas in individual parfait glasses for a visually stunning dessert that showcases the different components. This layered approach also allows guests to enjoy distinct textures in each bite.
Another innovative idea is to use the ice cream as a filling for mini cream puffs or churros, creating delightful handheld desserts. You can also create “ice cream sandwiches” by using soft, chewy cookies as the outer layers, pressing the ice cream firmly between them. For a truly show-stopping presentation, serve a generous scoop atop a warm slice of banana bread or a delicate crepe drizzled with caramel.
Preparation & Storage
Storing Leftovers
If you happen to have any Banana Pudding Ice Cream leftover, proper storage is key to maintaining its delicious quality. Ensure that the container is airtight to prevent air from reaching the ice cream, which can lead to freezer burn and affect its texture and flavor over time. A good quality plastic container with a tight-fitting lid is ideal.
For the best texture and taste, it is generally recommended to consume leftover ice cream within one to two weeks of its initial preparation. While it will remain frozen for longer, the creamy consistency can degrade, and the flavors might become less vibrant the longer it is stored. Always check for signs of freezer burn, such as ice crystals or an off smell, before enjoying.
Freezing
To freeze your Banana Pudding Ice Cream, use a sturdy, airtight container. Before sealing the container, press a layer of plastic wrap directly onto the surface of the ice cream. This acts as a barrier, minimizing contact with air and significantly reducing the formation of ice crystals, thereby preserving the creamy texture.
Make sure the container is completely sealed once the plastic wrap is in place. This is particularly important for longer-term storage. Properly frozen, the ice cream can retain its best quality for up to two weeks. For extended freezing beyond this period, while still possible, the texture might begin to change, becoming harder or icier.
Reheating
When it comes time to enjoy your frozen Banana Pudding Ice Cream, you might find it has become quite firm, especially after prolonged freezing. The best approach is not to “reheat” it in the traditional sense, but rather to temper it. Remove the container from the freezer and let it sit on the counter at room temperature for about 5 to 10 minutes.
This brief resting period allows the ice cream to soften slightly, reaching that perfect, creamy, scoopable consistency without becoming liquid. Avoid letting it sit out for too long, as it can become too soft and lose its appealing texture. The goal is to reach a state where it yields easily to a scoop, revealing its smooth, luscious interior.
Frequently Asked Questions
-
What kind of bananas should I use for the best flavor?
Absolutely! For the sweetest and most flavorful Banana Pudding Ice Cream, look for bananas that have lots of brown spots. They’re at their ripest, which means they’ll provide the best natural sweetness and creamy texture for your ice cream. These speckled beauties are packed with sugars that are ready to be transformed into a delicious frozen dessert.
-
How long can I store Banana Pudding Ice Cream in the freezer?
You can keep your delicious Banana Pudding Ice Cream in an airtight container in the freezer for up to 2 weeks. To maintain its freshness and avoid freezer burn, be sure to press plastic wrap directly onto the surface of the ice cream before sealing it with a lid. This double protection ensures optimal quality.
-
Can I freeze this ice cream for longer than 2 weeks?
While it is best enjoyed within 2 weeks, you can freeze Banana Pudding Ice Cream for longer, up to 3 months. However, you’ll want to ensure it’s in an airtight container and well-wrapped to prevent freezer burn, as that can affect texture and flavor quality. Proper sealing is paramount for extended storage.
-
What should I do if my ice cream is too hard to scoop?
Very! If your Banana Pudding Ice Cream is too hard, simply let it sit at room temperature for about 10 minutes before scooping. This softens it just enough to achieve that perfect creamy texture without losing any of its delightful flavor. Patience is key to enjoying its true texture.
-
Can I modify the recipe for dietary restrictions?
Certainly! If you’re looking for a dairy-free option, you can substitute heavy whipping cream with coconut cream and use plant-based milk instead of regular milk. Just remember, the natural sweetness from fully ripe bananas will remain an essential ingredient no matter the variations—so stick with those brown-speckled beauties!
-
Is it safe for pets or people with allergies?
If there are pet considerations, please keep in mind that dogs should avoid ice creams with ingredients like chocolate or excess sugar. For allergies, this recipe contains dairy and may not be suitable for lactose-intolerant individuals. Always check ingredient labels for potential allergenic components, especially when making substitutes!