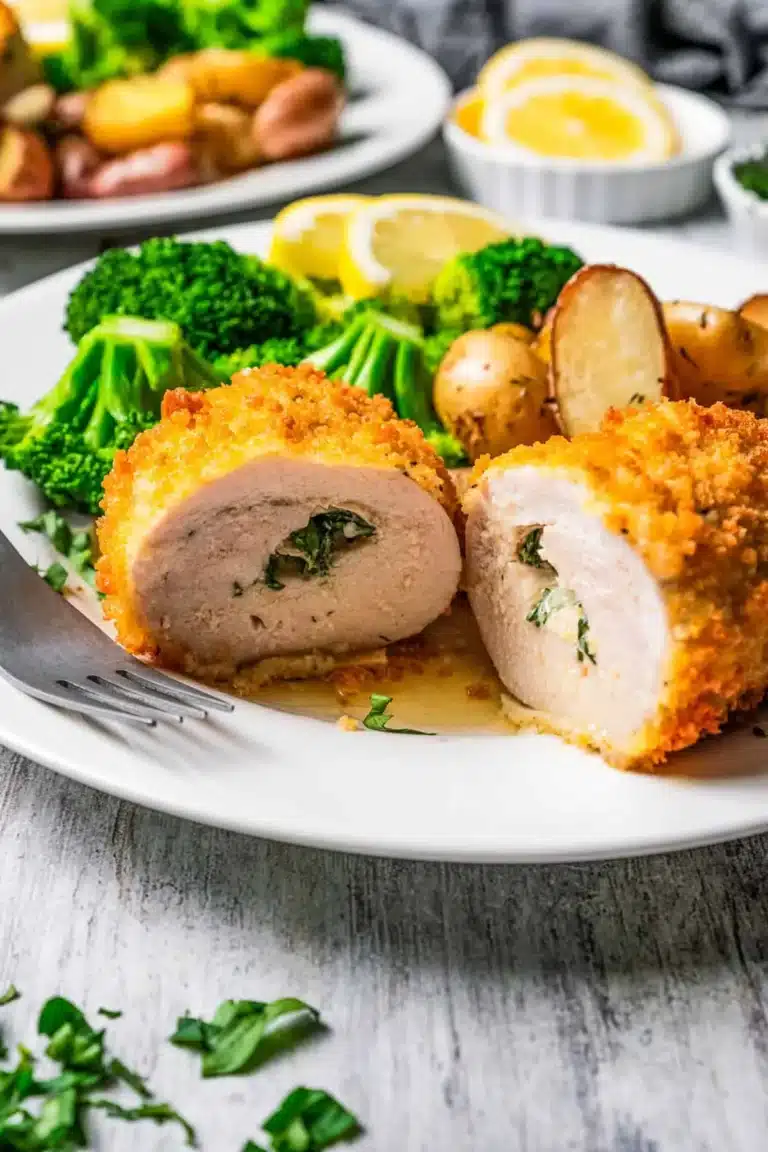
Chicken Kiev – Easy and Classic Stuffed Chicken Recipe!

Chicken Kiev is a culinary masterpiece that marries a perfectly crispy exterior with a molten, herbaceous, and garlicky butter filling. This classic dish, revered for its rich flavors and satisfying textures, offers a delightful dining experience. It’s a dish that promises comfort and elegance on a plate, making it a perfect choice for both weeknight indulgence and special celebrations.
The allure of Chicken Kiev lies in its seemingly simple yet expertly executed combination of ingredients and techniques. Each bite delivers a symphony of tastes and sensations, from the initial satisfying crunch of the golden breading to the succulent, tender chicken that yields to reveal a burst of aromatic, buttery goodness. This recipe elevates a humble chicken breast into something truly spectacular, a testament to the power of well-crafted comfort food.
Why You Will Love This Recipe
- Crispy Perfection: The double breading and initial frying create an incredibly satisfying crunchy exterior that remains delightful even after baking.
- Juicy Interior: The garlic and herb butter encased within the chicken melts as it cooks, infusing every fiber with moisture and exquisite flavor.
- Flavor Explosion: A harmonious blend of garlic, fresh parsley, and a hint of lemon zest creates a vibrant and aromatic butter that complements the chicken beautifully.
- Elegant Yet Easy: While it looks and tastes sophisticated, the preparation steps are straightforward, making it an approachable dish for home cooks.
- Versatile Delight: Chicken Kiev is perfect for a romantic dinner for two, a family gathering, or impressing guests with a touch of classic culinary flair.
Ingredients You Need
Crafting an exceptional Chicken Kiev begins with selecting the finest ingredients, each playing a crucial role in the final masterpiece. Using fresh, high-quality components ensures that the natural flavors of the chicken and the aromatic butter filling truly shine through, creating a dish that is both comforting and sophisticated. Paying attention to the details, such as using softened butter for easy mixing and panko breadcrumbs for ultimate crispiness, will elevate your culinary creation.
Chicken Kiev

Chicken Kiev is crispy crumbed chicken stuffed with lemony garlic and herb butter. It’s crunchy outside, juicy inside, and so delicious! This chicken recipe is a classic dish with loads of flavor, and it’s super simple to make.
- 6 tablespoons unsalted butter, softened
- 2 cloves garlic, minced
- 2 tablespoons chopped fresh parsley
- 4 chicken breast fillets, about 6 ounces each
- 1 cup all purpose flour
- salt and freshly ground black pepper, to taste
- 2 large eggs, beaten
- 2 cups panko breadcrumbs
- 1Combine the butter ingredients: Add softened butter, garlic, and parsley in a bowl. Stir well until combined. If you are using lemon zest, now is the time to add it.
- 2Chill: Place the butter on a piece of plastic wrap. Roll it into a log shape and twist the ends of the plastic wrap. Refrigerate the butter until firm.
- 3Pound the chicken: Place chicken breasts between two pieces of plastic wrap (one at a time) and pound with a meat mallet to ¼-inch thickness. Season the chicken to taste with salt and pepper.
- 4Roll the chicken: Cut the butter into four equal pieces. Place one piece of butter in the center of the pounded chicken. Fold the sides of the chicken breasts over the butter and roll from the narrower side until you have a log shape. Repeat with the remaining butter and chicken breasts.
- 5Wrap the prepared chicken with plastic wrap and freeze for 30 minutes.
- 6In the meantime, prepare the breading station. Add flour in a shallow wide bowl, with a pinch of salt and pepper. Stir to combine. Whisk the eggs with a pinch of salt and pepper in a separate bowl and add the panko breadcrumbs into the third bowl.
- 7Coat the chicken: Carefully remove plastic wrap from the chicken. Coat the chicken with flour, then eggs, shaking off the excess eggs. Finally, coat the chicken with panko breadcrumbs.
- 8Fry the chicken: Heat oil in a deep fryer to 375°F. Meanwhile, preheat the oven to 350°F. Fry the chicken for 1-2 minutes per side or until golden.
- 9Bake the chicken: Place a wire rack on top of the baking sheet. Add the fried chicken breasts to the wire rack and bake for 15 to 20 minutes or until the inner temperature reaches 165°F.
- 10Allow the chicken to rest for 5 minutes before serving and cutting.
Keywords: chicken kiev, stuffed chicken, crispy chicken, garlic herb butter, german dinner
The quantities for these essential components are readily available in the detailed recipe card, guiding you to achieve the perfect balance of flavors and textures for your Chicken Kiev.
Variations
While the classic Chicken Kiev is undeniably exquisite, its adaptability allows for creative twists that cater to diverse palates and dietary preferences. Experimenting with different flavor profiles for the compound butter can lead to exciting new taste sensations, transforming the traditional dish into something uniquely your own.
For a vibrant and zesty rendition, consider incorporating finely grated lime zest along with the lemon zest, and perhaps a pinch of red pepper flakes into the butter. This addition offers a subtle tropical note and a whisper of heat that beautifully contrasts with the richness of the chicken and butter. This variation would pair wonderfully with a baked lemon chicken for a citrus-forward meal experience.
A delightful vegan alternative can be achieved by using thick-cut cauliflower steaks or large portobello mushrooms as the base, stuffed with a savory plant-based butter. The vegan butter can be crafted from cashews or macadamia nuts, blended with garlic, herbs, nutritional yeast for a cheesy undertone, and a touch of lemon juice. Ensure the cauliflower or mushrooms are pre-roasted slightly to achieve a tender texture before breading and frying, similar to how one might prepare a hearty easy lobster bisque for a rich starter.
Low-carb enthusiasts can enjoy a guilt-free version by omitting the flour dredging and substituting traditional breadcrumbs with finely ground almond flour or pork rind crumbs. This modification significantly reduces the carbohydrate count while maintaining the delightful crunch. This approach allows for the rich, buttery filling to be the star without the carb load, making it a perfect main course alongside a fresh, crisp salad. This adaptation can be a delightful accompaniment to a light lunch or a satisfying dinner.
How to Prepare Chicken Kiev recipe
Step 1: Crafting the Aromatic Herb Butter
The heart and soul of Chicken Kiev lies in its luscious herb butter filling. This stage is where you infuse a base of softened butter with a medley of vibrant flavors, setting the stage for the deliciousness to come. The key here is to ensure the butter is at the perfect consistency – soft enough to be thoroughly mixed but not so melted that it becomes soupy.
In a small bowl, combine the softened unsalted butter with finely minced garlic cloves and freshly chopped parsley. If you’re opting for the optional, yet highly recommended, touch of brightness, now is the time to incorporate the finely grated lemon zest. These ingredients should be mixed diligently until they are completely homogenous, creating a beautifully speckled, fragrant mixture. A spatula works well for this, but for an even more intense flavor infusion and smoother texture, consider using a mortar and pestle to grind the garlic and herbs into the butter.
Once the herb butter mixture is perfectly combined, it’s time to shape it for easy insertion into the chicken. Spoon the butter onto a piece of plastic wrap or parchment paper. Then, carefully shape it into a compact log, approximately 1-1.5 inches in diameter. Twist the ends of the plastic wrap tightly, much like you would a candy wrapper, to seal the butter securely within. This log shape will make it incredibly simple to cut into even portions for each chicken breast later on.
Place the wrapped butter log into the refrigerator and allow it to chill until it is completely firm. This chilling process is absolutely critical. A well-chilled butter log will hold its shape when placed inside the chicken, significantly reducing the likelihood of it leaking out during the cooking process. This step might seem minor, but it’s a crucial element for a successful and mess-free Chicken Kiev. Patience during this chilling phase is a virtue that will be richly rewarded.
Step 2: Preparing the Chicken for Stuffing
The chicken breast, the canvas for our flavorful butter, needs to be prepared to receive its rich filling. This involves carefully pounding the chicken to an even thickness, creating a larger surface area that is easier to wrap around the butter and roll tightly. This step is vital for ensuring that the chicken cooks evenly and that the butter is well-enclosed, promising a juicy and flavorful outcome.
Begin by placing one chicken breast fillet between two sheets of plastic wrap or inside a resealable plastic bag. Using the flat side of a meat mallet or a rolling pin, gently but firmly pound the chicken breast. The goal is to achieve an even thickness of approximately ¼ inch across the entire fillet. It is important to work from the center outwards, ensuring that you don’t tear the delicate meat. This process not only tenderizes the chicken but also makes it more pliable for rolling.
Once the chicken has been pounded to the desired thickness, season both sides generously with salt and freshly ground black pepper. This initial seasoning is crucial as it provides a foundational layer of flavor that will permeate the chicken as it cooks. The salt will help to draw out some moisture, which aids in the browning process, while the pepper adds a subtle warmth. Do not be shy with the seasoning; it is essential for a well-balanced dish.
After seasoning, carefully remove the plastic wrap. You should have a thin, pliable piece of chicken ready to embrace its buttery core. Ensure that the surface is relatively smooth, free from any large tears, as this will make the rolling process much cleaner and more effective. The visual of these thin, seasoned chicken cutlets is a promising sign of the deliciousness that is soon to unfold.
Step 3: Filling and Rolling the Chicken
With the chicken butter chilled and the chicken breasts perfectly pounded, it’s time to bring these two elements together. This is arguably the most delicate and crucial step in creating the iconic Chicken Kiev, as it requires precision to ensure the buttery filling stays securely within the chicken during cooking.
Retrieve the firm butter log from the refrigerator and carefully cut it into four equal portions. The chilled state of the butter is paramount here; it should be solid enough to handle without melting significantly. Place one portion of the herb butter in the center of each pounded chicken breast fillet. Position the butter slightly off-center, towards the narrower end of the fillet, to facilitate a tighter roll.
Begin the rolling process by folding the sides of the chicken breast inwards, over the butter. Then, starting from the narrower end, carefully roll the chicken up tightly, enclosing the butter completely. Think of it like rolling a small, savory burrito. The aim is to create a compact, uniform log shape without any gaps or seams where the butter could escape. Ensure that the edges are tucked in neatly to create a sealed parcel.
Once each chicken breast has been filled and rolled, wrap it securely in plastic wrap. Again, twist the ends tightly to maintain the log shape and to ensure that the butter remains encased. This extra layer of security is vital for preventing any leakage during the initial frying and subsequent baking stages. Place these individually wrapped chicken rolls into the freezer for at least 30 minutes. This freezing period is essential as it further firms up the chicken and the butter, making the breading process much easier and more effective.
Step 4: Preparing the Breading Station
A perfectly golden and crispy exterior is a hallmark of exceptional Chicken Kiev, and achieving this requires a well-prepared breading station. This setup involves three distinct stages, each designed to ensure the panko breadcrumbs adhere beautifully to the chicken, creating that irresistible crunchy coating.
Set up three shallow, wide bowls or plates. In the first bowl, add the all-purpose flour. Season it generously with salt and freshly ground black pepper. Stir these ingredients together to ensure the seasoning is evenly distributed throughout the flour. This seasoned flour will act as the first dry coating, providing a surface for the egg wash to adhere to.
In the second bowl, whisk the two large eggs with a pinch of salt and pepper. The egg wash serves as the adhesive layer, binding the flour coating to the panko breadcrumbs. Ensure the eggs are thoroughly beaten so that there are no streaks of white, creating a smooth, uniform coating for the chicken. A fork or a whisk works perfectly for this task.
Fill the third bowl with the panko breadcrumbs. Panko breadcrumbs are highly recommended for their larger, airier texture, which results in an exceptionally crispy coating. If panko is unavailable, traditional fine breadcrumbs can be used, but the texture will be slightly different. Ensure you have ample breadcrumbs to coat each piece of chicken thoroughly.
Having these three bowls set up in sequence – flour, then egg wash, then breadcrumbs – allows for an efficient and systematic breading process. This organization is key to achieving an even and complete coating on each piece of chicken. The freezing step for the rolled chicken will now pay off, as the firm chicken will be much easier to handle and coat without the filling becoming compromised.
Step 5: Breading and Frying the Chicken
The breading process transforms the plain, rolled chicken into a vessel for crispy perfection, setting the stage for the final cooking stages. This methodical coating ensures that every surface is covered, leading to a uniformly golden and satisfying crunch. The cold chicken from its freezer rest is ideal for this step, as it helps the coating adhere better.
Carefully remove the frozen chicken rolls from their plastic wrap. Begin by dredging each chicken roll in the seasoned flour, ensuring it is evenly coated on all sides. Gently shake off any excess flour. This first layer of flour creates a dry surface that the egg wash can grip effectively.
Next, dip the flour-coated chicken into the beaten egg wash. Ensure that the chicken is completely submerged in the egg, allowing it to absorb the moisture. Let any excess egg drip off before proceeding to the final coating stage. This wet layer is crucial for the breadcrumbs to stick properly.
Finally, place the egg-washed chicken into the bowl of panko breadcrumbs. Press the breadcrumbs gently onto the chicken, ensuring that all surfaces are thoroughly covered. You can even slightly pat the breadcrumbs onto the chicken to encourage adherence. The goal is a thick, even layer of panko that will crisp up beautifully during cooking.
Once all the chicken rolls are breaded, it’s time for the initial frying. Heat a generous amount of oil in a deep fryer or a large, heavy-bottomed pot or Dutch oven to 375°F (190°C). Carefully lower the breaded chicken rolls into the hot oil, ensuring not to overcrowd the pot; fry in batches if necessary. Fry for 1-2 minutes per side, just until the exterior is golden brown and crisp. This partial fry is key to achieving that signature crunch and helps to seal the filling inside before baking.
Step 6: Baking to Golden Perfection
The final cooking stage for your Chicken Kiev involves baking, which ensures the chicken is cooked through to a safe internal temperature while the exterior achieves a beautiful golden hue and even crispier texture. This step is crucial for melding the flavors and ensuring the dish is perfectly cooked.
Preheat your oven to 350°F (175°C). While the oven is heating, prepare a baking sheet by placing a wire rack on top of it. This elevated rack allows air to circulate around the chicken, promoting even crisping and preventing the bottom from becoming soggy. The oil and crumbs that might drip from the chicken will be caught by the baking sheet below.
Carefully transfer the lightly fried chicken Kiev rolls from the fryer to the prepared wire rack on the baking sheet. Arrange them so that they have a little space between each one, allowing for optimal air circulation and even cooking. Ensure that the seam where you rolled the chicken is facing downwards if possible, as this can help prevent any potential butter leakage during baking.
Bake the Chicken Kiev in the preheated oven for 15 to 20 minutes, or until the internal temperature of the chicken reaches 165°F (74°C) when measured with an instant-read thermometer inserted into the thickest part of the chicken, avoiding the butter filling. The baking time will vary slightly depending on the thickness of your chicken breasts and your oven. A perfectly baked Chicken Kiev will be golden brown, incredibly juicy, and the butter filling will be molten and fragrant.
Once the chicken has reached the desired internal temperature and is beautifully golden, remove it from the oven. Allow the Chicken Kiev to rest on the wire rack for at least 5 minutes before serving. This resting period is essential, as it allows the juices within the chicken to redistribute, ensuring maximum tenderness and moisture. It also gives the molten butter a moment to settle slightly, making it easier to slice and serve without excessive spillage.
Pro Tips for Chicken Kiev recipe
Chill is Key: Always ensure your herb butter is thoroughly chilled and firm before attempting to fill and roll the chicken. A hard butter log is less likely to leak during cooking. This simple step makes a significant difference in the final presentation and success of the dish.
Double Dip for Extra Crunch: For an even more robust and crispy coating, consider a double breading. After the initial flour-egg-breadcrumb coating, dip the chicken back into the egg wash and then into the breadcrumbs again. This creates a thicker, more substantial crust that holds up beautifully.
Don’t Skip the Freeze: Freezing the rolled and breaded chicken for at least 30 minutes is crucial. This helps to set the shape, firm up the butter, and ensure the breading adheres perfectly. A cold chicken makes for easier handling and a superior final texture.
Use a Thermometer: While visual cues are helpful, an instant-read meat thermometer is your best friend for ensuring chicken is cooked to a safe and delicious 165°F (74°C). Overcooked chicken is dry, so precise temperature monitoring is vital.
Rest is Best: Just like with any good piece of meat, letting the Chicken Kiev rest for 5-10 minutes after baking allows the juices to settle back into the meat, resulting in a more tender and moist final product. This short pause ensures every bite is as delicious as the first.
Serving Suggestions for Chicken Kiev recipe
Decoration
Garnish your beautifully golden Chicken Kiev with a sprig of fresh parsley or chives for a pop of color and added aroma. A delicate sprinkle of finely chopped chives or a few tiny edible flowers can elevate the presentation, making it look as elegant as it tastes. A light dusting of paprika or a drizzle of a light herb sauce can also add visual appeal and a hint of extra flavor.
Side Dishes
Chicken Kiev pairs wonderfully with a variety of classic side dishes. Creamy mashed potatoes are a traditional and comforting choice, perfect for soaking up any delicious butter that might escape. Roasted asparagus, steamed broccoli, or a crisp green salad provide a fresh, balanced contrast to the richness of the chicken. For a heartier meal, consider crispy roasted potatoes or a flavorful pilaf.
Creative Serving Ideas
Present Chicken Kiev as a centerpiece for a special occasion, perhaps alongside a delicate easy berry tart for dessert. For a more casual gathering, you could slice the chicken into thick medallions and serve them over a bed of creamy risotto or with a side of garlic bread. Consider serving it with a light, refreshing drink like a crisp white wine or a sparkling lemonade to cut through the richness.
Preparation & Storage
Storing Leftovers
Leftover Chicken Kiev can be stored in an airtight container in the refrigerator for up to 3 days. Ensure the chicken has cooled completely before packing it away. While the crispy coating may soften slightly upon refrigeration, the flavor and juiciness of the chicken remain remarkably well-preserved.
Freezing
To freeze cooked Chicken Kiev, allow the chicken to cool completely. Wrap each piece individually and tightly in plastic wrap, then place them in a freezer-safe bag or container. Frozen Chicken Kiev can be stored for up to 2-3 months. For best results, thaw overnight in the refrigerator before reheating.
Reheating
The best method for reheating Chicken Kiev to restore its crispiness is in the oven. Place the chilled or thawed chicken on a wire rack set over a baking sheet and bake at 400°F (200°C) for about 10-15 minutes, or until heated through. This method helps to re-crisp the breading, bringing it back to its former glory.
Frequently Asked Questions
-
How long do you cook chicken Kiev for?
The cooking time for Chicken Kiev can vary depending on whether it is fried before baking, the thickness of the chicken, and your oven. However, if you follow the method of lightly frying the chicken for 1-2 minutes per side to achieve a golden exterior, it typically requires an additional 15-20 minutes of baking in a preheated oven at 350°F (175°C). The most reliable indicator of doneness is an internal temperature of 165°F (74°C), which should be checked with an instant-read thermometer inserted into the thickest part of the chicken, ensuring it reaches this safe temperature to be fully cooked through and tender.
-
How do I keep the butter from leaking out?
Preventing butter leakage is a common concern when preparing Chicken Kiev, but several techniques can significantly help. The most effective method is to ensure the herb butter is very firmly chilled before stuffing it into the pounded chicken. Furthermore, rolling the chicken tightly and securely, then freezing the formed chicken rolls for at least 30 minutes before breading and cooking, helps to solidify the butter and chicken, creating a tighter seal. Properly sealing the edges of the chicken as you roll it is also critical. Some chefs suggest baking the chicken on a layer of bread, which can absorb any escaping butter, creating garlic bread as a bonus side dish.
-
Why is it called chicken Kiev?
Chicken Kiev, or its Ukrainian spelling “Kyiv,” is named after the capital city of Ukraine, Kyiv. The origin story suggests that the dish was refined or popularized by a chef from Kyiv, making the city the namesake of this culinary creation. While its exact origins are debated, with some culinary historians tracing its lineage to French culinary traditions, the name “Chicken Kiev” became globally recognized, firmly linking it to its Ukrainian namesake. It’s a testament to how a dish can travel and become associated with a specific place through its development and popularization.