The Ultimate Santa's Trash Cookie Bars

The festive season often sparks a delightful atmosphere of creativity in the kitchen. Have you ever found yourself searching for that one recipe that encapsulates the joy of Christmas? Enter Santa’s Trash Cookie Bars – a treat that brings together an exciting mix of textures and flavors.
These cookie bars are not only visually appealing but also a delicious twist on traditional cookies, offering an irresistible crunch that children and adults alike will adore. They are a perfect way to infuse your celebrations with a sense of playful indulgence and unique culinary exploration.
Why You Will Love This Recipe
- Unexpected Flavors: The delightful marriage of sweet and salty components creates a truly exciting sensory experience that sets these bars apart from ordinary baked goods.
- Family-Friendly Fun: Children genuinely enjoy participating in the process, from crushing the snacks to adding their personalized favorite mix-ins, making it a bonding activity.
- Incredibly Versatile: These bars are remarkably adaptable; you can easily tailor them to suit your specific snack preferences or dietary requirements, ensuring everyone can enjoy them.
- Effortless Preparation: With straightforward and simple steps, you can have these delicious cookie bars ready in a surprisingly short amount of time, perfect for last-minute baking.
- Ideal for Gatherings: They are guaranteed crowd-pleasers, performing exceptionally well at holiday events, parties, and any occasion where a delightful treat is welcomed.
- Joyful Presentation: The vibrant colors contributed by M&Ms and sprinkles make these bars not just a treat for the taste buds but also a feast for the eyes, adding a festive cheer to any table.
Ingredients You Need
The foundation of Santa’s Trash Cookie Bars lies in its accessible and straightforward ingredient list. Each component plays a vital role in creating the signature texture and flavor profile that makes these bars so beloved. Using quality ingredients, especially fresh butter and good chocolate, will elevate the final product even further. Don’t hesitate to experiment with your favorite brands and types of snacks to truly personalize this recipe.
Santa’s Trash Cookie Bars
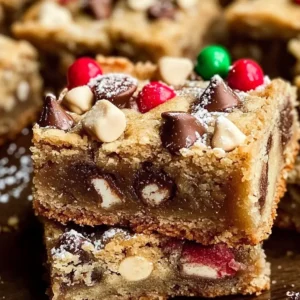
Indulge in the festive spirit with Santa's Trash Cookie Bars, a delightful and easy-to-make treat that combines a unique mix of sweet and salty flavors. These bars are perfect for holiday gatherings, cookie exchanges, or simply as a fun, creative dessert for the whole family. Featuring an exciting blend of crushed potato chips, pretzels, chocolate chips, and M&Ms, each bite offers an irresistible crunch and a burst of holiday cheer. Simple to prepare and wonderfully versatile, these bars are sure to become a new holiday favorite.
- 1 tablespoon cornstarch
- 1 teaspoon baking soda
- 1 teaspoon salt
- 1 cup unsalted butter, softened
- 1 teaspoon vanilla extract
- 2 large eggs
- 2 tablespoons Christmas sprinkles
- 1Gather all ingredients and ensure butter is softened. Preheat oven to 350°F (175°C). Line a 9-inch x 13-inch cake pan with parchment paper or foil.
- 2In a medium bowl, whisk together flour, cornstarch, baking soda, and salt.
- 3In a large bowl, cream together softened butter, granulated sugar, brown sugar, and vanilla extract until light and fluffy.
- 4Add eggs one at a time, mixing well after each addition.
- 5Gradually add the dry ingredients to the wet ingredients, mixing until just combined. Do not overmix.
- 6Gently fold in the crushed potato chips, pretzels, chocolate chips, M&Ms, and most of the sprinkles.
- 7Spread the dough evenly into the prepared pan.
- 8Top with additional M&Ms, chocolate chips, crushed chips, pretzels, and remaining sprinkles for a festive look.
- 9Bake for 22-25 minutes, or until the edges are golden brown and the center is slightly soft.
- 10Let cool in the pan for at least 1 hour before lifting out and slicing into squares.
Keywords: cookie bars, Easy Recipe, Festive Dessert, holiday treats, Santa’s Trash Cookie Bars, sweet and salty, Christmas baking
- flour: the base structure of the cookie bars, providing substance.
- cornstarch: helps to achieve the perfect tender texture, preventing them from becoming too dense.
- baking soda: acts as a leavening agent, helping the bars to rise slightly.
- salt: enhances all the other flavors and balances the sweetness.
- unsalted butter, softened: provides richness and helps in creaming with sugar for a light texture.
- granulated sugar: contributes to sweetness and helps in browning.
- light brown sugar, packed: adds moisture and a subtle caramel note.
- vanilla extract: offers a classic warm flavor that complements all the other ingredients.
- large eggs: bind the ingredients together and contribute to the texture.
- potato chips, crushed: introduces a wonderfully unexpected salty crunch.
- pretzels, crushed: adds another layer of salty crunch and a familiar baked flavor.
- chocolate chips: provide pockets of melty chocolate goodness.
- Christmas M&Ms: bring vibrant color and a sweet candy shell crunch.
- Christmas sprinkles: add a final festive touch and visual appeal.
Detailed quantities for each ingredient can be found within the recipe card for precise measurements.
Variations
One delightful way to adapt these bars is by infusing them with a rich peanut butter flavor. Simply incorporate about half a cup of creamy or crunchy peanut butter into the wet ingredients during the creaming stage. This addition will lend a wonderful nutty depth that pairs exceptionally well with the chocolate chips and salty crunch of the pretzels and chips.
For a more festive and fruity twist, consider adding dried fruits to your mix. Raisins, dried cranberries, or even chopped dried apricots can introduce a chewy texture and a burst of concentrated sweetness. These additions are particularly fitting for the holiday season and complement the sweet and salty elements beautifully. Adjust the amount based on your preference for fruitiness.
An ultra-sweet and indulgent variation involves swapping the crushed potato chips and pretzels for crushed Oreo cookies. This substitution transforms the bars into a decadent chocolatey treat with the familiar crunch of the cookie and cream filling. You might want to slightly reduce the amount of sugar in the base recipe if opting for this richer variation.
To cater to dietary needs, a gluten-free version is easily achievable. Simply substitute the all-purpose flour with a good quality gluten-free all-purpose flour blend that contains xanthan gum. Ensure that any additional mix-ins you choose, like chocolate chips or candies, are also certified gluten-free to maintain the integrity of the recipe for those with sensitivities.
Creating a dairy-free Santa’s Trash Cookie Bar is also quite straightforward. Replace the unsalted butter with a dairy-free butter substitute, such as a vegan butter stick or coconut oil. Opt for dairy-free chocolate chips and ensure any candies used are free from dairy ingredients. This makes the treat inclusive for those avoiding dairy products.
How to Prepare Santas Trash Cookie Bars
Step 1: Gather and Prepare Your Workspace
Before embarking on the delightful journey of creating Santa’s Trash Cookie Bars, it’s crucial to have all your ingredients measured and ready. This mise en place approach ensures a smooth and enjoyable baking process. Ensure your butter is at the perfect room temperature; it should be pliable but not melted, allowing it to cream effectively with the sugars.
Preheating your oven to 350 degrees Fahrenheit (175 degrees Celsius) is a fundamental step for achieving evenly baked bars. Simultaneously, prepare your 9-inch by 13-inch baking pan. Lining it with parchment paper or aluminum foil, leaving an overhang on the sides, will make lifting the baked bars out of the pan incredibly easy. This prevents sticking and simplifies cleanup considerably.
Step 2: Combine the Dry Ingredients
In a medium-sized mixing bowl, take the time to whisk together the flour, cornstarch, baking soda, and salt. Whisking these dry components thoroughly ensures that they are evenly distributed throughout the mixture. This prevents pockets of leavening agents or salt from affecting the texture or taste of the final bars.
This step is simple yet significant, as it prepares the base for your cookie dough. A well-combined dry mixture is key to the overall structure and rise of your cookie bars. Once whisked, you can set this bowl aside temporarily while you prepare the wet ingredients.
Step 3: Cream the Butter and Sugars
In a large mixing bowl, using an electric mixer or a stand mixer fitted with the paddle attachment, begin creaming the softened unsalted butter. Add the granulated sugar and the packed light brown sugar to the butter. Cream these ingredients together on medium speed until the mixture becomes light, fluffy, and pale in color.
This creaming process is vital for incorporating air into the dough. The air bubbles created at this stage will contribute to a lighter, more tender texture in your finished cookie bars. Don’t rush this step; continue mixing until the texture is visibly improved and airy.
Step 4: Incorporate Vanilla and Eggs
Once the butter and sugar mixture is perfectly creamed, add the teaspoon of vanilla extract. Mix it in briefly until just combined. Vanilla extract not only adds a wonderful aroma but also enhances the overall flavor profile of the cookie bars, rounding out the sweetness and saltiness.
Next, incorporate the two large eggs, one at a time. Beat the mixture for about 10 to 15 seconds after adding each egg, just enough to fully incorporate it before adding the next. This gradual addition ensures that the eggs emulsify properly into the batter, contributing to a cohesive dough without overmixing.
Step 5: Gradually Add Dry to Wet Ingredients
With the mixer on low speed, gradually add the whisked dry ingredients from Step 2 to the wet ingredients in the large bowl. Mix only until the flour streaks have just disappeared. It is very important not to overmix the dough at this stage.
Overmixing can develop the gluten in the flour too much, resulting in tough and dense cookie bars. The goal is a just-combined dough that still looks tender and slightly soft. Stop mixing as soon as the last dry ingredients are incorporated. The dough should hold together but not be overly stiff.
Step 6: Gently Fold in the Mix-Ins
Now comes the fun part of incorporating all the delicious crunchy and sweet elements. Using a sturdy spatula or a wooden spoon, gently fold in the crushed potato chips, crushed pretzels, chocolate chips, and most of the Christmas M&Ms. Reserve a small portion of these for topping later.
Be careful not to crush the M&Ms or chocolate chips too much as you fold them in. The aim is to distribute these elements evenly throughout the cookie dough. This step adds the signature texture and flavor bursts that make Santa’s Trash Cookie Bars so unique and delightful. Ensure each ingredient is somewhat evenly spread.
Step 7: Spread the Dough Evenly in the Pan
Transfer the cookie dough mixture into the prepared 9-inch by 13-inch baking pan. Using your spatula or the back of a spoon, carefully spread the dough evenly across the bottom of the pan. Ensure that the dough reaches all the corners and edges to create a uniform layer.
A consistent thickness is crucial for even baking. If some areas are thicker than others, they may not bake through properly while the thinner areas become overcooked. Gently press the dough down slightly to create a compact and even surface for the next step.
Step 8: Decorate the Top for a Festive Look
Before the bars go into the oven, it’s time to make them visually stunning. Sprinkle the reserved M&Ms, chocolate chips, crushed chips, pretzels, and the remaining Christmas sprinkles evenly over the top of the dough. This topping not only enhances the visual appeal but also ensures a delightful crunch and burst of flavor in every bite.
Press these toppings down very gently into the dough so they adhere during baking and don’t fall off. This final decorative touch is what truly earns these bars their festive name and makes them a showstopper at any holiday gathering. The colorful arrangement promises a treat that is as fun to look at as it is to eat.
Step 9: Bake to Golden Perfection
Place the prepared pan into the preheated oven at 350 degrees Fahrenheit (175 degrees Celsius). Bake for approximately 22 to 25 minutes. You’ll know they are ready when the edges are golden brown and the center looks slightly soft and just set.
Avoid overbaking, as this can lead to dry and hard bars. The center will continue to set as the bars cool. The enticing aroma filling your kitchen is a sure sign that deliciousness is almost ready. Keep a close eye on them during the last few minutes of baking to prevent them from browning too much.
Step 10: Cool and Slice for Serving
Once baked, remove the pan from the oven and place it on a wire rack to cool. Allow the cookie bars to cool completely in the pan for at least 1 hour. This cooling period is essential for them to firm up properly. Attempting to slice them while warm will likely result in a crumbly mess and bars that fall apart.
After sufficient cooling, use the parchment paper or foil overhang to carefully lift the entire slab of cookie bars out of the pan. Place it on a cutting board and, using a sharp knife, slice into your desired square or rectangular portions. This patient cooling and careful slicing ensures neat, attractive servings ready to be enjoyed.
Pro Tips for Santas Trash Cookie Bars
Don’t Overmix the Dough: This is a cardinal rule for tender baked goods. Overmixing develops the gluten in the flour, leading to tough, dense cookie bars. Mix the dry and wet ingredients only until they are just combined, and fold in your mix-ins gently.
Use Room Temperature Ingredients: Ensure your butter and eggs are at room temperature. Softened butter creams better with sugar, incorporating more air, while room temperature eggs emulsify more easily into the batter, creating a smoother, more cohesive dough.
Monitor Baking Time Closely: Ovens can vary, so keep an eye on your cookie bars during the last few minutes of baking. They should be golden brown around the edges but still appear slightly soft in the center, as they will continue to cook as they cool.
Cool Completely Before Slicing: Patience is key! Allowing the bars to cool for at least an hour in the pan before attempting to slice them ensures they firm up sufficiently. This prevents them from crumbling and results in clean, neat cuts.
Experiment with Mix-Ins: Embrace the “trash” aspect and get creative! Beyond chips and pretzels, consider adding nuts like peanuts or pecans, different types of candies, dried fruit, or even cereal for unique textural and flavor combinations. This is where the recipe truly becomes your own.
Serving Suggestions for Santas Trash Cookie Bars
Decoration
The presentation of Santa’s Trash Cookie Bars can be elevated with simple yet impactful decorative touches. Adding an extra sprinkle of colorful Christmas sprinkles over the top just before baking provides a festive sparkle. You can also strategically place a few extra M&Ms and chocolate chips on top to make them visually enticing.
For a more elaborate holiday theme, consider drizzling melted white chocolate or dark chocolate over the cooled bars. You could also add edible glitter or small, festive candy pieces that complement the existing mix-ins. These little additions make the bars look professionally made and perfectly suited for any holiday spread.
Side Dishes
While Santa’s Trash Cookie Bars are a complete treat on their own, they pair wonderfully with simple beverages. A tall, cold glass of milk is a classic accompaniment that cuts through the sweetness and richness. Hot cocoa or a warm mug of apple cider also makes for a comforting pairing, especially during colder months.
For those who enjoy a decadent dessert experience, serving a bar alongside a scoop of premium vanilla bean ice cream is highly recommended. The contrast between the warm cookie bar and cold ice cream is divine. A dollop of freshly whipped cream, perhaps lightly sweetened and infused with a hint of vanilla or cinnamon, also adds an extra layer of indulgence.
Creative Serving Ideas
Arrange the sliced cookie bars on a festive platter, perhaps adorned with a sprig of rosemary or some faux snow, to create a centerpiece for your holiday dessert table. You can also cut them into smaller, bite-sized squares and arrange them in mini cupcake liners for easy grab-and-go enjoyment at parties. This also makes them perfect for cookie exchange events.
Consider gifting these bars to friends, family, or colleagues. Package them in decorative tins or cellophane bags tied with a festive ribbon. They also make a wonderful addition to a holiday bake sale, offering a unique and delicious option that stands out from more traditional baked goods. Their playful nature is sure to bring smiles.
Preparation & Storage
Storing Leftovers
To keep your Santa’s Trash Cookie Bars fresh and delicious for as long as possible, proper storage is essential. Store any leftover bars in an airtight container at room temperature. Ensure the container is well-sealed to prevent the bars from drying out or absorbing unwanted odors from the kitchen environment.
They will typically maintain their optimal texture and flavor for up to 5 to 7 days when stored correctly. It’s best to avoid exposing them to direct sunlight or extreme heat, which can affect their quality. If your kitchen tends to be warm, refrigerating them might be a better option for longer freshness.
Freezing
Santa’s Trash Cookie Bars freeze remarkably well, making them an excellent make-ahead treat. Once the bars have cooled completely, you can freeze them whole or pre-sliced. Wrap them tightly first in plastic wrap, ensuring no air can get to them, and then in a layer of aluminum foil or place them in a freezer-safe airtight container.
Properly wrapped, they can retain their quality in the freezer for up to 2 to 3 months. This makes them perfect for preparing well in advance of the holiday season or for having a convenient stash of homemade treats ready at a moment’s notice.
Reheating
When you’re ready to enjoy your frozen or stored cookie bars, reheating is simple. If the bars are frozen, the best method is to allow them to thaw overnight in the refrigerator. Once thawed, you can enjoy them at room temperature, or for a warm, gooey experience, gently reheat individual portions.
To reheat, place a cookie bar on a microwave-safe plate and microwave on low power for 10-15 second intervals. Be careful not to overheat, as this can make them tough. A few seconds is usually enough to bring back that fresh-baked warmth and soften any chocolate chips.
Frequently Asked Questions
-
Can I prepare Santa’s Trash Cookie Bars ahead of time, and how should I store them?
Absolutely! These bars are fantastic for making ahead. You can prepare them a day or two in advance and store them in a single layer in an airtight container at room temperature. Placing parchment paper between layers if stacking them can prevent sticking. For optimal freshness and texture, avoid stacking too many layers if possible. They should remain delightfully soft and chewy for several days when stored properly.
-
What are the best substitutions if I don’t have certain ingredients, particularly for dietary needs?
The beauty of Santa’s Trash Cookie Bars is their adaptability. If you’re out of regular flour, a gluten-free all-purpose blend works well as a direct substitute. For a dairy-free version, swap butter with vegan butter or coconut oil and use dairy-free chocolate chips and candies. If you’re looking to reduce sugar slightly, you can substitute some of the granulated sugar with honey or maple syrup, though this might slightly alter the texture. Ensure any substitutions maintain the intended sweet and salty balance.
-
How can I make these bars more festive, and are they suitable for children to help make?
To enhance their festivity, always use seasonal sprinkles and candies like Christmas M&Ms. You can also add edible glitter or decorative drizzles of white chocolate after baking. These bars are exceptionally family-friendly and perfect for involving children in the baking process. Kids love helping to crush the potato chips and pretzels, as well as pressing the toppings into the dough. It’s a fun, hands-on activity that creates delicious memories and even better treats.