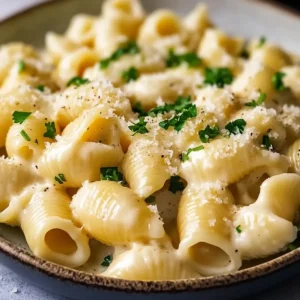
Creamy Garlic Chicken Shells: An Irresistible Comfort Dish

The aroma of warm garlic and creamy sauce wafting from the kitchen is a signal of comfort and deliciousness. It’s a scent that promises a satisfying meal, one that can be whipped up with surprising ease, even on the busiest of weeknights. This Creamy Garlic Chicken Shells recipe is precisely that kind of culinary magic, designed to bring joy and flavor to your table without demanding hours of your precious time.
Imagine tender mini shells, each one a perfect vessel for a velvety garlic Parmesan sauce, creating a dish that’s both elegant and incredibly approachable. It’s a recipe that has earned its place as a go-to for countless home cooks, celebrated for its simplicity and its deeply satisfying taste. This dish is not just a meal; it’s an experience, a warm hug in a bowl that the whole family will adore.
Why You Will Love This Recipe
- Effortless Preparation: This dish comes together in a flash, making it an ideal choice for weeknight dinners when time is of the essence. The minimal steps ensure you spend less time cooking and more time enjoying.
- Rich, Creamy Flavor: The luscious sauce, infused with garlic and Parmesan, is undeniably decadent and comforting, creating a flavor profile that’s both classic and utterly irresistible. It’s the kind of sauce that has you reaching for more.
- Versatile and Customizable: Easily adapt this recipe to your preferences by adding cooked chicken, shrimp, or a variety of vegetables, making it a truly personal culinary creation. This flexibility means you can serve it time and again with exciting new twists.
- Diet-Friendly Options: The recipe is easily made gluten-free by selecting appropriate pasta, ensuring everyone at the table can partake in this delightful meal. This thoughtful adaptation makes it a universally loved dish.
- Family-Approved Comfort: Designed to please, these creamy garlic shells offer a hearty and wholesome dining experience that appeals to all ages, becoming a cherished favorite. It’s the kind of meal that creates lasting memories around the dinner table.
Ingredients You Need
The success of any dish hinges on the quality of its ingredients, and for Creamy Garlic Chicken Shells, selecting fresh, vibrant components will elevate the final taste. Opting for good quality butter, fragrant fresh garlic, and finely grated Parmesan cheese will make a noticeable difference in the richness and depth of the sauce. The choice of pasta, while flexible, should be something that can hold onto that delightful sauce, ensuring every bite is packed with flavor.
Creamy Garlic Chicken Shells
A quick and comforting dish featuring tender mini shells coated in a rich garlic Parmesan sauce. This recipe is customizable and can easily be made gluten-free or vegetarian.
- 8 ounces Mini Shell Pasta (gluten-free pasta can be used for a gluten-free recipe)
- 2 tablespoons Butter (provides a rich base)
- 3 cloves Garlic (minced or pressed) (use fresh garlic for best results)
- 2 tablespoons Gluten-Free Flour (or All-Purpose Flour) (helps thicken the sauce)
- 1 cup Chicken Broth (substitute with vegetable broth for vegetarian option)
- 1 cup Milk (any kind or non-dairy milk as alternative)
- 1 teaspoon Dried Parsley Flakes (fresh parsley elevates the dish)
- 1 teaspoon Garlic Powder (adjust based on preference)
- Salt (essential for flavor enhancement) to taste
- Pepper (personalize to suit your taste) to taste
- 1 cup Parmesan Cheese (freshly grated) (nutritional yeast is a dairy-free substitute)
- 1Bring a large pot of salted water to a rolling boil. Add the mini shell pasta and cook according to package instructions until al dente, about 8-10 minutes. Drain and set aside.
- 2In a large skillet, melt the butter over medium heat. Add minced garlic and sauté for about 1 minute until fragrant and slightly golden.
- 3Sprinkle gluten-free flour over the sautéed garlic, whisk continuously for about 1-2 minutes to form a roux.
- 4Gradually whisk in chicken broth and milk, stirring constantly. Cook for about 3-5 minutes until it thickens and simmers.
- 5Stir in dried parsley, garlic powder, salt, and pepper. Mix in Parmesan cheese until melted.
- 6Add the cooked mini shell pasta to the creamy sauce, gently tossing to coat. Let absorb sauce for about 1-2 minutes.
- 7Serve immediately, garnishing with extra Parmesan cheese and herbs if desired.
Keywords: creamy pasta, garlic sauce, parmesan, shells, weeknight dinner, comfort food, gluten-free option
For the Pasta:
- mini shell pasta: a small, bite-sized pasta shape that perfectly cradles the creamy sauce; a gluten-free variety can be substituted to meet dietary needs.
- For the Sauce:
- butter: forms the luscious base of the sauce, contributing richness and a smooth texture.
- garlic (minced or pressed): the star ingredient, providing a pungent, aromatic depth that defines the dish; using fresh garlic is highly recommended for the best flavor.
- gluten-free flour (or all-purpose flour): acts as a thickener, ensuring the sauce achieves its signature creamy consistency.
- chicken broth: adds a savory foundation to the sauce, lending it a comforting depth of flavor; vegetable broth can be used for a vegetarian adaptation.
- milk (any kind): the key to achieving that velvety smooth texture, making the sauce rich and decadent; non-dairy alternatives are excellent choices for a dairy-free version.
- dried parsley flakes: adds a touch of color and a subtle herbal note, enhancing the visual appeal and flavor complexity.
- garlic powder: further amplifies the garlic presence, allowing for a more intense and customizable garlicky punch.
- salt and pepper: essential seasonings that balance and enhance all the other flavors in the dish.
- Parmesan cheese (freshly grated): brings a nutty, salty, and umami-rich element that is crucial for the sauce’s character; nutritional yeast is a great vegan alternative.
These are the foundational elements that will transform your kitchen into a haven of delicious aromas and comforting tastes, culminating in a dish that’s as delightful to make as it is to devour. Quantities for each ingredient can be found in the detailed recipe card.
Variations
To make this dish even more personal and exciting, consider these creative twists that cater to different tastes and dietary preferences, ensuring every meal is a new adventure.
Vegan Delight: For a completely plant-based option, swap the butter for olive oil or vegan butter. Use unsweetened non-dairy milk, like almond or soy, and replace the Parmesan cheese with nutritional yeast. This will impart a cheesy, umami flavor without any dairy.
Low-Carb Adaptation: To reduce carbohydrates, opt for a spiralized vegetable like zucchini noodles or spaghetti squash instead of traditional pasta. The creamy garlic sauce will coat these lighter alternatives beautifully, offering a refreshing take on the classic dish.
Spicy Kick: If you enjoy a bit of heat, add a pinch of red pepper flakes while sautéing the garlic. You can also stir in a dash of your favorite hot sauce at the end for a customizable level of spice that complements the rich creaminess.
Herbaceous Infusion: Elevate the sauce by adding fresh herbs like basil, chives, or thyme along with the parsley. The fresh herbs will bring a burst of vibrant flavor and aroma, making each bite even more exquisite.
Citrus Brightness: A squeeze of fresh lemon juice added just before serving can cut through the richness of the sauce, adding a delightful brightness and tang. This subtle addition can make the dish feel lighter and more complex.
These variations allow you to tailor the Creamy Garlic Chicken Shells to your exact liking, transforming a beloved classic into a personalized masterpiece. You can explore even more exciting dishes by visiting our dinner section.
How to Prepare Creamy Garlic Chicken Shells
Step 1: Cook the Pasta
Begin by bringing a generous pot of salted water to a vigorous, rolling boil. This ensures the pasta cooks evenly and quickly. Add your chosen mini shell pasta to the boiling water, stirring gently to prevent any sticking.
Cook the pasta according to the package directions, aiming for that perfect al dente texture, which typically takes around 8 to 10 minutes. Once cooked to perfection, drain the pasta thoroughly in a colander, reserving a small amount of the starchy pasta water if you wish to help emulsify the sauce later. Set the drained pasta aside while you focus on creating the luscious sauce.
The Importance of Al Dente: Cooking pasta to al dente is crucial as it will continue to cook slightly when combined with the sauce. Overcooked pasta can become mushy, detracting from the dish’s appealing texture. The slight firmness ensures a satisfying chew in every mouthful.
Step 2: Sauté the Garlic
In a large skillet or a deep sauté pan, melt the butter over medium heat. Allow the butter to melt completely and start to shimmer slightly, indicating it’s ready for the next step. Do not let it brown at this stage.
Add the minced or pressed fresh garlic to the melted butter. Sauté the garlic for about 60 seconds, stirring continuously. You want the garlic to become fragrant and just slightly golden, releasing its aromatic oils into the butter. Be careful not to burn the garlic, as this will impart a bitter taste to your sauce.
Aromatic Foundation: This step is vital for building the flavor profile of your Creamy Garlic Chicken Shells. The gentle sautéing unlocks the complex notes of the garlic, creating an irresistible aroma that fills your kitchen and promises a delicious meal.
Step 3: Create the Roux
Sprinkle the gluten-free flour (or all-purpose flour) evenly over the sautéed garlic and butter mixture. Immediately begin whisking the flour into the fat to create a smooth paste. This combination of flour and fat is known as a roux, which will act as the thickening agent for your sauce.
Continue to cook and whisk the roux for approximately 1 to 2 minutes. You’re looking for the raw flour taste to cook out, and the roux to take on a very light golden hue. Proper cooking of the roux prevents a floury taste in the finished sauce and ensures a silky texture. This is a foundational technique in creating smooth, stable sauces.
The Magic of the Roux: A well-made roux is the secret to a perfectly textured creamy sauce. It coats the back of a spoon beautifully and holds its consistency without separating, providing a luxurious base for the garlic and Parmesan flavors to shine through.
Step 4: Add the Liquid
Gradually pour in the chicken broth and milk, whisking constantly as you add them to the roux. Start with a small amount of liquid, whisking until it’s fully incorporated into the roux before adding more. This gradual addition helps to prevent lumps from forming and ensures a silky-smooth sauce.
Continue to cook the mixture over medium heat, stirring frequently, for about 3 to 5 minutes. You’ll notice the sauce beginning to thicken as it heats up. Keep whisking until the sauce reaches a gentle simmer and coats the back of a spoon with a luscious, even layer. The consistency should be smooth and creamy, not too thin and not too thick at this stage.
Achieving Creaminess: The combination of broth and milk, along with the emulsifying properties of the roux, creates the signature creamy texture. Stirring is key here to ensure all ingredients meld together perfectly, forming a cohesive and delightful sauce base.
Step 5: Season and Stir in Cheese
Once your sauce has achieved the desired consistency, it’s time to season it to perfection. Stir in the dried parsley flakes, garlic powder, salt, and freshly ground black pepper. Taste the sauce and adjust the seasonings as needed; this is your opportunity to personalize the flavor profile to your exact liking.
Gradually add the freshly grated Parmesan cheese to the sauce, stirring continuously until it is completely melted and beautifully incorporated. The cheese will melt into the sauce, adding its distinctive nutty and salty flavor and contributing to the overall richness and creaminess. Ensure all the cheese is melted before proceeding to the next step for a uniform flavor distribution.
The Flavor Powerhouse: Parmesan cheese is a cornerstone of this dish, lending a depth of savory flavor that pairs exquisitely with the garlic. Adding it while the sauce is warm ensures it melts smoothly, creating a unified and decadent experience with every spoonful.
Step 6: Combine Pasta and Sauce
Gently add the cooked and drained mini shell pasta directly into the skillet with the creamy garlic sauce. Use a large spoon or tongs to carefully toss the pasta, ensuring that every single shell is thoroughly coated with the rich, velvety sauce. The goal is for the pasta to absorb some of the delicious sauce, creating a harmonious marriage of textures and flavors.
Allow the pasta and sauce to simmer together over low heat for about 1 to 2 minutes. This short period allows the flavors to meld together beautifully, with the pasta soaking up the garlicky goodness. Avoid overcooking at this stage; you want the shells to retain their shape and texture, complementing the creamy sauce.
A Perfect Marriage of Flavors: By combining the pasta and sauce, you create a unified dish where each component enhances the other. The shells act as perfect little cups for the sauce, ensuring a burst of creamy, garlicky flavor with every bite. This final fusion is what makes the dish so incredibly satisfying.
Step 7: Serve the Dish
Your Creamy Garlic Chicken Shells are now ready to be served piping hot, filling your home with an irresistible aroma. Ladle generous portions into individual bowls, making sure each serving gets a good amount of pasta and plenty of that delectable sauce. The visual appeal of the creamy shells is sure to whet everyone’s appetite.
For an extra touch of elegance and flavor, garnish each bowl with a sprinkle of additional freshly grated Parmesan cheese and a scattering of fresh parsley or chives. This final flourish not only enhances the taste but also adds a vibrant splash of color, making the dish look as good as it tastes. Serve immediately and watch it disappear.
The Grand Finale: Serving this dish immediately ensures that the sauce is at its creamiest and the pasta is perfectly textured. It’s the culmination of your culinary efforts, ready to be enjoyed by your delighted guests or family.
Pro Tips for Creamy Garlic Chicken Shells
Fresh Garlic is Key: While pre-minced garlic can be a time-saver, using fresh garlic cloves that you mince yourself will unlock a far more robust and vibrant flavor profile for your sauce. The difference is truly remarkable.
Master the Roux: Be patient when cooking your roux. Whisk it continuously over medium-low heat until it reaches a light golden color and smells slightly nutty. This ensures it thickens effectively without any raw flour taste or unpleasant lumps.
Adjust Consistency with Care: If your sauce is too thick, thin it out by gradually adding more chicken broth or milk, whisking until you reach your desired consistency. Conversely, if it’s too thin, you can make a small slurry of flour and water or milk and whisk it into the simmering sauce to thicken it further.
Boost with Protein and Veggies: For a more complete meal, consider adding cooked chicken, sautéed shrimp, or a medley of your favorite vegetables like broccoli florets, spinach, or sun-dried tomatoes to the sauce. These additions not only add flavor and texture but also boost the nutritional content.
Leftover Management: Store any leftover Creamy Garlic Chicken Shells in an airtight container in the refrigerator for up to two days. When reheating, add a splash of milk or broth to loosen the sauce and restore its creamy texture.
Serving Suggestions for Creamy Garlic Chicken Shells
Decoration
A sprinkle of freshly chopped parsley or chives offers a bright green contrast to the creamy sauce, adding visual appeal and a hint of fresh flavor. A final dusting of finely grated Parmesan cheese can enhance the cheesy notes and provide an elegant finish. A few toasted pine nuts or slivered almonds can also add a delightful crunch and nutty undertone, elevating the presentation.
Side Dishes
Crisp, vibrant green salads, like a classic Caesar salad with its creamy dressing and crunchy croutons, provide a refreshing counterpoint to the richness of the pasta. Warm, crusty garlic bread is a perfect companion for soaking up any extra sauce, doubling down on the delicious garlicky flavors. Steamed or roasted asparagus spears or broccoli florets add a healthy, colorful, and texturally pleasing element to the meal, balancing the creamy pasta perfectly.
Creative Serving Ideas
For a more individual presentation, portion the Creamy Garlic Chicken Shells into individual oven-safe ramekins, top with a little extra cheese, and broil briefly until golden brown and bubbly. You can also incorporate the sauce and pasta into larger stuffed shells for a more substantial and impressive dish. Consider serving a dollop of pesto alongside the pasta for an extra layer of herbaceous flavor that complements the garlic beautifully.
Preparation & Storage
Storing Leftovers
Properly storing leftovers is key to maintaining the deliciousness of your Creamy Garlic Chicken Shells. Ensure the dish has cooled down to room temperature before transferring it into an airtight container. This helps prevent condensation, which can lead to a mushier texture upon reheating. Refrigerate the container promptly.
Leftovers will keep well in the refrigerator for up to 2 days. While the pasta may absorb more sauce and become softer over time, the flavors will continue to meld, making it still quite enjoyable. Always check for any signs of spoilage before consuming.
Freezing
Creamy Garlic Chicken Shells can be frozen to enjoy at a later date, though the texture of the pasta might change slightly upon thawing and reheating. It’s best to freeze the dish before it becomes overly saucy, or freeze the sauce and pasta separately if possible. Use freezer-safe containers or heavy-duty aluminum foil to prevent freezer burn.
For optimal results, allow the dish to cool completely before packaging it for the freezer. Portioning into individual servings can make reheating more convenient. Frozen Creamy Garlic Chicken Shells can be stored for up to 2 months.
Reheating
When ready to reheat your Creamy Garlic Chicken Shells, it’s best to do so gently to preserve the creamy texture of the sauce. For refrigerated leftovers, place the dish in a saucepan over low to medium heat. Stir frequently, and add a splash of milk, cream, or chicken broth if the sauce has become too thick.
If reheating from frozen, thaw the dish completely in the refrigerator overnight. Then, follow the stovetop reheating method as described for refrigerated leftovers. Avoid microwaving if possible, as it can sometimes lead to uneven heating and a less desirable texture for the pasta and sauce.
Frequently Asked Questions
-
What type of pasta is best for Creamy Garlic Chicken Shells?
While mini shell pasta is recommended for its ability to capture the sauce beautifully, you can absolutely use other small pasta shapes like ditalini, macaroni, or even orecchiette. The key is a shape that has nooks and crannies to hold onto the rich, creamy sauce. For those following a gluten-free diet, opt for your favorite gluten-free pasta variety; it will work just as wonderfully in this recipe.
-
How can I make the sauce thicker or thinner?
If your sauce is too thin, you can easily thicken it by creating a slurry with 1 tablespoon of gluten-free flour or cornstarch mixed with 2 tablespoons of cold water or milk. Whisk this slurry into the simmering sauce and cook for another minute or two until it thickens. If the sauce is too thick, simply thin it out by gradually adding more chicken broth or milk, a tablespoon at a time, until it reaches your desired consistency.
-
Can I add vegetables or protein to this dish?
Absolutely! This recipe is incredibly versatile and perfect for adding extra ingredients. Cooked chicken breast, sautéed shrimp, or even crumbled Italian sausage can be stirred in with the pasta and sauce for added protein. For vegetables, consider adding steamed broccoli florets, sautéed spinach, peas, bell peppers, or mushrooms during the last few minutes of cooking the sauce or when combining the pasta and sauce for a more complete meal.
-
What if I don’t have chicken broth?
If you’re out of chicken broth, vegetable broth is an excellent substitute and will still provide a savory base for your creamy garlic sauce. Water can also be used in a pinch, but it won’t offer the same depth of flavor. For a richer flavor, you could even use a little white wine mixed with water or broth, ensuring it simmers to cook off the alcohol.
-
How can I make this dish dairy-free?
To make this Creamy Garlic Chicken Shells dairy-free, substitute the butter with a good quality vegan butter or olive oil. Use unsweetened non-dairy milk such as almond, soy, or oat milk for the creamy component. Instead of Parmesan cheese, incorporate nutritional yeast for a cheesy, savory flavor. Ensure your gluten-free flour is also dairy-free if you’re opting for that route.