Easy Floating Island Dessert – Irresistibly Delicious Treat
There’s something undeniably enchanting about a dessert that looks like it’s been plucked straight from a fairytale.
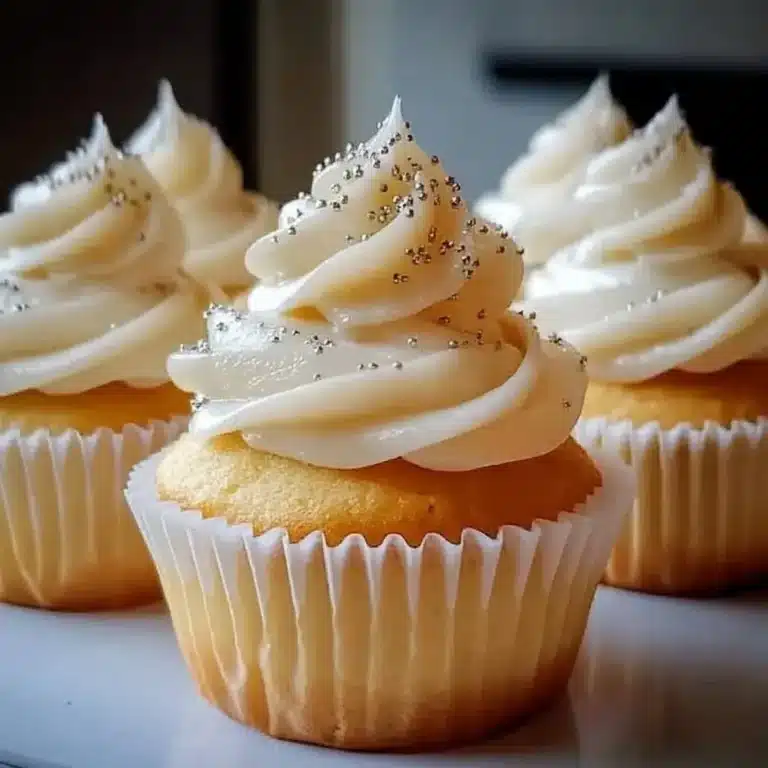
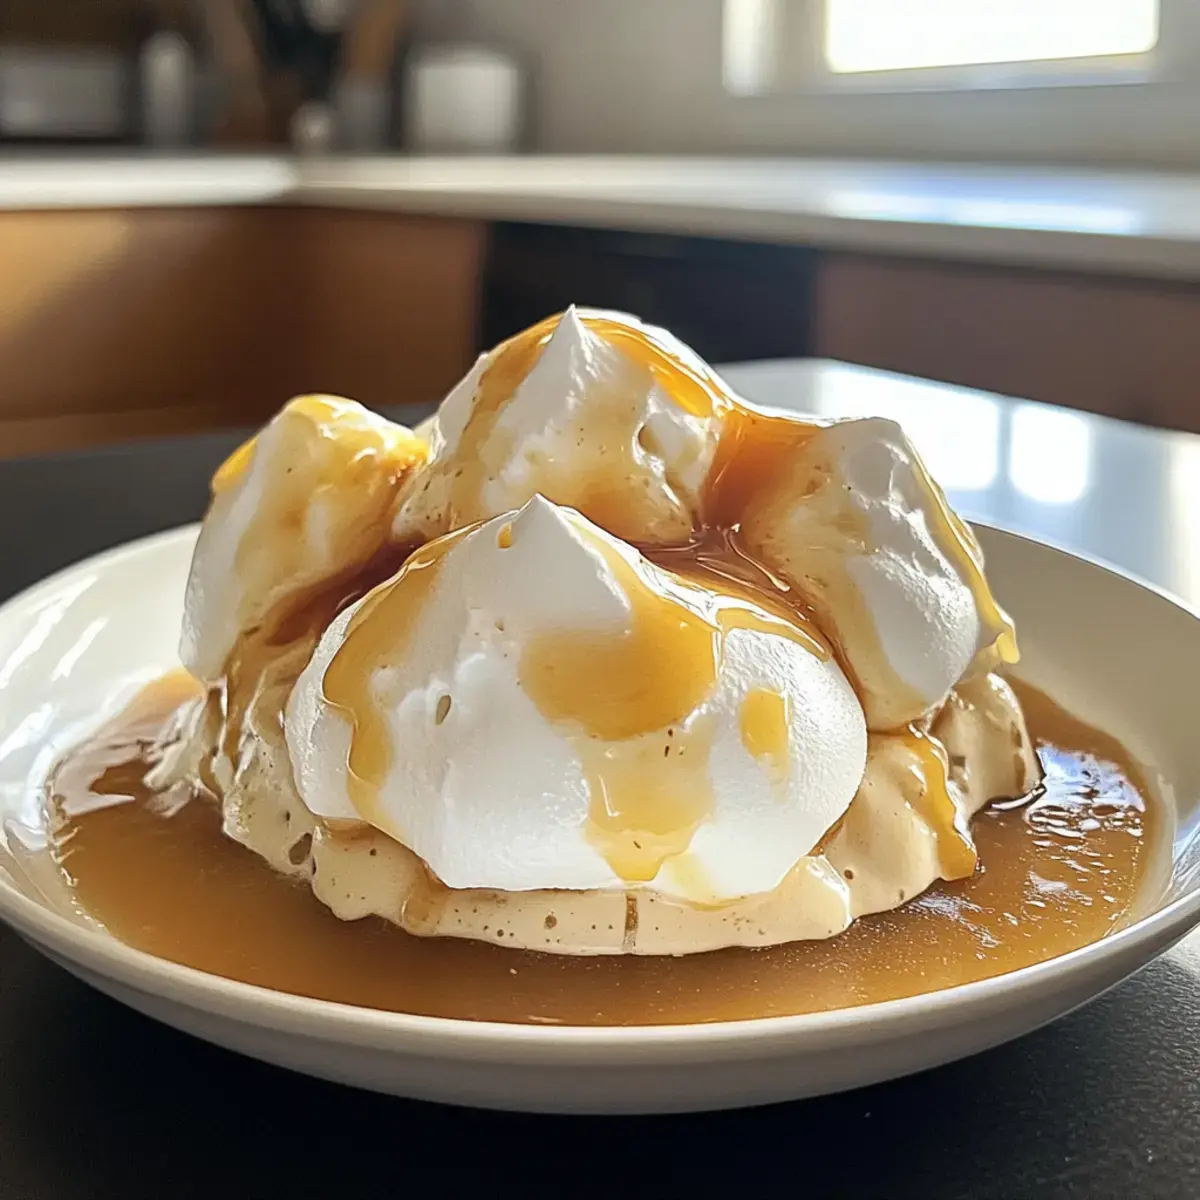
The Floating Island Dessert, known as Île Flottante, embodies that charm effortlessly. This classic French treat features fluffy poached meringues that seem to drift on a sea of silky vanilla custard, with a drizzle of caramel that adds the perfect touch of sweetness. It’s a stunning centerpiece that requires no baking, making it a breeze to impress.
Why You Will Love This Recipe
- Elegant Presentation: This dessert transforms any meal into a sophisticated dining experience, bringing a touch of French flair that guests will adore with its stunning visual appeal.
- Effortless Preparation: The no-bake method makes this ideal for home cooks seeking to save time without compromising on style or flavor.
- Versatile Flavors: Feel free to experiment with infusing your custard with citrus for a zesty twist, or swapping caramel for a vibrant berry coulis to suit any palate.
- Make-Ahead Friendly: Prepare meringues and custard in advance, reducing stress and allowing more time to enjoy your company.
- Crowd-Pleasing Treat: The exquisite balance of textures and flavors, from airy meringue to creamy custard and sweet caramel, guarantees it’s a hit at any gathering.
Ingredients You Need
Creating this exquisite Floating Island Dessert relies on carefully selected ingredients that come together to form its signature delicate textures and delightful flavors. Using high-quality components, especially for the eggs and dairy, will ensure the best possible outcome for both the ethereal meringues and the rich, velvety custard. Pay attention to the freshness of your vanilla extract; a good quality extract is key to that comforting, sweet aroma that defines this classic French confection.
Floating Island Dessert Magic

This classic French Floating Island Dessert, known as Île Flottante, features ethereal poached meringues that appear to float on a silky vanilla custard, finished with a decadent caramel drizzle. It's an elegant, no-bake dessert perfect for impressing guests with minimal fuss.
- For the Meringues:4 large Egg Whites (room temperature)1 cup White Sugar
- For the Custard:2 cups Whole Milk4 large Egg Yolks2 tablespoons Cornstarch1 pinch Salt1 tablespoon Vanilla Extract
- For the Caramel:1 cup White Sugar1/4 cup Water
- 1Prepare Meringues: Gently simmer a water bath. Beat egg whites until stiff peaks form. Gradually add sugar, mixing until glossy. Shape mounds on parchment paper and poach in simmering water for 8-10 minutes until firm but soft.
- 2Make Custard: Combine milk and cornstarch in a saucepan, whisking until smooth. Heat over medium heat, stirring until thickened (5-7 minutes). Remove from heat, whisk in egg yolks and vanilla extract. Let cool slightly.
- 3Prepare Caramel: Combine sugar and water in a clean saucepan. Heat over medium heat without stirring until a rich golden brown (7-10 minutes). Swirl pan gently for even cooking. Remove from heat and let cool for 1 minute.
- 4Assemble Dessert: Spoon cooled custard into serving dishes. Gently place a poached meringue on top of each. Drizzle with warm caramel just before serving.
Keywords: floating island, ile flottante, meringue, custard, caramel, French dessert, no bake, elegant dessert, classic dessert, vanilla
- egg whites: the foundation of light and airy meringues, room temperature is best for maximum volume.
- white sugar: provides sweetness to both the meringues and the caramel, crucial for structure and flavor.
- whole milk: forms the creamy base of the vanilla custard, contributing richness and smooth texture.
- egg yolks: these add immense richness, color, and a custardy consistency to the vanilla sauce.
- cornstarch: a helpful thickener for the custard, ensuring a smooth, non-runny consistency without a starchy taste.
- salt: a small pinch enhances all the other flavors, balancing the sweetness and adding depth.
- vanilla extract: the aromatic star that infuses the custard with its classic, comforting fragrance.
- water: essential for creating the liquid caramel sauce, it helps the sugar to dissolve evenly.
The precise quantities for each ingredient are detailed within the recipe card for your convenience.
Variations
This classic dessert lends itself beautifully to a multitude of creative interpretations, allowing you to tailor it to specific dietary needs or simply to explore new flavor profiles. Imagine a vibrant citrus twist, where the zest of lemons or oranges is subtly infused into the creamy custard, offering a refreshing counterpoint to the sweet meringue. This bright addition can elevate the dessert, making it particularly delightful during warmer months.
For those seeking a lighter or plant-based option, a dairy-free version is easily achievable. By substituting whole milk with creamy almond milk or rich coconut milk, you can create a luscious custard that retains its velvety texture. Ensure you choose unsweetened varieties to maintain control over the final sweetness of the dessert. This adaptation opens up the enjoyment of Floating Island Dessert to a wider audience.
Another exciting avenue for variation involves the topping. While caramel is traditional and delicious, consider a fruit coulis for a burst of freshness. A vibrant raspberry or strawberry coulis, made by gently simmering fresh or frozen berries with a touch of sugar, provides a beautiful visual contrast and a delightful tartness that cuts through the richness of the custard and meringue. This simple swap offers a completely new dimension to the familiar treat.
Embracing a low-carb approach is also possible with some thoughtful substitutions. Using sugar alternatives in both the meringue and the custard can significantly reduce the carbohydrate content. While achieving the exact texture of traditional meringue can be challenging with sugar substitutes, experimentation can yield delicious results. A sugar-free caramel sauce, made with a suitable sweetener, can complete this guilt-free indulgence, proving that dietary considerations don’t have to mean sacrificing dessert enjoyment.
Furthermore, for the adventurous palate, a hint of spice can add an unexpected layer of complexity. A tiny pinch of cinnamon or cardamom, stirred into the custard while it’s warming, can impart a subtle warmth and aromatic depth. This subtle infusion can transform the familiar comfort of Floating Island Dessert into something more exotic and intriguing, perfect for a cozy evening.
How to Prepare Floating Island Dessert
Step 1: Prepare the Ethereal Meringues
The journey to creating your spectacular Floating Island Dessert begins with the delicate art of crafting perfect meringues. This step requires attention to detail and a gentle touch, ensuring each meringue cloud is light, airy, and holds its shape beautifully.
Start by gathering your ingredients for the meringues: fresh egg whites at room temperature and granulated sugar. Room temperature egg whites whip up with more volume and stability than cold ones, which is critical for achieving that signature fluffy texture. Ensure your mixing bowl and whisk attachments are impeccably clean and completely free of any grease or fat; even a tiny residue can prevent the egg whites from emulsifying properly and reaching their full potential. This meticulous cleanliness is a cornerstone of successful meringue making.
In your clean, dry mixing bowl, begin whipping the egg whites on a medium speed with your electric mixer. You’re looking for them to start foaming up, becoming opaque and increasing in volume. As they begin to form soft peaks, gradually increase the mixer speed to high. Slowly, a tablespoon at a time, begin adding the granulated sugar. Continue to beat the mixture vigorously as you add the sugar. This gradual addition is key to allowing the sugar to fully dissolve into the egg whites, creating a glossy, stable meringue.
The meringue is ready when it is thick, glossy, and holds stiff peaks that stand straight up when you lift the whisk. When you rub a small amount of the meringue between your fingers, you should not feel any grittiness from undissolved sugar. This stage can take approximately 5-8 minutes of continuous beating, depending on your mixer’s power. The texture should be smooth, marshmallow-like, and lustrous, indicating that the sugar has emulsified properly, creating a stable structure that will hold up during poaching and serving.
Once your meringue is perfectly whipped, it’s time to shape it for poaching. Gently spoon or pipe mounds of the meringue mixture onto a baking sheet lined with parchment paper. Aim for a size that feels substantial but not overwhelming for individual servings. You can create elegant swirls or simple quenelle shapes, depending on your aesthetic preference. The parchment paper prevents sticking and makes it easier to transfer the poached meringues later.
To poach the meringues, prepare a large pot with enough water to generously cover the meringues without overcrowding the pot. Bring the water to a gentle simmer over medium-low heat. You want a steady, low simmer, not a rolling boil, as vigorous boiling can break apart the delicate meringue structure. Carefully slide the shaped meringues into the simmering water, ensuring they have enough space to float freely. Cook them for about 8 to 10 minutes, turning them gently halfway through with a slotted spoon to ensure even cooking. They should become firm to the touch but remain slightly soft in the center.
Using a slotted spoon, gently remove the poached meringues from the water and place them back onto the parchment-lined baking sheet to drain any excess water. Allow them to cool completely. The cooling process helps them firm up further. These delicate, cloud-like meringues are now ready to grace your luscious vanilla custard, providing that signature ethereal ‘floating island’ effect that makes this dessert so captivating and visually stunning.
Step 2: Craft the Silky Vanilla Custard
While the meringues are cooling, turn your attention to creating the rich, velvety vanilla custard that forms the serene sea for your meringue islands. This component is the heart of the dessert’s comforting embrace, providing a smooth, luxurious base that perfectly complements the airy sweetness of the meringue.
Begin by warming the milk in a medium saucepan over medium heat. You want the milk to be hot but not boiling; look for small bubbles forming around the edges of the pan. While the milk is heating, whisk together the egg yolks, cornstarch, and a pinch of salt in a separate bowl until the mixture is smooth and pale yellow. The cornstarch acts as a stabilizer, ensuring a perfectly thickened custard without any risk of curdling, and the salt is essential for enhancing the overall flavor profile by balancing the sweetness. Ensure the cornstarch is fully incorporated to avoid lumps.
Once the milk is adequately heated, it’s time for the crucial tempering process. Slowly ladle about half of the hot milk into the egg yolk mixture, whisking continuously and vigorously. This gradual addition of hot liquid gently raises the temperature of the egg yolks without scrambling them, a critical step in achieving a smooth, homogenous custard. Continue whisking until the mixture is well combined and appears slightly lighter in color.
Now, carefully pour the tempered egg yolk mixture back into the saucepan with the remaining hot milk. Place the saucepan back over medium-low heat. Whisk constantly, ensuring you reach all corners of the pan, especially the bottom, to prevent any sticking or burning. As the custard heats, it will gradually begin to thicken. This process typically takes about 5-7 minutes. You’ll notice the consistency change from thin and milky to a noticeably thicker, velvety sauce that coats the back of a spoon.
To test for doneness, dip a spoon into the custard and draw a line through it with your finger. If the line holds its shape and the custard doesn’t immediately run back together, it’s ready. The internal temperature should reach around 160-165°F (71-74°C). Overcooking can cause the custard to curdle, so it’s important to remove it from the heat as soon as it reaches the desired thickness. Stir in the vanilla extract during the last minute of cooking for the most potent flavor, or add it once it’s off the heat to preserve its aromatic qualities.
To ensure an ultra-smooth texture, strain the custard through a fine-mesh sieve into a clean bowl. This removes any potential small lumps or bits of cooked egg, guaranteeing a silken finish. Cover the surface of the custard directly with plastic wrap to prevent a skin from forming as it cools. Allow the custard to cool slightly at room temperature before chilling it in the refrigerator. The chilling process allows the flavors to meld and the custard to set to its perfect creamy consistency, ready to be the tranquil ocean for your floating meringues.
Step 3: Conjure the Glistening Caramel Drizzle
The finishing touch that truly elevates the Floating Island Dessert is the shimmering cascade of caramel sauce. This sweet, slightly bitter topping adds a sophisticated layer of flavor and a beautiful visual appeal, tying together the delicate components.
To begin making the caramel, you will need a clean, heavy-bottomed saucepan. Add the granulated sugar and the measured water to the pan. The water helps the sugar to dissolve evenly before it begins to caramelize, preventing premature burning. Place the saucepan over medium heat. It is crucial to resist the urge to stir the sugar mixture at this stage. Stirring can cause sugar crystals to form on the sides of the pan, which can lead to an unevenly cooked or gritty caramel. Instead, you can gently swirl the pan occasionally to ensure the sugar dissolves and caramelizes uniformly.
As the sugar mixture heats, it will first dissolve, then begin to bubble. Continue to cook without stirring, watching closely as the liquid starts to change color. It will progress from a clear syrup to a pale yellow, then to a beautiful golden amber. This transformation is the caramelization process, where the sugars break down and develop complex flavors. The entire process can take anywhere from 7 to 10 minutes, depending on your stove and pan.
The key to perfect caramel is careful observation. You are aiming for a rich, amber hue. If it becomes too dark, it will taste burnt and bitter. If it remains too light, it won’t have developed enough flavor. Swirling the pan gently can help monitor the color development and ensure even cooking. Once the desired amber color is achieved, immediately remove the pan from the heat. The residual heat in the pan will continue to cook the caramel slightly, so it’s important to act promptly to prevent it from becoming too dark.
Let the caramel cool in the saucepan for about a minute. It will still be very hot and liquid. This brief cooling period allows it to thicken slightly before you use it for drizzling. Be extremely cautious, as hot caramel can cause severe burns. If the caramel seems to have hardened too much, you can gently reheat it over very low heat, or add a tiny splash of water and stir carefully until it liquefies again. This ensures a smooth, pourable consistency for your finished drizzle.
This glistening caramel is then used to artfully drizzle over the assembled dessert, creating delicate strands that contrast with the softness of the meringue and custard. The slightly brittle texture of cooled caramel also adds a delightful textural element to each bite. It’s this careful layering of flavors and textures that makes the Floating Island Dessert a truly memorable culinary experience.
Step 4: Assemble the Enchanting Dessert
With all the individual components perfectly prepared – the ethereal meringues, the silken vanilla custard, and the glistening caramel drizzle – the final step is to bring them all together into the visually stunning Floating Island Dessert. This is where the magic truly happens, transforming simple ingredients into a work of art.
Select your serving dishes. These can be individual ramekins, elegant shallow bowls, or even wide, shallow plates, depending on the presentation you desire. Spoon a generous portion of the chilled vanilla custard into each serving vessel. Aim for a depth that will allow the meringue to nestle comfortably without sinking too deeply, creating that delightful visual of it floating.
Carefully take your cooled, poached meringues. Gently place one meringue atop the custard in each serving dish. The meringue should rest lightly on the surface of the custard, appearing to float serenely. Handle the meringues with care; they are delicate and should maintain their airy structure. If one happens to break, don’t worry; you can use the pieces to artfully arrange them on the custard, or perhaps use them for a smaller, more rustic presentation.
Now comes the moment of final embellishment: the caramel drizzle. Take your slightly cooled, still liquid caramel sauce. Using a spoon or a squeeze bottle, artfully drizzle the caramel over the top of the meringues and custard. You can create delicate threads, abstract patterns, or a more generous coating, depending on your preference. The warm caramel will cascade down the sides of the meringue, creating beautiful visual streaks and adding a tempting sheen.
For an extra touch of elegance and freshness, consider adding a final garnish just before serving. A few fresh berries, such as raspberries or sliced strawberries, can add a pop of color and a hint of tartness. A sprig of fresh mint also provides a refreshing aroma and a vibrant green contrast. Edible flowers can lend an even more whimsical and gourmet touch. These small additions not only enhance the visual appeal but also contribute subtle flavor notes that complement the dessert.
Serve your Floating Island Dessert immediately after assembly to enjoy the best textural contrasts. The coolness of the custard, the airy lightness of the meringue, and the slightly brittle, sweet caramel create a symphony of sensations in every bite. This final presentation is what makes the Île Flottante such a beloved and iconic French dessert, a testament to simple ingredients elevated through careful preparation and elegant assembly.
Pro Tips for Floating Island Dessert
Achieve Perfect Meringue Volume: For the fluffiest meringues, ensure your egg whites are at room temperature and that your mixing bowl and whisk attachments are scrupulously clean and grease-free. Any trace of fat can hinder the egg whites from whipping to their full potential volume.
Temper Egg Yolks Carefully: When adding hot milk to the egg yolks for the custard, do so gradually while whisking constantly. This tempering process gently heats the yolks, preventing them from scrambling and ensuring a smooth, velvety custard base.
Master the Caramel Color: Watch your caramel closely as it cooks. It should turn a rich amber color. If it gets too dark, it will taste burnt; if it’s too light, it won’t have developed enough depth of flavor. Swirl the pan gently rather than stirring to ensure even cooking and prevent crystallization.
Strain for Ultimate Smoothness: After preparing the custard, strain it through a fine-mesh sieve into a clean bowl. This crucial step removes any potential small lumps or bits of cooked egg, guaranteeing an impeccably smooth and luxurious texture for your dessert.
Prevent Meringue Soggy-ness: To keep your meringues perfectly crisp before serving, store them in an airtight container at room temperature once cooled. Assemble the dessert just before serving to maintain the delightful contrast between the soft custard and the airy meringue.
Embrace the Make-Ahead Strategy: The meringues and custard can be prepared up to 24 hours in advance. Store them separately and assemble the dessert right before you plan to serve it for optimal freshness and texture.
Serving Suggestions for Floating Island Dessert
Decoration
The visual appeal of Floating Island Dessert is as crucial as its taste, making garnishes and decorative touches key. A simple yet elegant decoration involves a delicate dusting of powdered sugar over the meringue, resembling a light snowfall. Fresh berries, such as vibrant red raspberries, plump blueberries, or thinly sliced strawberries, add a splash of color and a hint of tartness that beautifully complements the sweetness of the dessert. A few fresh mint leaves, artfully placed, not only add visual contrast with their deep green hue but also contribute a refreshing aroma.
For a more sophisticated presentation, consider a fine drizzle of contrasting sauce. A dark chocolate ganache can provide a rich, decadent counterpoint to the creamy custard and light meringue, while a bright berry coulis offers a fruity tang and stunning visual appeal. Edible flowers, like pansies or violets, can impart a whimsical and gourmet touch, transforming the dessert into a true centerpiece for any special occasion. The aim is to enhance the ethereal nature of the ‘floating island’ concept.
Side Dishes
While Floating Island Dessert is a complete indulgence on its own, certain accompaniments can further enhance the dining experience. A delicate citrus sorbet, such as lemon or grapefruit, can serve as a refreshing palate cleanser after the richness of the dessert, offering a zesty counterpoint. For those who enjoy a textural contrast, crisp almond biscotti or delicate tuiles provide a satisfying crunch that complements the soft meringue and smooth custard. These offer a delightful textural interplay that elevates each bite.
Beverages play an equally important role in rounding out the dessert experience. A small cup of strong coffee or a rich espresso is a classic pairing, its slight bitterness cutting through the sweetness and enhancing the complex flavors of the caramel. A dessert wine, like a Sauternes or a late-harvest Riesling, can also be a luxurious choice, its own sweetness and complex notes harmonizing beautifully with the dessert. Even a simple glass of chilled water, perhaps infused with a slice of cucumber or a sprig of mint, can offer a clean, refreshing contrast.
Creative Serving Ideas
Pushing the boundaries of the traditional presentation can lead to truly memorable dessert experiences. Instead of individual servings, consider assembling a larger, more dramatic Floating Island Dessert on a grand platter, allowing guests to serve themselves. This creates a communal and interactive element, making the dessert a focal point of conversation. You could also experiment with different shapes for the meringue, perhaps using small cookie cutters to create stars or hearts before poaching, adding a playful touch.
For a themed event, such as a garden party, incorporate edible flowers directly into the poaching water for the meringues, subtly infusing them with floral notes and creating visually stunning, pastel-hued islands. Another idea is to serve the dessert in elegant martini glasses, layering the custard, meringue, and caramel for a sophisticated, individual presentation. For a rustic charm, serve in small mason jars, layering the components for a delightful, portable treat that guests can enjoy at their leisure, perfect for outdoor gatherings.
Preparation & Storage
Storing Leftovers
Proper storage is key to maintaining the delicate textures of your Floating Island Dessert. If you have any leftover assembled dessert, cover it loosely with plastic wrap and refrigerate it. It’s best consumed within 1-2 days, as the meringues can absorb moisture from the custard over time, potentially losing some of their crispness. The goal is to preserve that delightful contrast between the soft custard and the still-somewhat-airy meringue.
For optimal results, it’s often better to store the components separately if you anticipate having leftovers. The vanilla custard can be kept in an airtight container in the refrigerator for up to 3 days. Ensure the surface is covered directly with plastic wrap to prevent a skin from forming. The poached meringues, once completely cooled, can be stored in an airtight container at room temperature for up to a week. This keeps them wonderfully crisp and ready for future use.
Freezing
Freezing the fully assembled Floating Island Dessert is generally not recommended, as the texture of the meringue can become compromised upon thawing. The airy structure can collapse, leading to a gummy or unpleasant consistency. Similarly, the custard may become watery or separate when frozen and then thawed.
However, the individual components can be frozen with varying degrees of success. Meringues, once baked or poached and completely cooled, can be frozen successfully. Place them in a single layer on a baking sheet and freeze until solid, then transfer them to an airtight container or freezer bag. They can be stored this way for up to 1 month. Thaw them at room temperature before using, and they should retain much of their crispness. The custard is more challenging to freeze effectively, as dairy-based sauces can sometimes separate; if you choose to freeze it, thaw it gently and whisk vigorously to try and restore its texture.
Reheating
Reheating the assembled Floating Island Dessert is not advisable due to the delicate nature of the meringue. The meringues are best served at their original temperature or slightly chilled. Microwaving or attempting to warm the assembled dessert would likely result in a soggy, unappealing texture for the meringue and could also overheat the custard, leading to separation.
If you have stored components separately, you can gently reheat the custard if desired. Warm it slowly over low heat on the stovetop, whisking continuously, until it reaches your desired serving temperature. Alternatively, it can be gently warmed in the microwave in short bursts, stirring between each interval. The poached meringues should be brought to room temperature before serving; they do not require reheating. If you froze meringues, simply allow them to thaw at room temperature before assembling the dessert.
Frequently Asked Questions
-
How do I ensure my meringues are perfectly poached and hold their shape?
Achieving perfect poached meringues requires attention to temperature and technique. Ensure your meringue mixture is stable by properly whipping the egg whites with sugar until stiff, glossy peaks form. When poaching, use a pot large enough to accommodate the meringues without overcrowding, and maintain a gentle simmer, not a rolling boil. The water should be hot enough to cook the meringues through, but not so vigorous that it breaks them apart. Poach for approximately 8-10 minutes, turning gently halfway through, until they are firm to the touch but still slightly soft in the center. Proper cooling on a parchment-lined rack is also essential for them to set completely.
-
What is the best way to prevent the custard from curdling during preparation?
The key to preventing custard curdling lies in the tempering process and controlled heating. Always start by gently warming your milk, and then carefully temper the egg yolks by slowly adding a portion of the hot milk to them while whisking continuously. This gradual introduction of heat gently raises the yolk temperature without cooking them too quickly. Once the tempered yolk mixture is returned to the saucepan with the remaining milk, cook over medium-low heat, stirring constantly with a whisk, ensuring you scrape the bottom of the pan to prevent hot spots. Remove the custard from the heat as soon as it thickens to the desired consistency (around 160-165°F or 71-74°C), as overcooking is a primary cause of curdling. Straining the finished custard through a fine-mesh sieve also helps ensure a perfectly smooth texture.
-
Can I make the caramel sauce ahead of time, and how should I reheat it if it hardens?
Yes, you can make the caramel sauce ahead of time, but it’s best used relatively fresh for optimal drizzling consistency. If you do make it in advance, store it in an airtight container at room temperature. If the caramel hardens, which it tends to do as it cools, it can be gently reheated. Place the hardened caramel in a clean saucepan over very low heat. Stir it constantly until it liquefies again. Alternatively, you can add a tablespoon or two of hot water to the hardened caramel in its container and gently warm it over a low-heat bain-marie or in short bursts in the microwave, stirring frequently until it becomes smooth and pourable. Be cautious, as hot caramel can cause severe burns.