Irresistible Chocolate Chip Sourdough Cruffins Recipe

As I flipped through my recipe notebook, a little sparkle of nostalgia washed over me, reminding me of cozy mornings spent in the kitchen. Among the cherished notes, the Chocolate Chip Sourdough Cruffins stood out, their flaky golden layers whispering promises of warm chocolatey indulgence.
These delightful pastries are perfect for breakfast or as an afternoon snack, merging the best of both worlds—comforting home baking and the art of sourdough. Not only are they a real crowd-pleaser, but they also involve only a few simple steps that will leave you feeling like a pastry chef in your own kitchen. Ready to treat yourself and your loved ones to a scrumptious adventure? Let’s dive into this irresistible recipe together!
Why You Will Love This Recipe
- Flaky Layers: The meticulous folding and baking process creates an unbelievably tender and flaky pastry with delightful layers that melt in your mouth.
- Irresistible Flavor Combination: The tangy notes of sourdough beautifully complement the rich sweetness of melted chocolate chips, offering a flavor profile that is both sophisticated and comforting.
- Visually Stunning: Cruffins, with their unique swirled appearance and golden-brown crust, are not only delicious but also incredibly appealing, making them a centerpiece for any brunch or gathering.
- Satisfyingly Chewy Texture: Beyond the crisp exterior, the interior boasts a soft, slightly chewy crumb that perfectly holds the pockets of warm, gooey chocolate.
- Versatile Treat: While perfect for a special breakfast, these cruffins also shine as an afternoon pick-me-up or a light dessert, proving their versatility throughout the day.
Ingredients You Need
Whipping up these delightful Chocolate Chip Sourdough Cruffins is easier than you think, especially when you focus on using quality ingredients. Each component plays a vital role in achieving the perfect balance of tang, sweetness, and delightful texture that defines this wonderful pastry. Understanding the purpose of each ingredient can elevate your baking experience and ensure the best possible outcome for your delicious cruffins.
Chocolate Chip Sourdough Cruffins
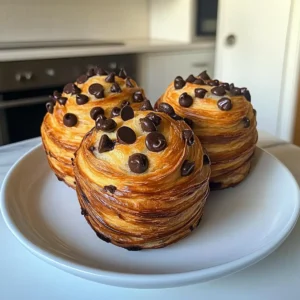
Indulge in these delightful Chocolate Chip Sourdough Cruffins, featuring flaky golden layers and warm chocolaty goodness. Perfect for breakfast, brunch, or an afternoon snack, these pastries combine the comforting nature of home baking with the unique tang of sourdough, offering an irresistible gourmet appeal with surprising simplicity.
- For the Dough
- 1 cup Active Sourdough Starter (Can use a store-bought starter if homemade is unavailable.)
- 3 cups All-Purpose Flour (Whole wheat flour for a denser texture.)
- 1 cup Granulated Sugar (Can be replaced with brown sugar for a richer flavor.)
- 1 teaspoon Salt (Essential; no substitutions advised.)
- 1/2 cup Melted Butter (Can use vegetable oil for a dairy-free option.)
- For the Filling
- 1 cup Chocolate Chips (Dark chocolate for a richer taste or white chocolate for a sweeter option.)
- 1Prepare Your Dough: In a large mixing bowl, combine your active sourdough starter, all-purpose flour, granulated sugar, and salt. Pour in the melted butter and mix until the dough starts to come together, creating a shaggy texture. This process should take about 3-5 minutes.
- 2Knead the Dough: Transfer the dough to a floured work surface and knead it gently for about 5 minutes. Aim for a smooth and elastic texture. Add a little more flour if too sticky, but avoid over-kneading.
- 3Let It Rise: Place the kneaded dough into a greased bowl, cover it with a damp kitchen towel or plastic wrap, and let it rise at room temperature for about 2 hours, or until doubled in size and airy.
- 4Roll Out the Dough: Turn the risen dough onto a lightly floured surface and roll it out into a rectangle approximately ½ inch thick, ensuring even thickness and straight edges.
- 5Shape the Cruffins: Generously sprinkle the chocolate chips across the rolled-out dough. Tightly roll the rectangle into a log shape, ensuring all chocolate is enclosed. Slice the log into 2-inch pieces and stand each piece upright in a greased muffin tin, packing them close together.
- 6Bake: Preheat your oven to 375°F (190°C). Let the shaped cruffins rest for about 30 minutes to puff slightly. Bake for 20-25 minutes, or until the tops are golden brown and a toothpick inserted into the center comes out clean.
Keywords: sourdough, cruffins, chocolate chip, pastry, baking, breakfast, brunch, dessert, yeasted dough, flaky pastry, homemade
- active sourdough starter: a lively, bubbly starter is key for that signature sourdough tang and a good rise.
- all-purpose flour: forms the structural backbone of the dough, providing a tender crumb.
- granulated sugar: adds sweetness to the dough and helps with browning.
- salt: essential for enhancing all the other flavors and controlling yeast activity.
- melted butter: lends richness, moisture, and contributes to the flaky texture of the pastry.
- chocolate chips: the stars of the show, offering pockets of molten, sweet chocolate throughout.
The exact quantities for these ingredients can be found within the detailed recipe card provided above, ensuring you have precisely what you need for success.
Variations
These Chocolate Chip Sourdough Cruffins are a fantastic base for creative culinary exploration, allowing you to tailor them to an endless array of preferences and occasions. Don’t hesitate to experiment with different flavor profiles and textures to make them uniquely yours.
Vegan Delight: To transform these cruffins into a vegan treat, simply substitute the melted butter with a high-quality plant-based butter or a neutral-flavored oil like coconut oil. Ensure your chocolate chips are also dairy-free; many brands offer delicious vegan options that melt beautifully.
Low-Carb Indulgence: For those mindful of carbohydrate intake, consider using a gluten-free, low-carb flour blend in place of all-purpose flour. You can also swap the granulated sugar for a granular sugar substitute that bakes well, and opt for sugar-free chocolate chips to significantly reduce the carb count while maintaining deliciousness.
Spiced Autumn Twist: Embrace the comforting flavors of fall by incorporating warm spices into the dough. A touch of cinnamon, nutmeg, or even a pinch of cardamom mixed with the flour can add a wonderfully aromatic dimension that pairs exceptionally well with the sourdough tang and chocolate.
Citrus Zest Infusion: For a brighter, more complex flavor profile, add the zest of one lemon or orange to the dough mixture. The subtle citrus notes will cut through the richness of the chocolate and complement the sourdough’s tang, creating a surprisingly refreshing pastry.
Nutty Crunch Addition: Elevate the textural experience by adding a handful of finely chopped nuts to the chocolate chips before rolling. Walnuts, pecans, or even almonds would provide a delightful crunch and an earthy undertone that harmonizes perfectly with the other ingredients.
How to Prepare Chocolate Chip Sourdough Cruffins
Step 1: Prepare Your Dough
Begin by gathering a large mixing bowl, ensuring it’s clean and dry for optimal dough development. Into this bowl, carefully measure and add your active sourdough starter, ensuring it’s bubbly and ready to work its magic. Next, incorporate the all-purpose flour, granulated sugar, and a precisely measured amount of salt. These dry ingredients will form the bulk of your dough structure.
Once the dry ingredients are in place, gently pour in the melted butter. It’s important that the butter is melted but not hot, as excessive heat can negatively affect the sourdough starter’s activity. Begin mixing these components together with a spatula or your hands. Continue mixing until the ingredients just start to come together, forming a shaggy, somewhat unorganized mass of dough. This initial mixing phase should take approximately 3 to 5 minutes.
The objective at this stage is not a smooth dough, but rather a cohesive collection of ingredients that signals readiness for the next crucial step: kneading. This shaggy texture indicates that the gluten strands are beginning to form, setting the foundation for a light and airy cruffin. Resist the urge to overmix at this point; gentle encouragement is key to developing the dough’s potential.
Step 2: Knead the Dough
Once your dough has achieved that initial shaggy consistency, it’s time to transfer it to a clean, lightly floured work surface. A smooth countertop or a dedicated pastry board works best. Gently scrape the dough from the bowl onto the floured area, ensuring you capture all the bits and pieces.
Now, begin the kneading process with a gentle, rhythmic motion. Push the dough away from you with the heels of your hands, then fold it back over itself. Rotate the dough slightly and repeat this motion. The goal here is to develop the gluten structure within the dough, which will give your cruffins their signature chewy yet tender texture. Continue kneading for approximately 5 minutes.
Throughout the kneading process, you’re aiming for a dough that transforms from sticky and rough to smooth and elastic. You can test for elasticity by gently stretching a small piece of the dough; it should stretch thinly without tearing easily. If the dough feels excessively sticky, you can lightly dust your hands or the work surface with a little more flour, but be cautious not to add too much, as this can make the cruffins tough.
Step 3: Let It Rise
After the dough has been kneaded to a smooth, elastic consistency, it’s time to allow it to develop its flavor and texture through fermentation. Find a clean, medium-sized mixing bowl and lightly grease its interior surfaces with a neutral oil, such as vegetable or canola oil. This prevents the dough from sticking as it rises.
Carefully place the kneaded dough into the greased bowl, turning it once to ensure all sides are lightly coated with the oil. This coating helps to prevent the surface of the dough from drying out during the rising period. Once the dough is in the bowl, cover it snugly with a damp kitchen towel or a piece of plastic wrap. A damp towel helps maintain humidity, which is beneficial for yeast activity.
Place the covered bowl in a warm, draft-free location in your kitchen. Allow the dough to rise at room temperature for approximately 2 hours. During this time, the sourdough starter will work its magic, causing the dough to expand significantly. You’ll know it’s ready when the dough has roughly doubled in size and feels light and airy when gently poked. The texture should be noticeably puffy and less dense than when you started.
Step 4: Roll Out the Dough
Once your dough has completed its initial rise and has become beautifully puffy, it’s time to prepare it for shaping. Gently turn the risen dough out onto a lightly floured work surface. Use your hands to gently press out any large air bubbles, but avoid completely deflating it; you want to retain some of that lovely lightness.
With a rolling pin, begin to roll the dough out into a large rectangle. Aim for a thickness of approximately ½ inch, and try to maintain an even thickness across the entire surface of the rectangle. This uniformity is important for consistent baking and even distribution of the filling. Work from the center outwards, rotating the dough as needed.
Ensure the edges of your rectangle are as straight and clean as possible. This will make it easier to create neat, tightly rolled logs in the next step, which is crucial for the characteristic cruffin shape. Take your time with this process, as a well-rolled rectangle sets the stage for perfectly formed cruffins.
Step 5: Shape the Cruffins
With your dough rectangle perfectly rolled out, it’s time to introduce the star filling. Generously and evenly sprinkle the chocolate chips across the entire surface of the rolled-out dough, creating a dense, delightful layer. Ensure you get chips close to the edges but not so close that they will fall out during rolling. This ensures every bite will be packed with chocolatey goodness.
Now, starting from one of the longer sides of the rectangle, begin to tightly roll the dough up. The key here is to roll it as compactly as possible, gently tucking the dough in as you go. This creates those beautiful, defined layers that are characteristic of cruffins. Once you’ve rolled the entire rectangle into a log, ensure the seam is tucked underneath.
Using a sharp knife, carefully slice the log into approximately 2-inch thick pieces. You should aim for even slices so that your cruffins bake at a similar rate. Gently stand each piece upright in a greased muffin tin. Pack the cruffins relatively close together within the tin; this encourages them to rise upwards and outwards, creating that distinctive cruffin shape.
Step 6: Bake
As your shaped cruffins begin their final resting period in the muffin tin, it’s time to preheat your oven. Set your oven to 375°F (190°C). This temperature is optimal for achieving a golden-brown exterior while ensuring the interior cooks through completely. Allowing the cruffins to rest for about 30 minutes at room temperature before baking helps them puff up slightly, creating an even lighter texture.
Once the oven is preheated and the cruffins have had their final rest, carefully place the muffin tin into the center rack of the oven. Bake for approximately 20 to 25 minutes. The baking time can vary slightly depending on your oven, so it’s important to keep an eye on them.
Your cruffins are ready when their tops are beautifully golden brown and look irresistibly puffed. To confirm they are cooked through, insert a toothpick into the center of one of the cruffins; if it comes out clean, they are perfectly baked. The aroma filling your kitchen at this stage will be absolutely divine, a true testament to your baking efforts.
Pro Tips for Chocolate Chip Sourdough Cruffins
Active Starter is Key: Ensure your sourdough starter is very active and bubbly before you begin. This means feeding it a few hours prior and checking that it has at least doubled in size. A vigorous starter is crucial for both the rise and the complex, tangy flavor characteristic of sourdough baking.
Gentle Kneading Matters: While kneading is essential for developing gluten, over-kneading can result in tough cruffins. Aim for a smooth, elastic dough that springs back when gently poked, but stop as soon as you reach this stage to maintain tenderness.
Warm Rising Environment: Sourdough thrives in warmth. If your kitchen is on the cooler side, place the dough in a slightly warm environment, such as inside a turned-off oven with the light on. This provides a cozy, consistent temperature for optimal fermentation and rise.
Don’t Overfill with Chips: While tempting, stuffing too many chocolate chips into the dough can sometimes prevent it from sealing properly, leading to chips falling out during baking. Aim for an even, generous layer rather than an excessive amount.
Cooling for Texture: Resist the urge to bite into a piping hot cruffin straight from the oven. Allowing them to cool on a wire rack for at least 10-15 minutes helps the internal structure set and the molten chocolate to firm up slightly, preventing a gooey mess and enhancing the overall texture.
Perfectly Even Slices: For consistent baking, it’s vital that your cruffin slices are as uniform in size as possible. Use a ruler to measure the dough log before slicing, or at least eyeball it carefully with a sharp, long knife for clean cuts.
Serving Suggestions for Chocolate Chip Sourdough Cruffins
Decoration
A light dusting of powdered sugar can add an elegant finish to your Chocolate Chip Sourdough Cruffins, creating a visually appealing contrast with their golden crust. For an extra touch of sweetness and a hint of sparkle, consider drizzling them with a simple glaze made from powdered sugar and a splash of milk or lemon juice. Edible gold leaf or a few fresh berries can also elevate their presentation for special occasions.
Side Dishes
These cruffins pair wonderfully with fresh, bright accompaniments that balance their rich flavor. A side of mixed fresh berries, such as raspberries, blueberries, and sliced strawberries, offers a refreshing tartness that cuts through the sweetness. A dollop of thick, creamy Greek yogurt or vanilla bean yogurt provides a cool, smooth contrast to the flaky pastry and melted chocolate.
Creative Serving Ideas
Elevate your cruffins into a sophisticated dessert by serving them warm with a scoop of high-quality vanilla bean ice cream. The contrast between the warm, gooey cruffin and the cold, creamy ice cream is simply divine. For a more brunch-oriented approach, serve them alongside a perfectly brewed cup of coffee or a delicate herbal tea, creating a comforting and indulgent breakfast experience.
Preparation & Storage
Storing Leftovers
To keep your delicious Chocolate Chip Sourdough Cruffins fresh for as long as possible, it’s best to store them in an airtight container at room temperature. This method helps to maintain their flaky texture for up to 3 days. If your environment is particularly warm or humid, consider refrigerating them, though this can slightly affect their crispness.
Freezing
For longer-term storage, these cruffins freeze exceptionally well. Wrap each cooled cruffin individually and tightly in plastic wrap, then place them in a freezer-safe bag or container. They can be stored in the freezer for up to 3 months, retaining their delightful flavor and texture.
Reheating
To enjoy your frozen cruffins, remove them from the freezer and allow them to thaw slightly at room temperature for about 15-20 minutes. Then, preheat your oven to 350°F (175°C) and bake for 10-15 minutes, or until they are warmed through and their flaky layers are revitalized. This process restores their oven-fresh appeal beautifully.
Frequently Asked Questions
-
What type of sourdough starter should I use for this recipe, and what if mine isn’t very active?
For the best results, it’s crucial to use an active, bubbly sourdough starter. This means feeding it a few hours before you plan to bake and ensuring it has visibly risen and shows plenty of activity. If your starter is sluggish, try feeding it twice a day for a couple of days leading up to your baking session, or place it in a warmer environment. A vigorous starter is the key to that signature sourdough tang and optimal leavening in your cruffins.
-
How can I ensure my cruffins are perfectly flaky and don’t turn out dry or dense?
Achieving flaky cruffins involves a few key techniques: ensure your dough is well-kneaded to develop gluten but avoid over-kneading, which can lead to toughness. Proper rising in a warm environment is essential for lightness. When rolling and shaping, maintain an even thickness and roll the dough tightly to create distinct layers. Lastly, be careful not to overbake; the cruffins should be golden brown, not dark brown, which can indicate they’re drying out.
-
What are the best ways to store and reheat leftover Chocolate Chip Sourdough Cruffins to maintain their quality?
To store leftovers, place cooled cruffins in an airtight container at room temperature for up to 3 days to preserve their texture. For longer storage, individual wrapping in plastic wrap and freezing for up to 3 months is ideal. To reheat, place frozen cruffins on a baking sheet in a preheated oven at 350°F (175°C) for about 10-15 minutes, or until warmed through and their flaky layers are crisp again. This method revives them beautifully, making them almost as good as fresh.