Loaded Potato Skins: 5 Irresistible Secrets to Delight

Are you ready to elevate your snacking game with a delightful twist on a classic comfort food? Loaded Potato Skins: 5 Irresistible Secrets to Delight is here to tantalize your taste buds and take your gatherings to the next level. Picture this: crispy potato skins filled to the brim with gooey cheese, crispy bacon, and a sprinkle of fresh green onions. Each bite is a burst of flavor that makes everyone smile.
This dish is not just delicious; it’s incredibly easy to prepare. Whether you’re hosting a party, wanting a cozy night in, or simply craving a comfort food treat, these loaded potato skins are the answer. You can whip them up with minimal effort and maximum flavor, making them a crowd-pleaser for any occasion. The best part? You can customize them to fit your taste preferences, ensuring every bite is perfect for you.
Why You Will Love This Recipe
- Flavor-Packed: Each bite is a perfect blend of savory and cheesy goodness, offering a truly satisfying experience.
- Super Simple: Minimal prep work and straightforward steps make it incredibly easy to whip up these delicious potato skins in no time.
- Versatile: Customize with your favorite toppings or sauces for a unique twist that suits any taste preference or occasion.
- Family-Friendly: This is a beloved dish that appeals to both kids and adults alike, making it a guaranteed hit at any gathering.
- Perfect for Any Occasion: Serve them as an appetizer, snack, or even a main dish at any casual or festive gathering.
Ingredients You Need
The success of any great recipe lies in the quality of its ingredients. For these loaded potato skins, we will focus on fresh, flavorful components that come together harmoniously. Choosing the right type of potato is paramount, as is selecting cheeses that melt beautifully and add a rich, savory depth. The supporting cast of bacon and green onions brings essential texture and aromatic brightness, ensuring every element contributes to the overall deliciousness.
Loaded Potato Skins: 5 Irresistible Secrets to Delight
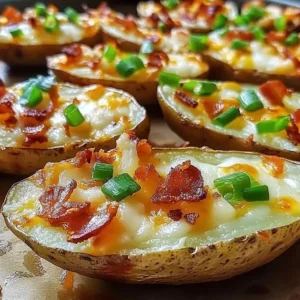
Deliciously crispy potato skins filled with gooey cheese, crispy bacon, and fresh green onions, perfect for any gathering. This recipe is special because it combines simple ingredients with easy steps to create something extraordinary.
- 4 large russet potatoes
- 1 cup shredded cheddar cheese
- 1/2 cup cooked and crumbled bacon
- 1/4 cup sliced green onions
- 1/2 cup sour cream
- 2 tablespoons olive oil
- Salt and pepper to taste
- 1Preheat your oven to 400°F (200°C). Pierce the potatoes, rub with olive oil, salt, and pepper.
- 2Bake potatoes directly on the oven rack for about 45 minutes until tender.
- 3Let cool slightly, cut in half lengthwise, and scoop out some flesh, leaving a 1/4-inch border.
- 4Brush insides with olive oil, season with salt and pepper.
- 5Return cut-side up to the oven and bake for another 10 minutes until crispy.
- 6Sprinkle generously with cheddar cheese, crumbled bacon, and sliced green onions.
- 7Return to the oven for 5 minutes, or until cheese is melted and bubbly.
- 8Serve warm with sour cream.
Keywords: Comfort Food, Customizable Snack, Easy Recipe, Loaded Potato Skins, Party Food, Appetizer, Snack
- large russet potatoes: choose russets for their thick skin, perfect for holding toppings and achieving ultimate crispiness.
- shredded cheddar cheese: a classic choice, but feel free to mix it up with pepper jack or mozzarella for a different flavor profile.
- cooked and crumbled bacon: bacon adds that irresistible savory, smoky element that makes these potato skins so incredibly delicious.
- sliced green onions: fresh and crunchy, green onions elevate the dish considerably with their mild oniony bite and vibrant color.
- sour cream: essential for that creamy, tangy touch that balances the richness of the fillings; it’s also great served on the side.
- olive oil: helps achieve a perfectly crispy texture on the potato skins, ensuring they are golden and delightful.
- salt and pepper: to taste, these fundamental seasonings enhance all the other flavors in the dish.
Quantities for each ingredient can be found in the detailed recipe card above, ensuring you have precisely what you need for perfect results every time.
Variations
The beauty of loaded potato skins lies in their incredible adaptability. You can transform this classic appetizer into something entirely new with just a few ingredient swaps.
Mexican Fiesta Twist: Embrace bold flavors by adding black beans and corn to your potato skins. Top with diced jalapeños for a bit of heat, and finish with a dollop of creamy avocado and a spoonful of your favorite salsa. This variation brings a vibrant, south-of-the-border flair to the familiar favorite.
BBQ Chicken Delight: For a heartier, smoky option, swap out the traditional bacon for tender, shredded barbecue chicken. A drizzle of extra BBQ sauce and a generous topping of crunchy coleslaw will complete this flavorful rendition, making it a standout choice for any summer cookout.
Vegetarian Buffalo Cauliflower: Cater to vegetarian guests by using crispy roasted buffalo cauliflower florets instead of bacon. A cooling drizzle of ranch dressing or blue cheese dressing provides the perfect creamy counterpoint to the tangy, spicy cauliflower, offering a satisfying vegetarian alternative that doesn’t compromise on flavor.
Breakfast Skins: Transform your potato skins into a hearty breakfast option by filling them with scrambled eggs, cheese, and crumbled breakfast sausage. This is a fantastic way to repurpose leftover potatoes or to create a delightful weekend brunch dish that is both comforting and satisfying.
How to Prepare Loaded Potato Skins
The journey to perfectly loaded potato skins begins with selecting the right potatoes and preparing them for that crucial first bake. Russet potatoes are the champions here, prized for their thick, sturdy skins that hold up beautifully to toppings and create a delightful crunch when baked properly. Washing them thoroughly is non-negotiable, as the skin is an integral part of the final delicious experience. You’ll want to ensure every speck of dirt is removed before they even think about heading into the oven.
Preheating your oven to the correct temperature is a critical step that ensures even cooking and optimal crispiness. A temperature of 400°F (200°C) is ideal for achieving that perfect balance between a tender interior and a wonderfully crisp exterior. Before they go into the heat, each potato needs to be pierced multiple times with a fork. This seemingly small act is vital; it allows steam to escape during baking, preventing potential blowouts and promoting a more even cook throughout the potato.
To further enhance the texture and flavor, a light coating of olive oil is applied to the entire surface of each potato. This not only aids in crisping but also provides a base for the seasonings. A generous sprinkle of salt and pepper then works its magic, infusing the skin with foundational savory notes that will complement all the toppings to come. This initial preparation sets the stage for the delicious transformation that awaits.
Step 1: Prepare the Potatoes for Baking
Begin by thoroughly washing your chosen russet potatoes under cool running water. Use a vegetable brush to gently scrub away any dirt or debris, ensuring the skins are impeccably clean. Once cleaned, pat the potatoes completely dry with a clean kitchen towel or paper towels. This step is crucial for achieving that coveted crispy skin, as excess moisture can steam the potato rather than crisp it.
Next, take a fork and pierce each potato several times on all sides. Aim for about 4-6 piercings per potato. This venting process allows steam to escape during baking, preventing the potatoes from bursting and promoting a more even cook. This simple preparation step is fundamental to creating the perfect potato skin vessel for your delicious fillings.
Finally, drizzle each potato with a tablespoon of olive oil. Using your hands, gently rub the oil all over the surface of the potatoes, ensuring they are evenly coated. This oil acts as a conductor for heat, helping to crisp the skin beautifully. Season generously with salt and freshly ground black pepper, rubbing it into the skin so the flavors penetrate.
Step 2: The Initial Bake for Tenderness
Once your potatoes are prepped and seasoned, it’s time to get them into the preheated oven. Place the oiled and seasoned potatoes directly onto the middle rack of your oven. Baking them directly on the rack allows for optimal air circulation around the entire potato, which is key for achieving an even bake and crispier skin. You can place a baking sheet on the rack below to catch any potential drips from the olive oil.
Bake the potatoes for approximately 45 to 60 minutes, depending on their size. The goal here is to achieve a potato that is tender all the way through. You can test for doneness by carefully inserting a sharp knife or a fork into the center of a potato. If it slides in with little resistance, the potato is perfectly tender and ready for the next stage of preparation.
It is important not to rush this initial baking phase. The tenderness achieved now will ensure that the potato flesh inside is soft and pleasant to eat, contrasting beautifully with the crispy skin. Overcooked potatoes can become dry, while undercooked ones will remain too firm. Patience during this step is truly a virtue for loaded potato skin perfection.
Step 3: Cool, Halve, and Scoop
After the initial bake, carefully remove the potatoes from the oven. Allow them to cool on a wire rack for about 10-15 minutes, or until they are cool enough to handle safely. Attempting to cut and scoop them while they are piping hot can be dangerous and may result in burns.
Once they have cooled sufficiently, use a sharp knife to cut each potato in half lengthwise, from one end to the other. Be careful to cut through the skin and the tender flesh, but try not to go all the way through to the bottom, as you want to create a boat-like shape for your fillings.
Now comes the scooping. Using a spoon or a melon baller, carefully scoop out a portion of the potato flesh from each half. Leave a border of about 1/4 to 1/2 inch of potato attached to the skin. This creates a sturdy shell that can hold a generous amount of your chosen toppings without collapsing. Save the scooped-out potato flesh for another use, such as mashed potatoes or potato soup; it’s too good to waste!
Step 4: Prepare the Skins for Crisping
With the potato shells now hollowed out and ready for their second bake, it’s time to prepare them for optimal crispiness. Take your pastry brush and lightly brush the inside of each potato skin with a little more olive oil. This second application of oil is crucial for achieving that wonderfully golden brown and crispy texture that makes loaded potato skins so irresistible.
Ensure you get the oil into all the nooks and crannies, paying special attention to the edges that will be exposed to the heat. After oiling, season the insides of the skins again with salt and pepper. This layering of seasoning ensures that every bite is packed with flavor, from the crispy shell to the cheesy filling. Don’t be shy with the seasoning; it truly makes a difference.
Place the prepared potato skins back onto the oven rack, cut side up. This orientation allows the heat to circulate freely around the edges and bottom of the skins, promoting even crisping. You can again place a baking sheet on the rack below to catch any stray drips, though at this stage, the oil application should be minimal.
Step 5: The Crisping Bake
Return the potato skins to the oven and bake them for an additional 10-15 minutes. The goal of this second bake is to render the skins wonderfully crisp and to give them a beautiful golden-brown hue. Keep an eye on them to prevent them from burning, as ovens can vary in temperature and intensity. The skins should develop a satisfying crispness that is delightful to bite into.
As they bake, you’ll notice the edges starting to curl slightly and turn a deeper golden color. The oil applied in the previous step will help them achieve this attractive and textural finish. This stage is where the potato skins truly transform from tender baked potatoes into the perfect crispy vessels that are the foundation of this beloved appetizer.
Once they reach your desired level of crispiness, carefully remove the potato skins from the oven. They will be hot, so handle them with care using oven mitts. The aroma at this point is already intoxicating, a promise of the deliciousness to come as they await their transformation into loaded potato skins.
Step 6: Load Them Up with Toppings
Now for the most exciting part: loading your crispy potato skins with all the delicious fillings! Generously sprinkle the shredded cheddar cheese over the bottom of each potato skin. Ensure you get an even layer of cheese, as it will melt into a gooey, irresistible blanket that binds all the other toppings together.
Next, evenly distribute the crumbled cooked bacon over the cheese. The salty, smoky crunch of the bacon is a quintessential element of loaded potato skins, adding a fantastic textural contrast and depth of flavor. If you’re using any additional toppings at this stage, such as diced jalapeños or a sprinkle of corn, add them now so they can meld with the cheese and bacon.
Finally, scatter the sliced green onions over the top. The fresh, slightly pungent bite of the green onions provides a bright counterpoint to the rich, savory fillings, adding both color and a refreshing finish. This visual appeal is just as important as the taste, making the potato skins look as enticing as they are to eat.
Step 7: The Melty Cheese Finale
With your potato skins fully loaded, they’re ready for their final trip to the oven. Return the filled potato skins to the oven, which should still be warm from the previous bake, or reheat it to around 375°F (190°C). This short bake is designed to melt the cheese to perfection and ensure all the flavors meld together beautifully.
Bake for another 5-8 minutes, or until the cheese is fully melted, bubbly, and perhaps even starting to turn a lovely golden brown in spots. This is the moment of truth, where the ingredients come together to create that classic, irresistible loaded potato skin experience. The bubbling cheese is a sign of pure deliciousness about to be enjoyed.
Once the cheese is perfectly melted and gooey, carefully remove the loaded potato skins from the oven. Allow them to cool for just a minute or two before serving. This brief cooling period is important; it prevents anyone from burning their mouths on the molten cheese and allows the flavors to settle slightly. They are now ready to be devoured!
Pro Tips for Loaded Potato Skins
Don’t Over-Scoop: When hollowing out the potatoes, leave a substantial enough border of potato attached to the skin. If you scoop too much, the skin will be flimsy and may break under the weight of the toppings, leading to a less enjoyable eating experience.
Crisp is King: Ensure your potato skins are thoroughly baked and crispy before adding the fillings. Soggy skins are the nemesis of great loaded potato skins. You can achieve extra crispiness by brushing them with oil and baking them twice, as outlined in the recipe.
Quality Cheese Matters: Opt for a good quality, full-fat cheese that melts well. Pre-shredded cheeses often contain anti-caking agents that can prevent them from melting as smoothly. Shredding your own cheese from a block will yield superior results and a more decadent, gooey texture.
Seasoning is Key: Don’t forget to season the potato skins themselves. The salt and pepper applied before and after scooping the flesh are essential for building flavor. Think of the potato skin as a base layer that needs its own delicious seasoning.
Get Creative with Toppings: While bacon and cheese are classic, don’t be afraid to experiment. Consider adding pulled pork, shredded chicken, different types of cheeses (like pepper jack or Gruyere), caramelized onions, or even a dollop of guacamole for an extra layer of flavor and texture. The possibilities are truly endless!
Serving Suggestions for Loaded Potato Skins
Decoration
The presentation of your loaded potato skins can significantly enhance the dining experience. A final flourish of finely chopped fresh chives or parsley adds a burst of color and a hint of herbaceous freshness. A delicate swirl of sour cream or a drizzle of ranch dressing can not only add visual appeal but also provide an extra layer of creamy indulgence.
For a more festive look, consider adding a few small, colorful garnishes like tiny diced red bell peppers or a sprinkle of paprika. These small touches can transform a simple appetizer into a visually stunning dish that beckons guests to dig in. The aim is to make them look as delicious as they taste.
Ensure the toppings are distributed evenly and appealingly. Sometimes, strategically placing a few pieces of bacon on top, rather than burying them, can enhance the visual texture and make the skins look even more bountiful. Remember, we eat with our eyes first!
Side Dishes
Loaded potato skins, while often an appetizer, can also be a hearty component of a larger meal. They pair wonderfully with a crisp, refreshing green salad tossed with a light vinaigrette. This provides a palate-cleansing contrast to the richness of the potato skins.
For a more substantial meal, consider serving them alongside grilled chicken or steak. The savory flavors of the protein will complement the cheesy, bacon-filled skins beautifully. A side of steamed or roasted vegetables, like broccoli or asparagus, also adds a healthy and colorful element to the plate.
If you are serving these during a casual gathering or a barbecue, they can be accompanied by other crowd-pleasing items such as coleslaw, corn on the cob, or even a hearty soup. A simple bowl of chili also makes for a fantastic pairing, creating a truly comforting and satisfying meal experience.
Creative Serving Ideas
Think outside the traditional appetizer platter for truly memorable presentations. Consider arranging the loaded potato skins on a rustic wooden board or a cast-iron skillet for a more casual, country-style vibe. This not only looks appealing but also keeps them warm and accessible.
For a themed party, like a sports game day or a movie night, arrange them in a fun shape or serve them in individual portions. You could also create a “loaded potato skin bar” where guests can customize their own skins with a variety of toppings. This interactive approach adds an element of fun and caters to every individual preference.
Another creative idea is to serve them as part of a larger grazing board or charcuterie spread. Their familiar, comforting nature makes them a welcome addition alongside cheeses, cured meats, olives, and crusty bread. This elevates them from a simple appetizer to a sophisticated yet approachable element of a shared dining experience.
Preparation & Storage
Storing Leftovers
If you find yourself with any leftover loaded potato skins, proper storage is key to maintaining their quality. Allow the potato skins to cool completely at room temperature before storing them. This prevents condensation from forming, which can lead to sogginess.
Once cooled, place the leftover potato skins in an airtight container. You can also line the container with parchment paper to prevent them from sticking together. Store the container in the refrigerator for up to 3 days. Ensure the container is sealed tightly to keep them fresh and prevent them from absorbing other odors in the fridge.
It is important to note that while they will retain their flavor, the crispiness of the skins may diminish somewhat during refrigeration. However, with proper reheating, you can bring back a good portion of that desirable crunch.
Freezing
Loaded potato skins can be frozen for longer storage, making them a convenient option for future cravings. To freeze them, ensure they are completely cooled after baking. It is best to freeze them before adding any cold toppings like fresh green onions or sour cream.
Arrange the cooled potato skins in a single layer on a baking sheet lined with parchment paper. Place the baking sheet in the freezer until the skins are firm to the touch, which usually takes about 1-2 hours. This flash-freezing step prevents them from clumping together in the storage container.
Once frozen solid, carefully transfer the potato skins to a freezer-safe bag or an airtight container. Remove as much air as possible from the bag before sealing. Frozen loaded potato skins will maintain their best quality for up to 3 months. When you’re ready to enjoy them, it’s best to thaw them in the refrigerator overnight before reheating.
Reheating
Reheating loaded potato skins requires a method that will restore their crispiness. The microwave is generally not recommended, as it tends to make them soft and soggy. Instead, the oven or an air fryer are your best options for achieving a delightful texture.
Oven Reheating: Preheat your oven to 350°F (175°C). Arrange the refrigerated or thawed potato skins on a baking sheet lined with parchment paper. Heat for approximately 10-15 minutes, or until they are warmed through and the cheese is melty again. Keep an eye on them to ensure they don’t overcook or burn.
Air Fryer Reheating: If using an air fryer, preheat it to around 375°F (190°C). Place the potato skins in the air fryer basket in a single layer, ensuring not to overcrowd it. Air fry for about 5-7 minutes, or until they are heated through and the skins are crispy again. This method is often quicker and yields excellent results.
Regardless of the method, reheating is best done when the skins are at least partially thawed. If reheating directly from frozen, increase the cooking time slightly and monitor carefully. Adding any fresh toppings like green onions or sour cream should be done *after* reheating.
Frequently Asked Questions
-
Can I prepare the loaded potato skins ahead of time?
Yes, you can definitely prepare elements of the loaded potato skins ahead of time to make assembly quicker. You can bake the potatoes, cool them, and then scoop out the flesh up to a day in advance. Store the hollowed-out skins in an airtight container in the refrigerator. When ready to serve, you can then proceed with brushing them with oil, seasoning, filling, and baking them until they are crispy and the cheese is melted. This advance preparation can save significant time, especially when entertaining guests.
-
What are the best substitutions for common ingredients?
For a dairy-free or vegan option, substitute the cheddar cheese with your favorite plant-based shredded cheese. To replace bacon, consider using crumbled tempeh bacon, crispy fried mushrooms, or even small pieces of smoked tofu for a savory flavor. For a lighter option, turkey bacon is a great substitute for pork bacon. If you prefer a creamier topping without dairy, cashew cream or a dairy-free sour cream alternative can be used. These substitutions ensure that the recipe can be adapted to various dietary needs and preferences without compromising on deliciousness.
-
How do I ensure my potato skins are extra crispy?
Achieving extra crispy potato skins involves a few key steps. Firstly, ensure you are using russet potatoes, as their thick skins are ideal for crisping. Secondly, don’t skip the initial piercing and oiling of the potatoes before the first bake. A thorough initial bake to achieve tenderness is crucial. After scooping out the flesh, re-brushing the inside of the skins with a little more olive oil and seasoning before the second bake is vital. Finally, baking them directly on the oven rack allows for maximum air circulation, promoting a more even and crispier finish. Avoid overcrowding the baking sheet, as this can lead to steaming rather than crisping.