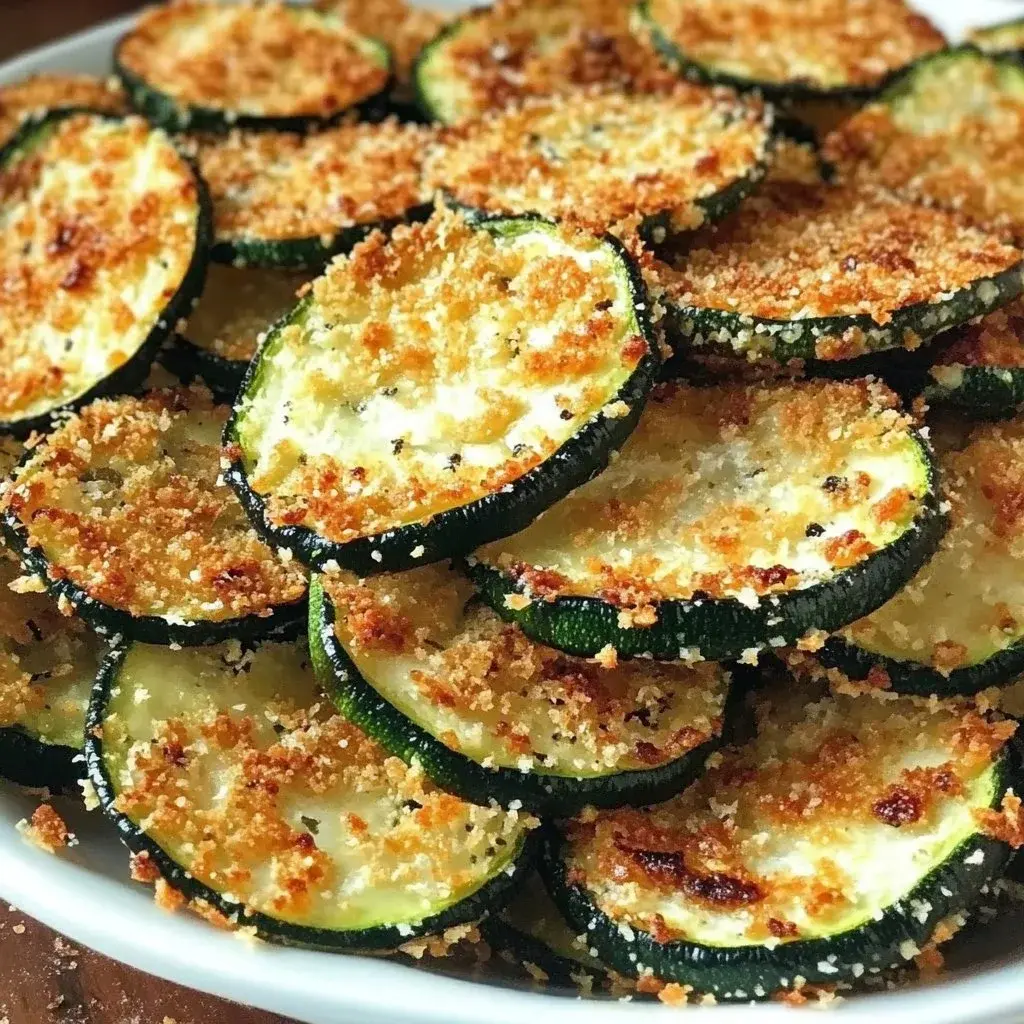
Parmesan Crusted Zucchini Chips: 5 Reasons You'll Love Them
Are you searching for a delicious, healthy snack that satisfies cravings without compromising your diet? Look no further! Parmesan Crusted Zucchini Chips are your answer. This scrumptious recipe not only delivers on flavor but also offers a crispy texture that is a delight to your palate.
Imagine the satisfying crunch of a chip transformed by the cheesy goodness of Parmesan. Zucchini, often overlooked, becomes an exciting ingredient when you turn it into chips. The best part? You can whip this up in no time, making it the perfect option for busy weeknights or unexpected guests. Isn’t it time we elevated the humble zucchini?
Why You Will Love This Recipe
- Irresistible Flavor: The savory Parmesan cheese combined with perfectly seasoned breadcrumbs creates a depth of flavor that is incredibly addictive. Each bite offers a delightful cheesy crunch.
- Incredibly Easy Preparation: This recipe involves simple steps that don’t require complex culinary skills. You’ll be amazed at how quickly these chips come together, making it ideal for spontaneous snacking.
- Versatile Snacking: Whether served as an appetizer at a party, a light lunch, or a satisfying side dish, these zucchini chips fit seamlessly into any meal occasion. Their adaptability makes them a go-to choice.
- Family-Approved Healthy Option: Even picky eaters will ask for more of these delicious chips. They offer a fantastic way to increase vegetable intake without anyone feeling like they’re eating something overly healthy.
- Satisfyingly Crispy Texture: The magic of Parmesan crusting and proper baking ensures a wonderfully crisp texture that rivals any fried chip. You get all the crunch you crave with fewer calories and less grease.
Ingredients You Need
Choosing the freshest ingredients is paramount for achieving the most delightful Parmesan Crusted Zucchini Chips. Opt for firm, medium-sized zucchinis that feel heavy for their size, indicating they are juicy and packed with flavor. High-quality Parmesan cheese, finely grated, will melt beautifully and create that essential savory crust, while good-quality breadcrumbs provide the perfect texture. Ensure your eggs are fresh for the best binding capabilities.
Parmesan Crusted Zucchini Chips
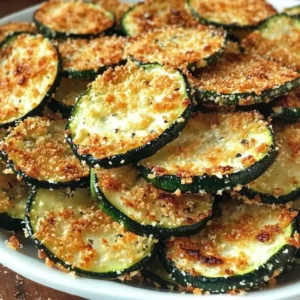
These crispy Parmesan Crusted Zucchini Chips are a delicious, healthy snack that satisfies cravings without compromising your diet, perfect for any occasion!
- 2 medium zucchinis, sliced
- 1 cup grated Parmesan cheese
- 1 cup breadcrumbs (can be Italian-style for bonus flavor)
- 1 teaspoon garlic powder
- 1 teaspoon salt
- 1/2 teaspoon black pepper
- 2 large eggs, beaten
- Cooking spray
- 1Preheat your oven to 425°F (220°C).
- 2Slice your zucchinis into thin rounds, ensuring uniform thickness for even cooking.
- 3In a bowl, combine breadcrumbs, grated Parmesan cheese, garlic powder, salt, and black pepper.
- 4Dip each zucchini slice into the beaten eggs, ensuring the coating sticks.
- 5Transfer the dipped zucchini slices to the breadcrumb mixture and coat thoroughly.
- 6Place the coated zucchini on a baking sheet lined with parchment paper, ensuring they are not overcrowded.
- 7Lightly spray the coated zucchini chips with cooking spray.
- 8Bake for 20-25 minutes, checking at the 20-minute mark for a golden brown color and crisp texture.
- 9Once out of the oven, allow to cool slightly before serving immediately to enjoy their best texture.
Keywords: Crispy Zucchini, Healthy Snacks, Parmesan Snacks, Vegetable Chips, Zucchini Chips
- zucchinis: select medium-sized, firm zucchinis for the best texture and flavor.
- parmesan cheese: finely grated Parmesan cheese is essential for the signature crust.
- breadcrumbs: panko breadcrumbs or Italian-style breadcrumbs work wonderfully for extra crispiness.
- garlic powder: adds a subtle yet important aromatic depth to the coating.
- salt: enhances all the other flavors in the chip.
- black pepper: provides a gentle warmth and complexity.
- eggs: beaten eggs act as the binder to hold the delicious coating onto the zucchini slices.
- cooking spray: a light mist helps achieve a beautiful golden-brown color and extra crispiness.
The exact quantities for each ingredient can be found within the provided recipe card.
Variations
To cater to different tastes and dietary needs, these Parmesan Crusted Zucchini Chips offer a wealth of variation possibilities. For a delightful vegan adaptation, you can easily swap out the eggs for a flax egg, created by mixing one tablespoon of ground flaxseed with three tablespoons of water and letting it sit for five minutes. The Parmesan cheese can be replaced with nutritional yeast, which offers a wonderfully cheesy and umami flavor without any dairy. This substitution maintains the delicious crust and savory notes.
If you are looking for a lower-carbohydrate option, consider substituting the breadcrumbs with finely ground almond flour or crushed pork rinds. Almond flour provides a neutral flavor and a good texture, while pork rinds add a wonderfully savory and extra-crispy element, reminiscent of traditional fried coatings. These alternatives allow those following a ketogenic or low-carb lifestyle to enjoy a similar satisfying crunch and flavor profile.
Furthermore, the spice profile can be easily customized to your preference. For a touch of heat, you can add a pinch of cayenne pepper or red pepper flakes to the breadcrumb mixture. Alternatively, incorporating dried herbs such as oregano, basil, or thyme, or even a sprinkle of paprika, can introduce delightful new flavor dimensions. These simple additions can transform your basic zucchini chips into a more adventurous and personalized snack.
How to Prepare Parmesan Crusted Zucchini Chips
Step 1: Prepare the Zucchinis and Oven
Begin by preheating your oven to a precise temperature of 425 degrees Fahrenheit (220 degrees Celsius). This high heat is crucial for achieving that signature crispiness in a relatively short amount of time. While the oven is reaching its optimal temperature, carefully wash your medium-sized zucchinis under cool running water. Pat them completely dry with a clean kitchen towel or paper towels; excess moisture can prevent the coating from adhering properly and make the chips steam rather than crisp up.
Next, you will need to slice the zucchinis into uniform rounds. Aim for a thickness of about 1/4 inch, or approximately 0.5 centimeters. Using a sharp knife or a mandoline slicer will help ensure consistency. Uniformity in thickness is absolutely key to ensuring that all the zucchini chips cook evenly. If some slices are much thinner than others, they might burn before the thicker ones are cooked through, and vice versa.
Once sliced, gently lay the zucchini rounds out on a layer of paper towels or a clean kitchen towel. You can even place another layer of paper towels on top. Allow them to sit for at least 10-15 minutes. This crucial resting period helps draw out excess moisture from the zucchini flesh. Pressing down gently with more towels afterwards can further help in drying them out, contributing significantly to a crispier final product.
Step 2: Create the Savory Coating Mixture
In a medium-sized mixing bowl, combine your breadcrumbs. If you are using plain breadcrumbs, consider adding a pinch of Italian seasoning or a dash of dried parsley to give them a more complex flavor profile. To the breadcrumbs, add the finely grated Parmesan cheese. Ensure the Parmesan is truly finely grated, as this will allow it to adhere better and melt more evenly during baking, forming a cohesive and delicious crust.
Next, incorporate the seasonings into the breadcrumb and cheese mixture. Add the garlic powder, which provides a wonderful aromatic base without the sharpness of fresh garlic. Follow this with the salt, which is essential for bringing out the natural flavors of the zucchini and the cheese, and then a generous pinch of freshly ground black pepper for a subtle kick. Whisk all these dry ingredients together thoroughly with a fork or a whisk until they are well combined and evenly distributed throughout the bowl.
It’s important that all the components of the dry coating are thoroughly mixed. This ensures that every zucchini chip receives an equal amount of seasoning and cheese, leading to consistent flavor and texture across the entire batch. Taste a tiny pinch of the mixture to ensure the seasoning is to your liking; you can always adjust it slightly if needed before you begin the coating process.
Step 3: Prepare the Egg Wash
In a separate, shallow bowl or a pie dish, crack the two large eggs. Using a fork or a whisk, beat the eggs vigorously until the yolks and whites are thoroughly combined and the mixture is slightly frothy. This egg wash serves as the adhesive that will allow the breadcrumb and Parmesan mixture to stick to the zucchini slices. Without this critical step, your coating would likely fall off during baking.
Ensure that the egg wash is smooth and evenly blended. If there are still distinct streaks of yolk and white, continue whisking until you achieve a uniform consistency. This uniformity is important for ensuring that the coating adheres evenly to each slice of zucchini. A well-beaten egg wash creates a more robust coating that is less likely to flake off during the baking process.
It’s also a good idea to have this bowl positioned conveniently next to your bowl of dry coating ingredients and your prepared zucchini slices. This preparation helps streamline the coating process, allowing you to move efficiently from dipping to coating and then to the baking sheet without any unnecessary delays, which is beneficial for maintaining the temperature of your ingredients and workspace.
Step 4: Coat Each Zucchini Slice
Now comes the fun part – coating the zucchini! Take one dried zucchini slice and gently dip it into the beaten egg wash, ensuring it is fully coated on both sides. Let any excess egg drip back into the bowl for a moment before proceeding to the next step. This ensures you don’t have too much liquid coating the zucchini, which could make the breadcrumbs soggy.
Immediately after dipping in the egg wash, transfer the wet zucchini slice to the prepared breadcrumb and Parmesan mixture. Gently press the slice into the crumbs, ensuring it is thoroughly coated on both sides. You want a nice, even layer of the savory mixture covering the entire surface of the zucchini. This step is where the magic happens, transforming the plain zucchini into a flavorful, crusted chip.
Repeat this dipping and coating process for each and every zucchini slice. It can be helpful to work in batches, especially if you have a large number of zucchini slices. Ensure that each slice is generously coated, as this is what will give you the delightful crunchy texture and cheesy flavor you are looking for. Once coated, set the prepared slices aside on a clean plate or parchment paper, ready for the next stage.
Step 5: Arrange for Optimal Baking
Prepare a baking sheet by lining it with parchment paper or a silicone baking mat. This prevents the zucchini chips from sticking to the pan and makes for much easier cleanup. Do not grease the parchment paper at this stage, as the cooking spray in the next step will provide the necessary oil for crisping. Ensure the entire surface of the baking sheet is covered by parchment paper if needed.
Carefully arrange the coated zucchini slices on the prepared baking sheet. It is absolutely essential to give each chip enough space. Do not let them overlap or touch each other. Overcrowding the baking sheet will cause the chips to steam instead of bake, resulting in a soggy texture rather than the desired crispiness. Aim for a single layer, allowing air to circulate freely around each chip.
If you have a lot of zucchini slices, you might need to use two baking sheets. This ensures that each chip has adequate room to become perfectly golden and crispy. Taking the time to arrange them properly is a small step that makes a significant difference in the final outcome of your Parmesan Crusted Zucchini Chips.
Step 6: The Finishing Touch for Crispiness
Once all the coated zucchini chips are neatly arranged on the baking sheet, it’s time for a crucial step that guarantees an extra layer of golden crispiness. Lightly and evenly spray the tops of the coated zucchini chips with cooking spray. This spray acts like a light oiling, helping to achieve that beautiful, golden-brown hue as they bake and enhancing their overall crisp texture.
Use a gentle, sweeping motion to apply the cooking spray. You do not need to drench the chips; a light mist is all that is required. This step is often overlooked but plays a significant role in achieving a professional-quality crispness. It helps the breadcrumb coating to toast beautifully in the oven, preventing it from becoming dry or brittle and ensuring a satisfying crunch with every bite.
Ensure you cover all the visible surfaces of the coated chips with the cooking spray. This even application ensures that all the chips will bake to a similar level of golden perfection. This simple act of spraying adds a touch of oil that is vital for the Maillard reaction, which is responsible for the browning and complex flavors that develop during baking. It truly elevates these homemade chips.
Step 7: Bake to Golden Perfection
Place the prepared baking sheet carefully into the preheated oven. Bake for approximately 20 to 25 minutes. However, it is highly recommended to start checking on the chips around the 18-minute mark. Ovens can vary significantly in their temperature accuracy and heat distribution, so visual cues are more reliable than strict timing.
You are looking for the Parmesan crusted zucchini chips to achieve a beautiful golden-brown color. They should appear firm to the touch and have a noticeably crisp texture. If they are not yet golden or crispy enough, continue baking them for additional 2-3 minute intervals, keeping a very close eye on them to prevent burning. The edges might start to look particularly toasty.
The goal is a delightful crispiness that makes them satisfying to eat. Once they have reached this perfect stage of golden-brown crispness, carefully remove the baking sheet from the oven. The aroma filling your kitchen at this point should be absolutely wonderful, a testament to the deliciousness that is about to be enjoyed.
Step 8: Serve and Enjoy!
As soon as you remove the baking sheet from the oven, resist the urge to dig in immediately. Allow the Parmesan Crusted Zucchini Chips to cool on the baking sheet for a few minutes. This short cooling period is important as it allows the chips to firm up further and retain their crispness. While they cool, the residual heat will continue to work its magic, ensuring maximum crunch.
Serve these delightful chips warm for the absolute best experience. Their crisp texture and cheesy flavor are most prominent when they are freshly baked. They make a fantastic appetizer or snack on their own, but they are also wonderfully complemented by various dipping sauces. Consider serving them with a side of marinara, ranch, or a zesty aioli to enhance the flavor profile.
Enjoy these homemade Parmesan Crusted Zucchini Chips as a healthier alternative to traditional fried snacks. They are a testament to how simple vegetables can be transformed into something truly irresistible with a few key ingredients and proper preparation. Your family and friends will surely be asking for the recipe!
Pro Tips for Parmesan Crusted Zucchini Chips
Uniform Slicing is Key: For perfectly even cooking, ensure all your zucchini slices are cut to the same thickness. A mandoline slicer is an excellent tool for achieving this consistency, preventing some chips from burning while others remain undercooked.
Drain Excess Moisture: Zucchini is full of water. Patting the slices dry thoroughly with paper towels after slicing and letting them rest on paper towels for about 15 minutes before coating will significantly improve their crispiness. This step is non-negotiable for achieving a truly crunchy chip.
Don’t Overcrowd the Pan: Give each zucchini chip ample space on the baking sheet. Overcrowding leads to steaming, which will result in soggy chips. Use two baking sheets if necessary to ensure proper air circulation around every piece.
The Power of Cooking Spray: A light mist of cooking spray before baking is vital for achieving that beautiful golden-brown color and extra crispiness. It helps the breadcrumb coating toast perfectly in the oven, mimicking the effect of frying without all the added oil.
Watch Them Closely: Ovens vary, so keep a close eye on your chips, especially towards the end of the baking time. They can go from perfectly golden to burnt quite quickly. Checking at the 20-minute mark and baking in 2-minute intervals thereafter is a good strategy.
Serve Immediately for Best Results: These chips are at their absolute best when served warm, right out of the oven. While leftovers can be reheated, they will never quite replicate the pristine crispness of freshly baked chips. Enjoy them at their peak!
Serving Suggestions for Parmesan Crusted Zucchini Chips
Decoration
To elevate the visual appeal of your Parmesan Crusted Zucchini Chips, a final flourish of fresh herbs can make a significant difference. Finely chopped parsley, chives, or even a sprinkle of dill can add a burst of color and a hint of freshness that complements the savory crunch. A final light dusting of extra grated Parmesan cheese just before serving also adds an attractive cheesy sheen and reinforces the delicious flavor.
Side Dishes
These versatile chips are an excellent accompaniment to a variety of main courses. They pair wonderfully with lighter dishes such as grilled chicken or fish, offering a satisfying textural contrast. For a more substantial meal, consider serving them alongside sandwiches or wraps, much like you would offer traditional fries. Their savory profile also makes them a great addition to a salad, transforming a simple greens dish into a more complete and interesting meal.
Creative Serving Ideas
Beyond being a simple appetizer, these zucchini chips can be incorporated into more elaborate presentations. Arrange them artfully on a platter and offer a selection of dipping sauces, such as a classic marinara, a creamy ranch, or a refreshing tzatziki, to cater to diverse palates. You could even layer them into a “chip nacho” style dish, topping them with melted cheese, salsa, and avocado for a unique take on a crowd-pleasing favorite. Their satisfying crunch makes them a great substitute for croutons in salads, adding both texture and flavor.
Preparation & Storage
Storing Leftovers
If you happen to have any leftover Parmesan Crusted Zucchini Chips, it’s best to store them in an airtight container at room temperature for a short period or in the refrigerator for longer storage. Allowing them to cool completely before storing is crucial to prevent condensation, which can lead to sogginess. While they are still delicious the next day, their optimal crispness will be somewhat diminished.
Freezing
For longer-term storage, it is highly recommended to freeze the zucchini chips *before* baking. Arrange the coated, uncooked zucchini slices in a single layer on a baking sheet and place them in the freezer until they are firm. Once frozen, transfer them to a freezer-safe bag or airtight container, separating layers with parchment paper to prevent sticking. This method ensures they retain their quality for up to two months.
Reheating
To reheat leftover baked zucchini chips, the best method is to place them back on a baking sheet in a preheated oven at around 375°F (190°C) for 5-10 minutes, or until they regain their crispness. Avoid using a microwave, as this will invariably make them soft and unappetizing. If reheating from frozen, they may require a slightly longer baking time.
Frequently Asked Questions
- Can I prepare the zucchini and coating ahead of time? Yes, you can slice the zucchini and prepare the breadcrumb coating mixture up to a day in advance. Store the sliced zucchini in an airtight container lined with paper towels in the refrigerator to draw out moisture, and keep the dry coating mixture in a sealed container at room temperature. However, it’s best to do the egg dipping and coating just before baking to ensure optimal crispness and adherence of the crust.
- What are the best substitutions for the breadcrumbs and Parmesan cheese if I have dietary restrictions? For a gluten-free version, you can substitute regular breadcrumbs with gluten-free breadcrumbs or finely ground almond flour. For a dairy-free or vegan option, replace the Parmesan cheese with nutritional yeast, which provides a cheesy flavor, and use a flax egg (1 tablespoon ground flaxseed mixed with 3 tablespoons water, let sit for 5 minutes) or unsweetened applesauce instead of regular eggs for binding.
- How can I ensure my zucchini chips are perfectly crispy and not soggy? Achieving crispiness involves several key steps: ensuring the zucchini is sliced uniformly, thoroughly drying the slices to remove excess moisture, not overcrowding the baking sheet to allow for proper air circulation, and using a light spray of cooking oil before baking. Baking at a sufficiently high temperature (425°F / 220°C) is also critical.