Traeger Grill Beer Can Chicken
Traeger Grill Beer Can Chicken is a smoky, beginner-friendly whole chicken that turns out juicy inside with crisp, caramelized skin outside.
It is a great cookout centerpiece when you want bold flavor, reliable results, and minimal hands-on prep.
Why You Will Love This Recipe
- Juicy & Tender: The unique cooking method ensures the chicken remains incredibly moist throughout, preventing dry meat.
- Smoky Flavor Profile: Utilizing the Traeger grill infuses the chicken with authentic wood-fired smoke for a truly exceptional taste.
- Crispy Skin Perfection: The combination of the initial low-and-slow cook followed by a high-heat finish results in irresistibly crisp and golden-brown skin.
- Simple Seasoning: The blend of brown sugar, smoked paprika, garlic, and other spices creates a delicious, balanced crust that is easy to prepare.
- Impressive Presentation: A whole roasted chicken always makes a statement, and this beer can method ensures it looks as good as it tastes.
Ingredients You Need
The quality of your ingredients plays a significant role in the final outcome of this Traeger Grill Beer Can Chicken. Opting for a fresh, high-quality whole chicken will ensure the best texture and flavor. Similarly, using fresh spices and a good quality beer will enhance the overall deliciousness of the dish. All these elements come together to create a memorable meal.
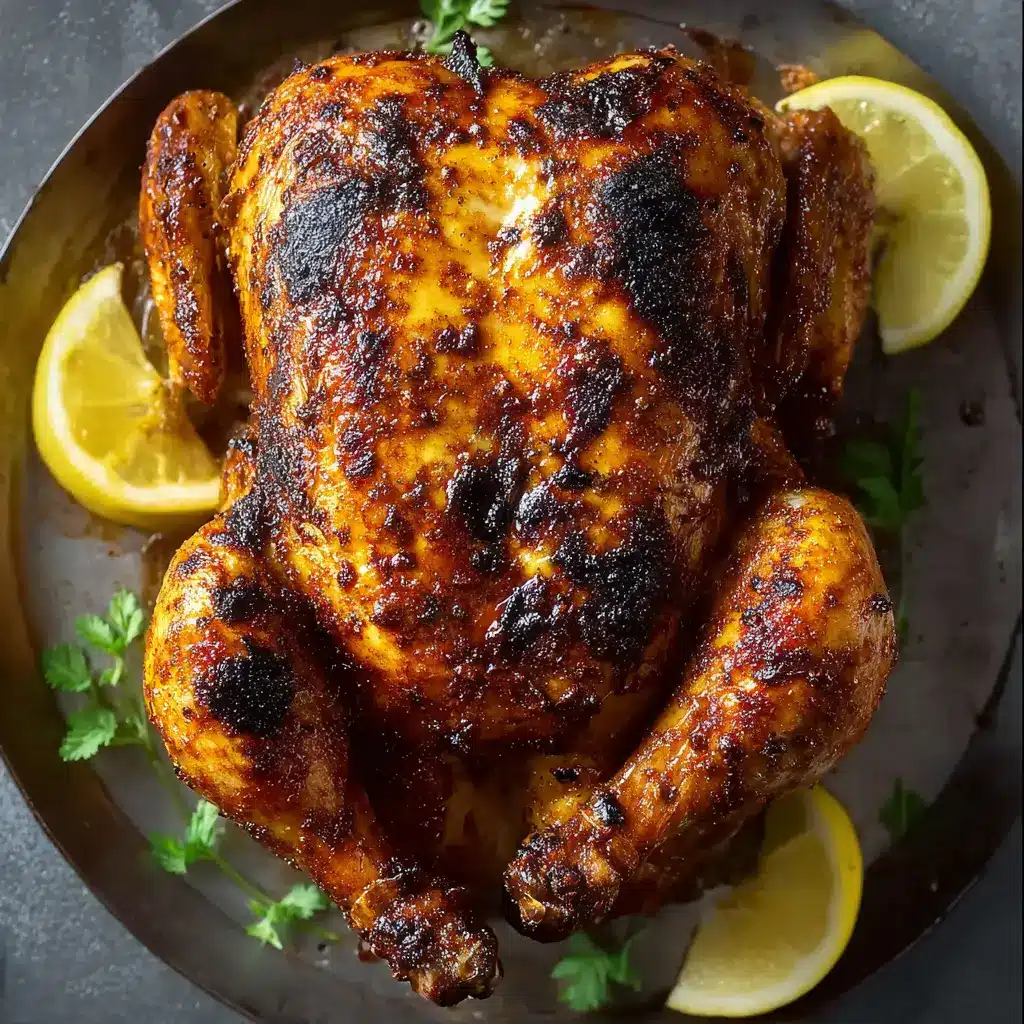
Traeger Grill Beer Can Chicken

This Traeger beer can chicken is prepared with a sweet-smoky spice blend and slowly cooked over wood-fired heat before being finished at a higher temperature for crisp, well-browned skin. The result is a tender, flavorful whole chicken with a seasoned exterior and juicy interior.
- 1 whole chicken (about 5 pounds, fresh or fully thawed)
- 1 teaspoon onion powder
- 1 can beer (12 ounces, preferably an inexpensive lager)
- 1 teaspoon dry mustard
- 1/2 teaspoon cayenne pepper (or adjust to suit your preferred heat level)
- Olive oil (for coating the chicken)
- 1 teaspoon garlic powder
- 1/4 cup firmly packed brown sugar
- 1 teaspoon ground black pepper
- 2 teaspoons smoked paprika (for pronounced smoky depth)
- 1 teaspoon salt
- 1Preheat the Traeger grill to 275°F. As the grill comes to temperature, combine the rub ingredients in a small bowl and stir until evenly blended.
- 2Remove the giblets from the cavity of the chicken, which are commonly enclosed in a small bag inside. Pat the chicken thoroughly dry with paper towels so the oil and seasoning adhere properly.
- 3Lightly coat the exterior of the chicken, as well as the inside of the cavity, with olive oil. Apply the prepared rub generously over the entire bird, making sure to season both the outside and the cavity well.
- 4Open the beer and pour out or consume about two-thirds of the can. Set the partially filled can directly on the grill grates, then carefully lower the chicken onto the can so it stands upright with the can inserted into the cavity.
- 5Smoke the chicken for approximately 1 1/2 hours, or until the internal temperature in the thickest portion, usually the breast, reaches 150°F. Check the temperature with a meat thermometer for accuracy.
- 6Increase the grill temperature to high, about 450°F, and continue cooking for 15 minutes more. Cook until the internal temperature reaches 175°F.
- 7Carefully remove the chicken from the grill and discard the beer can, taking care because it will be extremely hot. Let the chicken rest for several minutes before carving and serving.
Keywords: Traeger Grill Beer Can Chicken, smoked chicken, grilled chicken, whole chicken, backyard cooking, barbecue
Quantities for each ingredient can be found within the recipe card above.
Variations
For a vibrant vegan twist, consider creating a “Beer Can” stuffed portobello mushroom. You could marinate large portobello caps in a mixture of soy sauce, smoked paprika, garlic powder, and a splash of liquid smoke, then stuff them with a breadcrumb and herb mixture before grilling them upright on a can filled with vegetable broth or a flavorful mushroom broth.
A low-carb variation can be achieved by focusing on the spices and omitting the brown sugar. Instead, you might use a sugar substitute like erythritol or monk fruit to achieve a similar caramelization on the skin, and ensure all other ingredients are low-carb compliant.
Another creative approach involves infusing the beer with additional aromatics before cooking. Adding a sprig of rosemary, a few cloves of garlic, or a slice of lemon to the beer can before placing the chicken on top can impart subtle yet delightful new flavor dimensions to the entire bird.
How to Prepare Traeger Grill Beer Can Chicken
Step 1: Preparing the Traeger and the Rub
Begin by preheating your Traeger grill to a steady 275°F (135°C). This lower temperature is crucial for the initial, slow-cooking phase, which allows the chicken to become incredibly tender and juicy without drying out. Ensuring the grill is fully preheated before placing the chicken on it is key for consistent cooking from the very start.
While the grill is coming up to temperature, prepare your spice rub. In a small bowl, combine the brown sugar, smoked paprika, garlic powder, onion powder, dry mustard, salt, black pepper, and cayenne pepper. Whisk these ingredients together thoroughly until they are evenly distributed. This ensures that every part of the chicken will receive a balanced and consistent flavor profile.
The combination of sweet brown sugar, smoky paprika, and savory garlic and onion powders creates a wonderfully balanced flavor base. The dry mustard adds a subtle tang, preventing the rub from tasting too one-dimensional, while the cayenne provides a gentle warmth that can be adjusted to your personal preference. This simple yet effective rub is what gives the chicken its signature delicious crust.
Step 2: Preparing the Chicken for Cooking
The next critical step involves preparing the chicken itself. Carefully remove the whole chicken from its packaging. It is important to inspect the cavity and remove any giblets or the neck, which are often included in a small bag. These can be saved for other culinary uses or discarded.
Pat the entire surface of the chicken, both inside and out, exceptionally dry with paper towels. This step is absolutely paramount for achieving crispy skin. Moisture is the enemy of crispiness; a dry surface allows the olive oil and spice rub to adhere better, and it promotes better browning and rendering of the skin during the cooking process.
Think of this drying step as setting the stage for the perfect crispy exterior. Even if you are in a hurry, do not skip this. The effort is minimal, but the impact on the final texture of the chicken skin is significant. A dry bird is a happy, crispy bird.
Step 3: Oiling and Seasoning the Chicken
Once the chicken is thoroughly dried, it’s time to apply the olive oil. Lightly coat the entire exterior of the chicken with olive oil. This not only helps the spice rub to adhere more effectively but also contributes to a more even browning and helps to render the skin beautifully.
After applying the oil, generously season the chicken. Apply the prepared spice rub all over the bird, ensuring that you get into all the nooks and crannies. Do not forget to season the inside of the cavity as well. Pay special attention to coating the breast, thighs, wings, and the area around the legs for maximum flavor distribution.
The goal here is to create a flavorful crust that will caramelize and crisp up during the cooking process. Every surface should be covered, ensuring that no bite is left unseasoned. This thorough seasoning is what transforms a simple chicken into a culinary masterpiece.
Step 4: Setting Up the Beer Can
Now comes the iconic part of the “beer can” chicken. Open the can of beer. Before placing the chicken on it, pour off or drink about two-thirds of the beer. You want to leave enough liquid in the can to create steam as it heats, but not so much that it will boil over excessively.
Place the partially filled beer can directly onto the grill grates of your preheated Traeger. Carefully, and with great stability, lower the chicken onto the beer can so that the bird stands upright. The can should be inserted into the chicken’s cavity, creating a stable, upright cooking position. Ensure the chicken is balanced and will not tip over.
This upright position is crucial. It allows heat to circulate more effectively around the entire chicken, promoting more even cooking from all sides. The steam generated from the beer helps to keep the meat moist from the inside as it cooks, complementing the other methods for ensuring tenderness.
Step 5: The Low and Slow Cook
With the chicken securely positioned on the beer can, close the Traeger grill lid. Allow the chicken to cook at the initial temperature of 275°F (135°C) for approximately 1.5 hours. This extended period of low-and-slow cooking is fundamental to achieving a tender, succulent bird.
During this stage, the chicken is gently cooked through, allowing the connective tissues to break down and the meat to become incredibly tender. It’s a patient process, but it pays off significantly in terms of moisture and flavor retention. Avoid the temptation to open the grill lid too frequently, as this can release valuable heat and prolong the cooking time.
The primary objective during this phase is to cook the chicken through without toughening the breast meat. You are looking for the internal temperature to be well on its way to being done, but the focus is on gentle heat penetration. This forms the foundation for the final crispy skin.
Step 6: Finishing with High Heat
After the initial low-and-slow cooking period, it’s time to crank up the heat. Increase the Traeger grill temperature to approximately 450°F (230°C). This higher temperature is applied for the final 15-20 minutes of cooking.
This blast of high heat is what transforms the skin from merely cooked to perfectly crisp and beautifully caramelized. It helps to render the fat in the skin, making it delightfully crunchy and golden brown. The short duration at this high heat ensures that the exterior crisps up without overcooking the interior meat.
The transition from low to high heat is a smart technique that balances the need for tender meat with the desire for an appealing, crisp exterior. It’s the secret to achieving that restaurant-quality finish right in your backyard. Monitor the chicken closely during this final stage to prevent any burning.
Step 7: Resting and Carving
Once the chicken has reached an internal temperature of 170-175°F (77-79°C) in the thickest part of the thigh (avoiding the bone), it is fully cooked. Carefully remove the chicken from the grill. Use sturdy grilling gloves or tongs for this task, as the chicken and the beer can will be extremely hot.
As soon as the chicken is off the grill, carefully lift it off the beer can and discard the can, again, being mindful of its extreme heat. Transfer the chicken to a clean cutting board or serving platter. It is essential to let the chicken rest for at least 10-15 minutes before carving. This resting period allows the juices within the meat to redistribute evenly.
If you carve the chicken immediately, the juices will run out onto the cutting board, resulting in drier meat. Resting ensures that each slice of chicken is as moist and flavorful as possible, making the carving process more enjoyable and the final meal more delicious. This final step is as crucial as any other in the cooking process for optimal results.
Pro Tips for Traeger Grill Beer Can Chicken
- Dry is Key: Always ensure the chicken is patted extremely dry before applying oil and the spice rub. This is the most important step for achieving truly crispy skin.
- Secure the Bird: Make sure the chicken is stable on the beer can before closing the grill lid. A wobbly bird can lead to uneven cooking and potential messes.
- Temperature is King: Rely on a reliable meat thermometer rather than just time. The internal temperature in the thickest part of the thigh should reach 170-175°F (77-79°C) for doneness.
- Don’t Fear the Fat: Allow the chicken skin to render its fat during the high-heat finish. This contributes significantly to both the crispiness and the flavor.
- Rest is Best: Always allow the chicken to rest for at least 10-15 minutes after removing it from the grill. This is non-negotiable for juicy results.
Serving Suggestions for Traeger Grill Beer Can Chicken
Decoration
Garnish your beautifully cooked Traeger Grill Beer Can Chicken with fresh sprigs of parsley or cilantro for a pop of color and freshness. A few lemon wedges arranged around the platter can also add a bright, zesty visual element and offer a citrus option for diners.
Side Dishes
This smoky chicken pairs wonderfully with classic American comfort foods. Consider serving it alongside creamy lobster bisque, fluffy mashed potatoes, or sweet corn on the cob.
For a lighter, more refreshing option, a vibrant coleslaw or a crisp garden salad provides a welcome contrast to the rich, smoky flavor of the chicken. Grilled vegetables like asparagus, zucchini, or bell peppers are also excellent choices that echo the grilled nature of the main dish.
Hearty sides such as baked beans, macaroni salad, or even a simple baked potato will round out the meal perfectly, making it a satisfying feast for any occasion. The versatility of this dish means it can be adapted to suit a variety of tastes and preferences.
Creative Serving Ideas
Instead of carving it whole, consider shredding or pulling the meat after resting for a more casual presentation. This pulled chicken is perfect for tacos, sandwiches, or sliders.
You could also serve the chicken as part of a larger barbecue spread, alongside other grilled meats and classic BBQ accompaniments. This makes it an ideal centerpiece for family gatherings and cookouts.
For a slightly more elegant presentation, serve individual portions of carved chicken breast and thigh with a drizzle of a simple pan sauce made from the chicken’s drippings. This elevates the dish while still maintaining its approachable charm.
Preparation & Storage
Storing Leftovers
Once the chicken has cooled to room temperature, which should be within about two hours of cooking, store any leftovers in an airtight container in the refrigerator. This ensures that the chicken stays fresh and safe to eat.
Leftover chicken can be safely stored in the refrigerator for up to 3 to 4 days. Make sure the container is well-sealed to prevent the chicken from drying out or absorbing other odors from the refrigerator.
This makes it incredibly convenient for meal prepping lunches or quick dinners throughout the week. Having pre-cooked chicken on hand is a real time-saver.
Freezing
For longer-term storage, you can freeze the leftover chicken. It’s often best to remove the meat from the bones before freezing, as this saves space and makes thawing easier.
Wrap the deboned chicken meat tightly in plastic wrap, then place it in a freezer-safe bag or an airtight container. This double-layer of protection helps prevent freezer burn.
Properly frozen chicken can be stored for up to 3 months. Beyond that, while it may still be safe to eat, its quality might begin to decline.
Reheating
When reheating leftover chicken, the oven is often the preferred method for maintaining its texture and moisture. Place the chicken in an oven-safe dish, cover it loosely with foil, and reheat at a moderate temperature (around 325°F or 160°C) until warmed through.
A small splash of chicken broth or water added to the dish before reheating can help keep the meat moist and prevent it from drying out. This is particularly useful if the chicken seems a bit dry from its initial cooking.
While the microwave can be used for quick reheating of smaller portions, it can sometimes lead to a less desirable texture. If using the microwave, heat in short intervals, stirring or turning the chicken halfway through to ensure even heating.
Frequently Asked Questions
-
Can I use something other than beer in the can?
Yes, absolutely. While beer is traditional, its primary role is to provide moisture and steam, and to act as a stable base for the chicken. You can substitute the beer with chicken broth, apple cider, or even water. Some people also add aromatics like garlic cloves, sprigs of rosemary, or slices of lemon to the liquid for added flavor infusion.
-
Why does this recipe call for two different cooking temperatures?
The two-stage cooking process is designed to maximize both tenderness and skin crispiness. Starting at a lower temperature (275°F) allows the chicken to cook through gently, ensuring the meat remains moist and tender without drying out. The subsequent increase to a higher temperature (450°F) for the final cooking phase is specifically to render the fat in the skin and create that highly desirable crispy, golden-brown exterior.
-
How do I ensure the chicken is fully cooked and safe to eat?
The most reliable way to determine if the chicken is fully cooked is by using an instant-read meat thermometer. Insert the thermometer into the thickest part of the thigh, making sure not to touch the bone. The internal temperature should register between 170°F and 175°F (77°C to 79°C) for thighs, and around 165°F (74°C) for the breast. Juices should also run clear when the thigh is pierced.
This Traeger Grill Beer Can Chicken is a fantastic way to achieve incredibly flavorful and juicy whole chicken with a delightfully crispy skin, all with the ease and smoky goodness of Traeger grilling. It’s a recipe that consistently delivers impressive results and is perfect for both novice grillers and seasoned pitmasters looking for a reliable and delicious meal. You can find more grilling inspiration on our Pinterest page.