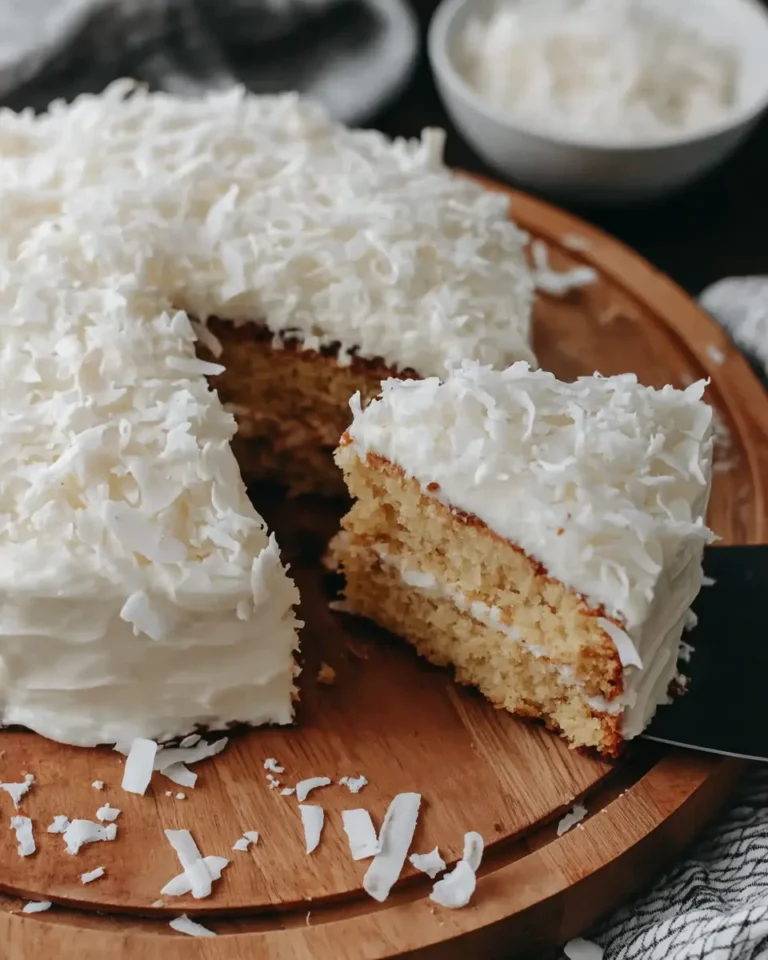
One Layer Coconut Cake

The allure of a perfectly baked cake often lies in its simplicity and the comforting familiarity of its flavors. This One Layer Coconut Cake embodies that sentiment beautifully, offering a deeply satisfying coconut experience without the fuss of multiple tiers.
It’s a delightful creation, designed for those moments when a grand celebration might feel like overkill, but a truly special dessert is still desired. The rich, tender crumb and the fragrant coconut notes make every slice a moment of pure bliss, perfect for any occasion, big or small.
Why You Will Love This Recipe
- Intense Coconut Flavor: This cake is a coconut lover’s dream, with coconut milk in the batter, coconut extract, and shredded coconut woven throughout for a pervasive and delicious tropical essence.
- Tender, Moist Crumb: Through a combination of full-fat coconut milk, butter, and coconut oil, the cake boasts an incredibly soft and moist texture that melts in your mouth.
- Perfectly Sized: The single-layer design makes it ideal for smaller gatherings or for when you simply want a delightful treat without an overwhelming amount of leftovers.
- Bakery-Quality Finish: Despite its straightforward preparation, the resulting cake is elegant and delicious, rivaling anything you’d find in a high-end bakery.
- Versatile and Adaptable: This recipe serves as a fantastic base, encouraging creative variations and personal touches to suit any palate or dietary need.
Ingredients You Need
The key to an exceptional One Layer Coconut Cake lies in the quality and thoughtful selection of its ingredients. Using full-fat coconut milk is paramount, as it imparts a luxurious richness and moisture that lighter versions simply cannot replicate. Similarly, opting for cake flour contributes to the cake’s signature tender and delicate crumb, distinguishing it from cakes made with all-purpose flour.
One Layer Coconut Cake

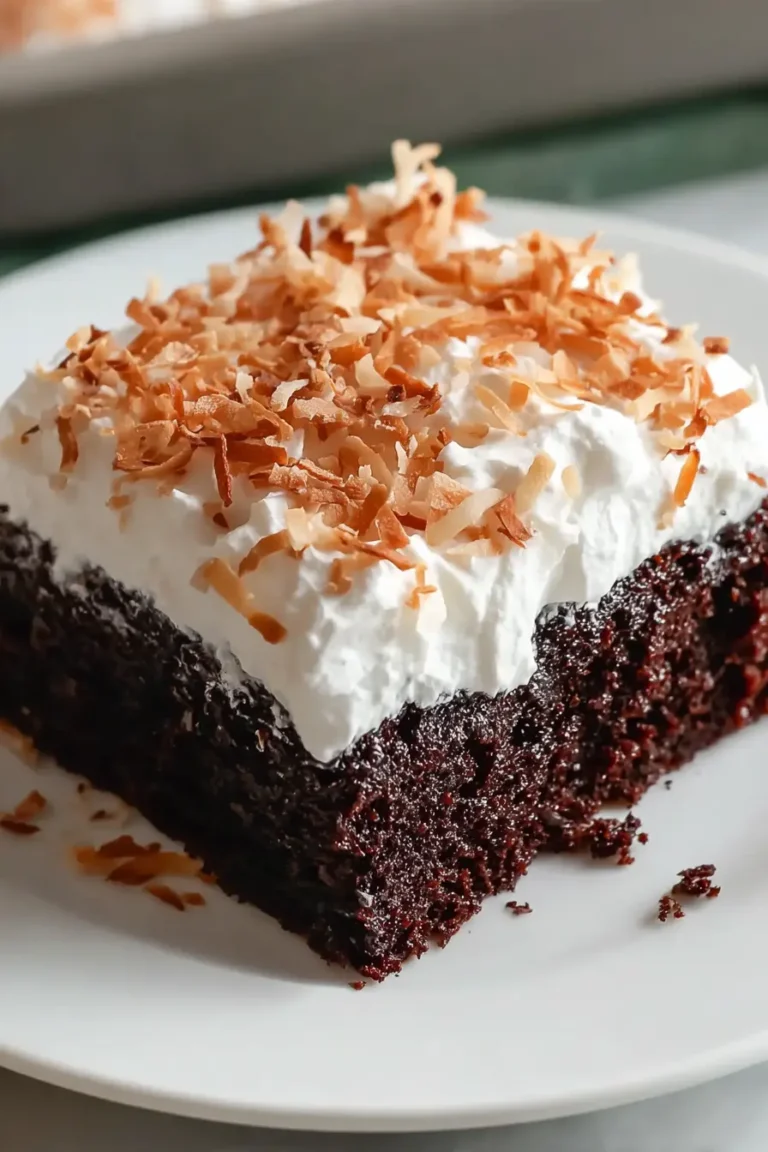
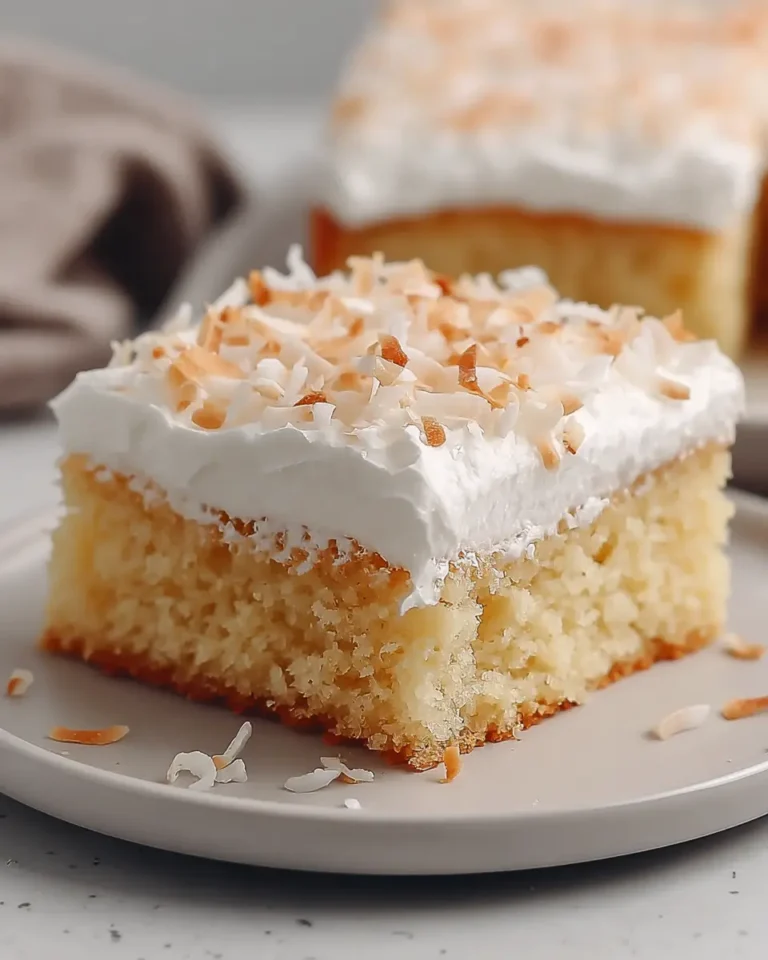
This single-layer coconut cake is tender, rich, and deeply aromatic, with full-fat coconut milk in the batter and toasted coconut folded throughout for added depth. It is finished with a smooth coconut buttercream and a generous addition of shredded coconut for a soft, flavorful finish.
- For the cake:
- 1 cup sifted cake flour
- 1/3 cup granulated white sugar
- 1/4 cup unsalted butter, softened
- 2 tablespoons coconut oil
- 1/3 cup full-fat unsweetened coconut milk
- 1 large egg yolk
- 1 large egg white
- 1 teaspoon coconut extract
- 1/2 teaspoon vanilla extract
- 1/2 teaspoon baking powder
- 1/2 teaspoon baking soda
- 1/8 teaspoon fine salt
- 1/8 teaspoon cream of tartar
- 1/3 cup sweetened shredded coconut, toasted and cooled
- For the frosting:
- 1/2 cup unsalted butter
- 2 1/3 cups powdered sugar, sifted
- 1/2 cup sweetened shredded coconut
- 2 tablespoons uns unsweetened coconut milk
- 1/2 teaspoon coconut extract
- 1Preheat the oven to 350°F (175°C). Coat a 6-inch round cake pan thoroughly with a flour-based baking spray, then set it aside.
- 2Place the sweetened shredded coconut for the cake in a small skillet over medium heat. Stir constantly until the coconut turns lightly golden. Remove it promptly from the heat to prevent scorching, then leave it to cool.
- 3In a medium mixing bowl, whisk together the sifted cake flour, baking powder, baking soda, and salt. Set this dry mixture aside.
- 4Using a hand mixer or a stand mixer fitted with the whisk attachment, beat the egg white with the cream of tartar on high speed for 2 to 3 minutes, or until stiff peaks form.
- 5In a separate bowl, using the paddle attachment, beat the softened butter, coconut oil, and sugar on medium speed until the mixture appears thoroughly blended. Add the egg yolk, coconut extract, vanilla extract, and coconut milk, then mix until fully incorporated.
- 6Add the dry ingredients gradually to the wet mixture, stirring only until combined. Fold in the whipped egg white gently, followed by the cooled toasted coconut, making sure the batter remains light and evenly mixed.
- 7Transfer the batter to the prepared cake pan and smooth the top. Bake for 30 to 35 minutes, or until a toothpick inserted into the center comes out clean.
- 8Remove the cake from the oven and allow it to cool completely on a wire rack before frosting.
- 9To prepare the frosting, beat the butter on medium-high speed until smooth and creamy. Reduce the mixer speed to low and add the sifted powdered sugar gradually. Add the coconut extract and coconut milk, then continue mixing until the frosting is smooth, cohesive, and well blended. Scrape down the bowl as needed, then stir or beat in the shredded coconut.
- 10Once the cake has cooled fully, spread the coconut frosting over the top and finish the cake evenly.
Keywords: Coconut Cake, Single Layer Cake, Small Batch Cake, Coconut Buttercream, Toasted Coconut
- cake flour: sieved for a lighter texture, it is the foundation of a delicate crumb.
- granulated sugar: provides sweetness without overpowering the nuanced coconut flavors.
- unsalted butter: contributes classic richness to both the cake and its creamy frosting.
- coconut oil: enhances the pervasive coconut aroma and adds an extra layer of tenderness.
- full-fat unsweetened coconut milk: the secret to a moist cake with a pronounced coconut character.
- large egg yolk: adds richness and binds the ingredients together beautifully.
- large egg white: whipped to stiff peaks, it introduces lightness and a finer crumb structure.
- coconut extract: intensifies the coconut essence, making it unmistakably fragrant.
- vanilla extract: complements the coconut, adding warmth and depth to the overall flavor profile.
- baking powder: a crucial leavening agent that ensures a good rise.
- baking soda: works with acidic components to create lift and a tender texture.
- fine salt: balances the sweetness and enhances all the other flavors.
- cream of tartar: stabilizes the egg white, helping it achieve and maintain stiff peaks for better lift.
- sweetened shredded coconut: toasted for added depth of flavor and folded into the batter for texture.
- powdered sugar: the base for a smooth, spreadable, and delightfully sweet buttercream frosting.
- unsweetened coconut milk: used sparingly in the frosting to achieve the perfect consistency and flavor balance.
The precise quantities for each ingredient are conveniently detailed within the accompanying recipe card.
Variations
This delightful One Layer Coconut Cake is incredibly adaptable, allowing for personalization to suit various tastes and dietary preferences. The inherent tropical notes of coconut make it a perfect canvas for other complementary flavors, transforming it into something uniquely yours.
Consider a tropical fruit infusion by folding in finely diced, drained pineapple or mango into the batter just before baking. This adds bursts of juicy sweetness and a delightful texture contrast. For an extra layer of indulgence, a hint of lime zest can be added to both the cake and the frosting, creating a vibrant, refreshing flavor profile that perfectly balances the rich coconut. This bright citrus note brings an unexpected but welcome complexity.
For those seeking a dessert that aligns with a lower-carbohydrate lifestyle, modifications are certainly possible. You can experiment with a sugar substitute like erythritol or xylitol for the cake and frosting, ensuring they are suitable for baking. Additionally, almond flour or a blend of coconut and almond flour can replace some or all of the cake flour to reduce the carbohydrate count. Be mindful that these substitutions may alter the texture slightly, requiring minor adjustments to liquid amounts to achieve optimal moisture.
A decadent vegan adaptation can also be achieved with a few simple swaps. For the egg, a flax egg (one tablespoon of ground flaxseed mixed with three tablespoons of water, let to sit for 5 minutes) or a commercial egg replacer can be used in the cake batter. Ensure your butter substitute is a high-quality vegan butter, and for the frosting, a vegan butter and plant-based milk like almond or soy milk will work beautifully. This vegan version still delivers all the beloved coconut flavor and tender texture.
How to Prepare One Layer Coconut Cake
Step 1: Preheating the Oven and Preparing the Pan
The journey to a perfect One Layer Coconut Cake begins with meticulous preparation. First, preheat your oven to the specified temperature of 350°F (175°C). This ensures the oven is at the optimal heat for even baking as soon as the cake goes in, preventing any temperature fluctuations that could compromise the texture or rise of the delicate batter.
Next, thoroughly coat a 6-inch round cake pan. Using a good quality baking spray that contains flour is highly recommended. This creates a non-stick barrier that is crucial for ensuring the cake releases cleanly from the pan after baking, preserving its beautiful shape and preventing any tearing. Alternatively, you can grease the pan generously with butter or shortening and then dust it with flour, tapping out any excess.
While the oven heats, take the time to toast the shredded coconut that will be incorporated into the cake batter. Place the 1/3 cup of sweetened shredded coconut in a small, dry skillet over medium heat. Stir constantly, watching the coconut very closely. It can go from pale to beautifully golden brown in a matter of moments. Remove it from the heat as soon as it achieves a light golden hue, as residual heat can continue to cook it. Promptly transfer the toasted coconut to a clean plate or a small bowl to cool completely. This toasting process unlocks a deeper, nuttier flavor and adds a delightful textural element to the finished cake.
Step 2: Combining Dry Ingredients for the Cake
In a medium-sized mixing bowl, combine all the dry ingredients for the cake portion of this recipe. This includes the sifted cake flour, baking powder, baking soda, and fine salt. Whisking these ingredients together thoroughly ensures that the leavening agents and salt are evenly distributed throughout the flour. This even distribution is absolutely vital for consistent leavening throughout the cake, preventing any dense pockets or uneven rising.
The act of sifting the cake flour beforehand is also a critical step. Sifting aerates the flour, making it lighter and easier to incorporate into the wet ingredients. It also helps to break up any small clumps that might have formed, contributing to a smoother, more uniform batter. A well-mixed dry ingredient base sets the stage for a cake with a fine, tender crumb.
Once whisked, set this bowl of dry ingredients aside. It will be incorporated into the wet ingredients in stages, ensuring that the batter is mixed just enough to combine, which is key to avoiding a tough cake. This careful separation and combining of dry and wet components is a hallmark of well-developed cake recipes, leading to superior texture and flavor.
Step 3: Whipping the Egg White for Lift
In a separate, scrupulously clean bowl, prepare to whip the egg white. It is imperative that this bowl and any utensils used are completely free of any grease or yolk. Even a tiny trace of fat can prevent the egg white from reaching its full volume. Add the 1 large egg white and the 1/8 teaspoon of cream of tartar to the bowl. The cream of tartar acts as a stabilizer, helping the egg white to achieve and maintain stiff, glossy peaks.
Using a hand mixer or a stand mixer fitted with the whisk attachment, begin beating the egg white on high speed. This process can take anywhere from 2 to 3 minutes, depending on the power of your mixer. You are looking for the egg white to transform from a clear liquid to a frothy foam, then gradually become opaque and thick. The goal is to achieve stiff peaks, which means that when you lift the whisk, the egg white stands straight up without curling over. This aerated egg white is a key component for creating a light and fluffy texture in your rich coconut cake.
This separate whipping of the egg white is a crucial step that differentiates this cake from simpler recipes. It introduces air directly into the batter at a later stage, contributing significantly to a lighter, more delicate crumb, which is especially desirable in a cake that already contains rich ingredients like butter and coconut milk. The volume and structure provided by the whipped egg white ensure the cake doesn’t feel dense or heavy.
Step 4: Creating the Creamy Wet Mixture
In another mixing bowl, the foundation of the cake’s rich flavor profile is built. Using a hand mixer or a stand mixer fitted with the paddle attachment, beat the softened 1/4 cup of unsalted butter and the 2 tablespoons of coconut oil together. Continue beating until the mixture appears thoroughly blended and creamy. This initial creaming process incorporates air into the fats, which aids in the cake’s tender texture and provides a smooth base for the other wet ingredients.
Next, add the 1 large egg yolk, the 1 teaspoon of coconut extract, the 1/2 teaspoon of vanilla extract, and the 1/3 cup of full-fat unsweetened coconut milk to the bowl. Beat these ingredients together until the entire wet mixture looks smooth, homogenous, and fully combined. The egg yolk enriches the batter, the extracts infuse it with delightful aromas, and the coconut milk provides essential moisture and a distinct coconut flavor. Ensure there are no streaks of egg or unincorporated liquid visible; a well-emulsified wet mixture is key.
This step is where the characteristic flavors of the cake begin to coalesce. The interplay between the butter, coconut oil, coconut milk, and extracts creates a deeply aromatic and flavorful base. It is important to use ingredients at the correct temperature; softened butter incorporates better, and room temperature coconut milk emulsifies more smoothly. This well-blended wet mixture will eagerly receive the dry ingredients in the next stage.
Step 5: Combining Batter Components and Folding
Now, it’s time to bring the wet and dry components together. Gradually add the dry ingredients (from Step 2) to the wet mixture (from Step 4). Mix on a low speed, or by hand with a spatula, just until the batter begins to come together. It’s crucial to avoid overmixing at this stage, as overmixing can develop the gluten in the flour, resulting in a tough cake. A few small streaks of flour remaining are perfectly acceptable at this point.
Gently fold in the whipped egg white (from Step 3) into the batter. Use a rubber spatula and a light hand, sweeping down the side of the bowl, across the bottom, and up the other side, turning the bowl as you go. The goal is to incorporate the airy egg white without deflating the volume you worked so hard to create. This folding action preserves the airiness, which is vital for a lighter cake crumb.
Finally, gently fold in the cooled, toasted shredded coconut. Again, be careful not to overmix. This is the final textural addition to the batter, providing delightful little pockets of toasted coconut flavor and chewiness. The batter should now be airy, cohesive, and speckled with golden toasted coconut. The careful folding of these components ensures a delicate balance between richness, airiness, and texture.
Step 6: Baking and Cooling the Cake
Carefully transfer the prepared batter into the well-greased and floured 6-inch round cake pan. Use your spatula to gently spread the batter evenly into the pan, ensuring the top is as smooth as possible. This will promote even baking and a beautifully level cake surface once it’s done. Place the pan into the preheated oven on the center rack.
Bake for approximately 30 to 35 minutes, or until the cake is set in the center and a toothpick inserted into the middle comes out clean. The edges should be pulling away slightly from the sides of the pan, and the top should be a beautiful golden brown. Resist the urge to open the oven door too early, as this can cause the cake to fall.
Once baked, remove the cake from the oven and place the pan on a wire rack. Allow the cake to cool in the pan for about 10-15 minutes. This initial cooling period allows the cake to firm up slightly, making it easier to handle. After this, invert the cake onto the wire rack to cool completely. It is absolutely imperative that the cake is fully cooled before attempting to frost it; a warm cake will cause the buttercream to soften and melt, resulting in a messy and unappealing finish. Patience here is key for a professional-looking cake.
Step 7: Preparing and Applying Coconut Buttercream
While the cake is cooling, prepare the luscious coconut buttercream. In a mixing bowl, beat the 1/2 cup of softened unsalted butter on medium-high speed until it becomes smooth and creamy. This ensures a light and fluffy base for the frosting. Begin gradually adding the 2 1/3 cups of sifted powdered sugar, mixing on a low speed. Adding the sugar slowly prevents a cloud of sugar from exploding from the bowl and ensures it is incorporated smoothly.
Once the powdered sugar is mostly incorporated, add the 2 tablespoons of unsweetened coconut milk and the 1/2 teaspoon of coconut extract. Continue mixing until the frosting is smooth, cohesive, and reaches a spreadable consistency. Scrape down the sides of the bowl as needed to ensure all ingredients are fully blended. The result should be a creamy, fragrant frosting that is perfectly balanced in sweetness and coconut flavor.
Finally, stir or beat in the 1/2 cup of sweetened shredded coconut into the frosting. This adds a delightful texture and reinforces the coconut theme. Once the cake has cooled completely, spread the coconut frosting evenly over the top of the cake. Use an offset spatula or a butter knife to create a smooth, snowy finish. You can opt for a rustic look or a perfectly smooth surface, depending on your preference. This final touch transforms the humble cake into a truly impressive dessert.
Pro Tips for One Layer Coconut Cake
Toast the Coconut Wisely: When toasting the shredded coconut for both the cake and the frosting, keep a very close eye on it. Coconut can go from perfectly golden to burnt in mere seconds. Stir constantly over medium heat and remove it from the pan immediately once it reaches your desired light golden color. Over-toasted coconut can impart a bitter flavor.
Ensure Complete Cooling Before Frosting: This cannot be stressed enough. Frosting a warm cake is a recipe for disaster, leading to melted frosting and a messy appearance. Allow the cake to cool entirely on a wire rack, which can take a couple of hours. Patience here guarantees a clean, professional finish for your delicious creation.
Fold with a Gentle Hand: When incorporating the whipped egg white and the toasted coconut into the batter, use a light, folding motion with a spatula. The goal is to combine the ingredients without knocking out the air from the egg whites. This is crucial for achieving a light, airy, and tender crumb rather than a dense cake.
Measure Flour Accurately: For a tender cake, accurately measuring your flour is essential. Spoon the cake flour into your measuring cup and level it off with a straight edge. Scooping directly from the bag can pack too much flour, leading to a drier cake. Sifting the cake flour before measuring further enhances its lightness.
Don’t Overmix the Batter: Once the dry ingredients are added to the wet, mix only until they are just combined. Overmixing develops the gluten in the flour, which can result in a tough, chewy cake. A few small lumps are preferable to overmixing. Similarly, be gentle when folding in the egg whites and coconut.
Serving Suggestions for One Layer Coconut Cake
Decoration
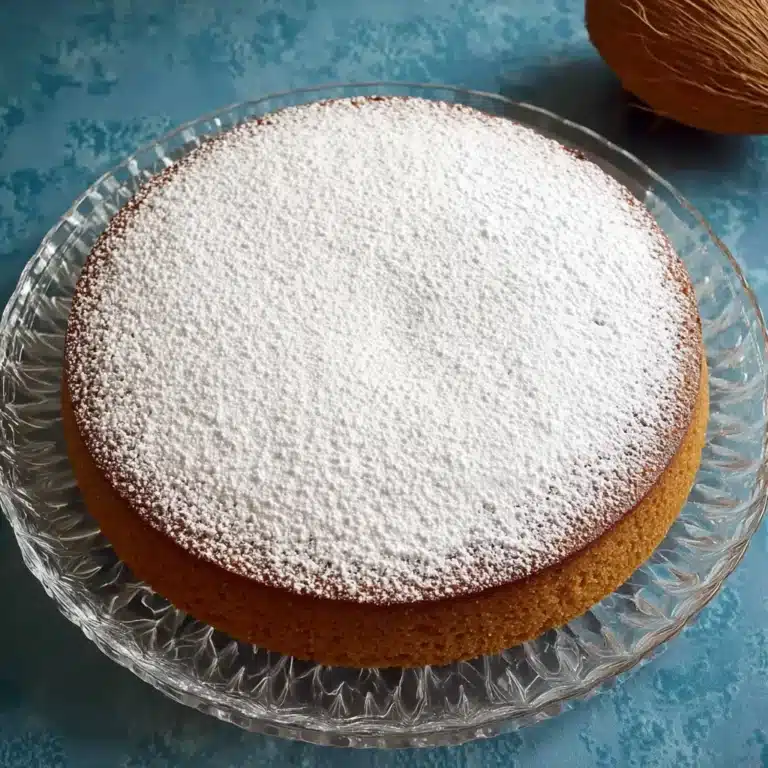
Elevate the visual appeal of your One Layer Coconut Cake with simple yet elegant decorative touches. A generous dusting of powdered sugar can create a snowy, frosted look, especially effective if the cake is served on a dark plate. You can also use a fine-mesh sieve to sprinkle a delicate pattern. For a more textured finish, use the remaining toasted shredded coconut from the frosting to sprinkle around the edges of the cake or create a defined border. Fresh coconut flakes, lightly toasted, offer a beautiful visual and aromatic enhancement.
Edible flowers, such as violets or pansies, can add a pop of color and a touch of sophistication. If you are feeling particularly artistic, consider piping a simple border around the top edge of the cake using extra frosting. A few strategically placed fresh berries, like raspberries or blueberries, can provide a vibrant contrast to the creamy white frosting and coconut. A light drizzle of caramel sauce or a thin glaze made with a little coconut milk and powdered sugar can also add an extra layer of visual interest and flavor.
Side Dishes
This delightful coconut cake pairs wonderfully with a variety of accompaniments that complement its tropical sweetness. Fresh fruit is a classic choice; a medley of berries, such as strawberries, raspberries, and blueberries, offers a refreshing tartness that cuts through the richness of the cake. Sliced tropical fruits like mango, kiwi, or fresh pineapple also create a cohesive flavor profile.
For a more decadent pairing, consider a dollop of freshly whipped cream, perhaps lightly sweetened or infused with a hint of vanilla. A scoop of high-quality vanilla bean ice cream or a complementary tropical sorbet, like mango or pineapple sorbet, creates a delightful dessert combination. Even a simple cup of coffee or a fragrant cup of herbal tea can serve as a perfect, understated side, allowing the cake to be the star of the show.
Creative Serving Ideas
Transform this single-layer gem into an impressive dessert by serving it alongside a scoop of passionfruit sorbet for an intense tropical flavor explosion. Another delightful idea is to serve small, individual portions alongside a shot of rich espresso or a tiny glass of chilled coconut milk for a sophisticated dessert experience. You can also present it as part of a dessert tasting platter, alongside miniature versions of other baked goods or fruit tarts for a delightful variety.
Consider serving slices warm, perhaps with a small ramekin of warm caramel or a chocolate ganache for dipping. This transforms it into a comforting, dessert-style treat. For a brunch setting, a slice of this coconut cake with a side of fresh fruit salad and a light yogurt parfait makes for a lovely sweet offering. The versatility of this cake means it can be adapted for elegant dinner parties or casual weekend gatherings, always impressing with its delightful flavor and texture.
Preparation & Storage
Storing Leftovers
Because of the creamy buttercream frosting, it is best to store any leftover One Layer Coconut Cake covered tightly. If you plan to keep it for longer than a few hours at room temperature, refrigeration is the most suitable option. In the refrigerator, the cake should maintain its freshness and deliciousness for up to 4 days. Ensure it is well-covered to prevent it from drying out or absorbing any unwanted odors from other foods.
For the optimal eating experience after refrigeration, it is highly recommended to let a slice of cake sit at room temperature for about 20 to 30 minutes before serving. This allows the crumb to soften and the frosting to become beautifully creamy and spreadable again. Cold cake can be dense, so this small step makes a significant difference in enjoying the cake’s intended texture and flavor. Avoid storing it uncovered, as this will lead to staleness and a less appealing texture.
Freezing
The One Layer Coconut Cake freezes exceptionally well, making it a fantastic option for make-ahead baking. If you wish to freeze the unfrosted cake layer, ensure it has cooled completely. Wrap it very tightly in two layers of plastic wrap, followed by a layer of aluminum foil. This triple layer of protection will prevent freezer burn and preserve the cake’s moisture and flavor. Frozen unfrosted cake layers can be stored for up to 2 months.
To thaw, unwrap the cake layer and place it on a wire rack in the refrigerator. Allow it to thaw overnight. Once fully thawed and closer to room temperature, it is ready to be frosted. If you wish to freeze leftover frosted slices, wrap them individually and tightly as described above. Frosted slices can be frozen for about 1 month. Thaw them at room temperature for a few hours before serving.
Reheating
This delightful One Layer Coconut Cake does not typically require reheating. Its best served at room temperature, or slightly chilled if preferred, to enjoy the soft texture of the crumb and the creamy consistency of the frosting. If the cake has been refrigerated, the most effective way to enjoy it is to simply allow a slice to come to room temperature on the counter for about 20-30 minutes before eating. This gentle warming process brings out the full flavor and ensures the frosting is perfectly soft and spreadable.
Attempting to reheat the cake in an oven or microwave can easily lead to drying out the cake or melting the frosting unevenly. The delicate nature of the coconut cake and its buttercream are best preserved by avoiding direct heat. Instead, rely on ambient temperature to bring the cake to its ideal serving state. The subtle warmth of the room is all that’s needed for this flavorful dessert.
Frequently Asked Questions
-
Can I make this cake ahead of time?
Yes, absolutely. The cake layer can be baked up to a day in advance. Ensure it is completely cooled before wrapping it tightly in plastic wrap and storing it at room temperature or in the refrigerator. For the best results, frost the cake on the day you plan to serve it, or frost it the day before and store it in the refrigerator, allowing it to come to room temperature for about 30 minutes before serving. This cake holds its texture and flavor very well, making it an excellent choice for advance dessert planning.
-
Do I need full-fat coconut milk for this cake?
While you can use a lighter version of coconut milk, using full-fat, unsweetened coconut milk is strongly recommended for this recipe. The higher fat content in full-fat coconut milk contributes significantly to the cake’s richness, moisture, and tender crumb. Lighter versions may result in a batter that is less luxurious, and the finished cake might not be as moist or intensely flavored. The quality of the coconut milk directly impacts the final outcome of this delicate dessert.
-
Why is the egg white whipped separately?
The process of whipping the egg white separately and then folding it into the batter is a key technique that contributes to the cake’s delightful texture. Since this cake is already rich with ingredients like butter, coconut oil, and coconut milk, the separately whipped egg white adds essential lift and airiness. This prevents the cake from becoming too dense or heavy, resulting in a lighter, softer, and more delicate crumb that is characteristic of a well-made cake. It’s an extra step that yields a noticeably superior result.