Coconut Mug Cake in Minutes
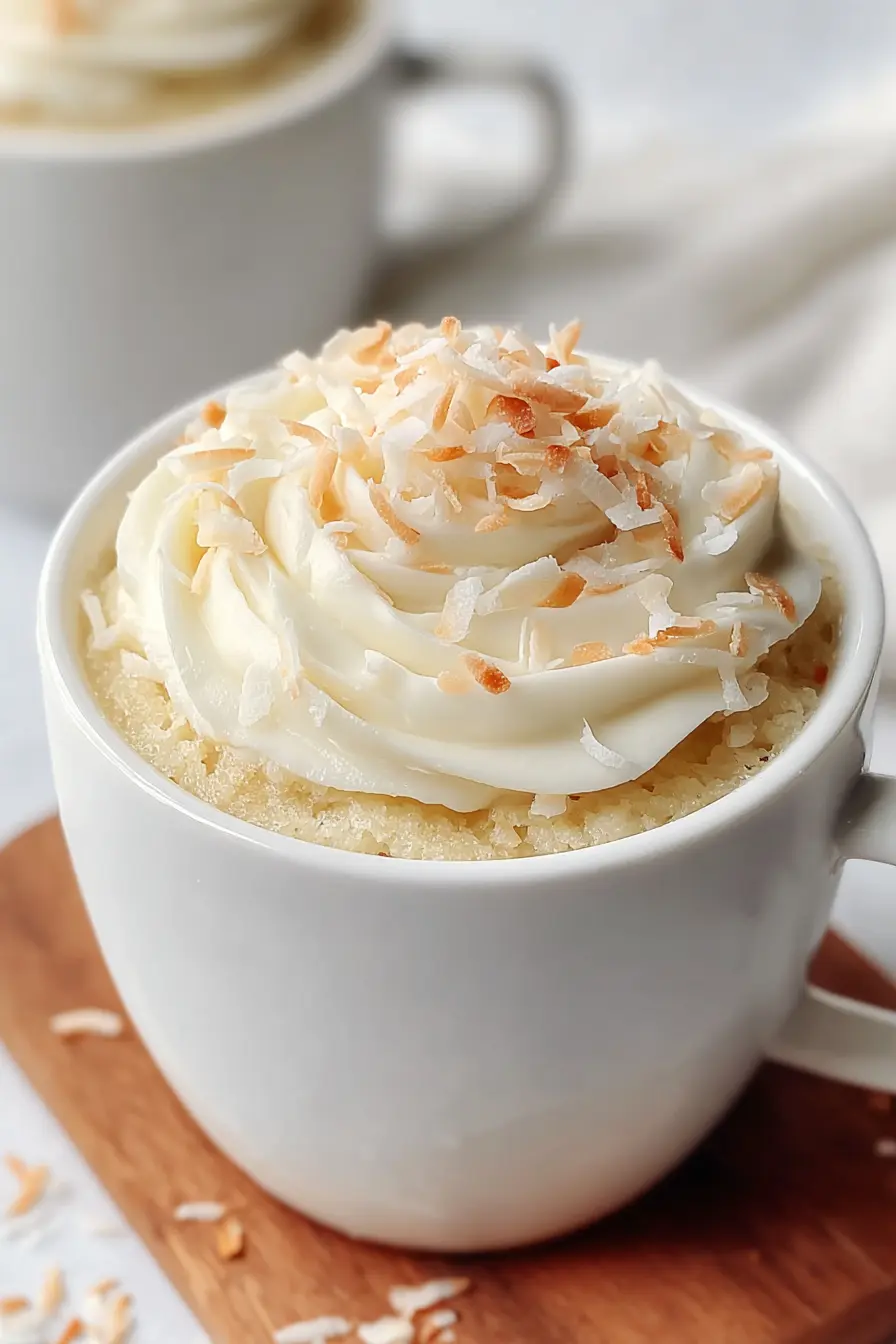
Quick, cozy, and beginner-friendly, Coconut Mug Cake offers a soft, warm dessert with rich coconut flavor in just minutes. It is perfect for small cravings, fast weeknight treats, and those moments when you want something homemade without baking a full cake.
This is the kind of dessert that fits real life, allowing you to mix it in one small bowl and cook it in the microwave for a tender little cake ready in no time. The flavor works because every ingredient has a clear job, from the butter for richness to the sour cream for softness, and the flaked coconut for texture.
Why You Will Love This Recipe
- Speedy Preparation: Enjoy a delicious, homemade-tasting dessert in under 5 minutes, perfect for spontaneous sweet tooth attacks.
- Single-Serving Delight: This recipe is perfectly portioned for one, eliminating the temptation of leftovers and reducing food waste.
- Simple Ingredients: It uses common pantry staples, meaning you likely have everything you need to make it right now.
- Irresistible Texture: Despite its quick cooking time, this mug cake boasts a wonderfully moist and tender crumb.
- Customizable Finish: Easily adapt the toppings to suit your mood or what you have on hand, making each mug cake unique.
Ingredients You Need
Crafting this delightful coconut mug cake relies on a few key ingredients that combine to create its signature flavor and texture. Using good quality staples will elevate this simple treat. Ensure your coconut extract is fresh for the most vibrant taste.
Coconut Mug Cake

A warm, individual coconut cake prepared in minutes, this simple microwave dessert offers a soft texture and rich flavor in a convenient single-serving format. Quick, cozy, and beginner-friendly, it's perfect for small cravings or fast weeknight treats.
- 2 tablespoons granulated sugar
- 1 tablespoon melted butter
- 3 tablespoons milk (preferably whole for a richer result)
- 1 tablespoon full-fat sour cream
- 1/4 teaspoon coconut extract
- 2 tablespoons flaked coconut (such as Baker¿s shredded coconut)
- 1/2 teaspoon baking powder
- 1/4 cup all-purpose flour
- 1In a small bowl, stir together the sugar, baking powder, and flour.
- 2Add the melted butter, milk, sour cream, and coconut extract. Mix until the batter looks smooth and creamy, then fold in the flaked coconut.
- 3Continue stirring just until the batter is free of visible lumps.
- 4Spoon or pour the batter into a microwave-safe mug with enough room for the cake to rise.
- 5Microwave for about 1 to 1 1/2 minutes, checking at the 1-minute mark. The exact time may vary by appliance.
- 6Let the mug cake stand for a minute or two before eating.
- 7Finish with any preferred topping, such as buttercream frosting, whipped cream, plain or toasted shredded coconut, or another garnish of choice. Serve directly from the mug.
Keywords: Coconut Mug Cake, Microwave Cake, Single Serving, Quick Dessert, Easy Baking, Coconut Flavor
- granulated sugar: adds just enough sweetness for a comforting dessert that isn’t overly heavy.
- melted butter: brings richness and helps create a soft, cake-like texture that feels more satisfying than many quick microwave sweets.
- milk: loosens the batter and keeps it smooth; whole milk gives the mug cake a slightly fuller, creamier finish.
- full-fat sour cream: a small ingredient that makes a big difference, helping the crumb stay moist and tender instead of dry.
- coconut extract: gives the cake its clear coconut flavor, making the finished dessert fragrant and distinct.
- flaked coconut: adds texture and reinforces the coconut taste in every bite, giving the cake a more homemade feel.
- baking powder: provides lift, helping the batter puff gently as it cooks in the microwave.
- all-purpose flour: gives the mug cake structure and turns the wet mixture into a true cake rather than a pudding-like dessert.
The precise quantities for each ingredient are detailed in the recipe card above for your convenience.
Variations
For those seeking to adapt this delightful Coconut Mug Cake to specific dietary preferences or simply to explore new flavor profiles, several exciting variations are readily achievable.
Vegan Coconut Mug Cake: To transform this into a delicious vegan treat, simply swap out the dairy ingredients. Replace the milk with your favorite plant-based alternative, such as almond milk, oat milk, or soy milk. For the sour cream, a dollop of full-fat coconut yogurt or a tablespoon of cashew cream will provide that essential moisture and richness. Ensure your melted butter substitute is a vegan butter or a neutral oil like melted coconut oil to maintain the tropical theme. This version still captures the essence of coconut cake beautifully.
Low-Carb / Keto Coconut Mug Cake: Adapting this recipe for a lower carbohydrate lifestyle is straightforward and yields a satisfying dessert. Replace the all-purpose flour with an equal amount of almond flour or coconut flour, or a blend of both for optimal texture. For sweetness, switch the granulated sugar for a keto-friendly sweetener like erythritol, stevia, or monk fruit sweetener, adjusting the amount to your taste. You might also consider adding a touch more fat, perhaps by increasing the butter or sour cream slightly, as low-carb flours can sometimes absorb more liquid.
Gluten-Free Coconut Mug Cake: For individuals avoiding gluten, this mug cake can be made gluten-free with a simple flour substitution. A good quality gluten-free all-purpose flour blend that contains xanthan gum will work wonderfully as a direct substitute for the all-purpose flour. Alternatively, you could experiment with using only almond flour or coconut flour, though you may need to slightly adjust the liquid content to achieve the perfect batter consistency. Always check the labels of your chosen gluten-free flour blend to ensure it suits your needs.
How to Prepare Coconut Mug Cake
Step 1: Combine the Dry Ingredients
Begin by gathering a small, microwave-safe mug. This is where the magic will happen, so choose one you really like. Into this mug, add the granulated sugar, baking powder, and all-purpose flour.
It is crucial to stir these dry ingredients together thoroughly before introducing any wet components. This initial mix ensures that the leavening agent, the baking powder, is evenly distributed throughout the flour. This even distribution is key to achieving a uniformly risen cake, preventing dense spots or pockets of unmixed ingredients.
Taking a moment here to whisk or stir these components until they are well incorporated helps to lay the foundation for a perfectly textured mug cake. This simple step sets you up for success and guarantees that every spoonful will be delightful. It’s a small detail that makes a significant difference in the final outcome of your quick dessert.
Step 2: Incorporate the Wet Ingredients and Coconut
Once your dry ingredients are happily mingled, it’s time to introduce the wet elements that will transform the mixture into a batter. Carefully add the melted butter, milk, sour cream, and the aromatic coconut extract directly into the mug with the dry ingredients.
Now, using a small whisk or a miniature spatula, gently stir everything together. Your goal here is to combine the ingredients until the batter appears smooth and creamy. This is the point where the components start to emulsify, creating the luscious texture that will become your cake. Be patient and ensure all the dry bits are moistened.
As soon as the batter has reached a smooth consistency, it’s time to fold in the flaked coconut. Sprinkle the flaked coconut into the batter and use your utensil to gently incorporate it. You want the coconut to be evenly dispersed throughout the batter, ensuring you get that lovely texture and flavor in every bite. Avoid overmixing at this stage.
Step 3: Achieve a Lump-Free Batter
Continue stirring the batter gently but thoroughly after adding the flaked coconut. The primary objective at this stage is to eliminate any visible lumps of flour or unincorporated ingredients that might still be lurking in the mixture.
A smooth batter is not just aesthetically pleasing; it’s a critical factor for even cooking. When the batter is uniform, the heat from the microwave can penetrate and cook the cake consistently from all sides. This means you’re far less likely to end up with gooey, undercooked spots in the center or dry, overcooked edges.
Your batter should look cohesive and have a glossy sheen. If you notice any stubborn dry pockets, a few more gentle stirs will usually do the trick. The final consistency should be pourable but not overly runny, indicating that the flour has absorbed the liquids adequately. This step ensures a tender and well-developed crumb in your finished mug cake.
Step 4: Transfer Batter to the Mug
Now, take your prepared batter and carefully spoon or pour it into your chosen microwave-safe mug. It is essential to select a mug that offers sufficient headspace for the cake to rise without overflowing. This is a crucial step to prevent a microwave mess.
Avoid the temptation to fill the mug to the very brim. Mug cakes notoriously puff up quite significantly during the cooking process due to the rapid heating of the batter. Leaving adequate room, typically filling the mug no more than two-thirds full, provides this necessary expansion space.
Consider the size of your mug carefully. A standard 10-12 ounce mug is usually ideal. If you use a smaller mug, you run a higher risk of overflow. If you are using a larger mug, the cake might cook a bit faster or become thinner. Ensure the batter is distributed relatively evenly within the mug for uniform cooking.
Step 5: Microwave to Perfection
Place the mug containing the batter into your microwave. Begin by microwaving on high power for approximately 1 minute. This initial burst of heat is usually enough to start the cooking process and allow the cake to rise.
After the first minute, carefully remove the mug from the microwave. Check the center of the cake. If it still appears visibly wet or gooey, it needs a little more time. However, do not continue microwaving for long periods.
Instead, continue cooking in very short intervals, about 10 to 15 seconds at a time. Check the cake after each interval. The cake is done when the top is set and springs back lightly when gently touched. Be cautious not to overcook, as this is the quickest way to achieve a rubbery texture. The exact time will vary based on your microwave’s wattage.
Step 6: Allow to Rest Briefly
Once your coconut mug cake has finished cooking, resist the urge to dive in immediately. Carefully remove the hot mug from the microwave, perhaps using oven mitts or a towel, as it will be quite hot to the touch.
Let the mug cake stand undisturbed for a minute or two. This short resting period is surprisingly important for the cake’s final texture. During this time, the internal structure of the cake continues to set and stabilize.
This brief pause helps to redistribute any remaining internal heat and allows the moisture within the cake to equalize. It prevents the cake from feeling overly steamy or underdone, resulting in a more pleasant, tender crumb that is easier to enjoy. This simple step enhances the overall eating experience.
Step 7: Garnish and Enjoy
Now for the most enjoyable part: decorating and savoring your freshly made coconut mug cake. While it’s delicious on its own, a few simple garnishes can elevate it from a quick treat to a special dessert.
Consider adding a dollop of whipped cream for a classic pairing that adds lightness and a cool contrast to the warm cake. If you have toasted coconut flakes on hand, a sprinkle of those offers an intensified coconut flavor and a delightful crunch. This small addition can make the mug cake feel more complex and layered.
For those who prefer a richer experience, a small swirl of buttercream frosting or a light swipe of cream cheese frosting can transform it into something reminiscent of a mini bakery-style indulgence. Even a simple dusting of powdered sugar can provide a touch of elegance. Choose your favorite topping or enjoy it plain!
Pro Tips for Coconut Mug Cake
Mastering the art of the coconut mug cake is all about a few simple techniques and an understanding of how microwave cooking works. These tips will help ensure you achieve the perfect texture and flavor every time.
Don’t Overmix: While you want a smooth batter, overworking the flour can develop the gluten too much, leading to a tougher, heavier cake. Mix only until the ingredients are just combined and the batter is mostly smooth. A few tiny streaks of flour are usually fine and will cook out.
Microwave Wattage Matters: Microwave ovens vary significantly in their power. Start checking for doneness at the lower end of the recommended cooking time, especially if you have a high-wattage microwave. It’s much easier to add a few more seconds than to fix an overcooked, rubbery cake.
The Resting Period is Key: That minute or two of resting time after microwaving is crucial. It allows the cake to finish cooking from residual heat and the crumb to set properly, resulting in a much softer, more enjoyable texture. Don’t skip this step!
Mug Size is Important: Use a mug that is large enough to accommodate the cake’s rise. Filling it more than two-thirds full greatly increases the risk of overflow. A standard 10-12 ounce mug typically works best for this recipe.
Embrace Toasted Coconut: For an extra depth of flavor and a delightful crunch, lightly toast your flaked coconut before adding it to the batter. Spread the coconut on a small plate and toast in the microwave for 30-60 seconds, watching it very carefully to prevent burning. This simple step adds a gourmet touch to your mug cake.
Serving Suggestions for Coconut Mug Cake
Decoration
The visual appeal of your coconut mug cake can be significantly enhanced with thoughtful decoration. A simple dusting of powdered sugar offers an elegant, minimalist finish that highlights the cake’s warm tones. For a touch more tropical flair, consider a sprinkle of toasted shredded coconut; the toasting process brings out a nuttier flavor and adds a pleasant crunch that contrasts beautifully with the soft cake.
A delicate swirl of homemade or store-bought whipped cream is another classic and effective choice. It provides a cool, creamy counterpoint to the warm cake. You could also add a few fresh berries, like raspberries or blueberries, for a burst of color and a touch of tartness that cuts through the sweetness. Edible flowers can also add a whimsical and sophisticated touch, making your mug cake a delightful centerpiece for a small gathering or a personal indulgence.
Side Dishes
While a mug cake is often a complete dessert on its own, it can be beautifully complemented by a few simple side dishes that enhance the overall experience. A small scoop of vanilla bean ice cream or a coconut-flavored sorbet provides a delightful temperature and textural contrast; the coldness of the ice cream against the warm cake is a classic pairing.
Consider a light fruit salad featuring tropical fruits like pineapple, mango, and kiwi. The natural sweetness and slight tartness of these fruits echo the coconut theme and add a refreshing element. If you are serving this as part of a larger meal, a very small portion of this mug cake can serve as a sweet ending without being overwhelming. Its single-serving nature makes it perfect for portion control.
Creative Serving Ideas
Beyond simple toppings, there are several creative ways to present your coconut mug cake to make it extra special. For a fun brunch or breakfast treat, serve it warm with a side of crispy bacon or a small portion of yogurt and granola. This unexpected pairing can be quite delightful. If you are making mug cakes for a small gathering, consider preparing a few different flavor variations and letting guests choose their own toppings from a small ‘mug cake bar’ complete with various sprinkles, sauces, and fruits.
Another charming idea is to serve the mug cake as part of a dessert platter. Alongside a slice of fruit tart or a couple of artisanal cookies, the mug cake adds a cozy, homemade element. You could also hollow out the center of the cake slightly after it has cooled a bit and fill it with a spoonful of fruit compote or a rich chocolate ganache for an added layer of flavor and visual interest. For an adventurous twist, serve it with a shot of rum or a small glass of sweet dessert wine.
Preparation & Storage
Storing Leftovers
Given its nature as a single-serving dessert, the coconut mug cake is optimally enjoyed immediately after preparation when its texture is at its softest and most inviting. However, if you find yourself with a small amount of leftover cake, it can be stored with reasonable success.
To store, cover the mug securely with plastic wrap or aluminum foil, or transfer the cake to a small airtight container. Refrigerate it promptly. Properly stored, the mug cake should remain palatable for up to one day. Be aware that refrigeration will likely cause the cake to firm up considerably, altering its original tender texture.
When you decide to enjoy the leftover cake, plan to reheat it. This step is essential to revive some of its initial appeal. While it won’t perfectly replicate the freshly made experience, reheating can significantly improve the texture and make it more enjoyable than eating it cold and firm.
Freezing
Freezing is generally not the ideal method for storing this particular type of mug cake. Because it is designed to be a quick, soft, and tender microwave dessert, the delicate crumb structure is susceptible to damage during the freezing and thawing process.
When frozen, the moisture within the cake can form ice crystals. Upon thawing, these crystals can break down the cake’s structure, often resulting in a dry, crumbly, or even mushy texture that is quite unappealing. Small cakes, in particular, can lose their intended textural qualities more readily when subjected to freezing temperatures.
For these reasons, it is highly recommended to consume the coconut mug cake fresh. If you anticipate not finishing it, it is better to store it in the refrigerator for a very short period or to simply make a smaller batch next time. Freezing is best reserved for baked goods that are more robust and designed to withstand such preservation methods.
Reheating
Reheating a leftover coconut mug cake is a straightforward process, but it requires attention to avoid further compromising its texture. The goal is to warm the cake through gently without causing it to become tough or dry.
Place the mug cake in the microwave. Instead of setting it for a single, extended period, opt for very short intervals. Start with about 10 to 15 seconds of reheating on high power. After this brief burst, check the cake’s temperature and texture.
Continue reheating in additional short bursts of 5 to 10 seconds, checking after each one. This incremental approach allows you to monitor the warming process closely. The cake should feel warm to the touch and have a slightly softer consistency than it did when cold. Be extremely careful not to overheat, as this is the primary cause of rubbery texture in reheated microwave cakes.
Frequently Asked Questions
-
Can I make this mug cake ahead of time and reheat it later?
While this coconut mug cake is best enjoyed immediately after preparation for optimal texture and flavor, it can be stored and reheated. Leftovers should be covered and refrigerated for up to one day. To reheat, use short microwave intervals (10-15 seconds at a time) to warm it through gently. Be cautious not to over-reheat, as this can lead to a dry or rubbery consistency. The resting period after reheating is also important to allow the crumb to settle.
-
Why did my mug cake turn out rubbery or dry?
A rubbery or dry texture in a mug cake is almost always a result of overcooking. Microwaving for too long, or at too high a power setting without careful monitoring, can quickly toughen the cake. Microwave wattages vary significantly, so it’s essential to start checking for doneness early, usually around the 1-minute mark for this recipe. Using short bursts of cooking time in the final stages and allowing the cake to rest after microwaving are crucial steps to prevent this issue and achieve a tender crumb.
-
What can I substitute for sour cream in this recipe?
If you don’t have sour cream or prefer not to use it, plain full-fat yogurt is an excellent substitute and will provide a very similar moistness and tenderizing effect. Greek yogurt, if it’s full-fat, also works well, though it might make the batter slightly thicker. A tablespoon of cream cheese, softened and mixed well into the batter, can also add richness and moisture, though it might slightly alter the flavor profile. Non-dairy alternatives like full-fat coconut yogurt can also be used for a vegan option.