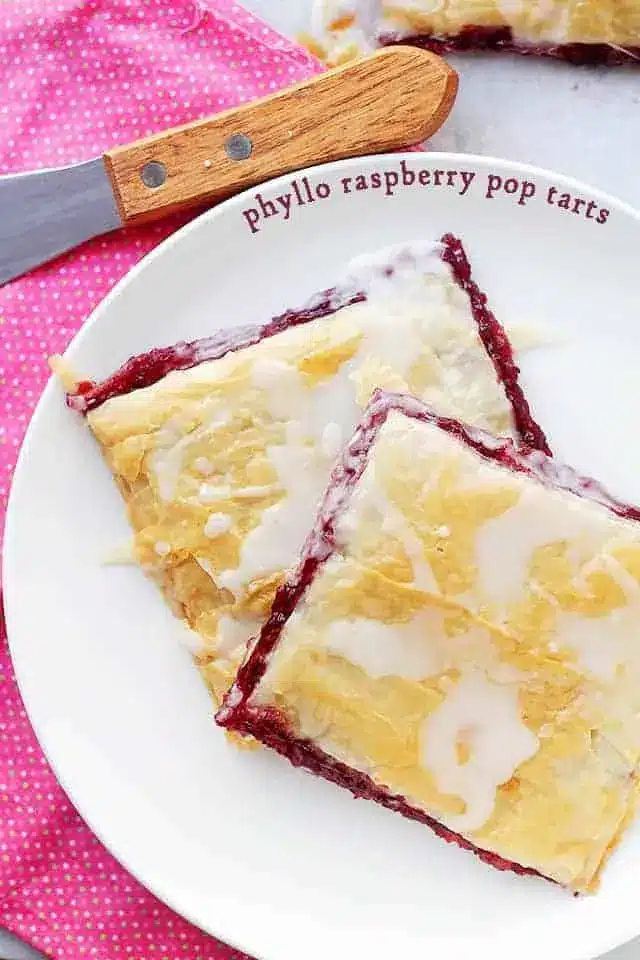
Phyllo Raspberry Pop Tarts with Vanilla Glaze | Homemade Pop Tarts
Discover a delightful twist on a classic treat with these incredibly easy Phyllo Pop Tarts. Imagine the satisfying crunch of flaky phyllo dough embracing a sweet, fruity center, all topped with a simple vanilla glaze. This recipe elevates the humble pop tart into a sophisticated yet wonderfully simple dessert or breakfast option that’s sure to impress.
If you’re looking for a dessert that’s both visually appealing and incredibly easy to make, these phyllo pop tarts are your answer. They leverage store-bought phyllo dough to create a wonderfully crisp texture without the fuss of traditional pastry making, making them perfect for busy weeknights or impromptu gatherings. You’ll be amazed at how quickly these beautiful tarts come together, offering a taste of homemade goodness in a fraction of the time.
Why You Will Love This Recipe
- Effortless Elegance: Phyllo dough provides a sophisticated, flaky texture that makes these tarts feel like a gourmet treat, yet they are remarkably simple to assemble.
- Speedy Preparation: With minimal hands-on time, you can go from pantry staples to delicious baked goods in under an hour, perfect for satisfying last-minute cravings.
- Versatile Filling: While raspberry jam is featured, this recipe is a fantastic canvas for your favorite fruit preserves, allowing for endless flavor customization.
- Golden, Flaky Perfection: The layers of phyllo bake up incredibly light and crispy, offering a delightful contrast to the sweet, gooey jam filling.
- Charming Presentation: A simple drizzle of vanilla glaze adds a touch of sweetness and a beautiful finish, making these pop tarts perfect for any occasion.
Ingredients You Need
The beauty of these phyllo pop tarts lies in their simplicity, relying on a few key ingredients to deliver maximum flavor and texture. Using good quality phyllo dough is paramount for achieving that signature crispiness that defines this delightful pastry. Ensure your jam is one you truly enjoy, as its fruity notes will be at the heart of each bite. The ingredients for the glaze are straightforward, providing a sweet balance without overwhelming the other elements.
Phyllo Raspberry Pop Tarts
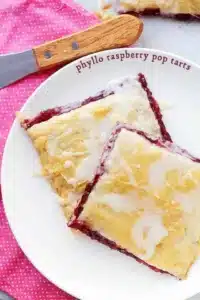
These phyllo Pop Tarts are the easiest homemade pop tart recipe ever! Layers of phyllo sheets filled with raspberry jam and topped with a sweet vanilla glaze.
- 4 tablespoons butter, melted
- 10 phyllo sheets, divided
- 1 cup powdered sugar
- 1 teaspoon pure vanilla extract
- 2 to 3 tablespoons water
- 1Preheat oven to 400°F. Line a baking sheet with foil.
- 2Layer 5 pieces of Phyllo sheets on the prepared baking sheet, brushing each sheet with the melted butter before adding the next.
- 3Brush the 5th sheet with butter and spread the raspberry jam, leaving a 1-inch empty border around the edges.
- 4Layer the remaining 5 Phyllo sheets, brushing each sheet with butter before adding the next.
- 5Brush the top layer with butter and cut the pastry into 8 rectangles. A pizza-cutter works best. DO NOT remove or separate the pastries, yet.
- 6Bake for 12 to 15 minutes, or until golden brown. Remove from oven and let slightly cool.
- 7Make the glaze. Meanwhile, in a small mixing bowl whisk together powdered sugar, vanilla and 2 tablespoons water; whisk until smooth and thoroughly combined. If the glaze is too thick for your liking, add 1 more tablespoon water and whisk until smooth.
- 8Drizzle each pop tart with vanilla glaze. Glaze will harden as it stands. Serve.
Keywords: Phyllo, Pop Tarts, Raspberry, Dessert, Pastry
- melted butter: essential for brushing between phyllo layers to ensure crispness.
- phyllo sheets: the star ingredient, providing a delicate, flaky crust.
- raspberry jam: the sweet and slightly tart filling that makes these pop tarts irresistible.
- powdered sugar: forms the base of the sweet vanilla glaze.
- pure vanilla extract: adds a warm, aromatic flavor to the glaze.
- water: used to achieve the perfect consistency for the glaze.
Specific quantities for these ingredients can be found within the accompanying recipe card.
Variations
The versatility of these phyllo pop tarts is one of their greatest strengths. You can easily adapt the filling to cater to different tastes and dietary preferences. Consider experimenting with different fruit jams; apricot, blackberry, or even a spiced apple butter would be delightful alternatives to raspberry. A sprinkle of cinnamon or nutmeg in the jam could also add a warm, autumnal spice note, particularly lovely during cooler months.
For those seeking a low-carb option, you can explore sugar-free jams or even a filling made from pureed berries sweetened with a low-carb sweetener like erythritol or stevia. Ensure the consistency is thick enough not to run out during baking. A touch of lemon zest mixed into the jam would add a bright, refreshing contrast, making the pop tarts feel lighter and more summery. This adaptation proves that healthy eating doesn’t mean sacrificing delicious treats.
A truly decadent variation involves adding a layer of finely chopped nuts, such as walnuts or pecans, to the jam filling. For a chocolate lover’s dream, you could swirl in some melted dark chocolate or even add a few mini chocolate chips to the jam. Another exciting possibility is to incorporate a hint of spice like cardamom or ginger into the glaze for an exotic twist. These creative twists ensure that you can enjoy homemade pop tarts in a way that perfectly suits your palate. To explore more sweet pastry delights, you might find our easy berry tart recipe inspiring.
How to Prepare phyllo pop tarts
Step 1: Prepare Your Workspace and Preheat the Oven
Before you begin assembling your delicious phyllo pop tarts, it’s crucial to set yourself up for success. Ensure you have a clean, spacious work surface where you can comfortably lay out the delicate phyllo sheets. This preparation minimizes stress during the assembly process, allowing the magic to happen smoothly. Have all your ingredients measured and ready to go; this is a key principle in efficient baking.
Preheat your oven to 400°F (200°C). This moderate to high temperature is essential for achieving the signature crispiness of the phyllo dough. A well-preheated oven ensures that the tarts bake evenly from the moment they enter, developing a beautiful golden-brown hue and a satisfying crunch. Proper preheating is a foundational step that contributes significantly to the final texture and appearance of your pop tarts.
Next, line a large baking sheet with parchment paper or aluminum foil. This simple step prevents the tarts from sticking to the pan and makes cleanup much easier. If using foil, a light coating of cooking spray can further ensure no sticking. This proactive measure is a small detail that makes a big difference in the overall baking experience, ensuring your beautiful tarts release cleanly after baking.
Step 2: Building the Phyllo Layers
Begin by taking one sheet of phyllo dough from the package and gently laying it flat on your prepared surface. It’s important to work relatively quickly as phyllo dough can dry out. If you’re not using the entire package at once, keep the remaining sheets covered with a slightly damp kitchen towel to maintain their suppleness. Remember, phyllo dough is incredibly thin, so handle it with care to avoid tearing.
Using a pastry brush, lightly coat the entire surface of the first phyllo sheet with melted butter. This butter layer is what creates the individual flaky layers as it bakes, separating the thin sheets and giving them that characteristic crispiness. Don’t be shy with the butter; it’s a key component for achieving the desired texture. The goal is a light, even coating across the entire sheet.
Carefully place another sheet of phyllo directly on top of the buttered first sheet. Again, brush this second sheet generously with melted butter, ensuring complete coverage. Repeat this process for a total of five phyllo sheets, buttering each one before layering the next. This creates a substantial base for your filling and ensures a wonderfully crisp bottom crust for your pop tarts.
Step 3: Adding the Irresistible Filling
Once you have layered and buttered five sheets of phyllo dough, it’s time to introduce the delicious filling. Take your raspberry jam and spread it evenly over the top phyllo sheet. Be sure to leave a border of about one inch around all the edges. This border is crucial; it acts as a seal, preventing the jam from leaking out of your pop tarts during baking and creating a contained pocket of fruity goodness.
The amount of jam can be adjusted slightly to your preference, but aim for an even layer that covers most of the surface within the one-inch border. Too much jam might cause it to bubble over, while too little might leave you wanting more. The one-inch border is your guide to ensuring a neat and contained filling. This careful distribution ensures a perfect balance of pastry to filling in every bite.
After spreading the jam, it’s time to create the top layers of your pop tart. Place another sheet of phyllo dough directly over the jam layer. Brush this sheet with melted butter, just as you did with the bottom layers. Continue layering and buttering an additional four sheets of phyllo on top of this, for a total of five more sheets. This builds up the pastry structure, creating a substantial and flaky top crust.
Step 4: Shaping and Cutting the Tarts
With all ten layers of phyllo dough and the jam filling in place, it’s time to prepare the pop tarts for baking. Give the very top layer of phyllo one final, generous brushing of melted butter. This ensures the top crust will also bake to a beautiful golden-brown perfection. A good coating of butter on the top will enhance the overall visual appeal and crispiness of the finished product.
Now, using a sharp knife or, ideally, a pizza cutter, carefully score the layered pastry into eight equal rectangles. Do not separate the rectangles completely at this stage; you want them to remain connected on the baking sheet for now. Scoring them makes it much easier to cut them apart cleanly after baking, ensuring neat individual pop tarts. Apply enough pressure to cut through all the layers without disturbing the jam too much.
This scoring step is a technique borrowed from preparing delicate pastries, ensuring that once baked, you can easily divide the large pastry into individual servings without tearing. The intention is to create defined lines that will guide your separation later. This methodical approach guarantees a professional-looking presentation for your homemade treats. You are now one step closer to enjoying these delightful pastries fresh from the oven.
Step 5: Baking to Golden Perfection
Carefully transfer the baking sheet with the scored phyllo pastry into your preheated 400°F (200°C) oven. Bake for approximately 12 to 15 minutes. Keep a close eye on the tarts during this time; ovens can vary, and you want them to achieve a beautiful, even golden-brown color. The phyllo should puff up and become incredibly crisp and flaky.
The aroma of toasting phyllo and warm jam will begin to fill your kitchen, a delightful sign that your pop tarts are nearing completion. The exact baking time will depend on your oven’s performance and how thick your layers are. The key indicator is the visual cue of a rich golden hue across the entire surface of the pastry. You are looking for that perfect crispness that only phyllo can deliver.
Once the phyllo pop tarts are perfectly golden and crisp, carefully remove the baking sheet from the oven. Let them cool on the baking sheet for a few minutes. This initial cooling period allows them to firm up slightly, making them easier to handle. Allowing them to cool on the sheet prevents the bottoms from becoming soggy and helps maintain their crisp texture. They are now ready for the final, sweet touch.
Step 6: Crafting and Applying the Vanilla Glaze
While the phyllo pop tarts are cooling slightly, it’s time to prepare the simple yet essential vanilla glaze. In a small mixing bowl, combine the powdered sugar and pure vanilla extract. Start by adding two tablespoons of water. Whisk the ingredients together vigorously until you achieve a smooth, lump-free consistency. The goal is a glaze that is thick enough to coat the tarts but thin enough to drizzle easily.
If the glaze appears too thick and difficult to drizzle, gradually add more water, a teaspoon at a time, whisking thoroughly after each addition. Conversely, if it’s too thin, you can add a little more powdered sugar to thicken it. The perfect glaze should have a beautiful sheen and flow smoothly from your whisk or spoon. Achieving the right consistency is key to a professional-looking finish.
Once the glaze is ready and the pop tarts have cooled slightly, it’s time to drizzle. Use a spoon or a piping bag with a fine tip to create decorative patterns over each of the pop tart rectangles. Don’t worry about making it perfect; a rustic drizzle adds to the homemade charm. Allow the glaze to set and harden completely before serving, which typically takes about 10-15 minutes. This final step seals in the sweetness and adds a beautiful finish.
Pro Tips for phyllo pop tarts
Work Quickly with Phyllo: Phyllo dough dries out very quickly once exposed to air. Keep the unused sheets covered with a slightly damp (not wet!) kitchen towel while you work with the sheets you need. This prevents them from becoming brittle and difficult to handle.
Butter is Your Friend: Don’t skimp on the melted butter when brushing the phyllo layers. It’s the key to achieving that incredibly flaky, crisp texture that makes these pop tarts so special. Ensure each layer is evenly coated for consistent results.
Seal the Edges Well: When spreading the jam, maintaining that one-inch border is crucial. This prevents the filling from leaking out during baking, ensuring your pop tarts remain neat and tidy. A well-sealed edge results in a cleaner final product.
Score, Don’t Cut Through: When shaping the tarts, only score the pastry with a pizza cutter or sharp knife. Do not cut all the way through the layers. This makes it easier to separate the tarts cleanly after baking without tearing the delicate phyllo.
Don’t Overbake: Keep a close eye on the tarts while they are baking. Phyllo dough can go from golden to burnt very quickly. The baking time is a guideline; adjust based on your oven and desired crispness.
Serving Suggestions for phyllo pop tarts
Decoration
The simple vanilla glaze provides a lovely canvas for further decoration if you wish to add a personal touch. You could pipe thin lines of melted dark or white chocolate over the hardened vanilla glaze for a classic contrast. Edible glitter or sprinkles can add a festive sparkle, making them perfect for parties or holidays. For a more sophisticated look, consider a light dusting of powdered sugar just before serving, which offers a delicate sweetness and a beautiful visual appeal.
Side Dishes
These phyllo pop tarts are quite versatile and can be enjoyed on their own as a delightful treat. However, they also pair wonderfully with a cold glass of milk or a steaming cup of coffee or tea, a classic combination for any pastry. For a more substantial breakfast or brunch, consider serving them alongside a fresh fruit salad, yogurt, or a side of scrambled eggs and crispy bacon. They also make a lovely accompaniment to a light lunch.
Creative Serving Ideas
For a delightful afternoon tea, present these pop tarts on a tiered stand, perhaps alongside mini sandwiches and scones. You can also serve them warm, straight from the oven, with a dollop of whipped cream or a scoop of vanilla bean ice cream for an indulgent dessert. Imagine breaking open a warm tart and having the jam slightly ooze out – pure bliss! For a fun twist, cut them into smaller bite-sized pieces and serve them as part of a dessert buffet or a sweet charcuterie board.
Preparation & Storage
Storing Leftovers
To store leftover phyllo pop tarts, allow them to cool completely at room temperature. Once cooled, place them in an airtight container. They will maintain their best texture and crispness when stored at room temperature for up to 2-3 days. Avoid refrigerating them, as this can make the phyllo dough lose its crispiness and become soggy.
Freezing
While best enjoyed fresh, you can freeze these pop tarts. It’s recommended to freeze them *before* glazing for the best results. Once baked and completely cooled, wrap them individually in plastic wrap, then place them in a freezer-safe bag or container. They can be frozen for up to 1-2 months. Ensure they are well-protected from freezer burn.
Reheating
If you have frozen your pop tarts, allow them to thaw completely at room temperature before reheating. To regain some of their crispiness, reheat them in a preheated oven at around 300°F (150°C) for 5-8 minutes, or until warmed through and slightly crisped. If reheating leftovers that were stored at room temperature, a short stint in a warm oven can also revive their flaky texture, though this is optional.
Frequently Asked Questions
-
Can I use puff pastry instead of phyllo dough for these pop tarts?
Yes, you can absolutely substitute puff pastry for phyllo dough in this recipe. Puff pastry will yield a different texture – it will be more airy and layered, but less delicate and shatteringly crisp than phyllo. If using puff pastry, you’ll likely need fewer sheets to achieve a similar thickness. Follow the same buttering and filling steps. The baking time might need slight adjustment; keep an eye on it as puff pastry can brown quickly.
-
How do I prevent my phyllo dough from tearing when I assemble the tarts?
Phyllo dough is delicate, and some minor tears are often unavoidable, but you can minimize them. Ensure your dough is thawed correctly according to package directions. Keep the unused sheets covered with a damp (not wet) towel to prevent drying. Work smoothly and deliberately, and don’t worry too much about small tears, as the butter layers and subsequent sheets will help conceal them. Pressing down gently after layering also helps to ‘glue’ any small imperfections.
-
What other fillings can I use for these phyllo pop tarts besides raspberry jam?
The possibilities for fillings are extensive! Fruit jams like strawberry, blueberry, apricot, or cherry are excellent choices. For a more savory twist, consider a cream cheese filling mixed with a little sugar and fruit, or even a spiced apple or pear filling. Chocolate hazelnut spread is another popular option, mimicking classic pop tart flavors. You can also mix in a pinch of cinnamon, nutmeg, or cardamom with your chosen jam for added warmth and complexity. For a hint of citrus, add lemon or orange zest to the jam.