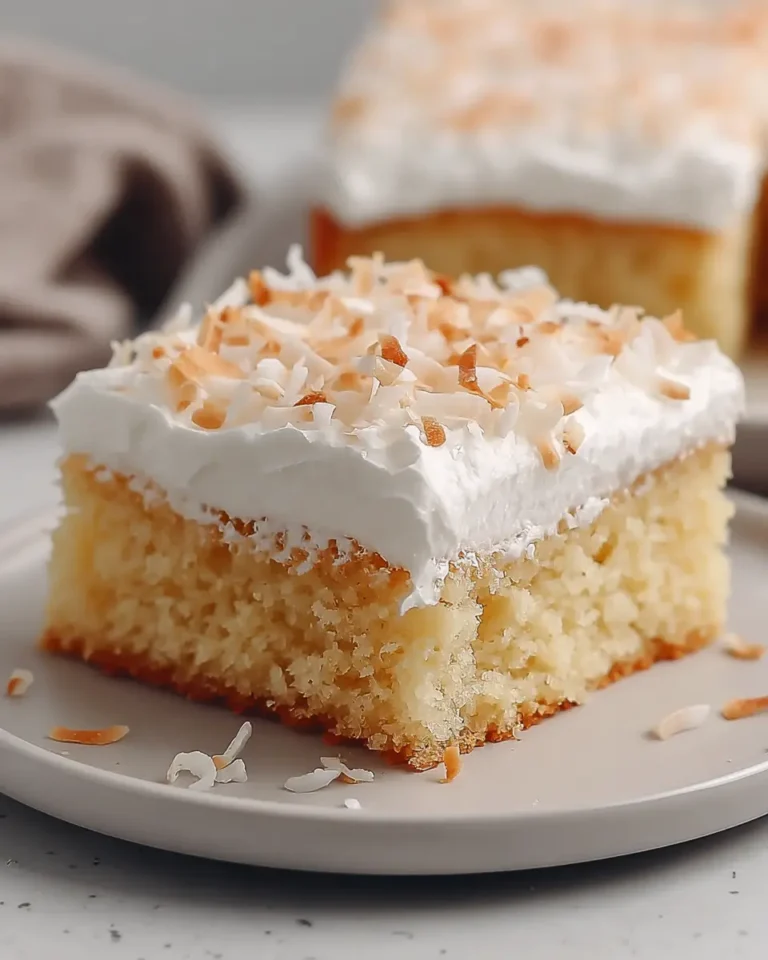
Old Fashioned Coconut Cake
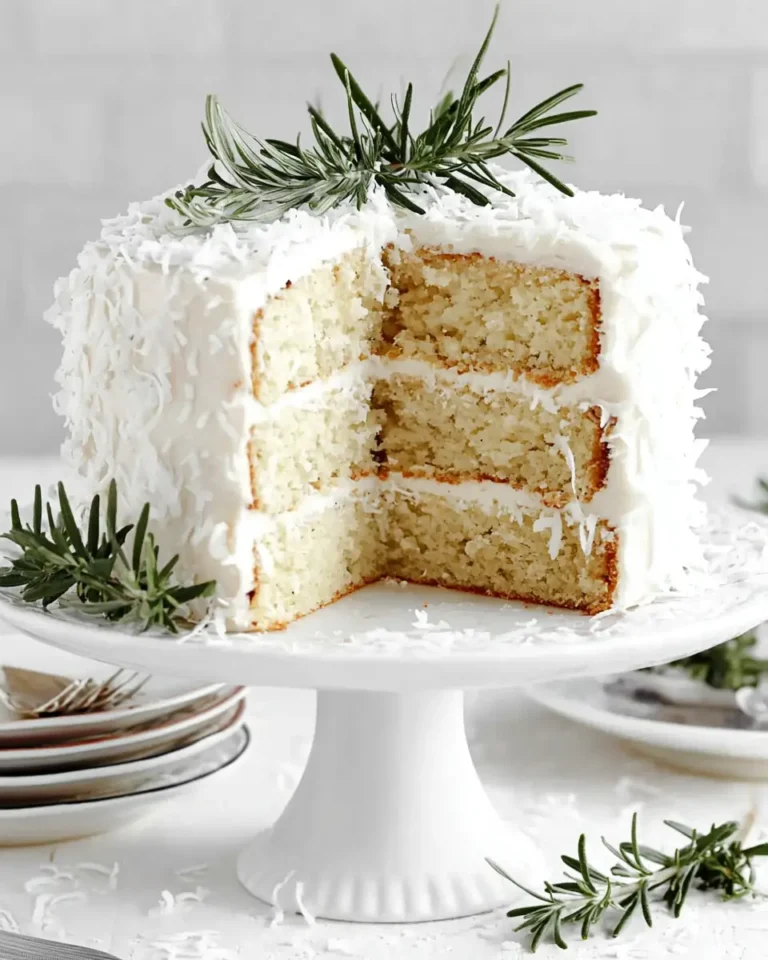
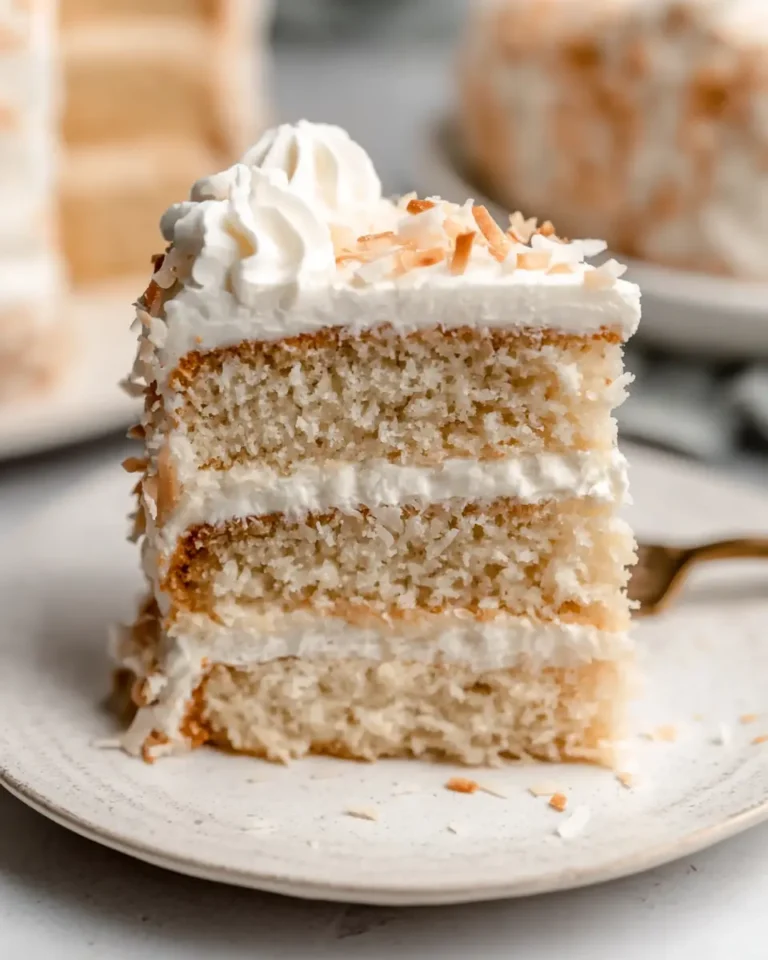
There’s a certain magic woven into the fabric of classic desserts, a comforting nostalgia that speaks of simpler times and gatherings filled with laughter. The Old Fashioned Coconut Cake is one such masterpiece, a tender, buttery creation that embodies elegance without pretense. Its delicate coconut essence, enveloped in a cloud-like seven-minute frosting and crowned with a snowy coconut finish, makes it a perennial favorite for holidays and cherished family occasions.
This cake is more than just a dessert; it’s an experience. Its beautiful appearance evokes a sense of tradition, promising a taste that is as delightful as it looks. The rich, buttery crumb, enhanced by the tenderness of buttermilk, harmonizes perfectly with the sweet, familiar finish of coconut, offering a truly comforting and celebratory bite.
Why You Will Love This Recipe
- Nostalgic Charm: This cake evokes a wonderful sense of tradition, reminiscent of grandma’s kitchen and special family celebrations, delivering a taste that is both familiar and deeply satisfying.
- Exceptional Texture: The crumb is wonderfully soft and rich, thanks to the generous use of butter and the tenderizing effect of buttermilk, ensuring every bite is a delight.
- Flavorful Balance: A perfect harmony of buttery cake, subtle coconut notes, and the airy sweetness of seven-minute frosting creates a sophisticated yet approachable flavor profile.
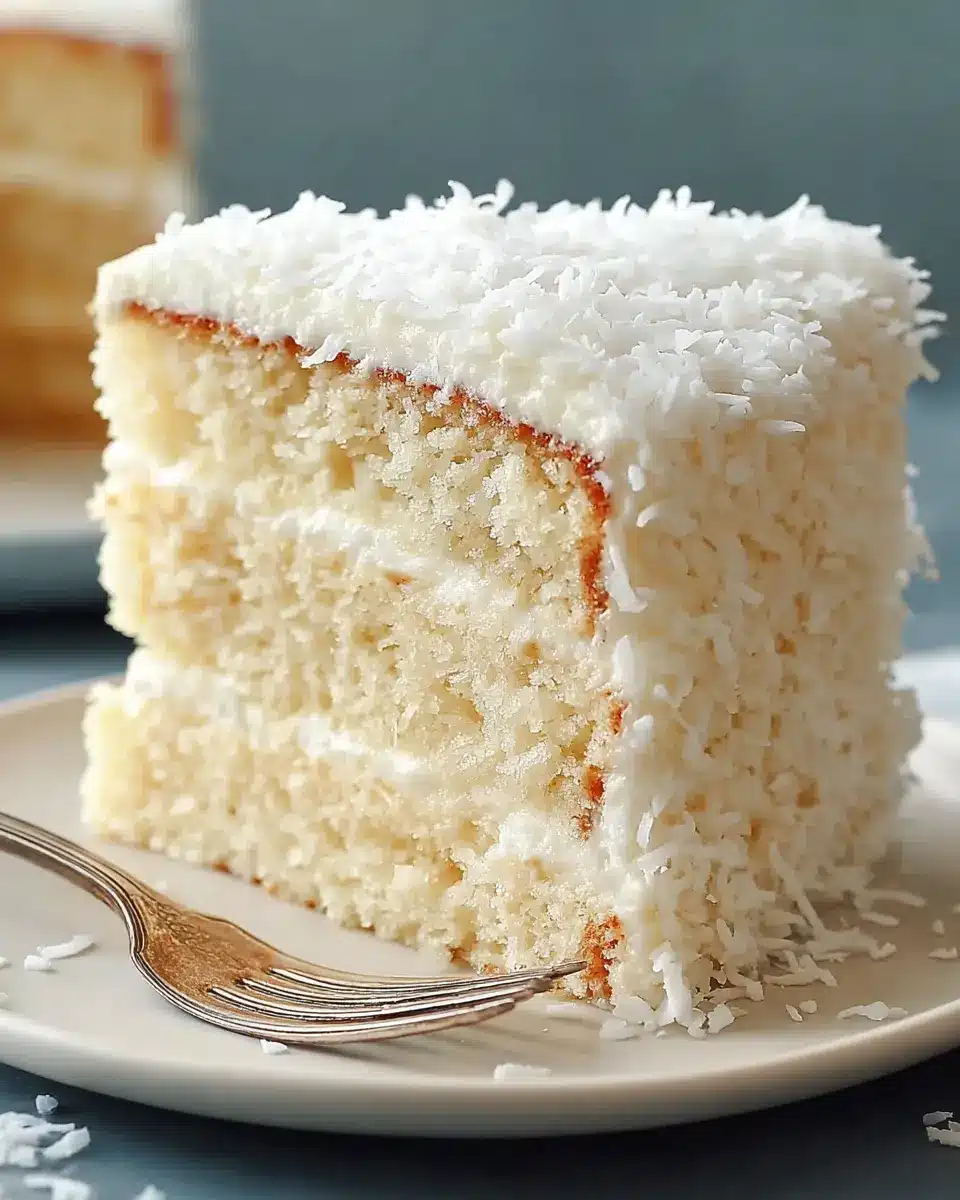
- Visually Stunning: The iconic snowy coconut topping over the fluffy white frosting makes this cake a showstopper, perfect for adding a touch of elegance to any table.
- Rewarding Bake: While exuding classic charm, the preparation is straightforward, making it an accessible and deeply gratifying baking project for home cooks of all levels.
Ingredients You Need
Crafting this Old Fashioned Coconut Cake begins with selecting high-quality ingredients that form the foundation of its exquisite flavor and texture. Using room temperature butter and eggs is paramount, as it allows for optimal creaming, which incorporates essential air for a lighter, more tender crumb. Fresh, good-quality coconut will also elevate the overall taste experience, ensuring that sweet, tropical note sings through.
Old Fashioned Coconut Cake
A classic coconut cake with a tender, buttery crumb and delicate coconut flavor, finished with a generous coating of sweetened shredded coconut over a layer of no-fail seven-minute frosting. It’s dependable for holidays, family gatherings, and anytime you want a classic cake that feels special without being fussy.
- Vegetable shortening for coating the pans
- 2 1/2 cups all-purpose flour
- 1 teaspoon baking powder
- 1/4 teaspoon salt
- 1 teaspoon baking soda
- 1 cup unsalted butter, softened to room temperature
- 2 cups granulated sugar
- 5 large eggs
- 1 teaspoon vanilla extract
- 1 teaspoon coconut flavoring
- 1 cup buttermilk
- 2 cups sweetened shredded coconut for finishing
- Seven-minute frosting (recipe not included)
- 1Preheat the oven to 350°F (175°C). Lightly coat two 9-inch round cake pans, or one 9x13-inch pan, with vegetable shortening, then dust with flour. Set the prepared pans aside.
- 2Place the softened butter and granulated sugar in a large mixing bowl. Using an electric mixer on medium speed, beat until the mixture becomes pale, smooth, and very creamy, allowing at least 4 minutes for proper creaming.
- 3Add the eggs, vanilla extract, and coconut flavoring to the butter mixture. Beat thoroughly until the mixture is fully incorporated and evenly blended.
- 4In a separate medium bowl, combine the 2 1/2 cups all-purpose flour, baking soda, baking powder, and salt. Stir until the dry ingredients are evenly distributed.
- 5Add the dry mixture and the buttermilk to the creamed mixture. Beat with the electric mixer on medium speed, scraping down the bowl as needed, until the batter is smooth and fully combined, about 2 to 3 minutes.
- 6Transfer the batter to the prepared pan or pans. Bake until a toothpick inserted into the center comes out clean, about 25 to 30 minutes for the round layers or 30 to 35 minutes for the 9x13-inch cake.
- 7Remove the cake from the oven and let it cool completely. Once cooled, frost with no-fail seven-minute frosting, spreading it evenly over the surface. Immediately scatter the shredded coconut over the top and gently press it onto the sides so it adheres.
Keywords: Old Fashioned Coconut Cake, Coconut Cake, Classic Cake, Buttery Cake, Seven Minute Frosting, Holiday Dessert, Celebration Cake
- unsalted butter: softened to room temperature for optimal creaming.
- granulated sugar: provides sweetness and contributes to the cake’s light, fluffy texture when beaten with butter.
- large eggs: add structure, richness, and help the cake rise beautifully, ensuring it slices cleanly while remaining moist.
- vanilla extract: imparts a classic, warm aroma and flavor that complements the coconut and butter.
- coconut flavoring: enhances the distinct coconut taste without overpowering the other delicate flavors.
- all-purpose flour: the primary structural component of the cake, keeping the crumb sturdy yet tender.
- baking powder: a leavening agent that works with baking soda to give the cake a reliable and even rise.
- baking soda: reacts with acidic ingredients to provide lift and a tender texture, balancing the overall crumb.
- salt: a crucial element that sharpens the sweetness and prevents the cake from tasting flat, enhancing all other flavors.
- buttermilk: contributes significant tenderness and a subtle, pleasant tang that beautifully balances the cake’s sweetness and frosting.
- vegetable shortening: used for greasing the pans to ensure the cake layers release effortlessly after baking.
- all-purpose flour: a small amount used for dusting the greased pans, further preventing sticking.
- sweetened shredded coconut: the star of the topping, providing texture, sweetness, and the signature snowy finish.
The precise quantities for each ingredient are detailed within the accompanying recipe card, ensuring perfect results every time you bake.
Variations
While the classic Old Fashioned Coconut Cake is undeniably divine, its inherent versatility allows for delightful modifications to suit various dietary preferences or flavor profiles. These adaptations ensure everyone can enjoy a slice of this beloved dessert.
For a delightful vegan iteration, you can expertly substitute the butter with a high-quality vegan butter or a blend of refined coconut oil and plant-based butter. The eggs can be replaced with flax eggs or commercial egg replacers, ensuring the cake still achieves a wonderful structure. Additionally, ensure your buttermilk substitute is dairy-free, such as almond or soy milk mixed with a touch of vinegar or lemon juice. The seven-minute frosting will require a vegan marshmallow fluff or a carefully crafted aquafaba-based meringue for that iconic airy finish.
If you’re exploring a low-carb or ketogenic lifestyle, adapting this cake requires a thoughtful approach to sweeteners and flour. Swap the granulated sugar for a granulated erythritol or xylitol blend, and replace the all-purpose flour with a combination of almond flour and coconut flour. You might need to adjust the liquid content slightly, as these alternative flours absorb moisture differently. For the frosting, sugar-free powdered sweeteners can be used in a buttercream base or a sugar-free meringue alternative.
Another exciting avenue is to infuse the cake with complementary flavors, moving beyond just coconut. Consider adding a hint of citrus zest, like lemon or lime, to the cake batter for a bright, refreshing counterpoint to the sweetness. Alternatively, a touch of berry extract or even a swirl of fruit preserve could introduce a lovely fruity dimension. These subtle additions can elevate the cake’s complexity and offer a unique twist on the traditional recipe, making it feel both familiar and excitingly new.
How to Prepare Old Fashioned Coconut Cake
Step 1: Preparing the Baking Vessels and Oven
The journey to a perfect Old Fashioned Coconut Cake commences with meticulous preparation of your baking pans and preheating the oven. This foundational step is crucial for ensuring the cake layers bake evenly and release cleanly without tearing, preserving their beautiful structure. Begin by generously greasing the interior surfaces of two 9-inch round cake pans with vegetable shortening; ensure every nook and cranny is covered.
Following the greasing, lightly dust the inside of each pan with all-purpose flour, tapping out any excess. This flour coating creates a barrier that further assists in preventing the cake from adhering to the pan. Simultaneously, preheat your oven to 350°F (175°C). An accurately preheated oven ensures that the moment the batter enters, it begins to bake at the correct temperature, promoting consistent rising and a tender crumb.
Why this matters: Proper pan preparation isn’t just about aesthetics; it’s about the integrity of the cake. A well-greased and floured pan is your best defense against a cake that sticks, which can mar the appearance and even compromise its texture when you attempt to salvage broken pieces. This careful attention to detail sets the stage for a flawless bake and a beautiful final presentation, making the subsequent frosting and decorating stages much more rewarding and less stressful.
Step 2: The Art of Creaming Butter and Sugar
This stage is arguably the most critical for achieving the signature light and tender crumb of an old-fashioned coconut cake. Take your softened, room-temperature unsalted butter and place it in a large mixing bowl. Add the granulated sugar to the butter. Using an electric mixer on a medium speed, begin the creaming process. This isn’t a quick stir; it’s an extended beating that can take at least 4 to 5 minutes.
During this process, the butter and sugar crystals work together to incorporate air into the mixture. You are looking for a transformation from a dense, yellow mass to a pale, fluffy, almost cloud-like consistency. This aeration is what provides lift and creates the delicate, melt-in-your-mouth texture that defines a truly exceptional cake. Do not be tempted to shorten this step; the time spent here directly contributes to the cake’s superior quality and old-fashioned character.
The Best Part: This extended creaming phase builds the internal structure of the cake before any flour is even introduced. It ensures that when the leavening agents later get to work, they have a substantial, airy matrix to expand into. The visual cue of a pale, almost white, and very fluffy mixture is your confirmation that you’ve achieved the perfect foundation for a supremely tender cake. This step is a testament to the principle that patience in baking truly yields delicious rewards.
Step 3: Incorporating Eggs and Flavorings
Once the butter and sugar have achieved that perfect pale and fluffy state, it’s time to introduce the eggs and flavorings. Add the large eggs, one at a time, beating well after each addition. This gradual incorporation allows the eggs to emulsify properly into the butter-sugar mixture, further contributing to the richness and structure of the batter. Ensure each egg is fully blended before adding the next to prevent any separation.
Next, stir in the vanilla extract and the coconut flavoring. These aromatics are essential for building the cake’s characteristic flavor profile. Beat the mixture until it appears uniformly smooth and well-combined. If at this point the batter looks silky and has a consistent appearance, you are well on your way to achieving a balanced and evenly baked cake. The smooth texture indicates that the fats and liquids are well-emulsified, which is key for a delicate crumb.
A Baker’s Insight: The order and method of adding ingredients are not arbitrary; they are designed to create specific reactions and textures. Adding eggs gradually and beating thoroughly ensures they bind effectively, providing strength and moisture. The flavorings, added at this stage, meld beautifully with the fats and sugars, creating a deeply satisfying aroma that promises a delicious outcome. This stage is where the core essence of the cake’s flavor begins to truly develop.
Step 4: Combining Dry and Wet Ingredients
In a separate medium bowl, combine all of your dry ingredients: the all-purpose flour, baking powder, baking soda, and salt. Whisk them together thoroughly to ensure the leavening agents and salt are evenly distributed throughout the flour. This step is crucial because uneven distribution of leavening can lead to pockets of dense cake or uneven rising. A good whisking guarantees that every part of the batter will benefit equally from the lift provided by the baking powder and soda.
Now, it’s time to bring the dry ingredients and the wet ingredients together. Add about one-third of the dry ingredient mixture to the creamed butter-egg mixture. Begin mixing on a low speed. Then, add half of the buttermilk. Continue mixing, alternating between the dry ingredients and the buttermilk, and ending with the dry ingredients. Scrape down the sides and bottom of the bowl frequently with a spatula to ensure everything is incorporated, and there are no streaks of dry flour hiding at the bottom.
Tip: Mixing the dry and wet ingredients in alternating additions helps create a smoother batter and prevents the gluten in the flour from developing too much, which can result in a tough cake. Overmixing at this stage should be avoided; mix only until the batter is just combined and smooth. The goal is to develop just enough gluten for structure, not so much that the cake becomes chewy. Properly scraped bowls ensure a homogeneous batter.
Step 5: Baking the Cake Layers to Perfection
Once your batter is smooth and beautifully combined, it’s time to divide it evenly between the two prepared 9-inch round cake pans. Use a spatula to gently spread the batter, ensuring an even layer in each pan. If you are using a 9×13-inch pan, pour all of the batter into that single pan, spreading it evenly. Place the pans in the preheated oven, ideally on the middle rack for optimal heat circulation.
Bake the cake layers until the tops are set and a toothpick inserted into the center comes out clean. For two 9-inch round pans, this typically takes about 25 to 30 minutes. For a 9×13-inch cake, the baking time may be slightly longer, around 30 to 35 minutes. Start checking for doneness towards the lower end of the suggested time range, as oven temperatures can vary. The cake is ready when the edges begin to pull away slightly from the sides of the pan, and the surface springs back gently when lightly touched.
The Science of Doneness: The toothpick test is a reliable indicator, but visual and tactile cues are also important. A clean toothpick means the internal structure has set. The slight pull-away from the pan indicates the cake has finished rising and is beginning to contract slightly. The spring-back test confirms that the internal structure is firm enough to hold its shape once cooled. Properly baked layers are the foundation for a beautifully frosted and decorated cake, ensuring each slice is tender and moist.
Step 6: Cooling, Frosting, and Finishing Touches
After removing the cake from the oven, let the layers cool in their pans for about 10 to 15 minutes. This brief cooling period allows the cake to firm up slightly, making it easier to remove from the pans without breaking. Gently invert the cakes onto a wire cooling rack to cool completely. It is absolutely essential that the cake layers are entirely cool before proceeding to the frosting stage. Warm cake will melt the frosting, leading to a messy and unappealing finish.
Once the cake layers are thoroughly cooled, prepare your seven-minute frosting according to its specific instructions. Spread a generous layer of this fluffy frosting evenly over the top of one cake layer, then carefully place the second layer on top. Continue frosting the top and sides of the entire cake, creating a smooth, even surface. This frosting acts as the adhesive for the final, defining element of the cake: the coconut.
Immediately after frosting, generously scatter the sweetened shredded coconut over the top and down the sides of the cake. Gently press the coconut into the frosting with your hands or a spatula to ensure it adheres well. This final coating gives the cake its classic, beautiful, and iconic snowy appearance, completing the transformation into a truly Old Fashioned Coconut Cake. The contrast between the soft cake, the airy frosting, and the slightly textured coconut is pure bliss.
Pro Tips for Old Fashioned Coconut Cake
Room Temperature Ingredients are Key: For the creaming process to work optimally and create that essential airy structure, ensure your butter and eggs are at true room temperature. Cold ingredients will not emulsify properly, leading to a denser cake. Softened butter should yield slightly when pressed, and eggs should feel neither cold nor warm to the touch.
Don’t Rush the Creaming: The step of creaming butter and sugar is not merely about combining them; it’s about aerating the mixture. Dedicate at least 4-5 minutes of beating time. This process whips air into the batter, which is the primary source of the cake’s lightness and tender crumb, a hallmark of a truly old-fashioned cake. The resulting pale, fluffy mixture is your visual cue for success.
Cool Completely Before Frosting: Patience is a virtue, especially when it comes to frosting. Attempting to frost a warm cake is a recipe for disaster, as the heat will melt the frosting, causing it to slide off and create a sticky mess. Allow the cake layers to cool entirely on a wire rack before even thinking about applying any frosting. This ensures the frosting stays put and adheres beautifully.
Even Frosting Application for Coconut Adhesion: For the shredded coconut to stick uniformly, the frosting needs to be applied evenly across the cake’s surface. Use an offset spatula to create a smooth, consistent layer. This provides a receptive surface for the coconut to cling to, ensuring a professional and beautiful snowy finish that is consistent on every slice. If there are uneven spots in the frosting, the coconut coverage will be patchy.
Gentle Coconut Pressing: When applying the shredded coconut, a gentle press is often more effective than a hard push. After generously sprinkling the coconut, lightly pat it onto the frosting with the palm of your hand or the back of a spoon. This helps the coconut adhere without compacting the delicate frosting, maintaining its light and airy texture while ensuring it sticks securely for that iconic appearance.
Serving Suggestions for Old Fashioned Coconut Cake
Decoration
The classic decoration for this cake is its abundant coating of sweetened shredded coconut, pressed gently into the seven-minute frosting. This creates a beautiful, snowy landscape that is both elegant and inviting. For an extra touch of visual flair, you can toast some of the shredded coconut before applying it; this adds a subtle golden hue and a deeper nutty flavor. You might also consider adding a few candied violets or edible flowers around the base or on top for a hint of color and sophistication.
Side Dishes
The rich, sweet nature of this coconut cake pairs wonderfully with elements that offer a contrast in flavor and texture. A simple bowl of fresh berries, such as strawberries, raspberries, or blueberries, provides a bright, tart counterpoint that cuts through the sweetness. A small scoop of high-quality vanilla bean ice cream or a dollop of freshly whipped cream can enhance the dessert experience without overwhelming the cake’s delicate flavors. For a more sophisticated pairing, consider a drizzle of raspberry coulis or a light lemon curd.
Creative Serving Ideas
Beyond the traditional slice, this cake lends itself to creative presentations. Consider serving individual portions as part of a dessert tasting menu, perhaps alongside a miniature version of a berry tart or a funfetti cookie. You could also create miniature coconut cake bites by baking the batter in mini muffin tins and topping each with a small dollop of frosting and a sprinkle of coconut. For a summer gathering, serve slices alongside a refreshing chilled beverage like iced tea or a light fruit punch, allowing the cake to be the star of a warm-weather treat.
Preparation & Storage
Storing Leftovers
This delightful Old Fashioned Coconut Cake is best stored covered at room temperature for up to two days. A cake carrier with a well-fitting lid is ideal, as it protects the frosting from drying out and the coconut from becoming stale. If your kitchen is particularly warm, or if you plan to store it for longer than two days, refrigeration is a better option. Ensure the cake is well-covered in the refrigerator to prevent it from absorbing other odors.
Freezing
For longer-term storage, freezing is an excellent choice, though it’s best to freeze the cake before it’s frosted. Tightly wrap the unfrosted cake layers in several layers of plastic wrap, followed by a layer of aluminum foil, to prevent freezer burn. Properly wrapped, the unfrosted cake layers can be stored in the freezer for up to two months. Once you’re ready to serve, thaw the frozen layers in the refrigerator overnight, then bring them to room temperature before frosting and decorating.
Reheating
Because this cake features a delicate, fluffy frosting rather than a baked glaze, direct reheating in an oven or microwave is generally not recommended. Such methods can cause the frosting to melt or become oily, ruining the texture and appearance. Instead, if the cake has been refrigerated and has firmed up, simply allow slices to sit at room temperature for about 20 to 30 minutes before serving. This brief resting period will allow the butter-based crumb to soften again, restoring its delightful moistness and the frosting to its light, airy consistency.
Frequently Asked Questions
-
Can I use regular milk instead of buttermilk in this Old Fashioned Coconut Cake recipe?
While buttermilk is highly recommended for its ability to tenderize the crumb and add a slight tang that balances the sweetness, you can substitute it if necessary. To create a buttermilk substitute, measure one cup of regular milk and stir in one tablespoon of white vinegar or lemon juice. Let it sit for about 5 to 10 minutes until it thickens slightly; this homemade version mimics the acidity and texture of buttermilk, yielding similar results in the cake’s tenderness and rise. It’s a reliable way to ensure you can still achieve a wonderfully moist and flavorful cake even without buttermilk on hand.
-
How do I achieve a perfectly smooth and even frosting on my coconut cake?
Achieving a smooth frosting is key to a beautiful final presentation, especially for a cake meant to be covered in coconut. Ensure your cake layers are completely cool before frosting; a warm cake will cause the frosting to melt and slide. Use an offset spatula for application, which provides better control and allows you to spread the frosting evenly. For a smoother finish, you can dip your spatula in hot water, wipe it dry, and then gently smooth the frosting. Work in smooth, deliberate strokes, filling in any gaps and leveling the top. Taking your time with this step will greatly contribute to the cake’s polished appearance, making the subsequent coconut application look even more professional.
-
What is the best type of coconut to use for the topping, and how can I ensure it sticks well?
For the classic “snowy” finish, sweetened shredded coconut is the preferred choice. It provides the perfect balance of texture and sweetness. Ensure the coconut is fresh and moist for the best results. To make sure it adheres beautifully to the frosting, apply it immediately after you’ve finished frosting the cake while the frosting is still soft and receptive. Generously sprinkle the coconut over the entire cake, then gently press it onto the sides and top with the palm of your hand or the back of a spoon. This gentle pressure helps the coconut cling without crushing the delicate frosting beneath.