Irresistible Deviled Eggs with Green Olive Garnish – Easy Party Appetizer

Every gathering has that one dish that steals the show, and for me, it’s always been these Deviled Eggs with Green Olive Garnish! This playful twist on a timeless classic features a creamy filling that carries the briny notes of olives, making it a standout appetizer. Not only are they a breeze to whip up, but they’re also a guaranteed crowd-pleaser that elevates any occasion.
With their beautiful presentation and sophisticated flavor, these deviled eggs will have your guests reaching for seconds. Curious about what makes them so irresistible? Let’s dive into the recipe together and discover the magic behind this delightful appetizer that perfectly complements various cuisines, from quick breakfast ideas to elegant dinner courses.
Why You Will Love This Recipe
- Crowd-Pleasing Appeal: These Deviled Eggs with Green Olive Garnish are sure to be the star of your next event, leaving your guests raving about their flavorful twist. They are a perfect addition to any holiday spread or casual get-together.
- Easy to Prepare: With just a few simple ingredients and straightforward steps, you can whip up these delightful bites in no time, making them perfect for spontaneous gatherings or when you need a quick yet impressive appetizer. They are a fantastic option for a light lunch too.
- Rich, Creamy Texture: The combination of creamy yolks, mayonnaise, and cream cheese results in a decadent filling that’s hard to resist, echoing the luxurious taste of a martini, and providing a satisfying mouthfeel. This rich texture makes them a delightful complement to other dishes.
- Garnish for Elegance: Topped with beautiful green olives, these deviled eggs present an eye-catching dish that adds a touch of sophistication to any appetizer table, making them a perfect companion to sides like Cheesy Green Chile or a refreshing Healthy Stovetop Chili. Their visual appeal is undeniable.
- Versatile Options: You can easily make them your own by experimenting with different fillings or garnishes; try spicy jalapeños for a kick or crispy prosciutto for added crunch, allowing you to tailor them to specific tastes and themes. This adaptability makes them a go-to recipe for any occasion.
Ingredients You Need
To create these exceptional Deviled Eggs with Green Olive Garnish, sourcing high-quality ingredients is paramount for achieving the best flavor and texture. Fresh, large eggs form the perfect foundation for this beloved appetizer, ensuring a creamy and delightful experience with every bite. The richness of the mayonnaise and cream cheese, coupled with the tang of Dijon mustard and the subtle briny notes from olive brine, creates a harmonious filling that is both complex and comforting, a true testament to simple ingredients yielding remarkable results.
Deviled Eggs with Green Olive Garnish
Elevate your parties with these Deviled Eggs with Green Olive Garnish, a creamy and sophisticated appetizer sure to please any crowd. This playful twist on a timeless classic features a creamy filling that carries the briny notes of olives, making it a standout appetizer.
- 6 large Eggs (fresh)
- 1/4 cup Mayonnaise (can substitute with Greek yogurt)
- 2 oz Cream Cheese (softened)
- 1 tbsp Dijon Mustard (can substitute with yellow mustard)
- 1 tbsp Olive Brine (adjust to taste)
- 1 tbsp Vodka (optional)
- 1 tsp Paprika/Smoked Paprika (fresh herbs are an alternative)
- 12 pieces Green Olives (pitted varieties like manzanilla or queen)
- 1Place fresh large eggs in a medium saucepan and cover them with cold water, ensuring the water is about an inch above the eggs. Bring the water to a boil over medium heat, then cover the saucepan and remove it from the heat. Let the eggs sit covered for 12 minutes to achieve perfectly cooked yolks.
- 2Carefully transfer the eggs to an ice water bath using a slotted spoon. Let them cool for about 5 to 10 minutes.
- 3Gently peel off the shells under running water if needed. Slice each egg in half lengthwise.
- 4Scoop the cooked yolks out of each egg white into a mixing bowl. Use a fork to mash the yolks until completely smooth and crumb-free.
- 5To the mashed yolks, add mayonnaise, softened cream cheese, Dijon mustard, olive brine, and vodka if using. Stir everything together until creamy and well combined, ensuring a smooth texture without lumps.
- 6With a spoon or piping bag, carefully fill each egg white half with the yolk mixture. Aim for a generous dollop that forms a nice mound on top.
- 7Sprinkle a dusting of paprika or smoked paprika over the filled eggs for an attractive color contrast. Adding a juicy green olive on a cocktail pick atop each egg will not only enhance visual appeal but will also tie together the delightful briny flavor.
- 8Place the garnished deviled eggs in an airtight container and refrigerate for at least 30 minutes before serving. Chilling helps enhance their flavors, making every bite refreshing and delicious.
Keywords: deviled eggs, appetizer, party food, olives, classic, easy recipe
- eggs: the foundation of our deviled eggs, providing the perfect creamy base.
- mayonnaise: adds essential creaminess and moisture, making the filling luxuriously smooth.
- cream cheese: enhances the richness and contributes to a velvety texture, ensuring indulgence.
- dijon mustard: offers a slight tang and depth of flavor that balances the richness beautifully.
- olive brine: infuses the filling with a subtle, savory brininess that complements the olives and adds a sophisticated edge.
- vodka: optional, but adds a subtle martini-like complexity for an adult twist on a classic.
- paprika/smoked paprika: provides a beautiful visual contrast and a hint of smoky or sweet flavor.
- green olives: the star garnish, offering a burst of briny flavor and an attractive pop of color.
The precise quantities for these ingredients are detailed within the accompanying recipe card, ensuring perfect proportions for optimal taste and consistency. These ingredients come together to create a truly memorable appetizer that is perfect for any gathering.
Variations
The beauty of deviled eggs lies in their incredible versatility, allowing for endless customization to suit diverse palates and dietary needs. For those seeking a bit of heat, incorporating finely diced pickled jalapeños or a dash of sriracha into the yolk mixture can introduce a delightful spicy kick. This fiery addition transforms the classic into something exciting and bold, perfect for adventurous eaters who enjoy a touch of spice in their appetizers.
Another avenue for creative variation involves the cream cheese component itself. Opting for flavored cream cheeses, such as chive, herb and garlic, or even a smoky cheddar, can imbue the filling with an entirely new dimension of flavor. These infused cream cheeses offer a convenient way to layer complexity and introduce unique taste profiles that elevate the humble deviled egg to gourmet status, making them perfect for themed parties or special occasions.
For those following a low-carb lifestyle, consider replacing some of the mayonnaise with pureed avocado or a rich Greek yogurt. This not only reduces carbohydrates but also introduces healthy fats and a lighter, fresher taste. Furthermore, a sprinkle of finely chopped chives or dill weed into the filling can add a vibrant herbaceousness, bringing a burst of freshness that perfectly balances the richness. These simple adjustments ensure that everyone can enjoy a delicious deviled egg, regardless of their dietary preferences.
If you are aiming for a vegan adaptation, the possibilities are equally exciting. Mashed silken tofu or a creamy blend of soaked cashews can serve as an excellent substitute for the egg yolks, providing a wonderfully smooth texture. Vegan mayonnaise will ensure the creaminess remains, and nutritional yeast can add a subtle cheesy undertone. Garnish these with finely diced red bell peppers or capers for a colorful and flavorful finish. This vegan version is a testament to how inclusive and adaptable classic recipes can become.
To introduce a delightful crunch, consider topping your deviled eggs with crispy fried shallots, toasted breadcrumbs infused with herbs, or even finely crumbled bacon bits for a savory contrast. These textural additions provide an exciting counterpoint to the creamy filling, enhancing the overall sensory experience. The interplay of smooth and crunchy textures is a hallmark of sophisticated appetizers and will surely impress your guests. These can be wonderful additions when serving alongside something like a baked lemon chicken, offering a diverse range of textures and flavors.
Finally, for those who appreciate a smoky nuance, the use of smoked paprika as a garnish is a fantastic choice. Alternatively, you could infuse the filling with a hint of liquid smoke, used sparingly, to achieve a more pronounced smoky flavor. This depth of flavor makes the deviled eggs particularly appealing during barbecue season or as part of a hearty dinner spread, pairing wonderfully with grilled meats and robust side dishes.
How to Prepare Deviled Eggs with Green Olive Garnish
Step 1: Boil the Eggs
Begin by carefully placing your selection of fresh, large eggs into a medium-sized saucepan. Ensure that the eggs are arranged in a single layer at the bottom of the pan, preventing them from rolling around excessively during the boiling process. Cover the eggs completely with cold water, making sure the water level is approximately one inch above the top of the eggs. This ensures even cooking and prevents any potential cracking.
Next, bring this water to a rolling boil over medium heat on your stovetop. Once the water reaches a vigorous boil, immediately cover the saucepan tightly with a lid. Then, remove the saucepan from the heat entirely, allowing the residual heat to cook the eggs gently and effectively. Let the eggs sit undisturbed, covered, for precisely 12 minutes to achieve perfectly cooked yolks that are firm but not overcooked, making them ideal for a smooth filling.
This method of cooking, often referred to as the “steam-cooking” method after initial boiling, is highly effective for achieving consistently cooked eggs. It minimizes the risk of the dreaded green ring around the yolk, which can occur with overcooking. The result is a vibrant yellow yolk perfect for mashing and creating that signature creamy texture characteristic of truly great deviled eggs.
Step 2: Cool the Eggs
After the 12-minute resting period, it’s crucial to halt the cooking process swiftly. Use a slotted spoon to carefully transfer the hot eggs from the saucepan into a prepared ice water bath. This bath should be made with plenty of ice cubes and cold water, creating a shock that stops the yolks from continuing to cook.
Allow the eggs to remain in the ice bath for a minimum of 5 to 10 minutes. This cooling period serves a dual purpose: it stops the cooking process, preventing any further hardening of the yolks, and it significantly aids in the peeling process. The rapid temperature change causes the egg white to contract slightly away from the shell membrane, making it easier to remove.
You can test if the eggs are sufficiently cooled by gently tapping one on a hard surface. The shell should feel cool to the touch, and the tapping should help loosen it. Peeling them while still slightly warm can sometimes be easier than when they are completely cold, as the membrane is more pliable.
Step 3: Peel and Halve the Eggs
Once the eggs have cooled sufficiently in the ice bath, it’s time for the peeling. Begin by gently tapping the cooled egg on a hard surface, like your countertop, all over to create small cracks in the shell. Then, start peeling the shell away, ideally under a gentle stream of cool running water. The water helps to get underneath the shell membrane, making it easier to slip off cleanly without tearing the egg white.
Take your time with this step, as a clean peel is essential for attractive deviled eggs. Any remaining bits of shell can be meticulously removed with the tip of a paring knife or your fingernail. The goal is to reveal a smooth, unblemished egg white, ready to be transformed into a culinary delight.
After peeling all the eggs, arrange them on a clean cutting board. Using a sharp knife, carefully slice each egg in half lengthwise. This creates the perfect little boats for your creamy filling. Place the egg white halves gently on a plate or platter, ensuring they don’t slide around, ready for the next exciting stage of preparation.
Step 4: Prepare the Filling
With the egg whites set aside, the next step is to extract the cooked yolks from their protective shells. Gently scoop out the vibrant yellow yolks from each halved egg white and place them into a medium-sized mixing bowl. It’s important to ensure all the yolk is removed from the whites, as this forms the base of your delicious filling, contributing essential creaminess and flavor.
Once all the yolks are collected in the bowl, take a fork and begin to mash them thoroughly. The objective here is to achieve a completely smooth, lump-free consistency. Mash until the yolks resemble a fine, sandy texture. This smooth base is crucial for incorporating the other filling ingredients evenly and achieving that signature velvety texture.
This mashing process ensures that every component of the filling blends seamlessly, creating a uniform flavor profile in every bite. A well-mashed yolk base is the first step toward a truly exceptional deviled egg, setting the stage for the rich and creamy magic that is about to unfold. The smoother the yolks, the more decadent the final filling will be.
Step 5: Mix the Ingredients
Now, it’s time to bring all the delicious elements of the deviled egg filling together. To the bowl containing the perfectly mashed egg yolks, add the mayonnaise, ensuring it’s soft and creamy. Next, incorporate the softened cream cheese, which adds an extra layer of richness and a luxurious smooth texture that is simply irresistible. Don’t forget to add the Dijon mustard for that essential tang and depth of flavor.
For that characteristic briny essence that makes these deviled eggs unique, add a tablespoon of olive brine. If you’re opting for the optional martini twist, now is the time to add the tablespoon of vodka. Stir all these ingredients together vigorously with a whisk or a sturdy fork. Continue mixing until the entire concoction is thoroughly combined, achieving a wonderfully creamy and uniform texture, free from any lumps.
The goal is a filling that is smooth, spreadable, and bursting with balanced flavors. Taste the mixture at this point and adjust the olive brine if you desire a saltier profile or add a tiny bit more mustard for extra zest. This careful blending ensures each deviled egg will deliver a consistently delightful taste experience.
Step 6: Fill the Egg Whites
With your luscious yolk filling prepared and the egg white halves ready, it’s time to unite them. You can achieve this elegantly using a spoon or, for a more professional and decorative finish, a piping bag fitted with a star tip. Carefully spoon or pipe the yolk mixture into each hollowed-out egg white half.
Aim to create a generous mound of filling that sits proudly atop each egg white. Don’t be shy with the filling; a good dollop ensures a satisfying bite and a beautiful presentation. The goal is to fill the whites completely, creating an appealing visual that hints at the creamy richness contained within.
If using a piping bag, apply gentle, even pressure to create decorative swirls or rosettes. This not only looks impressive but also ensures an even distribution of the flavorful filling. The filled egg whites will now be ready for their final flourish, showcasing the meticulous preparation and care you’ve put into creating these delectable appetizers.
Step 7: Garnish to Perfection
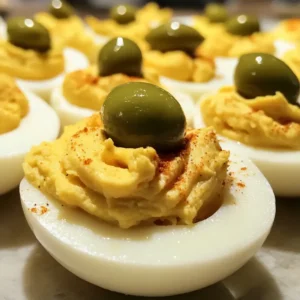
The final touch that transforms your filled egg whites into show-stopping Deviled Eggs with Green Olive Garnish is the art of decoration. Begin by lightly dusting the surface of the creamy filling with a sprinkle of paprika or smoked paprika. This adds a beautiful pop of color, ranging from a delicate pinkish hue to a deeper, more intense red, providing an attractive visual contrast.
For the signature element, place a juicy, pitted green olive atop each deviled egg. You can position the olive directly on the filling or perch it elegantly on a small cocktail pick inserted into the filling. This olive not only enhances the visual appeal by adding a vibrant green accent but also reinforces the unique briny flavor that defines this particular recipe, tying all the elements together beautifully.
The combination of the colorful paprika and the striking green olive creates an appetizer that is as pleasing to the eye as it is to the palate. This attention to detail in garnishing elevates the deviled eggs from a simple snack to a sophisticated culinary creation, ready to impress any guest with its elegant presentation.
Step 8: Chill Before Serving
To ensure that the flavors meld together perfectly and the deviled eggs achieve their optimal taste and texture, it’s essential to chill them before serving. Carefully transfer the garnished deviled eggs into an airtight container. Ensure that the container is large enough to hold the eggs without them touching each other too much, which could smudge the garnishes or cause them to stick together.
Place this container in the refrigerator and allow the deviled eggs to chill for at least 30 minutes. This chilling period is not just about temperature; it allows the diverse flavors of the filling to harmonize, creating a more cohesive and satisfying taste experience. The coolness also enhances the refreshing quality of the appetizer, making it especially delightful on a warm day or as part of a larger buffet.
The slight chill will also firm up the filling just a touch, making it easier to handle and eat. Your elegant and flavorful Deviled Eggs with Green Olive Garnish will be perfectly prepared to impress your guests when it’s time to enjoy this delightful starter, ready to be served at any special occasion or casual gathering.
Pro Tips for Deviled Eggs with Green Olive Garnish
Perfect Peeling: For the easiest egg peeling experience, opt for eggs that are about a week to 10 days old rather than brand-new ones. Fresher eggs tend to adhere more stubbornly to their shells, making peeling a chore and potentially leaving bits behind. Slightly older eggs have undergone a chemical change that allows the membrane to separate more readily from the shell.
Chill Time Maximization: To truly allow the flavors to deepen and meld, it is highly recommended to chill the filled and garnished deviled eggs for at least 30 minutes before serving. This period allows the creamy filling to set slightly and the subtle notes of olive brine and mustard to permeate the mixture, creating a more harmonious taste sensation.
Serving Freshness is Key: While you can prepare components ahead of time, assemble your Deviled Eggs with Green Olive Garnish as close to serving time as possible. This ensures the egg whites maintain their slight firmness and prevents the filling from becoming watery or the garnishes from wilting, thereby preserving their appealing presentation and delightful texture.
Achieving Mixing Smoothness: A common pitfall is a lumpy yolk mixture. To avoid this, ensure your cream cheese is truly softened to room temperature before you begin mixing. If you find lumps persisting, a brief pulse in a food processor or using an immersion blender can transform a slightly chunky mixture into a perfectly velvety smooth filling, enhancing the overall luxurious mouthfeel.
Taste Adjustment for Perfection: The saltiness and briny flavor can vary based on the olive brine used. Don’t hesitate to taste your yolk mixture before filling the egg whites and adjust the amount of olive brine accordingly. A little extra brine can significantly enhance the savory notes, while too much can overpower other delicate flavors, so careful tasting is key to achieving your ideal flavor balance.
Serving Suggestions for Deviled Eggs with Green Olive Garnish
Decoration
The visual appeal of deviled eggs is just as important as their taste, transforming them into miniature edible artworks. A light dusting of paprika or smoked paprika over the creamy filling provides a beautiful blush of color, adding a rustic charm. For the signature look, a plump, pitted green olive is the quintessential garnish, offering a vibrant contrast and a delightful briny punctuation mark.
Consider adding a tiny sprig of fresh dill or chives right next to the olive for an extra burst of green and a hint of herbaceous aroma. A sprinkle of finely chopped chives or parsley over the top can also add texture and visual interest, making each egg unique. For a more festive touch, especially during holidays, a small sliver of pimento pepper or a tiny caper can offer a unique visual element and flavor accent.
The way the garnish is placed can elevate the presentation significantly. Aim for symmetry and neatness, ensuring the olive or herb sits proudly atop the filling. This meticulous attention to decorative detail ensures that your Deviled Eggs with Green Olive Garnish are not only delicious but also a stunning centerpiece for any appetizer spread.
Side Dishes
Deviled eggs are wonderfully versatile and pair well with a wide array of complementary dishes that enhance the overall dining experience. A fresh, crisp vegetable platter offers a refreshing counterpoint to the rich creaminess of the deviled eggs. Think of crunchy carrot sticks, bell pepper strips in various vibrant colors, celery stalks, and refreshing cucumber slices, providing a light and healthy contrast.
A well-curated cheese board is another excellent companion. The sharp, tangy notes of aged cheddar or the creamy mildness of brie can create a delightful interplay of flavors with the savory deviled eggs. Add an assortment of crackers, some crusty bread, and perhaps some fruit like grapes or figs to complete the sophisticated spread. This combination offers a delightful grazing experience.
For those looking for something more substantial, small sliders or mini quiches make for a perfect addition to a buffet featuring deviled eggs. Consider pairing them with a light pasta salad or a vibrant green salad dressed with a vinaigrette. The goal is to offer a balance of flavors and textures, ensuring a satisfying culinary journey for your guests.
Creative Serving Ideas
Move beyond the traditional platter and explore innovative ways to present your Deviled Eggs with Green Olive Garnish. Arrange them artfully on a rustic wooden board, perhaps interspersed with fresh herbs or edible flowers, for a truly charming display. For a more elegant affair, consider serving them on a tiered stand, creating height and visual interest on your table.
Another creative idea is to incorporate them into a larger appetizer board. Group them with other small bites such as mini meatballs, shrimp cocktail, or caprese skewers. This creates a bountiful spread that caters to every taste and preference. The deviled eggs become a focal point, drawing guests in with their appealing appearance and promise of deliciousness.
For a playful touch, serve them in individual mini muffin tins or decorative small cups, making them easy for guests to grab and enjoy. You could even place them on a bed of fresh greens, like arugula or watercress, for an added layer of freshness and visual appeal. These thoughtful presentations transform a simple appetizer into a memorable culinary experience, perfect for any celebration.
Preparation & Storage
Storing Leftovers
Should you be fortunate enough to have any Deviled Eggs with Green Olive Garnish left over, proper storage is key to maintaining their deliciousness. It is highly recommended to store them in a single layer within an airtight container. This prevents the filling from sliding off and keeps them from absorbing any unwanted odors from other foods in the refrigerator.
For the best quality and to maintain their appealing texture, it’s advisable to consume leftovers within two days of preparation. While they are still safe to eat beyond this point, the creamy filling may begin to dry out slightly, and the egg whites might lose some of their firmness, impacting the overall experience. Always ensure the container is sealed tightly to preserve freshness.
If the deviled eggs are already assembled with garnish, try to ensure the container provides enough headspace so the olives and paprika don’t get smudged. This careful storage will ensure that even leftovers provide a delightful treat, though they are undeniably best enjoyed freshly made.
Freezing
Unfortunately, deviled eggs are not well-suited for freezing. The delicate creamy texture of the yolk filling can be significantly compromised by the freezing and thawing process. When frozen, the water content within the mayonnaise and cream cheese can form ice crystals, leading to a grainy or separated consistency once thawed.
The egg whites themselves can also become somewhat rubbery or watery after being frozen and then defrosted. Because the integrity of both the filling and the egg white is so crucial to the enjoyment of deviled eggs, freezing is not recommended if you wish to preserve their intended delightful texture and flavor profile. It’s always best to prepare them fresh for optimal results.
For best results, plan to make only the amount you anticipate will be consumed or appropriately stored in the refrigerator. This ensures that every deviled egg you serve is at its peak of deliciousness, without any textural compromises that freezing can unfortunately inflict upon this classic appetizer.
Reheating
Reheating deviled eggs is generally not recommended, as it can negatively impact their texture and appeal. They are best served chilled or at room temperature, allowing their creamy filling to be enjoyed in its intended state. Attempting to reheat them, whether in an oven, microwave, or on the stovetop, can lead to a mushy or oily filling and a dry or rubbery egg white.
The delicate balance of flavors and textures in deviled eggs is precisely what makes them so beloved, and this balance is best preserved when they are served cold or at ambient temperature. The chilling process itself helps to meld the flavors, creating a cohesive and delightful taste experience that is compromised by heat.
If you have made them slightly ahead of time, simply ensure they are properly stored in the refrigerator. Take them out about 15-20 minutes before serving to allow them to come closer to room temperature, which enhances their flavor. This gentle acclimation is the closest you should get to “reheating” them, ensuring their deliciousness is fully appreciated.
Frequently Asked Questions
-
How do I know when my eggs are ripe for boiling?
For the best deviled eggs, it’s ideal to use eggs that are about 7 to 10 days old. Slightly older eggs tend to peel more easily than very fresh ones because a slight chemical change occurs in the egg as it ages, which helps the membrane to detach from the shell. If you’re unsure about an egg’s freshness, you can perform the float test: a fresh egg will lie flat on the bottom of a bowl of water, while an older egg may stand up on its end or float, indicating it’s past its prime.
-
What’s the best way to store leftover deviled eggs?
To maintain the quality and appearance of your Deviled Eggs with Green Olive Garnish, store any leftovers in a single layer within an airtight container in the refrigerator. This method prevents the filling from smearing and protects them from absorbing other odors. It is best to consume them within two days for optimal texture and flavor, as the filling can start to dry out or the egg whites might lose their firmness over time, impacting the overall enjoyment of this delightful appetizer.
-
Can I freeze deviled eggs?
No, it is not recommended to freeze deviled eggs. The creamy filling, primarily composed of mayonnaise and cream cheese, contains a high water content that can lead to a separated and grainy texture upon thawing. Freezing and thawing can also make the egg whites watery or rubbery, fundamentally altering the delightful smooth consistency that makes deviled eggs so appealing. They are best enjoyed fresh or stored properly in the refrigerator for short-term consumption.