Irresistible Rhubarb Pie Recipe with Lattice Crust Delight

As I sliced through the golden lattice crust of my Perfect Rhubarb Pie, the aroma of sweet vanilla mingled with the tangy essence of fresh rhubarb, instantly transporting me to sun-soaked spring afternoons. This delightful rhubarb pie recipe with lattice crust combines the traditional tartness of rhubarb with a unique vanilla sugar twist, making it the perfect centerpiece for any gathering.
Not only is this pie a true crowd-pleaser, but it also offers the joy of a homemade dessert that radiates warmth and nostalgia. Whether you’re looking for a comforting treat to share or a fabulous dessert to impress your friends, this pie ticks all the boxes. Ready to dive into this delicious classic? Let’s get baking!
Why You Will Love This Recipe
- Irresistible Flavor: The unique twist of vanilla sugar elevates the traditional rhubarb tartness into an unforgettable dessert, creating a harmonious balance of sweet and tart notes that will delight your palate.
- Beautiful Presentation: The golden lattice crust creates a stunning visual that will impress guests at any gathering, showcasing your culinary skill and attention to detail.
- Nostalgic Comfort: Every bite evokes childhood memories of springtime pie-making, offering a delightful taste of nostalgia that warms the heart and soul with its comforting, familiar flavors.
- Versatile Ingredients: This pie is easily adaptable, as it can be made gluten-free by swapping out the all-purpose flour for a 1:1 baking blend, ensuring everyone can enjoy this delightful treat.
- Perfect for Any Occasion: Whether served at a casual picnic or as a sophisticated family dinner finale, it’s a guaranteed crowd-pleaser that brings joy and satisfaction to any event.
Ingredients You Need
The quality of your ingredients directly impacts the final taste and texture of your rhubarb pie. Opting for fresh, vibrant rhubarb and good-quality butter will make a significant difference in the overall deliciousness of your dessert. Ensuring your butter is properly chilled is also paramount for achieving that coveted flaky crust.
Perfect Rhubarb Pie with Lattice Crust
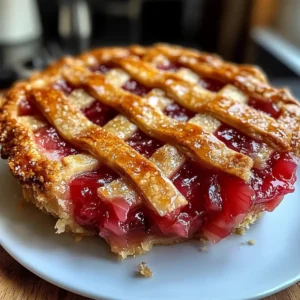
A delightful rhubarb pie recipe with a beautiful lattice crust, combining the traditional tartness of rhubarb with a unique vanilla sugar twist. This pie is a perfect centerpiece for any gathering, offering a comforting taste of nostalgia.
- For the Filling:
- 4 cups Fresh Rhubarb (or frozen, thawed and drained)
- 1 cup Granulated Sugar (or erythritol for lower-carb)
- 1/2 cup Vanilla Sugar (or 1 tbsp vanilla extract)
- 1/4 cup Cornstarch
- For the Crust:
- 2 1/2 cups All-Purpose Flour (substitute with gluten-free blend if needed)
- 1 cup Cold Butter (cubed)
- 1/2 teaspoon Salt
- 6-8 tablespoons Ice Water (add slowly until dough comes together)
- 1Prepare the Dough: Combine 2 ½ cups of all-purpose flour and ½ teaspoon of salt in a large bowl. Cut in 1 cup of cold, cubed butter until the mixture resembles coarse crumbs. Gradually add 6-8 tablespoons of ice water, mixing until the dough forms a ball. Wrap it in plastic wrap and chill in the refrigerator for at least 30 minutes.
- 2Prepare the Filling: Wash and slice 4 cups of fresh rhubarb into bite-sized pieces. In a separate bowl, combine the rhubarb with 1 cup of granulated sugar, ½ cup of vanilla sugar, and ¼ cup of cornstarch. Gently stir the mixture and let it sit for 15 minutes.
- 3Roll Out Dough: Divide the chilled dough into two equal portions. Roll out the first portion to about 1/8 inch thick and transfer it to a 9-inch pie pan, letting it overhang slightly.
- 4Assemble the Pie: Pour the rhubarb filling into the prepared bottom crust. Roll out the second portion of dough and cut it into strips for the lattice design. Lay the strips across the filling, weaving them, and trim excess dough. Crimp the edges to seal.
- 5Bake: Preheat oven to 400°F (200°C). Place the pie on a baking sheet and bake for 20 minutes. Reduce oven temperature to 350°F (175°C) and bake for another 25-30 minutes, until the crust is golden and the filling is bubbling.
- 6Cool: Remove the pie from the oven and let it cool on a wire rack for at least 2 hours before slicing and serving.
Keywords: rhubarb pie, lattice crust, vanilla sugar, fruit pie, spring dessert, homemade pie
- fresh rhubarb: essential for that signature tangy flavor; frozen rhubarb works too if properly thawed and drained thoroughly to remove excess moisture.
- granulated sugar: sweetens the filling, providing the perfect counterpoint to the rhubarb’s tartness; consider erythritol for a lower-carb alternative if you are managing sugar intake.
- vanilla sugar: enhances the depth of flavor with its warm, aromatic notes; mix ½ cup granulated sugar with 1 vanilla bean or 1 tsp vanilla extract if you don’t have it on hand for a homemade version.
- cornstarch: a crucial thickener for the filling, preventing a watery pie and ensuring a perfectly set slice every time.
- all-purpose flour: forms the tender, flaky base of your crust; to make it gluten-free, substitute with a 1:1 gluten-free baking blend for a universally enjoyable pie.
- butter: provides that rich, delicious flavor and essential flakiness to the pastry; keep it very cold and cubed for the best possible texture.
- salt: just a pinch is needed to enhance all the other flavors in your pie; don’t skip this small but mighty ingredient.
- ice water: binds the crust ingredients together to form a cohesive dough; add it slowly, tablespoon by tablespoon, until the dough just comes together.
The precise quantities for each ingredient are detailed within the accompanying recipe card for your convenience.
Variations
Embracing variations allows you to personalize this classic rhubarb pie, tailoring it to specific dietary needs or simply to explore new flavor profiles. The inherent tartness of rhubarb is a wonderfully versatile base for many culinary explorations.
For a delightful vegan adaptation, consider using a plant-based butter alternative and a flax egg (1 tablespoon flaxseed meal mixed with 3 tablespoons water, left to sit for 5 minutes) to bind the crust. Replace the butter with a chilled, high-quality vegan butter block, ensuring it is firm and cold. For the filling, ensure your sugars are vegan-certified. This approach maintains the beloved texture and taste while catering to a vegan lifestyle, proving that deliciousness knows no dietary boundaries.
To achieve a low-carb or keto-friendly version of this rhubarb pie, a strategic substitution of sweeteners is key. Opt for erythritol or xylitol (if safe for your household pets, as it is toxic to dogs) in place of granulated sugar and vanilla sugar. You might also need to slightly adjust the cornstarch amount, potentially using a keto-friendly thickener like xanthan gum (use sparingly, about 1/2 teaspoon) to achieve the desired filling consistency. The crust can also be adapted using almond flour or a blend of almond and coconut flour, along with a keto-friendly sweetener and a binder like psyllium husk.
Elevating the flavor profile with subtle additions can transform the pie into something truly unique. A touch of almond extract, perhaps a mere teaspoon, added to the filling can introduce a sophisticated, nutty undertone that beautifully complements the tart rhubarb. Alternatively, incorporating a pinch of warm spices like cinnamon or nutmeg can evoke a cozy, autumnal feel, even in the heart of spring. Experimenting with these small additions can lead to surprisingly delightful results.
How to Prepare Rhubarb Pie Recipe with Lattice Crust
Step 1: Prepare the Dough
Begin by gathering your dry ingredients for the crust: 2 ½ cups of all-purpose flour and ½ teaspoon of salt. Place these into a large, chilled mixing bowl. The cold environment is crucial for developing a tender and flaky pastry.
Next, add 1 cup of cold, cubed unsalted butter to the flour mixture. Using a pastry blender, your fingertips, or a food processor, cut the butter into the flour until the mixture resembles coarse crumbs with some pea-sized pieces of butter remaining. These visible butter pieces are what create steam during baking, resulting in flakiness.
Gradually add 6-8 tablespoons of ice water, one tablespoon at a time, mixing gently after each addition. Continue adding water until the dough just begins to come together into a cohesive ball. Be careful not to overmix, as this can develop the gluten and lead to a tough crust. Once formed, wrap the dough tightly in plastic wrap and refrigerate for at least 30 minutes to allow the gluten to relax and the fat to re-chill.
Step 2: Prepare the Filling
While the dough is chilling, it’s time to prepare the star of the show: the rhubarb filling. Thoroughly wash and trim the fresh rhubarb stalks, then slice them into bite-sized pieces, roughly ½ inch thick. If using frozen rhubarb, ensure it has been completely thawed and very well-drained of any excess liquid.
In a separate large bowl, combine the prepared rhubarb with 1 cup of granulated sugar and ½ cup of vanilla sugar. Gently stir these ingredients together to coat the rhubarb evenly. If you don’t have vanilla sugar, you can achieve a similar flavor by mixing 1 cup of granulated sugar with 1 vanilla bean (split and scraped) or 1 teaspoon of pure vanilla extract, then using ½ cup of this mixture.
Sprinkle ¼ cup of cornstarch over the rhubarb and sugar mixture. Cornstarch is essential for thickening the filling to the perfect consistency, preventing a soupy pie. Gently stir everything together until well combined, ensuring the cornstarch is distributed throughout. Let this mixture sit for at least 15 minutes; this allows the rhubarb to release its juices, which will then be thickened by the cornstarch, resulting in a perfectly set filling.
Step 3: Roll Out Dough
After the dough has had sufficient chilling time, remove it from the refrigerator. On a lightly floured surface, divide the dough into two equal portions – one will serve as the bottom crust and the other will be used for the decorative lattice top. If the dough feels too stiff to work with immediately, let it rest at room temperature for a few minutes.
Take one portion of the dough and roll it out using a rolling pin into a circle approximately 12 inches in diameter and about 1/8 inch thick. Carefully transfer the rolled-out dough to a 9-inch pie pan. Gently press the dough into the bottom and up the sides of the pan, ensuring there are no air pockets. Trim any excess dough hanging over the edges, leaving about a 1-inch overhang, which will be used to crimp the edges later.
For the second portion of dough, roll it out to the same thickness as the bottom crust on your floured surface. This piece will be cut into strips for the lattice work. Once rolled out, you can either cut this dough into uniform strips using a pizza cutter or a sharp knife, or you can cut out shapes if you prefer a more decorative top. Set these strips aside, ready for assembly.
Step 4: Assemble the Pie
With your pie crust in the pan and your filling prepared, it’s time to bring everything together. Carefully pour the rhubarb filling into the bottom crust, spreading it out evenly. Ensure that any accumulated juices are included, as these will help create the luscious filling texture.
Now, begin creating the lattice top. Take the rolled-out dough for the lattice and cut it into strips. The width of the strips is a matter of preference, but about ½ to ¾ inch is typical. Arrange the first set of strips parallel to each other across the top of the filling, spaced about ½ inch apart. Then, take the remaining strips and weave them perpendicularly over and under the first set of strips, creating the classic lattice pattern.
Once the lattice is complete, trim any excess dough from the ends of the strips. Gently press the edges of the lattice strips onto the overhang of the bottom crust to seal them. You can then crimp the edges of the entire pie using your fingers or a fork to create a decorative and secure seal, ensuring the filling stays contained during baking.
Step 5: Bake
Preheat your oven to 400°F (200°C) well in advance to ensure it reaches the correct temperature. Place the assembled pie on a baking sheet lined with parchment paper or foil; this will catch any potential drips from the filling, making cleanup much easier.
Carefully place the pie into the preheated oven and bake for 20 minutes at 400°F (200°C). This initial high heat helps to set the crust and begin the baking process effectively. After 20 minutes, reduce the oven temperature to 350°F (175°C).
Continue baking the pie in the lower temperature for another 25-30 minutes, or until the crust is a beautiful golden brown and the filling is bubbling vigorously. If the edges of the crust start to brown too quickly before the center is done, you can loosely cover them with strips of aluminum foil. Once baked to perfection, remove the pie from the oven.
Step 6: Cool
This is perhaps the most challenging, yet crucial, step in achieving a perfect rhubarb pie: patience. Once you remove the beautifully baked pie from the oven, place it on a wire rack to cool. It is essential to allow the pie to cool for at least 2 hours, and ideally 3-4 hours.
During this cooling period, the molten filling continues to cook and, more importantly, to set. If you cut into the pie too soon, the filling will be runny and may ooze out, leading to a less appealing presentation and a messier slice. The cooling process allows the cornstarch to activate fully and thicken the juices into a delightful, sliceable consistency.
As the pie cools, its wonderful aroma will fill your kitchen, a testament to the deliciousness that awaits. Once it has cooled sufficiently, your Perfect Rhubarb Pie with Lattice Crust will be beautifully fragrant and ready to be sliced and served, revealing its perfectly set, tangy-sweet filling encased in a golden, flaky crust.
Pro Tips for Rhubarb Pie Recipe with Lattice Crust
Chill for Flakiness: Always ensure that your butter and your dough are kept very cold throughout the preparation process. Warm ingredients are the enemy of a flaky crust; they melt the butter too early, resulting in a tougher, less tender pastry. Work quickly and pop the dough back in the fridge if it starts to feel warm.
Juice Management: Allow your rhubarb filling mixture to sit for at least 15 minutes before assembling the pie. This critical step draws out excess moisture from the rhubarb, which is then thickened by the cornstarch, thereby preventing a soggy bottom crust and ensuring a well-set filling.
Lattice Precision: For the cleanest and most visually appealing lattice strips, use a sharp knife or a pizza cutter. This ensures precise cuts that lay neatly and contribute to the overall beautiful presentation of your rhubarb pie. Uniform strips make weaving much easier and the finished product looks more polished.
Oven Accuracy: Double-check your oven temperature with an oven thermometer if you have one. Home ovens can sometimes be inaccurate, and consistent, correct heat is vital for even baking. Uneven heat can lead to a perfectly golden top with an undercooked bottom, or vice versa, sabotaging that perfect crust you’ve worked so hard to achieve.
Covering the Edges: If you notice the edges of your pie crust browning too quickly during the baking process, don’t hesitate to cover them with strips of aluminum foil. This protects them from burning while allowing the rest of the pie to finish cooking thoroughly, ensuring a beautifully golden and evenly baked crust all around.
Serving Suggestions for Rhubarb Pie Recipe with Lattice Crust
Decoration
While the lattice crust itself is a beautiful decoration, a light dusting of powdered sugar over the cooled pie can add a touch of elegance and sweetness. A few fresh mint leaves or a sprig of rosemary placed artfully on top can also provide a lovely visual contrast and a hint of fresh aroma.
Side Dishes
The classic accompaniment to rhubarb pie is a generous scoop of creamy vanilla ice cream; its coolness and sweetness perfectly balance the tartness of the rhubarb. Alternatively, a dollop of freshly whipped cream, lightly sweetened, offers a lighter yet equally delightful contrast. For a more substantial meal, consider pairing this dessert with a comforting side like mashed sweet potatoes or a light, refreshing green salad to round out your dining experience.
Creative Serving Ideas
Serve individual slices warm for a comforting dessert, perhaps alongside a small glass of dessert wine like a sweet Riesling to enhance the fruit flavors. You could also crumble some toasted almonds or pecans over the top of each slice just before serving for an added textural element and nutty flavor. Consider transforming a slice into a parfait by layering it with whipped cream and crumbled shortbread cookies in a glass.
Preparation & Storage
Storing Leftovers
Once your delicious rhubarb pie has cooled completely, it can be stored at room temperature for 1-2 days, provided your kitchen is not excessively warm. Cover the pie loosely with plastic wrap or a clean kitchen towel to prevent it from drying out. If you anticipate needing to store it for longer than a couple of days, refrigeration is the best option.
Freezing
To freeze your rhubarb pie, ensure it is completely cooled first. Wrap the entire pie tightly in a double layer of plastic wrap, followed by a layer of heavy-duty aluminum foil. This double protection helps prevent freezer burn and preserves the quality of the pie. It can be stored in the freezer for up to 2 months.
Reheating
When you’re ready to enjoy a slice of your frozen or refrigerated rhubarb pie, it’s best to reheat it gently. For a refrigerated pie, preheat your oven to 350°F (175°C) and bake for about 15-20 minutes, or until warmed through and the crust is crisp again. If reheating from frozen, allow the pie to thaw overnight in the refrigerator first, then follow the same reheating instructions.
Frequently Asked Questions
-
How do I select fresh rhubarb for my pie?
When choosing fresh rhubarb at the market, look for firm, crisp stalks that are vibrantly colored and free from any dark spots, bruises, or signs of wilting. The stalks should feel heavy for their size, indicating freshness and moisture content. It is crucial to remember that rhubarb leaves are toxic and must be discarded immediately upon purchase; only the stalks are edible and suitable for baking.
-
What should I do if my rhubarb pie filling turns out watery?
A watery pie filling is often a result of insufficient thickening or excess moisture from the rhubarb. To prevent this, ensure you allow the rhubarb to sit with the sugar and cornstarch for at least 15 minutes before baking, as this draws out excess juices. For future pies, you can also slightly increase the amount of cornstarch, or use a combination of cornstarch and a small amount of tapioca starch for extra thickening power. Properly cooling the pie for a sufficient amount of time is also key to allowing the filling to set completely.
-
Are there any dietary considerations I should be aware of for this rhubarb pie?
Absolutely! This recipe can be easily adapted for various dietary needs. For a gluten-free version, simply substitute the all-purpose flour in the crust with a 1:1 gluten-free baking blend. If you are managing sugar intake or following a low-carbohydrate diet, you can replace the granulated sugar with a suitable sugar substitute like erythritol or stevia, and you may need to adjust the cornstarch quantity slightly or use a keto-friendly thickener. Always check ingredient labels carefully if you have specific allergies or intolerances.