Vegan Chocolate Pie: 5 Steps to Pure Bliss
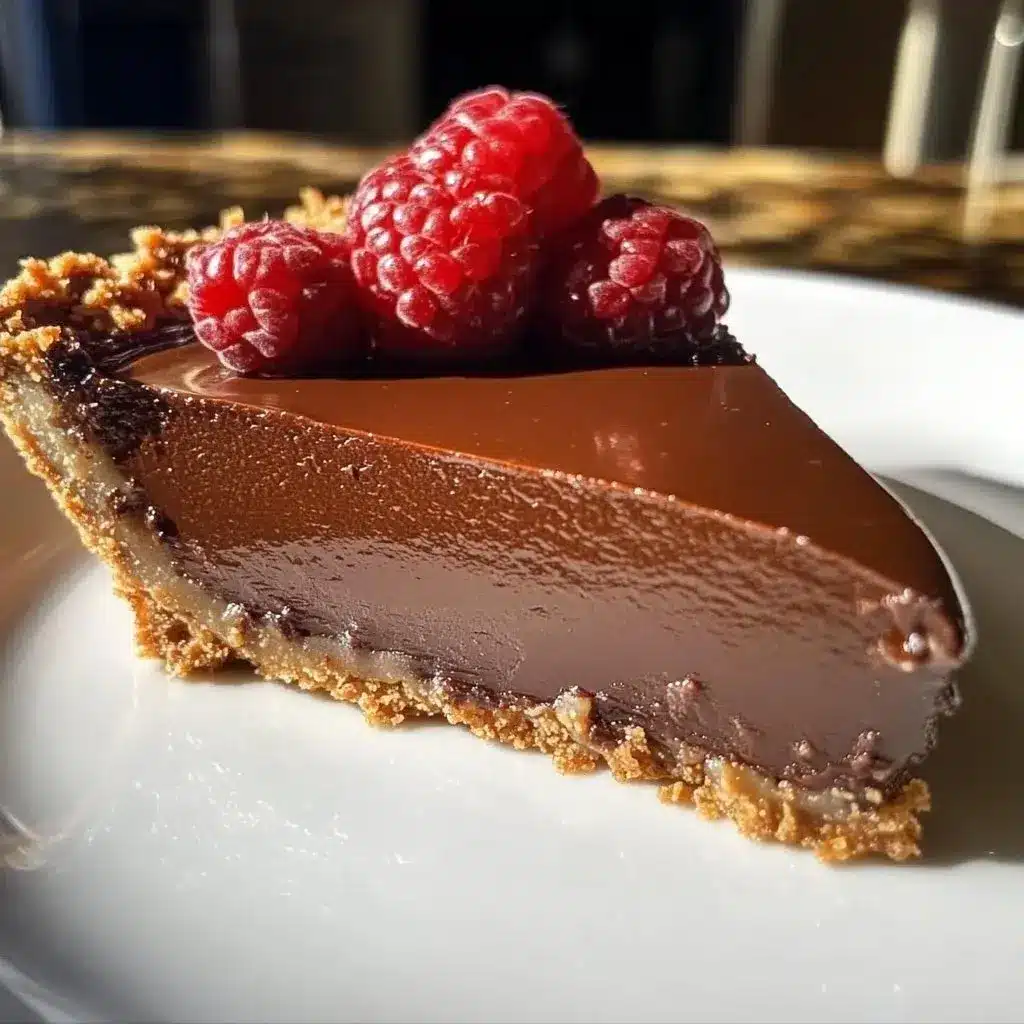
Have you ever craved something sweet yet decadent, but you want to keep it plant-based? Look no further than the delightful Vegan Chocolate Pie: 5 Steps to Pure Bliss. This creamy treat is not only guilt-free but also bursting with rich flavors that will make your taste buds dance.
With its easy preparation and smooth, chocolatey goodness, it caters to both vegans and non-vegans alike. Can you imagine the joy on your friends’ faces when you serve this delectable pie at your next dessert gathering? You might wonder why you haven’t made this vegan chocolate pie sooner.
Why You Will Love This Recipe
- Quick Preparation: Dinner or dessert is on the table with minimal effort, requiring only a short baking time and some passive chilling.
- Rich Flavor Profile: The marriage of premium dark chocolate and creamy coconut milk creates an incredibly luxurious mouthfeel that rivals traditional dairy-based pies.
- Versatile Dietary Option: This recipe is naturally plant-based, and it can be easily adjusted to suit various dietary needs including gluten-free preferences.
- Family-Friendly Appeal: Even the pickiest eaters often find it hard to distinguish this high-quality vegan version from a conventional cocoa-based pie.
- Simple Ingredients: Most items are kitchen staples that you likely already have in your pantry, making last-minute baking easy and stress-free.
Ingredients You Need
The secret to a successful vegan dessert lies in the quality of your ingredients, as every element plays a crucial role in the final texture. Using high-quality cocoa powder and pure maple syrup will significantly elevate the overall taste of your creation. Always check your dark chocolate labels to ensure they are dairy-free to keep the recipe strictly plant-based.
Vegan Chocolate Pie: 5 Steps to Pure Bliss

A decadent, plant-based chocolate pie featuring a nutty almond flour crust and a silky-smooth dark chocolate coconut filling. Perfect for any occasion and naturally vegan.
- 1 1/2 cups almond flour
- 1/4 cup cocoa powder
- 1/4 cup coconut oil, melted
- 1/4 cup maple syrup
- 1/2 teaspoon salt
- 1 can coconut milk
- 1 cup dark chocolate chips
- 1 teaspoon vanilla extract
- 1Preheat your oven to 350°F (175°C).
- 2In a mixing bowl, combine almond flour, cocoa powder, melted coconut oil, maple syrup, and salt. Mix until well-combined.
- 3Transfer the mixture to a pie dish and press it evenly into the bottom and up the sides.
- 4Bake the crust in the preheated oven for 10 minutes, then let it cool completely.
- 5In a saucepan, heat the can of coconut milk over medium heat until warm, but not boiling.
- 6Add the dark chocolate chips to the warm coconut milk, stirring until melted and smooth.
- 7Remove from heat and stir in the vanilla extract.
- 8Pour the chocolate filling into the cooled crust, spreading it evenly.
- 9Refrigerate the pie for at least 2 hours to set.
- 10Slice and serve chilled, optionally topped with fresh berries or coconut whipped cream.
Keywords: Chocolate Dessert, Easy Vegan Recipe, Healthy Dessert, Plant-based Dessert, Vegan Chocolate Pie
- almond flour: serves as the nutrient-dense, grain-free base for your crispy crust.
- cocoa powder: provides the deep, intense chocolate foundation that defines this dessert.
- coconut oil: helps bind the crust ingredients together while ensuring a perfect, crumbly texture.
- maple syrup: adds a natural sweetness that complements the bitterness of the dark chocolate.
- salt: acts as a flavor enhancer to balance the sweetness of the maple syrup and cocoa.
- coconut milk: creates the lush, velvety consistency required for the decadent chocolate filling.
- dark chocolate chips: melts into the coconut milk to provide the signature fudge-like thickness.
- vanilla extract: adds a layer of aromatic depth that rounds out the chocolate notes.
Please refer to the recipe details for specific quantity measurements to ensure the perfect balance of fats and sugars in your pie.
Variations
The Nutty Crunch: You can experiment with the crust by folding in finely chopped toasted walnuts or pecans. This adds a delightful textural contrast that pairs beautifully with the smooth filling.
The Refreshing Zest: Add a teaspoon of pure peppermint extract to your filling before it cools. This transforms the classic chocolate profile into a refreshing, holiday-inspired treat that is perfect for winter gatherings.
Low-Carb Adjustment: If you are following a specific low-carb lifestyle, simply substitute the maple syrup with a high-quality stevia or erythritol-based liquid sweetener. This allows you to maintain the dinner-party-worthy presentation while sticking to your nutritional goals.
How to Prepare Vegan Chocolate Pie
Step 1: Gather and Organize
Preparation is Key: Start by assembling all your ingredients on your countertop, ensuring everything is at room temperature. Measuring your almond flour and cocoa powder accurately helps prevent a crust that is too dry or too oily.
Workspace Setup: Clear a clean space for mixing. Having your pie dish and spatula ready will make the transition from mixing to baking seamless and efficient.
Step 2: Crafting the Crust Base
Mixing the Dry and Wet: In a medium-sized bowl, whisk together your almond flour, cocoa powder, and salt until no clumps remain. Add the melted coconut oil and maple syrup, stirring continuously until the mixture resembles coarse, dark sand.
The Consistency Check: Test the texture by pressing a small amount of the dough between your fingers. It should hold its shape perfectly without crumbling apart.
Step 3: Pressing the Crust
Even Distribution: Transfer your crumbly mixture into a standard pie dish. Use the back of a measuring cup or your fingers to firmly press the crust into the bottom and up the sides.
Securing the Edges: Ensure the crust is of uniform thickness, especially around the edges where the pie is most fragile. A well-compacted crust is the foundation of a successful lunch-time or evening treat.
Step 4: Baking the Foundation
Oven Temperature: Preheat your oven to 350°F (175°C) early so it is at the perfect temperature when you are ready to slide the crust in. Place the dish on the center rack for approximately 10 minutes.
The Cooling Phase: Once the crust is golden and fragrant, remove it from the heat. Allow it to cool completely on a wire rack, as a hot crust will melt the filling too quickly.
Step 5: The Silky Filling
Warming the Milk: Pour your coconut milk into a saucepan and heat over medium flame. Gently warm the milk without letting it reach a boil, as high heat can affect the delicate coconut fat structure.
Melting the Chocolate: Once warm, remove the pan from the heat and stir in the dark chocolate chips. Stir steadily in one direction to create a glossy, uniform emulsion. Add your vanilla extract at this stage for a fragrant finish.
Step 6: Setting the Pie
Final Pour: Pour your smooth chocolate mixture into the cooled crust. Use an offset spatula to smooth the top for a professional appearance.
The Chill Time: Refrigerate the pie for at least two hours to allow the coconut fats to solidify. This patience is rewarded with a perfect, clean slice every single time.
Pro Tips for Vegan Chocolate Pie
The Cooling Rule: Never pour hot filling into a warm crust. If you are in a rush, place the crust in the freezer for ten minutes before filling it.
The Salt Balance: A tiny pinch of sea salt on top of the finished pie before serving can highlight the cocoa notes wonderfully. It acts as an incredible flavor bridge for dark chocolate lovers.
Mixing Precision: When combining your crust ingredients, do not over-mix. Just a gentle fold ensures that your base remains light and crispy rather than becoming hard and dense.
Quality Matters: Using full-fat coconut milk from a can is non-negotiable for this recipe. The lighter, carton-based coconut milks lack the necessary fat content to help the pie set properly during the chilling phase.
Serving Suggestions for Vegan Chocolate Pie
Decoration
You can garnish your pie with fresh organic berries, such as raspberries or strawberries, to provide a sharp, acidic contrast. A light dusting of powdered sugar or a few fresh mint leaves can also provide a stunning color contrast against the dark, glossy chocolate.
Side Dishes
Serving this rich dessert alongside a dollop of vegan coconut whip or even a small side of dairy-free vanilla bean ice cream adds a creamy dimension. It is truly the perfect end to a baked lemon chicken or other savory main courses.
Creative Serving Ideas
Think about using the pie as a centerpiece for a dessert buffet. You could also serve smaller, individual-sized portions in ramekins for a more formal, plated experience that your guests will certainly adore.
Preparation & Storage
Storing Leftovers
The best way to store your pie is to cover it tightly with eco-friendly plastic wrap or place it in a glass container. It will remain perfectly fresh and delicious in your refrigerator for up to seven days.
Freezing
For longer storage, you can freeze your pie for up to two months. Simply wrap it in a layer of parchment paper followed by foil to prevent freezer burn. It is best to slice the pie before freezing so you can remove only the portions you need.
Reheating
This pie is intended to be enjoyed chilled, but if you prefer a softer texture, you can let a slice sit at room temperature for ten minutes. Avoid excessive heat, as the coconut milk base will lose its structure if it gets too warm.
Frequently Asked Questions
- Can I use a different type of flour if I do not have almond flour?
While almond flour is the preferred choice for its natural fats and low-carb profile, you can substitute it with a finely ground oat flour. Note that the texture of the crust might be slightly softer and less crumbly than the original version. - Why is it important to warm the coconut milk before adding the chocolate?
Warming the milk creates the perfect thermal environment for the chocolate to melt without the need for high-heat double boilers. This gentle process prevents the chocolate from seizing and ensures a silky, professional-grade ganache texture. - Is this dessert suitable for children or picky eaters who aren’t vegan?
Absolutely, because the flavor is so robust and familiar, most people do not notice the absence of dairy. It is frequently compared to a standard fudge pie, making it a reliable crowd-pleaser for any family gathering or school event.
Follow along with our journey at Pinterest for more inspiration. If you enjoyed this recipe, you might also be interested in our easy berry tart or perhaps some delicious funfetti cookies for your next bake. Remember, baking is a joyful experience that is meant to be shared with those you love!