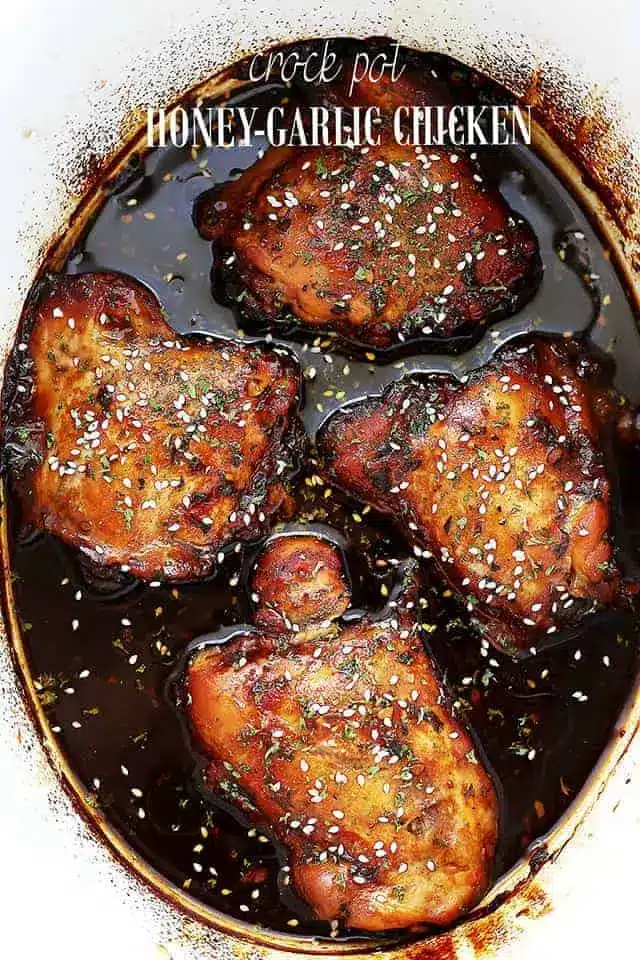
Smoky Beer Can Chicken Marinade
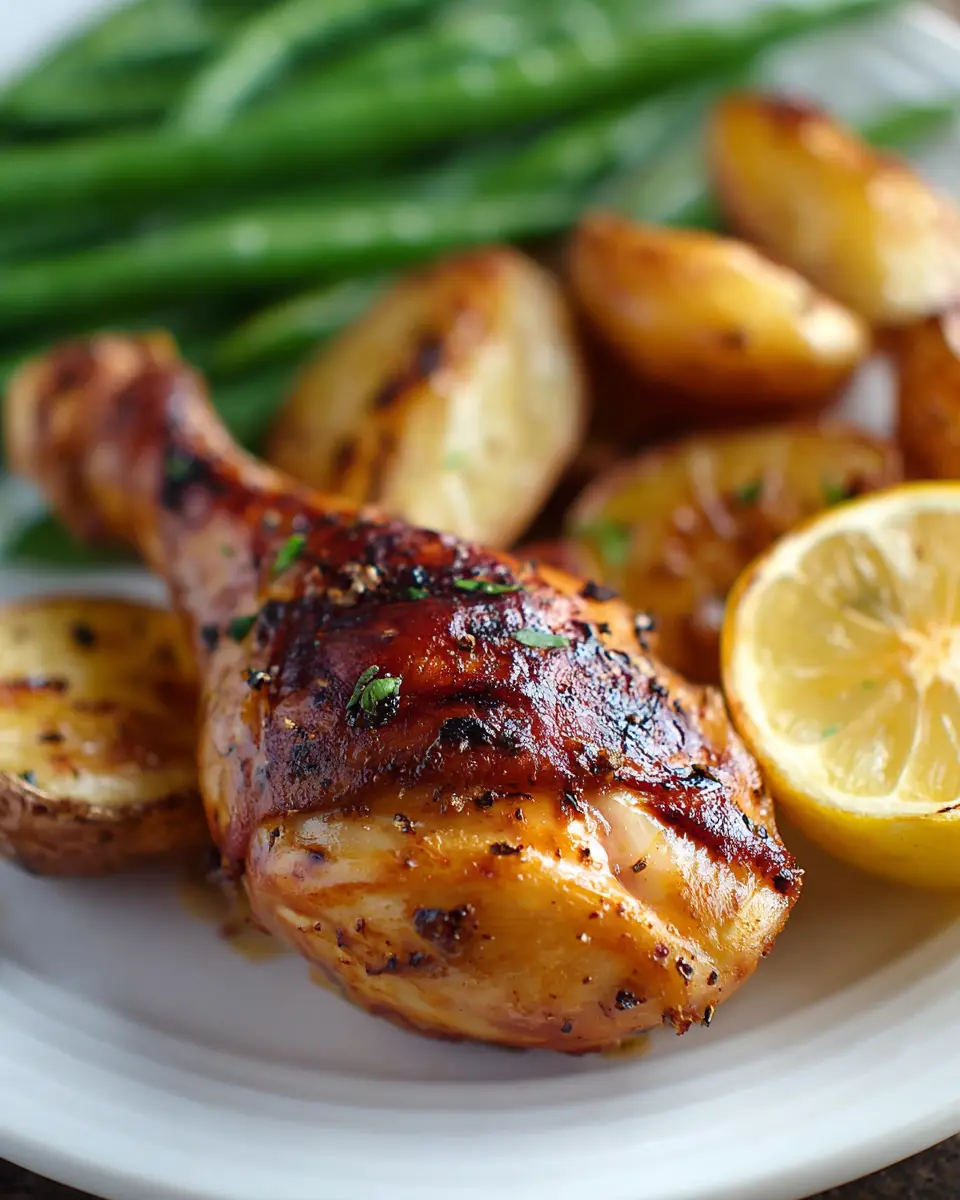
This Smoky Grilled Beer Can Chicken Marinade is a game-changer for anyone looking to elevate their grilled chicken experience. It promises a perfectly juicy, flavorful, and tender result with an irresistible smoky char that will have everyone asking for seconds.
Crafted with a simple yet effective blend of ingredients, this marinade offers a bright, citrusy, and savory profile that complements the natural richness of chicken beautifully. It’s the ideal solution for busy weeknights or relaxed weekend gatherings, transforming ordinary chicken into an extraordinary culinary delight with minimal fuss.
Why You Will Love This Recipe
- Effortless Flavor Infusion: The combination of beer, lemon, and savory spices penetrates the chicken, ensuring deep, consistent taste in every bite.
- Juicy Perfection: The marinade’s components, especially the butter and beer, work together to keep the chicken incredibly moist and tender during grilling.
- Quick Assembly: Whipping up this marinade takes mere minutes, allowing you to get it onto the chicken and into the refrigerator with ease.
- Versatile Appeal: This recipe is perfect for casual BBQs, family dinners, or even as a sophisticated dish for entertaining guests.
- Satisfyingly Smoky: The grilling process combined with the marinade creates a delightful smoky essence and a perfectly charred exterior.
Ingredients You Need
The success of this marinade hinges on using fresh, high-quality ingredients. Opting for fresh lemon juice and a good quality beer will make a noticeable difference in the final flavor profile. Using real butter, not margarine, contributes to the richness and helps achieve that desirable glossy finish on the grilled chicken.
Smoky Grilled Beer Can Chicken Marinade
A bright, savory marinade that blends light lager, lemon juice, melted butter, garlic salt, and lemon pepper to season chicken pieces before grilling. The result is tender, juicy chicken with a lightly smoky, charred finish.
- 1/3 cup melted butter
- 1 can beer (preferably a light lager)
- 1 teaspoon lemon pepper seasoning
- 4 pounds chicken pieces
- 1 1/2 cups lemon juice
- 1 teaspoon garlic salt
- 1In a mixing bowl, whisk together the melted butter, beer, lemon juice, garlic salt, and lemon pepper seasoning until the marinade is thoroughly combined and evenly seasoned.
- 2Arrange the chicken pieces in a large zip-top bag or a shallow container. Pour the marinade over the chicken, making certain every piece is well coated. Seal the bag, or cover the dish securely, then refrigerate for 4 to 6 hours.
- 3Preheat the grill to medium heat so the chicken cooks evenly and develops crisp, golden skin while remaining moist inside.
- 4Remove the chicken from the marinade and place it on the hot grill. Cook the pieces, turning them every 15 to 20 minutes so each side grills evenly. As the chicken cooks, brush it generously with the remaining marinade to build flavor and help retain moisture.
- 5Continue grilling until the chicken reaches an internal temperature of 165°F (75°C) and the juices run clear. Once cooked through and lightly charred, transfer the chicken from the grill and let it rest for several minutes before serving.
Keywords: Smoky Grilled Beer Can Chicken Marinade
- melted butter: forms the rich base of the marinade, ensuring tenderness and aiding in browning for a beautiful finish.
- light lager beer: provides a subtle malty undertone that complements the citrus and savory notes without overpowering them.
- lemon juice: imparts a crucial bright, zesty flavor that cuts through the richness and tenderizes the chicken beautifully.
- garlic salt: delivers an instant savory depth and garlic essence, simplifying the seasoning process.
- lemon pepper seasoning: reinforces the citrus theme while adding a gentle peppery warmth that pairs perfectly with grilled poultry.
- chicken pieces: the star of the show, ensuring a hearty and satisfying meal that can be enjoyed in various cuts.
The exact quantities for each ingredient are conveniently listed in the recipe card above, ready for you to assemble.
Variations
For those seeking a plant-based alternative, consider using firm tofu or thick slices of portobello mushrooms. Marinate them using the same principles as the chicken, adjusting the marinating time slightly as these absorb flavors differently. Grilling them until tender and slightly charred will yield a delicious vegan main course.
A low-carb version can be achieved by substituting the beer with extra lemon juice and a splash of chicken broth. Ensure you focus on keeping the marinating time appropriate to avoid the chicken becoming too “cooked” by the acidity alone, which is crucial for maintaining texture.
To add a different dimension, incorporate a touch of honey or maple syrup into the marinade for a hint of sweetness, especially if you enjoy a sweet and savory profile. This can beautifully balance the tanginess of the lemon and the savory saltiness. For a spicier kick, consider adding a pinch of red pepper flakes or a dash of your favorite hot sauce to the mixture.
How to Prepare Smoky Grilled Beer Can Chicken Marinade
Step 1: Combine the Marinade Base
Begin by gathering a large mixing bowl, ensuring it’s spacious enough to comfortably whisk together all the liquid ingredients. Into this bowl, pour the melted butter. The butter should be smoothly liquid, not overheated, to best emulsify with the other components.
Next, add the light lager beer. The choice of beer is important; a light lager is recommended for its mild flavor that won’t compete with the other elements, offering a subtle malty depth. Then, measure out the fresh lemon juice. The acidity of the lemon is key to both flavor and tenderizing the chicken, so use freshly squeezed juice for the brightest taste.
Follow with the garlic salt, which provides a foundational savory flavor, and the lemon pepper seasoning, which amplifies the citrus notes and adds a hint of spice. Whisk these ingredients together thoroughly until the mixture is completely blended and appears uniform. You’re aiming for a harmonious emulsion where no single ingredient stands out jarringly, setting the stage for truly flavorful chicken.
Step 2: Marinate the Chicken
Select a suitable container for marinating your chicken. A large, heavy-duty zip-top bag works wonderfully, as it allows for easy coating and minimal mess. Alternatively, a shallow, non-reactive dish can also be used, provided it can be covered securely.
Carefully place all your chicken pieces into the chosen container. Once the chicken is nestled inside, pour the prepared marinade evenly over the top. Gently turn and toss the chicken pieces to ensure that every single surface, from every angle, is thoroughly coated with the vibrant marinade. This even coating is vital for consistent flavor penetration and even cooking.
After ensuring complete coverage, seal the zip-top bag securely, pressing out as much air as possible, or cover the dish tightly with plastic wrap or a lid. Transfer the container to the refrigerator and let the chicken marinate for a minimum of several hours. For the best flavor infusion, aim for 4 to 6 hours, allowing the citrus and savory elements to work their magic deep into the meat.
Step 3: Preheat the Grill
When you’re ready to start the grilling process, the first crucial step is to preheat your grill. This step is essential for achieving that perfect smoky char and ensuring the chicken cooks through evenly without drying out. Aim for a medium heat setting on your grill, which typically falls around 350-400°F (175-205°C).
A medium heat is ideal because it provides enough warmth to cook the chicken thoroughly to an internal temperature of 165°F (74°C) while allowing the exterior to develop a beautiful, lightly charred crust. It’s hot enough to sear the surface and impart smoky flavors but not so intensely hot that it burns the outside before the inside is cooked.
While the grill is heating up, take a moment to ensure your grill grates are clean. A clean grate prevents sticking and ensures those beautiful grill marks are purely from the cooking process, not from previous meals. Allow the grill to reach the target temperature and stabilize for at least 10-15 minutes before introducing the chicken.
Step 4: Grill the Chicken
Once the grill has reached its medium heat and is ready, carefully remove the chicken pieces from the marinade. Allow any excess marinade to drip back into the bag or dish for a moment, though some residual liquid clinging to the chicken is desirable for flavor and moisture. Discard the remaining marinade; it should not be reused after contact with raw chicken.
Arrange the marinated chicken pieces directly on the preheated grill grates. It’s important to leave a little space between each piece of chicken. This air circulation helps the heat reach all sides of the chicken evenly, promoting uniform cooking and preventing steaming, which can hinder that desirable crispy skin development.
Begin the grilling process by cooking the chicken for approximately 15 to 20 minutes on the first side. Then, using sturdy tongs, flip each piece of chicken. Continue to cook, turning the chicken every 15 to 20 minutes thereafter. This consistent turning ensures that all sides of the chicken receive equal exposure to the grill’s heat, leading to even browning and cooking throughout.
Step 5: Baste and Continue Grilling
As the chicken continues to cook on the grill, it’s time to enhance its flavor and moisture further by basting. Reserve a small portion of the marinade before you started grilling the chicken, or simply scoop some of the juices that have accumulated on the indirect heat side of your grill if using. If you reserved some marinade, ensure it has not been in contact with raw chicken.
Using a good quality basting brush, generously apply a layer of the reserved marinade or juices over the surfaces of the chicken pieces. This basting process not only adds another layer of the delicious citrusy, savory flavor but also helps to keep the surface of the chicken moist. It encourages the development of a beautiful, glossy, and slightly caramelized exterior that is incredibly appetizing.
Continue to grill, turning the chicken as needed, and basting periodically throughout the remaining cooking time. The goal is to build up a beautiful crust and ensure maximum flavor infusion. Pay attention to the visual cues; the chicken should be developing lovely golden-brown hues and appealing char marks.
Step 6: Check for Doneness and Rest
The final stage of grilling involves ensuring the chicken is cooked perfectly through. The safest and most accurate way to check for doneness is by using an instant-read meat thermometer. Insert the thermometer into the thickest part of the chicken, avoiding any bone, as this can give a false reading.
You are looking for an internal temperature of 165°F (74°C) for the chicken to be considered safely cooked and perfectly tender. The juices should also run clear when the chicken is pierced with a fork or knife; this indicates that the proteins have fully set and the chicken is no longer pink inside. The exterior should have appealing charred spots, signifying a well-developed smoky flavor.
Once the chicken reaches the target temperature and is cooked through, carefully remove it from the grill. Place the cooked chicken on a clean platter or cutting board. It is crucial to let the chicken rest for at least 5 to 10 minutes before slicing or serving. This resting period allows the juices to redistribute throughout the meat, ensuring that every bite is succulent and flavorful, rather than having the juices run out onto the plate.
Pro Tips for Smoky Grilled Beer Can Chicken Marinade
Marinating Time is Key: While you can marinate for shorter periods, allowing the chicken to sit in the marinade for at least 4-6 hours will yield a significantly deeper and more complex flavor. Avoid marinating for much longer than 6-8 hours, especially with bone-in pieces, as the lemon juice can begin to alter the texture of the meat, making it mushy.
Uniformity in Chicken Pieces: If possible, try to use chicken pieces that are roughly similar in size. This ensures that they will all cook at a more even pace on the grill. If you have a mix of very small wings and larger thighs, you might want to remove the smaller pieces earlier to prevent them from drying out before the larger ones are cooked through.
Resting for Juiciness: Don’t skip the resting period after grilling! This is a critical step for achieving the most succulent chicken. The resting allows the muscle fibers to relax and reabsorb the juices that have been pushed to the center during cooking, resulting in noticeably more tender and flavorful bites.
Grill Temperature Management: Maintaining a consistent medium heat is vital. If your grill flares up too much, move the chicken to an indirect heat zone for a few minutes to control the charring, then return it to direct heat to finish cooking. Mastering this temperature control is what separates good grilled chicken from great grilled chicken.
Flavor Boosters: For an extra layer of smoky flavor, consider adding a handful of wood chips (like hickory or mesquite, soaked beforehand) to your charcoal grill or using a smoker box on a gas grill. This will infuse the chicken with an even more pronounced smoky aroma and taste, complementing the marinade perfectly.
Serving Suggestions for Smoky Grilled Beer Can Chicken Marinade
Decoration
Garnish your beautifully grilled chicken with fresh lemon wedges and sprigs of fresh parsley or cilantro. These vibrant additions not only enhance the visual appeal, making the dish look even more inviting, but also offer a burst of freshness that complements the savory marinade. A sprinkle of finely chopped chives can also add a delicate oniony note and a pop of green color.
Side Dishes
A classic potato salad is a fantastic partner for this smoky grilled chicken, offering a cooling contrast to the savory and slightly zesty flavors. Its creamy texture and comforting taste make it a picnic-perfect accompaniment. Grilled corn on the cob is another excellent choice, echoing the smoky char of the chicken while providing a sweet, juicy element.
For a lighter option, consider a crisp green salad with a simple vinaigrette or a refreshing coleslaw. These crunchy, fresh sides cut through the richness of the chicken and provide a balanced meal. You could also serve it with oven-roasted potatoes or a side of baked beans for a heartier meal.
Creative Serving Ideas
Shred the leftover grilled chicken and use it in tacos, quesadillas, or as a flavorful topping for salads. The already infused flavors make it perfect for quick and delicious second-day meals. You could also chop it finely and mix it into pasta salads or use it as a filling for sandwiches and wraps.
Consider serving the chicken family-style on a large platter, allowing everyone to pick their favorite pieces. For a more elegant presentation, you could serve individual portions alongside a colorful medley of grilled vegetables like bell peppers, zucchini, and asparagus. This makes for a complete and visually appealing meal that’s easy to manage.
Preparation & Storage
Storing Leftovers
Once the chicken has cooled completely, store any leftovers in an airtight container in the refrigerator. Ensure the container is sealed tightly to prevent the chicken from drying out and to maintain its freshness. Properly stored, the grilled chicken should remain delicious for up to 3 to 4 days.
It’s always a good idea to separate any bones if you are storing pieces that are bone-in, especially if you plan to shred the meat for later use. This makes it easier to handle the leftovers and ensures that the meat stays intact and flavorful. Avoid leaving cooked chicken at room temperature for more than two hours to prevent bacterial growth.
Freezing
For longer storage, this smoky grilled beer can chicken can be successfully frozen. Wrap individual portions tightly in plastic wrap, then place them inside a freezer-safe bag or container. This double layer of protection helps prevent freezer burn and preserves the quality of the chicken.
When freezing, it’s best to remove as much air as possible from the packaging to maintain the chicken’s texture and flavor. Properly frozen, the chicken can retain its quality for up to 2 to 3 months. Labeling the packages with the date of freezing will help you keep track of your stored items.
Reheating
To reheat the grilled chicken, the best method is to use your oven at a low temperature, around 325°F (160°C). Place the chicken in an oven-safe dish, cover it with foil, and heat gently until warmed through. This method helps to preserve the moisture and prevent the chicken from becoming dry and tough.
Microwaving is also an option, particularly for smaller portions. However, be cautious not to overheat. Loosely cover the chicken and heat in short intervals, checking for doneness between each burst. This prevents the chicken from becoming rubbery. If the chicken seems a bit dry after reheating, a splash of water or broth in the dish can help revive its moisture.
Frequently Asked Questions
-
Can I marinate the chicken overnight?
While this particular marinade is designed to be effective within a few hours, marinating for longer periods, such as overnight, is generally safe for bone-in chicken pieces. However, due to the lemon juice, extended marination beyond 6-8 hours, particularly for smaller or boneless cuts, can potentially lead to a change in the chicken’s texture, making it softer or even mushy. For optimal results that balance deep flavor with perfect texture, it’s advisable to stick to the 4-6 hour marinating window.
-
What kind of beer is best for this marinade, and can I substitute it?
A light lager is highly recommended for this marinade because it offers a clean, subtle malty flavor that supports the other ingredients without adding bitterness or overpowering the chicken. Its mild profile allows the lemon, butter, and seasonings to shine. If you absolutely cannot use beer, you can substitute it with an equal amount of chicken broth or even water. However, the beer does contribute a unique depth and slight tenderizing effect that would be missed in a substitution.
-
How can I ensure the chicken gets smoky flavor without a smoker?
Achieving a smoky flavor on a standard grill involves utilizing the grill’s heat and potentially adding wood chips. Ensure your grill reaches and maintains a medium heat, allowing the chicken to cook slowly enough to absorb the grill’s ambient smoky essence. For an enhanced smoky taste, you can place a small handful of pre-soaked wood chips (like hickory, mesquite, or applewood) directly onto the hot coals of a charcoal grill or in a smoker box on a gas grill during the cooking process. This will generate smoke that infuses the chicken as it cooks, providing that desirable smoky char without needing a dedicated smoker.