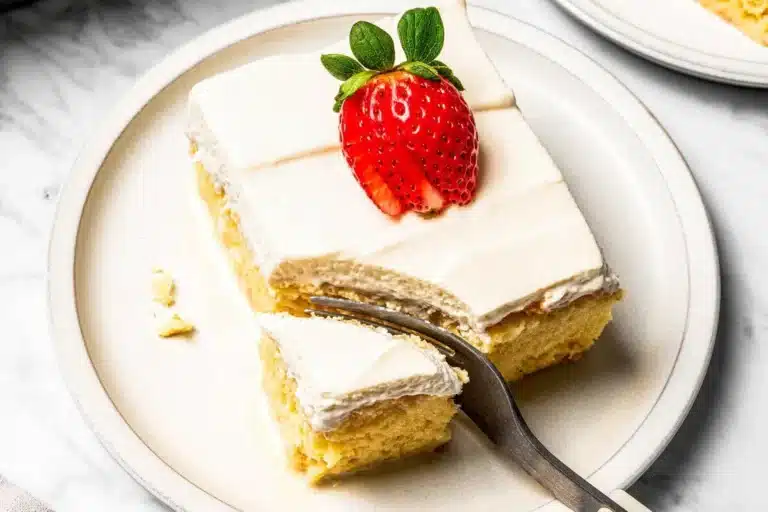
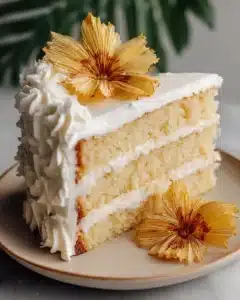
Sunny Pineapple Layer Cake

Pineapple Layer Cake is a light, creamy, make-ahead dessert with tender cake layers, juicy pineapple flavor, and a chilled vanilla topping that makes it perfect for birthdays, spring gatherings, and easy family celebrations. This is the kind of cake that feels bright and cheerful the moment it hits the table.
The soft layers soak up pineapple juice, so every bite stays moist and flavorful without feeling heavy. The frosting keeps things wonderfully simple, bringing together whipped topping, vanilla pudding mix, and crushed pineapple into a creamy finish that spreads easily and gives the cake its cool, fluffy texture.
Why You Will Love This Recipe
- Effortless Assembly: Using a convenient cake mix as a base means you can skip the scratch baking complexities, allowing for a quicker route to a beautiful dessert. The simplicity extends to the frosting, which requires minimal effort to create a delightful creamy texture.
- Moist and Flavorful Layers: Infusing the cake layers with pineapple juice is a game-changer, guaranteeing a wonderfully moist crumb and a burst of tropical flavor in every single bite. This step ensures the cake remains deliciously tender, even after chilling.
- Perfect Make-Ahead Dessert: This cake is designed for advance preparation, allowing flavors to meld and textures to set beautifully in the refrigerator. It’s an ideal choice for busy hosts who want a stunning dessert ready when needed without last-minute fuss.
- Crowd-Pleasing Appeal: The combination of light cake, bright pineapple notes, and a sweet, creamy topping is universally loved, making it a guaranteed hit at parties, family dinners, or any occasion calling for a special treat. It strikes a delightful balance between comforting and exciting.
Ingredients You Need
The beauty of this Pineapple Layer Cake lies in its use of readily available ingredients that come together harmoniously to create an exceptional dessert. Each component plays a vital role in achieving the perfect balance of moist cake, vibrant fruitiness, and smooth, creamy frosting. The thoughtful selection ensures a dessert that is both approachable to make and delightful to eat, offering a taste of sunshine in every slice.
Pineapple Layer Cake
A light and tender layered cake infused with pineapple juice and finished with a creamy pineapple-vanilla frosting. This chilled dessert offers a moist crumb and a bright tropical flavor in every slice.
- 1 package yellow cake mix
- 3 large eggs, brought to room temperature
- 1/3 cup neutral vegetable oil
- 1 cup water
- 1 cup pineapple juice
- 1 can crushed pineapple
- 12 ounces whipped topping, thawed
- 1 package instant vanilla pudding mix
- Crushed pineapple from the ingredient list above
- 1Preheat the oven to 350°F.
- 2In a large bowl, prepare the cake batter by mixing the yellow cake mix, room-temperature eggs, vegetable oil, and water according to the package instructions. Stir until the mixture is smooth and evenly blended.
- 3Grease three 6-inch cake pans or two 9-inch cake pans thoroughly with nonstick cooking spray. Divide the batter evenly among the prepared pans.
- 4Bake for 35 minutes when using 6-inch pans, or 25 minutes when using 9-inch pans. The cake layers are ready when a toothpick inserted into the center comes out clean.
- 5Place the pans on a wire rack and allow the cakes to cool for 10 minutes before removing them from the pans. Turn the layers out and set them right side up to continue cooling until they are easy to handle.
- 6Using a serrated knife, trim away the rounded tops of the cake layers so each one is level.
- 7Slowly spoon or pour the pineapple juice over each layer, allowing the liquid to absorb into the cake. Leave the layers to cool completely before frosting.
- 8To make the frosting, combine the whipped topping, instant vanilla pudding mix, and crushed pineapple in a mixing bowl. Stir until the mixture is fully incorporated and creamy.
- 9Place one cake layer onto a serving plate and spread a generous portion of frosting across the top. Add the next layer and repeat. If using a third layer, continue in the same manner.
- 10After stacking the cake, spread the remaining frosting over the top and around the sides until the entire cake is evenly covered.
- 11Refrigerate the finished cake until serving time so the frosting can set and the flavors can develop fully.
Keywords: Pineapple Layer Cake
Quantities for these delightful ingredients can be found within the recipe card, ensuring you have everything you need for baking success.
Variations
To elevate this already delightful cake, consider a few creative twists that cater to different dietary preferences and flavor profiles. The inherent flexibility of the recipe allows for wonderful adaptations.
For a vibrant vegan version, the yellow cake mix can be substituted with a vegan-friendly cake mix, and eggs can be replaced with flax eggs or a commercial egg replacer. The dairy in the whipped topping can be swapped for a plant-based whipped cream alternative, such as coconut cream or soy-based whipped topping, ensuring a cruelty-free and equally delicious outcome. Ensure your instant vanilla pudding mix is also dairy-free; many are naturally so, but it’s always wise to check the label.
A low-carb or keto-friendly adaptation is certainly achievable with a few smart ingredient swaps. Opt for a sugar-free yellow cake mix or prepare a keto-friendly cake base from scratch using almond flour or coconut flour. For the frosting, sugar-free instant vanilla pudding mix and a sugar-free whipped topping (or stabilized heavy cream) will be your allies, while the crushed pineapple can be replaced with finely diced unsweetened pineapple chunks or a sugar-free pineapple flavoring for that essential tropical essence, albeit in a less concentrated form.
You can also introduce exciting new flavor dimensions by incorporating other complementary fruits. A hint of lime zest added to the frosting can provide a zesty counterpoint to the sweetness, reminiscent of a tropical piña colada. Alternatively, a small amount of maraschino cherry juice or even finely chopped cherries folded into the frosting can offer a delightful color contrast and a subtle cherry-almond undertone, creating a “cherry pineapple swirl” effect that is both visually appealing and delicious.
How to Prepare Pineapple Layer Cake
Step 1: Preparing the Cake Layers
Begin by preheating your oven to the recommended temperature of 350°F (175°C) to ensure even baking. Thoroughly grease and flour your chosen cake pans, whether you are using three 6-inch pans for a taller cake or two standard 9-inch pans for a more classic structure. This crucial step prevents the cake layers from sticking, allowing for easy removal and a pristine presentation once baked. Applying a non-stick baking spray or a generous coating of butter and flour will provide the best release.
In a large mixing bowl, combine the yellow cake mix, three large eggs (brought to room temperature for better emulsification), 1/3 cup of neutral vegetable oil for moisture, and 1 cup of water as specified by the cake mix instructions. Stir these ingredients together until the batter is smooth, evenly blended, and free of any dry pockets. The texture should be consistent and pourable, indicating that all ingredients have been thoroughly incorporated. This forms the foundation of your delicious Pineapple Layer Cake.
Carefully divide the prepared cake batter equally among your greased and floured cake pans. Ensure each pan receives a similar amount of batter to promote uniform baking and even cake heights. Place the filled pans into the preheated oven and bake for approximately 35 minutes for 6-inch pans, or 25 minutes for 9-inch pans, or until a toothpick inserted into the center of each cake comes out clean. This indicates that the cakes are fully cooked through and ready for the next stage.
Once baked, remove the cake pans from the oven and let them rest on a wire cooling rack for about 10 minutes. This brief resting period allows the cakes to firm up slightly within the pans, making them easier to handle. After this initial cooling, carefully invert the pans to release the cake layers onto the wire rack, allowing them to cool completely. It is essential that the cake layers are fully cooled before proceeding to the frosting stage to prevent the topping from melting or sliding.
Once the cake layers are cool enough to handle, gently level their tops using a serrated knife. This process involves carefully slicing off the domed crust to create a flat surface. Leveling ensures that the cake layers stack neatly and that the frosting can be applied evenly from edge to edge, contributing to a polished and professional final appearance. Take your time with this step for the best results.
Step 2: Infusing with Pineapple Juice
Now comes the step that truly imbues the cake with its signature moistness and tropical essence. Slowly and deliberately spoon or pour the 1 cup of pineapple juice over the surface of each cooled cake layer. It is important to do this gradually, allowing the cake crumb time to absorb the liquid thoroughly. Avoid rushing this process, as an even saturation is key to achieving the desired texture and flavor throughout the cake. This step is what transforms a good cake into an exceptional one.
As you apply the pineapple juice, you will notice the cake layers begin to soften and absorb the liquid. This process creates an incredibly moist and tender crumb that is characteristic of this specific Pineapple Layer Cake. The juice not only adds moisture but also deepens the pineapple flavor, ensuring that every bite is infused with that bright, fruity taste. The cake is essentially becoming even more delicious as it sits and absorbs this liquid gold.
Allow the cake layers to sit for a period after the pineapple juice has been absorbed, continuing to cool completely if any warmth remains from the baking process. This resting time allows the juice to fully integrate into the cake structure, ensuring that the moisture is evenly distributed. A completely cool and saturated cake layer is essential for the next steps, particularly when applying the frosting. This patience will be rewarded with a superior finished product.
The pineapple juice preparation is more than just adding moisture; it’s about building layers of flavor and texture. It creates a delightful chewiness in the cake that is both satisfying and refreshing. This technique is a simple yet incredibly effective way to enhance the overall sensory experience of the dessert. You are essentially marinating the cake in pure pineapple goodness before the frosting even makes its appearance.
Consider the role of the pineapple juice as a bridge between the cake and the frosting. It softens the cake crumb, making it more receptive to the creamy topping, and it also provides a flavor link that ties the entire dessert together. This deliberate infusion is what sets this Pineapple Layer Cake apart, offering a depth of flavor that is both sophisticated and delightfully accessible.
Step 3: Crafting the Creamy Frosting
To prepare the luscious frosting, begin by combining the thawed 12 ounces of whipped topping, 1 package of instant vanilla pudding mix, and the drained crushed pineapple in a medium-sized mixing bowl. Ensure the whipped topping is fully thawed but still cold for optimal texture and stability. The instant pudding mix will act as a stabilizer and thickener, while the crushed pineapple adds delightful texture and bursts of fruity flavor.
Gently stir these ingredients together until the mixture is fully incorporated and achieves a creamy, smooth consistency. Avoid over-mixing, as this can cause the whipped topping to deflate and lose its airy texture. The goal is a frosting that is light, fluffy, and spreadable, with the crushed pineapple evenly distributed throughout. This creates an appealing visual as well as a textural element in the final cake.
The instant vanilla pudding mix is a key ingredient that provides both structure and a delightful vanilla flavor that beautifully complements the pineapple. It helps the frosting set up and maintain its shape, making it ideal for a chilled cake. The combination of the creamy whipped topping and the subtle vanilla notes creates a perfectly balanced sweetness that doesn’t overpower the pineapple.
The crushed pineapple adds a wonderful textural contrast to the otherwise smooth frosting. Each bite will offer small pockets of juicy pineapple, enhancing the overall fruity experience and making the cake feel more vibrant and authentic. Make sure to drain the crushed pineapple well to prevent the frosting from becoming too watery. This careful balance of ingredients ensures a frosting that is both delicious and visually appealing.
This frosting is designed to be light and airy, which is perfect for a chilled dessert like this Pineapple Layer Cake. It spreads easily over the moist cake layers and the sides of the cake, creating a beautiful, smooth finish. The simplicity of this frosting recipe means you can achieve a professional-looking result with minimal effort, making the entire dessert process more enjoyable and less stressful.
Step 4: Assembling the Cake
Begin the assembly process by placing the first leveled cake layer onto your chosen serving plate or cake stand. It’s helpful to use a dollop of frosting on the plate first to secure the bottom layer and prevent it from shifting. Ensure the cake layer is positioned centrally and is stable before proceeding to add the frosting.
Generously spread a thick layer of the prepared creamy frosting across the top of the first cake layer. Use an offset spatula or the back of a spoon to create an even coating, reaching close to the edges. This layer of frosting acts as both a binder for the next cake layer and a delicious filling that enhances the overall flavor and texture of the cake.
Carefully place the second cake layer on top of the frosted first layer. If you are using three cake pans, this process is repeated with the second layer of frosting applied to the second cake layer, followed by the third cake layer. Ensure each subsequent layer is aligned as neatly as possible with the one below it for a stable and visually appealing cake structure. The anticipation builds with each added layer.
Once all cake layers are stacked, use the remaining frosting to cover the entire cake. Start by applying a thin “crumb coat” over the top and sides of the cake. This initial layer traps any loose crumbs and provides a smooth base for the final, thicker layer of frosting. Chill the cake for about 15-20 minutes after the crumb coat to allow it to set, making the final frosting application much cleaner.
After the crumb coat has set, apply the rest of the frosting evenly over the top and sides of the cake. Use your spatula to create smooth surfaces or decorative swirls as desired. The goal is to completely cover the cake layers, creating a unified and attractive finish. A well-frosted cake not only looks beautiful but also helps to seal in the moisture from the pineapple-infused layers.
Step 5: Chilling for Optimal Flavor
Once the Pineapple Layer Cake is fully assembled and frosted, it is crucial to refrigerate it. Place the cake carefully into the refrigerator, ensuring it is level so the frosting doesn’t slide. This chilling period is not just about setting the frosting; it’s about allowing the flavors to meld and deepen. The pineapple juice soaked into the layers will further soften them, and the frosting will firm up, creating a cohesive and delightful dessert.
Allow the cake to chill for at least one to two hours, or even longer if time permits. The longer it chills, the more integrated the flavors will become, and the cleaner your slices will be when you cut into it. This is a dessert that truly benefits from patience, as the flavors develop beautifully during this time, creating a more complex and satisfying taste experience. Think of this as the final, essential seasoning of your culinary creation.
The chilled temperature is also what makes this cake so refreshing and delightful to eat. The cool, creamy frosting combined with the moist cake layers creates a wonderful contrast that is perfect for warmer weather or as a light ending to a meal. Unlike many traditional cakes that are best at room temperature, this Pineapple Layer Cake is designed to be enjoyed cold, highlighting its light and airy qualities.
When ready to serve, take the cake out of the refrigerator. If you prefer a slightly softer texture, you can let it sit at room temperature for about 10 to 15 minutes before slicing. However, many find the fully chilled state to be the most appealing, offering a satisfyingly cool bite. The decision often comes down to personal preference and the desired texture of the cake.
This final chilling step ensures that every component of the cake comes together perfectly. The moistness from the pineapple juice, the creaminess of the frosting, and the tender cake all meld into a harmonious and delicious whole. It’s the culmination of the preparation process, transforming all the individual ingredients into a show-stopping dessert ready to be enjoyed by all.
Step 6: Presenting Your Masterpiece
Before serving, take a moment to admire your creation. The smooth, creamy frosting, perhaps adorned with a few extra dollops or swirls, presents a beautiful canvas. The cake is a testament to the simple yet effective techniques used, from the moist pineapple-infused layers to the luscious vanilla-pineapple topping. It’s ready to be the star of any dessert table, promising a burst of bright, tropical flavor.
When it comes time to slice, use a sharp, clean knife. A gentle sawing motion is often best to cut through the chilled frosting without dragging it. Wiping the knife clean between slices can help maintain the pristine appearance of the cake and ensure each piece is neatly cut. This attention to detail in presentation enhances the overall dining experience, making the cake even more inviting.
The visual appeal of this cake is significant; its pale yellow hue and creamy white frosting evoke a sense of lighthearted celebration. It’s a dessert that looks as good as it tastes, making it perfect for special occasions like birthdays, anniversaries, or spring holidays. The simplicity of its design doesn’t detract from its charm; in fact, it enhances its approachable elegance.
This Pineapple Layer Cake is best served cold or slightly softened. The refreshing nature of the chilled dessert makes it a perfect palate cleanser after a rich meal or a delightful treat on its own. Its bright flavors and light texture mean it’s often enjoyed by guests of all ages, making it a universally appreciated choice for gatherings.
Consider the joy this cake brings. It’s a reminder of simple pleasures, a delightful escape to tropical flavors, and a testament to the fact that delicious desserts don’t always require complex techniques. Share this delightful cake with loved ones and watch their faces light up with every delicious, moist bite of sunshine.
Pro Tips for Pineapple Layer Cake
Room Temperature Eggs: Always use eggs that have been brought to room temperature before incorporating them into the cake batter. This simple step ensures that the eggs emulsify more effectively with the other ingredients, leading to a smoother batter and a finer cake crumb. It’s a small effort that makes a noticeable difference in the final texture of your cake layers.
Drain Crushed Pineapple Well: When preparing the frosting, it’s vital to drain the crushed pineapple thoroughly. Excess liquid can make the frosting too thin and runny, compromising its ability to set properly and cover the cake smoothly. Squeeze out as much moisture as possible using a fine-mesh sieve or by pressing it gently with a spoon.
Gradual Juice Application: When spooning the pineapple juice over the cake layers, do it gradually. Allow each cake to absorb the juice slowly rather than pouring it all at once. This controlled saturation ensures the cake crumb softens evenly and absorbs the liquid without becoming soggy or falling apart. Patience here yields a wonderfully moist cake.
Chilling is Key: Do not skip the chilling step for the assembled and frosted cake. Refrigerating the cake allows the frosting to firm up, the flavors to meld beautifully, and the cake layers to become even more moist. This also makes slicing much cleaner, resulting in professional-looking portions. Aim for at least 1-2 hours of chilling time for optimal results.
Serrated Knife for Leveling: Use a good quality serrated knife when leveling the cake layers. The teeth of the serrated blade saw through the cake gently without compressing it, which helps maintain the integrity of the crumb. This technique ensures your layers are perfectly flat for even stacking and a beautiful final presentation of your Pineapple Layer Cake.
Serving Suggestions for Pineapple Layer Cake
Decoration
Elevate the visual appeal of your Pineapple Layer Cake with simple yet elegant decorative touches. A sprinkle of toasted shredded coconut over the top and sides adds a delightful texture and enhances the tropical theme. Alternatively, a few fresh pineapple wedges or maraschino cherries placed artfully on top can create a vibrant focal point.
For a slightly more elaborate but still easy decoration, consider piping small rosettes of the frosting around the edges of each layer or along the base of the cake. A dusting of powdered sugar can also provide a soft, snowy contrast to the creamy frosting, especially if you’re aiming for a more classic dessert presentation. Don’t be afraid to let the natural beauty of the cake shine through; its simple charm is part of its appeal.
Side Dishes
While this Pineapple Layer Cake is a complete dessert in itself, pairing it with complementary items can enhance the overall dining experience. Fresh berries, such as sliced strawberries or raspberries, offer a bright, slightly tart contrast to the sweetness of the cake and frosting. A small dollop of whipped cream on the side can add an extra touch of indulgence for those who enjoy it.
For a more cohesive tropical theme, consider serving a small side of chilled mango slices or a light fruit salad featuring pineapple, kiwi, and melon. This adds another layer of refreshing fruitiness that complements the cake beautifully. A simple scoop of high-quality vanilla bean ice cream also pairs wonderfully, creating a classic and always-welcome dessert combination.
Creative Serving Ideas
Transform this cake into a delightful dessert bar by offering small bowls of toppings guests can add to their slices. Options could include extra toasted coconut, chopped nuts like macadamia or pecans, or even a drizzle of caramel sauce for those who prefer a richer flavor profile. This interactive approach allows guests to customize their dessert experience.
Consider serving individual portions in elegant glasses or jars for a more refined presentation. Layer cubes of the cake with the frosting and perhaps some fresh pineapple chunks for a deconstructed, trifle-style dessert. This method is not only visually stunning but also ensures a perfect balance of cake and frosting in every spoonful. It’s a fantastic option for making the cake feel even more special.
Preparation & Storage
Storing Leftovers
Store any leftover Pineapple Layer Cake, properly covered, in the refrigerator. Due to the whipped topping and pudding mix in the frosting, it is essential to keep the cake chilled to maintain its texture and prevent spoilage. An airtight container or tightly wrapped plastic wrap will keep the cake fresh and prevent it from absorbing odors from other foods in the refrigerator.
The cake should remain fresh and delicious for up to 3 to 4 days when stored correctly in the refrigerator. The flavors often meld and deepen over time, so it can even taste better on the second or third day. When you’re ready to enjoy a slice, simply take it out of the refrigerator and let it sit for about 10-15 minutes to slightly soften the frosting if you prefer a less firm texture, though many enjoy it perfectly chilled.
Freezing
For longer-term storage, this Pineapple Layer Cake can be frozen, although it’s best to freeze the unfrosted cake layers if possible for the optimal texture upon thawing. Wrap individual unfrosted cake layers tightly in plastic wrap, then in aluminum foil, or place them in a freezer-safe bag. Unfrosted layers can typically be stored in the freezer for up to 2 months.
If freezing the fully assembled and frosted cake, it’s advisable to freeze individual slices. Wrap each slice securely in plastic wrap, followed by a layer of aluminum foil or place in a freezer-safe container. Frosted slices are best consumed within about 1 month to maintain the best texture of the frosting. Thawing frozen frosted cake should be done gradually in the refrigerator to prevent the frosting from becoming unstable or watery.
Reheating
Reheating is generally not necessary or recommended for this Pineapple Layer Cake, as it is designed to be served cold or at refrigerator temperature. The nature of the whipped topping and pudding mix in the frosting means that applying heat would likely cause it to melt and lose its intended texture. The chilling process is integral to its appeal, providing a refreshing and light dessert experience.
If a slice is exceptionally firm straight from the refrigerator, the best approach is to allow it to sit at room temperature for a brief period, typically 10 to 15 minutes. This will soften the frosting slightly and allow the cake’s flavors to become more pronounced without compromising the integrity of the dessert. Enjoying it chilled is part of its charm and simplicity.
Frequently Asked Questions
-
Can I use a different type of cake mix for this recipe?
While yellow cake mix is recommended for its classic flavor and texture that pairs beautifully with pineapple, you can experiment with other varieties. A white cake mix or even a vanilla cake mix would also work well, providing a slightly different base note. Avoid strongly flavored mixes like chocolate or spice, as they might overpower the delicate pineapple flavor. Always follow the package directions for preparing the cake mix batter, adjusting liquids and eggs as specified, to ensure the best results.
-
Why is my frosting too thin, and how can I fix it?
A thin frosting is often due to undrained crushed pineapple, over-mixing the whipped topping, or not allowing the instant pudding mix enough time to set. To fix thin frosting, you can try chilling it in the refrigerator for 30-60 minutes to help it firm up. If it’s still too loose, you can gently fold in a little more instant vanilla pudding mix, a tablespoon at a time, allowing it to thicken before adding more. Ensure all ingredients were cold when combined, as this aids in the frosting’s stability.
-
How can I ensure my cake layers are perfectly moist and flavorful?
The key to incredibly moist and flavorful cake layers lies in two main steps: using the pineapple juice as directed and not over-baking the cakes. Spooning the pineapple juice over the cooled layers allows them to absorb the liquid, infusing them with moisture and flavor. When baking, keep a close eye on the cakes and test for doneness with a toothpick; it should come out clean but not dry. Over-baking will lead to a drier crumb, even after adding the juice. Baking until just done ensures a tender, moist cake.