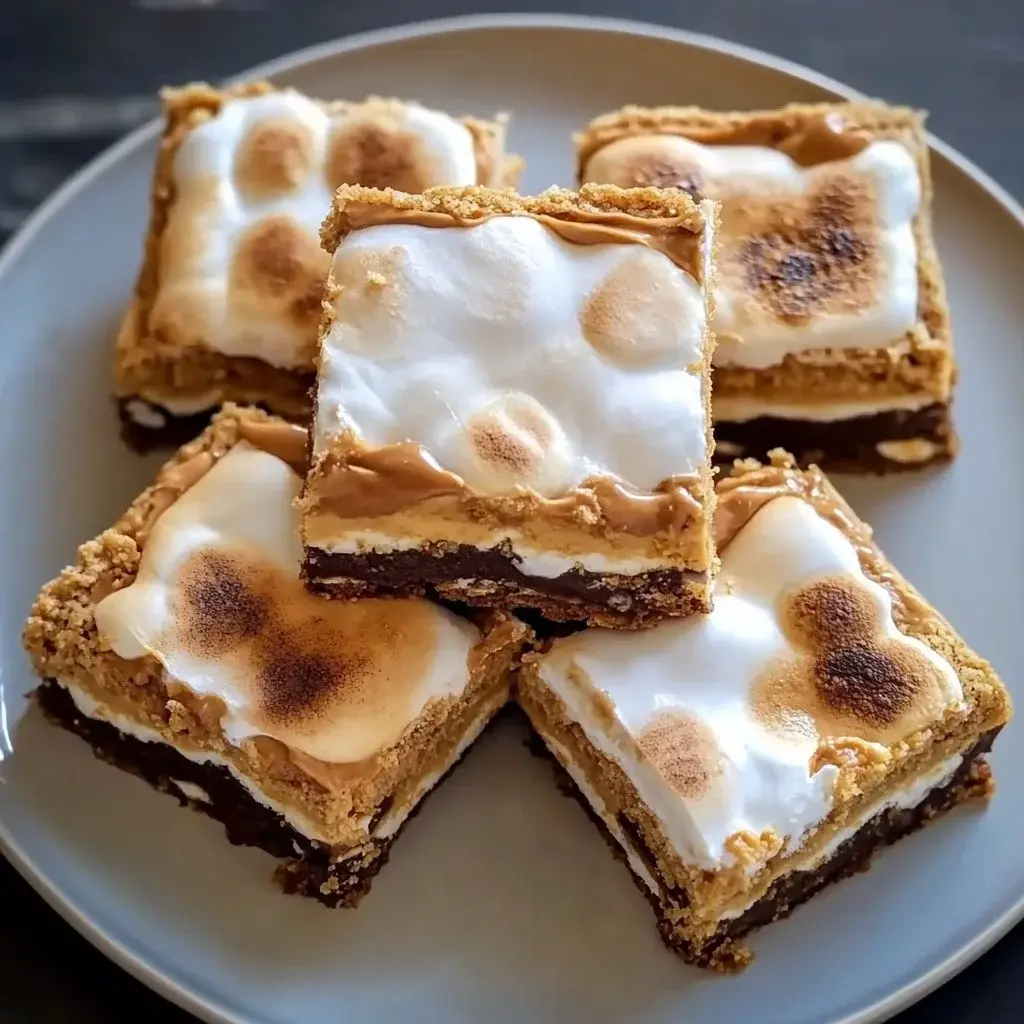
Irresistible Peanut Butter S'mores Bars
Have you ever found yourself craving the nostalgic flavor of a campfire s’more but lack the means to enjoy it outdoors? Enter the delicious Peanut Butter S’mores Bars. This treat brilliantly combines the traditional elements of a s’more with the creamy, rich goodness of peanut butter, creating a dessert that is both comforting and satisfying. These bars are perfect for family gatherings, potlucks, or even a quiet evening at home.
What makes Peanut Butter S’mores Bars particularly special is their simplicity. With just a handful of ingredients, you can whip up a delightful dessert that will impress anyone who tries it. Plus, the recipe is easily adaptable, allowing you to customize it to suit various preferences and dietary needs. Imagine sinking your teeth into layers of buttery graham cracker crust, smooth peanut butter, gooey chocolate, and puffy marshmallows.
Why You Will Love This Recipe
- Irresistible Flavor Combination: The classic s’mores trio of marshmallow, chocolate, and graham cracker is elevated with the addition of creamy, rich peanut butter, creating a flavor profile that is both comforting and excitingly new. This harmonious blend ensures every bite is a delightful explosion of sweet and nutty notes.
- Effortless Preparation: These bars are designed for ease, requiring minimal culinary skill and time. You won’t need any complex techniques or specialized equipment, making it an ideal recipe for beginners or for those hectic weeknights when dessert is a must but time is scarce.
- No Baking Required for Assembly: While a brief bake sets the crust and toasts the marshmallows, the main assembly involves simple layering and mixing. This “no-fuss” approach means less time in the kitchen and more time enjoying the delicious results with friends and family.
- Highly Customizable: The beauty of this recipe lies in its adaptability. You can easily tailor it to fit various dietary needs, such as making it vegan or gluten-free, or simply swap ingredients to suit your personal taste preferences. This flexibility ensures everyone can enjoy a piece of this delightful treat.
- Perfect for Any Occasion: Whether you’re hosting a summer barbecue, a cozy movie night, a birthday celebration, or simply need an afternoon pick-me-up, these bars are a guaranteed hit. Their portable nature and crowd-pleasing appeal make them suitable for any event, big or small.
Ingredients You Need
Crafting these delightful Peanut Butter S’mores Bars begins with selecting high-quality ingredients that will ensure the best possible flavor and texture. Using fresh, reliable staples is the first step towards a truly irresistible dessert. The interplay between the crunchy crust, the smooth peanut butter, the melty chocolate, and the gooey marshmallows relies heavily on the integrity of each component.
Irresistible Peanut Butter S’mores Bars

This recipe brilliantly combines the traditional elements of a s'more with the creamy, rich goodness of peanut butter, creating a dessert that is both comforting and satisfying. These bars are perfect for family gatherings, potlucks, or even a quiet evening at home. They offer a flavor explosion with simple preparation and are easily customizable.
- 1 1/2 cups graham cracker crumbs
- 1/2 cup unsalted butter, melted
- 1/4 cup sugar
- 1 cup creamy peanut butter
- 1 cup chocolate chips (can use semi-sweet or milk chocolate)
- 2 cups miniature marshmallows
- 1Preheat oven to 350°F (175°C) and grease a 9x9 inch baking pan.
- 2In a large mixing bowl, combine graham cracker crumbs, melted butter, and sugar until the mixture resembles damp sand. Press this mixture evenly into the bottom of the prepared pan to form a sturdy crust.
- 3Bake the crust for 8 minutes until it is lightly golden.
- 4Allow the crust to cool slightly, then spread the peanut butter evenly over the baked crust.
- 5Sprinkle the chocolate chips evenly over the peanut butter layer.
- 6Distribute the miniature marshmallows evenly over the chocolate chips.
- 7Return the pan to the oven and bake for an additional 10-12 minutes until the marshmallows are golden and fluffy.
- 8Remove from the oven and allow to cool completely at room temperature.
- 9Once cool, slice into squares and serve.
- 10Store any leftovers in an airtight container at room temperature or refrigerate for longer freshness.
Keywords: Easy Treat, Family Recipe, No-Bake Dessert, Peanut Butter S'mores Bars, S'mores, Dessert, Snack
You’ll find the precise quantities for each ingredient within the recipe card. For the base, you’ll need graham cracker crumbs, unsalted butter, and sugar. The delectable filling comprises creamy peanut butter, chocolate chips (your favorite kind, whether semi-sweet or milk chocolate), and miniature marshmallows for that classic gooey s’mores effect.
Variations
Elevate your Peanut Butter S’mores Bars with a delightful vegan transformation. To achieve this, simply substitute the unsalted butter with a plant-based alternative like coconut oil or vegan butter. Ensure you use vegan chocolate chips, which are readily available in most grocery stores. For the marshmallows, opt for vegan-friendly options, or consider a melted coconut cream for a similar gooey texture.
Embrace a low-carb lifestyle without missing out on this decadent treat. For the crust, you can utilize crushed almond flour or coconut flour mixed with melted butter and a sugar substitute like erythritol or stevia. When layering, choose sugar-free chocolate chips and consider using a sugar-free peanut butter or a nut butter alternative.
Add an extra layer of indulgence with a sprinkle of crunchy toppings or a drizzle of decadent sauce. Consider incorporating chopped toasted nuts, such as pecans or walnuts, directly into the peanut butter layer for added texture and flavor. A thin drizzle of caramel sauce or a dusting of sea salt flakes over the marshmallows before baking can create a sophisticated sweet and salty contrast.
How to Prepare Peanut Butter S’mores Bars
Step 1: Assembling the Crust
Begin by preheating your oven to 350°F (175°C). This ensures the oven is at the optimal temperature for baking the base to a perfect golden hue. It’s a crucial first step that sets the stage for the entire dessert.
Next, meticulously grease a 9×9 inch baking pan. This prevents the bars from sticking, which is vital for easy removal and clean slicing later on. You can use butter, cooking spray, or parchment paper for this purpose, ensuring a non-stick surface.
In a large mixing bowl, combine the graham cracker crumbs, melted unsalted butter, and sugar. Stir until the mixture evenly resembles damp sand, meaning the crumbs are well-coated with the butter and sugar. This forms the sturdy foundation of your bars.
Press this crumb mixture firmly and evenly into the bottom of the prepared baking pan. Aim for a compact and level layer; this forms your delicious crust. A flat base is important for uniform baking and easier cutting.
Bake this prepared crust for approximately 8 minutes. You’re looking for it to become lightly golden, indicating it’s slightly toasted and set. Over-baking at this stage can make the crust too hard, so keep a close watch.
Step 2: Creating the Peanut Butter Layer
Once the crust has finished its initial bake, carefully remove the pan from the oven. Allow it to cool slightly for a few minutes. This slight cooling period makes it easier to handle and spread the next layer without melting it too quickly.
While the crust is still warm, evenly spread a generous layer of creamy peanut butter over the baked base. The warmth of the crust helps the peanut butter spread smoothly and adhere well. Ensure the entire surface of the crust is covered for consistent flavor in every bite.
The consistency of the peanut butter is key here. Creamy peanut butter works best for a smooth, even spread. If your peanut butter is very stiff, you might gently warm it for a few seconds in the microwave to make it more pliable.
Take your time to ensure the peanut butter layer is uniform across the entire crust. This layer is a star component, providing a rich, nutty counterpoint to the sweetness of the other ingredients. A well-distributed layer guarantees a balanced flavor experience.
Step 3: Adding the Chocolatey Goodness
Now, it’s time to introduce the chocolate element. Generously sprinkle the chocolate chips over the smooth layer of peanut butter. Aim for an even distribution so that each bar receives a good amount of melty chocolate.
You can use any type of chocolate chips you prefer, such as semi-sweet, milk chocolate, or even dark chocolate for a richer taste. The choice of chocolate will significantly impact the final flavor profile of your bars.
As the bars bake, these chips will begin to melt into luscious pockets of chocolate, creating that irresistible gooeyness characteristic of s’mores. This step is where the magic truly starts to happen, blending the peanut butter and chocolate flavors.
Ensure the chocolate chips are spread as evenly as possible. This ensures that when the chocolate melts, it creates a consistent layer, preventing some bites from being overly chocolatey and others from lacking it. This evenness is key for a perfectly balanced flavor.
Step 4: The Marshmallow Topping
The final layer of our s’mores masterpiece involves the marshmallows. Evenly distribute the miniature marshmallows over the chocolate chips, covering the surface as much as possible. The goal is to create a fluffy, abundant topping.
Miniature marshmallows work best as they melt and spread more evenly than larger ones. They will puff up and turn golden brown in the oven, giving that classic s’mores look and texture. Don’t be shy; a good amount of marshmallows is essential for that gooey factor.
As these marshmallows bake, they will become wonderfully puffy and soft, creating a delightful contrast to the firmer layers beneath. This toasted marshmallow topping is the hallmark of any s’more creation and is vital for the authentic experience.
Ensure the marshmallows are spread out to cover the entire top surface. This ensures that every part of the bar will have that delightful toasted marshmallow goodness when served. A well-covered top is key to a visually appealing and delicious finish.
Step 5: The Finishing Bake
Return the pan containing the assembled bars back into the preheated oven. Bake for an additional 10 to 12 minutes. This final bake is primarily to melt and lightly toast the marshmallows.
Keep a very close eye on the bars during these last few minutes of baking. You want the marshmallows to become beautifully golden and puffy, but not burnt. Burnt marshmallows can impart an unpleasant bitter flavor to your dessert.
The chocolate chips underneath the marshmallows will also melt further, creating a luscious, gooey filling. This combination of melted chocolate and toasted marshmallows is what makes these bars so incredibly decadent.
The goal is a visually appealing top with lightly browned, soft marshmallows. The exact time might vary slightly depending on your oven, so visual cues are more important than strict timing here. The aroma will also tell you they are nearly ready.
Step 6: Cooling and Setting
Once the bars have reached the desired golden-brown perfection on top, carefully remove the pan from the oven. Place the pan on a wire rack to begin the cooling process. It is vital to allow the bars to cool completely at room temperature.
This cooling period is critical because it allows all the layers to set and firm up. If you try to cut the bars while they are still warm, they will likely fall apart, and the layers will be messy. Patience here is key to achieving neat, well-defined bars.
The peanut butter and melted chocolate will solidify slightly as they cool, binding the layers together. The marshmallows will also settle into their characteristic gooey texture. Resist the urge to rush this step; the results are worth the wait.
As the bars cool, the flavors also meld together, creating a more cohesive and satisfying taste experience. The transformation from a warm, gooey mess to perfectly sliceable bars is truly remarkable and essential for presentation.
Step 7: Slicing and Serving
Once the Peanut Butter S’mores Bars have completely cooled down and set, it’s time to cut them into portions. Use a sharp knife to carefully slice the bars into squares. For the cleanest cuts, you might consider wiping the knife clean between each slice.
Aim for even-sized pieces to ensure everyone gets a comparable amount of each delicious layer. The size of your portions can be adjusted based on whether you’re serving them as individual treats or as part of a larger dessert spread. A 3×3 or 4×4 grid usually works well for a 9×9 pan.
Now that your bars are ready, they can be served immediately for an enjoyable treat. Alternatively, you can store them for later enjoyment, making them a convenient make-ahead dessert option. This versatility is one of their many charms.
Present your beautifully sliced Peanut Butter S’mores Bars with pride. They are ready to be devoured, offering a delightful blend of nostalgic flavors with a modern, peanut-butter-infused twist. Enjoy the fruits of your simple yet rewarding labor!
Pro Tips for Peanut Butter S’mores Bars
Don’t skip the pan preparation. Greasing your baking pan thoroughly is non-negotiable. Failure to do so can result in your delicious bars sticking stubbornly to the pan, making them incredibly difficult to remove and slice neatly. Parchment paper can also be a great insurance policy against sticking.
Watch the crust closely. While the crust only bakes for a short time, overbaking it can lead to a hard, brittle base that detracts from the overall texture. Aim for a light golden brown; it should feel set and slightly firm, but not overly hard.
Layer with care. Uneven spreading of peanut butter or chocolate can lead to inconsistent flavor distribution. Take the time to ensure each layer is as uniform as possible across the entire pan. This attention to detail ensures every bite is perfectly balanced.
Cool completely. This is perhaps the most critical tip for achieving clean slices. Rushing the cooling process will result in gooey, falling-apart bars. Allow them ample time at room temperature to set properly; they should be firm to the touch before you even think about cutting.
Quality ingredients matter. Use a good quality peanut butter that you enjoy the taste of, as its flavor is prominent in the bars. Similarly, the quality of your chocolate chips will directly impact the richness of the chocolate layer. Don’t compromise on these key flavor components.
Consider a sea salt finish. For an extra touch of sophistication, sprinkle a small amount of flaky sea salt over the marshmallows just before the final baking. This creates a delightful sweet and salty contrast that can elevate the entire flavor profile of the bars, making them even more addictive.
Serving Suggestions for Peanut Butter S’mores Bars
Decoration
To enhance the visual appeal of your Peanut Butter S’mores Bars, consider a few simple decorative touches. A light dusting of unsweetened cocoa powder or powdered sugar over the top can add a sophisticated finish. Alternatively, you could drizzle melted chocolate or a contrasting peanut butter sauce artfully over the cut bars for an extra visual flourish.
Side Dishes
These bars are rich and decadent on their own, but they pair wonderfully with refreshing accompaniments. A tall glass of cold milk is a classic and perfect pairing, cutting through the sweetness and richness. For an even more indulgent experience, serve a warm bar alongside a scoop of premium vanilla bean ice cream, allowing the ice cream to melt into the gooey layers.
Creative Serving Ideas
Move beyond simple slicing by presenting these bars in creative ways. You could cut them into smaller, bite-sized pieces and serve them as part of a dessert buffet or a candy bar. For a fun twist, arrange them on a rustic wooden board with a few fresh berries or a dollop of whipped cream for a more composed dessert presentation.
Preparation & Storage
Storing Leftovers
To keep your delicious Peanut Butter S’mores Bars fresh and delicious, store them in an airtight container. At room temperature, they will typically remain enjoyable for about 3-4 days. For longer storage, or if you live in a warm climate, refrigeration is recommended to prevent them from becoming too soft or melting.
Freezing
These bars freeze remarkably well, making them an excellent option for making ahead. Ensure each bar is individually wrapped tightly in plastic wrap to prevent freezer burn. Then, place the wrapped bars into a freezer-safe airtight container or a heavy-duty freezer bag. They can be stored in the freezer for up to 2-3 months.
Reheating
When you’re ready to enjoy a frozen bar, the best method is to thaw it overnight in the refrigerator. Once thawed, you can enjoy it cold or gently reheat it for a warm, gooey experience. A few seconds in the microwave (about 10-15 seconds per bar) will bring back that fresh-baked warmth and meltiness, reminiscent of campfire s’mores.
Frequently Asked Questions
-
Can I make Peanut Butter S’mores Bars ahead of time, and how should they be stored?
Absolutely! These bars are ideal for making in advance, making them perfect for parties or busy schedules. For optimal freshness, store them in an airtight container at room temperature for up to 3-4 days. If you prefer them to stay firmer or live in a warm climate, refrigeration is a good option, extending their shelf life. Ensure the container is well-sealed to prevent them from drying out or absorbing odors.
-
What is the ideal way to know when my Peanut Butter S’mores Bars are perfectly baked, and what happens if I overbake them?
The primary indicator of doneness is the marshmallows; they should be puffed up and lightly golden brown. A slight watchfulness during the final few minutes of baking is crucial. Overbaking can lead to burnt marshmallows, imparting a bitter taste that compromises the sweet flavors of the bars. It can also make the crust too hard and the overall texture less desirable. Aim for a beautiful, toasted look rather than a dark brown or black char.
-
Besides peanut butter, what other nut or seed butters can I use, and how can I adapt the recipe for different dietary needs like vegan or gluten-free?
For alternative nut butters, almond butter or cashew butter are excellent substitutes, offering a similar creamy texture and rich flavor. For those with seed preferences or allergies, sunflower seed butter is a fantastic option. To make the bars vegan, swap the butter for coconut oil or vegan butter, use vegan chocolate chips, and source vegan marshmallows. For gluten-free Peanut Butter S’mores Bars, substitute the graham cracker crumbs with certified gluten-free graham cracker crumbs or a similar gluten-free cookie crumb alternative. The core structure of the recipe is quite forgiving and adaptable.