Oreo Cookie Cake – The Ultimate Comfort Dessert Recipe

Get ready to embark on a delightful culinary adventure with a dessert that’s as fun to make as it is to devour. This Oreo cookie cake is a celebration of textures and flavors, marrying the comforting familiarity of Oreos with the satisfying chewiness of a giant, homemade cookie. It’s an absolute showstopper, perfect for any occasion that calls for a touch of sweetness and a whole lot of joy.
Imagine a rich, decadent base studded with chunks of your favorite chocolate sandwich cookies, all crowned with a dreamy vanilla buttercream frosting. This isn’t just a cake; it’s an experience designed to bring smiles and create lasting memories. Its appeal lies in its simplicity, its indulgence, and its sheer deliciousness, making it a go-to for bakers of all levels.
Why You Will Love This Recipe
- Quick Preparation: This impressive dessert comes together swiftly, usually within 40 minutes of total active time, making it ideal for spontaneous cravings or last-minute party planning.
- Irresistible Flavor Combination: The classic pairing of chocolatey Oreos with sweet vanilla buttercream frosting creates a flavor profile that’s universally loved and undeniably addictive.
- Visually Stunning: Its unique giant cookie format provides a delightful surprise and a fantastic canvas for creative decorating, turning it into a memorable centerpiece.
- Customizable Delight: Whether you love extra Oreos, a sprinkle explosion, or a smooth frosting finish, this cake offers endless possibilities for personalization to suit any taste or event.
- Crowd-Pleasing Appeal: This dessert is designed to be a hit with all ages, from young children to seasoned dessert aficionados, guaranteeing happy faces all around.
Ingredients You Need
Crafting this Oreo cookie cake begins with selecting high-quality ingredients, which form the foundation of its exceptional taste and texture. Using fresh, premium components ensures that every bite is a testament to the richness and depth of flavor this dessert offers. The right butter, sugars, and perfectly integrated Oreos are crucial for achieving that signature chewy consistency and delightful crunch.
Oreo Cookie Cake
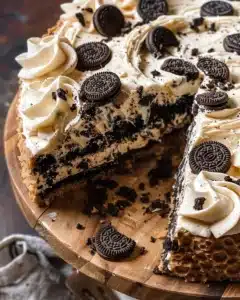
Oreo Cookie Cake is the ultimate dessert that combines the beloved taste of Oreos with a soft, chewy giant cookie base. This indulgent treat is perfect for birthdays, parties, or simply satisfying your sweet tooth. With luscious vanilla buttercream icing and chunks of Oreos throughout, it’s sure to impress anyone who tries it. Best of all, you can whip up this delicious cake in just 40 minutes, making it an easy and delightful choice for any gathering. Bring joy and comfort to your table with this fun twist on a classic dessert!
- 3/4 cup unsalted cultured butter (cool room temperature)
- 1 cup light brown sugar (packed)
- 1/4 cup granulated sugar
- 2 large eggs (room temperature)
- 1 large egg yolk (room temperature)
- 2 teaspoons vanilla extract
- 2 1/3 cups all-purpose flour
- 2 cups chopped Oreos
- 3/4 teaspoon baking soda
- 1/2 teaspoon fine sea salt
- 6 tablespoons unsalted butter (room temperature)
- 1 cup powdered sugar
- 2 teaspoons heavy cream
- 1/2 teaspoon vanilla extract
- Pinch fine sea salt
- 1Preheat your oven to 350°F (180°C). Grease the bottom and sides of a 9-inch cake pan or springform pan. If using a traditional cake pan, line it with two long strips of parchment paper in an X shape, then place a round piece of parchment on the bottom. For a springform pan, simply line the bottom.
- 2In a stand mixer bowl or using a hand mixer, cream together the unsalted cultured butter, light brown sugar, and granulated sugar until fluffy. This should take about 3 minutes.
- 3Mix in the eggs and egg yolk one at a time. Be sure to scrape down the sides of the bowl after each addition. Next, add the vanilla extract to enhance flavor.
- 4Incorporate all-purpose flour, baking soda, and fine sea salt into the mixture. When nearly combined, fold in the chopped Oreos gently. Use an offset spatula to spread the batter evenly into your prepared cake pan.
- 5Bake in your preheated oven for 22–30 minutes. The top should be golden brown when done; check with a toothpick inserted into the center—if it comes out clean, it's ready! Allow it to cool completely on a wire rack before removing it from the pan.
- 6While your cake cools down, cream together room temperature unsalted butter and powdered sugar until well combined. Mix in heavy cream, vanilla extract, and a pinch of salt. Beat on medium speed until it's light and fluffy.
- 7Fill a pastry bag fitted with a star tip using your prepared frosting. Pipe decorative swirls on top of your cooled Oreo cookie cake. For an extra touch, garnish with sprinkles or additional chopped Oreos before serving!
Keywords: Oreo, cookie cake, chocolate, dessert, baking, party, birthday, easy, quick
- unsalted cultured butter, cool room temperature: This is the creamy base that provides richness and structure, ensuring a tender crumb.
- light brown sugar, packed: Adds moisture and a caramel-like depth of flavor, contributing to the cookie’s chewy texture.
- granulated sugar: Contributes to crispness on the edges and sweetness, balancing the brown sugar’s chewiness.
- large eggs, room temperature: Essential for binding the ingredients, adding richness, and contributing to the cake’s lift.
- large egg yolk, room temperature: Enriches the dough further, providing a more tender and decadent texture.
- vanilla extract: A classic flavor enhancer that rounds out the sweet notes and complements the chocolate of the Oreos beautifully.
- all-purpose flour: The primary structure builder for the cookie cake, providing the necessary framework.
- chopped Oreos: The star ingredient, these cookies bring their iconic flavor and delightful texture throughout the cake.
- baking soda: Acts as a leavening agent, helping the cake to rise slightly and achieve a desirable texture.
- fine sea salt: Balances the sweetness and enhances all the other flavors, bringing a subtle savory note.
- unsalted butter, room temperature: The foundation for the creamy, luscious vanilla buttercream frosting.
- powdered sugar: Provides the sweetness and structure for the frosting, creating a smooth, spreadable consistency.
- heavy cream: Adds richness and helps achieve a silky smooth texture in the frosting.
- vanilla extract: Infuses the frosting with its classic aromatic and sweet flavor.
- fine sea salt: A tiny pinch enhances the frosting’s sweetness and adds a professional touch.
The precise quantities for each ingredient are readily available within the accompanying recipe card, ensuring you have all the necessary measurements for success.
Variations
The beauty of this Oreo cookie cake lies not just in its classic form but also in its incredible adaptability. You can transform this delightful treat into something entirely new with simple ingredient swaps and creative additions, catering to diverse dietary needs and flavor preferences.
For a vegan rendition, the key is substituting the butter and eggs. Use a high-quality vegan butter substitute for both the cookie base and the frosting, and replace the eggs with a flax egg (1 tablespoon ground flaxseed mixed with 3 tablespoons water, let sit for 5 minutes) or a commercial egg replacer. Ensure your Oreos are vegan, as many varieties are. The result is a plant-based wonder that tastes just as decadent and satisfying.
If you’re aiming for a low-carb or ketogenic version, you’ll need to make more significant adjustments. Replace the all-purpose flour with a blend of almond flour and coconut flour, and swap the granulated and brown sugars with erythritol, xylitol (caution: toxic to dogs), or a monk fruit sweetener blend. For the frosting, use a keto-friendly powdered sweetener. This requires careful attention to ratios to achieve the right texture, but it’s entirely achievable for a guilt-free indulgence.
Consider adding other flavor dimensions to your cake. A swirl of berry compote or a layer of rich chocolate ganache between the cookie base and frosting can add an extra layer of complexity. You could also infuse the frosting with mint extract for a refreshing twist, or even fold in some chocolate chips alongside the Oreos for an intensified chocolate experience, making each slice a unique adventure.
How to Prepare Oreo cookie cake
Step 1: The Crucial Oven Preheat and Pan Preparation
Embarking on the creation of your Oreo cookie cake begins with the fundamental step of preheating your oven to precisely 350°F (180°C). This ensures that when your cake finally enters the oven, it’s greeted with consistent, optimal heat, which is paramount for even baking and achieving that perfect golden-brown exterior. Simultaneously, you must meticulously prepare your chosen baking vessel, whether it’s a standard 9-inch cake pan or a springform pan, by greasing its bottom and sides thoroughly. This acts as a non-stick barrier, preventing your precious cookie cake from adhering to the pan during the baking process, which would be a heartbreaking setback.
For traditional cake pans, an extra layer of protection is highly recommended to guarantee easy release. Line the bottom of the pan with a circle of parchment paper, ensuring it fits snugly. To facilitate removal of the cake later, it’s advisable to also line the pan with two long strips of parchment paper that cross each other in an ‘X’ shape, with the ends extending up the sides of the pan. If you opt for a springform pan, simply lining the bottom with parchment paper is usually sufficient, as the removable side makes extraction much simpler.
Step 2: The Art of Creaming Butter and Sugars
This next phase is where the magic truly starts to happen, transforming simple ingredients into a luscious, cohesive base. In the bowl of your stand mixer, fitted with the paddle attachment, or using a sturdy hand mixer, combine the softened unsalted cultured butter, the packed light brown sugar, and the granulated sugar. The goal here is to cream these ingredients together until the mixture becomes wonderfully light, fluffy, and pale in color. This process, typically taking around 3 minutes of diligent mixing, effectively incorporates air into the butter and sugar, which is vital for creating a tender texture in your final cookie cake.
The fluffy consistency achieved at this stage is not merely aesthetic; it signifies that the sugars have begun to dissolve and the fat has emulsified, creating a stable foundation for the rest of the ingredients. This aeration will contribute to the cake’s slight lift and a desirable chewiness, preventing it from becoming dense or heavy. Resist the urge to rush this step, as it’s a critical contributor to the overall success of your bake, laying the groundwork for a truly magnificent Oreo cookie cake.
Step 3: Incorporating Eggs and Enhancing Flavor
With your butter and sugar mixture beautifully aerated, it’s time to introduce the eggs and the essential flavor enhancer, vanilla extract. Add the two large eggs, one at a time, beating well after each addition. It is incredibly important to scrape down the sides and bottom of the bowl after incorporating each egg. This ensures that all the ingredients are evenly distributed and fully integrated into the batter, preventing pockets of unincorporated egg or butter from affecting the cake’s final texture and consistency.
Following the eggs, generously measure and add the vanilla extract. This aromatic liquid is more than just a scent; it’s a key flavor component that beautifully complements the rich chocolate notes of the Oreos and adds a warm, inviting depth to the entire dessert. Its presence rounds out the sweetness and prevents the cookie cake from tasting one-dimensionally sugary, contributing to a more complex and satisfying flavor profile that beckons for another bite.
Step 4: The Marriage of Dry and Wet Ingredients, Plus the Oreos
Now, the dry ingredients make their grand entrance into the wet mixture, beginning the transformation into dough. Add the all-purpose flour, the baking soda, and the fine sea salt to the bowl. Begin mixing on a low speed, just until the dry ingredients are mostly incorporated. It’s crucial not to overmix at this stage, as this can develop the gluten in the flour too much, resulting in a tougher cookie cake.
Once the dry ingredients are just about combined, it’s time for the star of the show: the chopped Oreos. Gently fold these delightful cookie pieces into the batter using an offset spatula or a wooden spoon. The aim is to distribute them evenly throughout the dough without crushing them too much. Finally, use your offset spatula to carefully spread this glorious, Oreo-studded batter evenly into your prepared cake pan, ensuring the surface is as smooth and level as possible for uniform baking.
Step 5: The Patient Bake and Essential Cooling
With your batter prepped and waiting, it’s time to usher your Oreo cookie cake into the preheated oven. Place the prepared pan into the center of your 350°F (180°C) oven and allow it to bake for approximately 22 to 30 minutes. The exact baking time can vary depending on your oven’s calibration and the depth of your pan, so keeping an eye on it is key. You’ll know it’s nearing perfection when the edges are beautifully golden brown and the center appears set.
To confirm doneness, perform the classic toothpick test: insert a wooden toothpick or a cake tester into the center of the cake. If it comes out clean, or with just a few moist crumbs attached (not wet batter), your cake is ready. Once baked, carefully remove the pan from the oven and place it on a wire rack to begin the cooling process. It’s absolutely vital to let the cookie cake cool completely in the pan on the wire rack before attempting to remove it. Rushing this step can lead to the cake breaking or crumbling, as it’s still quite fragile when hot.
Step 6: Crafting the Velvety Vanilla Buttercream
While your magnificent Oreo cookie cake is diligently cooling on the wire rack, dedicate your attention to creating the luscious vanilla buttercream frosting that will crown this creation. In a clean mixing bowl, preferably with your stand mixer fitted with the paddle attachment, cream together the softened unsalted butter and the sifted powdered sugar. It is important to sift the powdered sugar to avoid any lumps and ensure a silky smooth frosting texture.
Continue to beat these two ingredients together until they are well combined and form a thick paste. Gradually add the heavy cream, a tablespoon at a time, mixing after each addition until you reach your desired consistency. Finally, stir in the vanilla extract and a tiny pinch of fine sea salt, which works wonders to enhance the sweetness and add a professional balance. Beat the frosting on medium speed for an additional 2-3 minutes until it becomes wonderfully light, fluffy, and spreadable.
Step 7: The Grand Finale: Decoration and Presentation
The moment has arrived to bring your Oreo cookie cake to its full visual glory. Ensure that your cake has cooled entirely before you begin the decorating process; any residual warmth can cause the frosting to melt and slide off, compromising the beautiful finish you’ve worked so hard to achieve. Prepare your pastry bag by fitting it with your favorite star tip. This will allow you to pipe elegant swirls, rosettes, or a decorative border around the top of the cake, adding a professional and festive touch.
Fill the pastry bag with your prepared vanilla buttercream frosting and begin piping your chosen design onto the cooled cookie cake. For an extra burst of flavor and visual appeal, consider garnishing the frosted cake with additional chopped Oreos, a sprinkle of chocolate shavings, or even some colorful sprinkles. This final flourish not only enhances the dessert’s aesthetic but also reinforces its beloved Oreo identity, making it an irresistible treat for your eyes and your taste buds.
Pro Tips for Oreo cookie cake
Achieving cookie cake perfection involves a few key techniques and considerations that elevate your bake from good to truly outstanding. These expert insights are designed to help you navigate the process smoothly and ensure a delightful outcome every single time you decide to whip up this crowd-pleasing dessert.
Room Temperature is Key: Always ensure your butter and eggs are at room temperature before you begin. This allows them to emulsify properly with the sugars and flour, resulting in a lighter, more tender crumb. Cold ingredients can lead to a denser, tougher cookie cake, so take the time to let them sit out on the counter.
Gentle Mixing is Crucial: When it comes to adding the flour, mix only until just combined. Overmixing the batter develops the gluten in the flour, which can make your cookie cake tough and chewy rather than tender and delightful. Stop mixing as soon as you no longer see streaks of dry flour.
Accurate Oven Temperature Matters: Ovens can be notoriously inaccurate. Using an oven thermometer is a fantastic way to verify that your oven is running at the correct temperature. Consistent heat ensures even baking, preventing burnt edges and undercooked centers.
Patience with Cooling: Allow the cookie cake to cool completely in the pan on a wire rack before attempting to frost it. Frosting a warm cake will lead to a melted, messy situation. Patience here is rewarded with a perfectly decorated and beautifully set dessert.
Freshest Oreos for Best Flavor: Ensure you are using fresh Oreos for chopping and incorporating into the batter. Stale cookies won’t provide the same satisfying texture or flavor punch. Check the expiration date on your package before you begin.
Serving Suggestions for Oreo cookie cake
Decoration
The visual appeal of your Oreo cookie cake can be enhanced with simple yet effective decorative touches. A classic choice is to pipe swirls of the vanilla buttercream around the edges and across the top, creating a beautiful border and playful peaks. For an added Oreo punch, sprinkle roughly chopped Oreos over the frosting before it sets; this adds texture and reinforces the cake’s theme. Alternatively, a dusting of cocoa powder or a drizzle of dark chocolate ganache can provide a sophisticated contrast to the sweet frosting.
Side Dishes
While the Oreo cookie cake is a complete dessert on its own, pairing it with complementary side dishes can create a more elaborate and satisfying experience. A scoop of creamy vanilla bean ice cream is a timeless partner, its coolness and subtle sweetness perfectly balancing the richness of the cake. For a fruity counterpoint, a small bowl of fresh berries like raspberries or strawberries adds a burst of tartness and vibrant color. A dollop of lightly sweetened whipped cream can also offer a lighter, airier texture that complements the dense cookie cake beautifully.
Creative Serving Ideas
Think beyond the standard slice to make your Oreo cookie cake even more memorable. Consider cutting the cake into small, bite-sized squares and arranging them on a tiered dessert stand for a party; this makes them easy for guests to grab and mingle with. For a truly unique presentation, serve individual slices alongside a shot glass of cold milk—a nostalgic nod to how many people enjoy Oreos. You could also present a slice warm, perhaps with a side of salted caramel sauce for a delightful sweet and salty combination.
Preparation & Storage
Storing Leftovers
Should you be fortunate enough to have any Oreo cookie cake remaining, proper storage is key to maintaining its deliciousness. The best method is to store it in an airtight container at room temperature. This helps to prevent the cake from drying out and keeps the frosting from becoming too hard. If stored correctly, the cake should remain fresh and enjoyable for up to three days, retaining its signature chewy texture and rich flavor.
Freezing
For longer storage, the Oreo cookie cake freezes remarkably well, making it a convenient make-ahead dessert option. Once the cake has completely cooled and has been frosted, wrap it very tightly in several layers of plastic wrap, ensuring there are no air pockets. You can then add an outer layer of aluminum foil for extra protection against freezer burn. Properly wrapped, the cake can be frozen for up to two months, preserving its flavor and texture for future enjoyment.
Reheating
When you’re ready to enjoy your frozen Oreo cookie cake, allow it to thaw overnight in the refrigerator. Once thawed, you can gently reheat individual slices if desired to recapture some of that freshly baked warmth and softness. A few options exist: place a slice on a baking sheet in a preheated oven at 350°F (175°C) for about 10 minutes, or warm it in a microwave on medium power for 15-20 seconds. For a quick stovetop method, gently warm a slice in a covered skillet over low heat for about 5 minutes.
Frequently Asked Questions
-
How can I customize my Oreo Cookie Cake beyond the basic recipe?
Customization is where this Oreo cookie cake truly shines, offering a fantastic canvas for your creativity. You can infuse the vanilla buttercream frosting with different extracts, such as mint for a refreshing twist or a hint of almond for added complexity. Consider folding additional mix-ins into the cookie batter alongside the Oreos; mini chocolate chips, toffee bits, or even chopped nuts like pecans or walnuts can introduce exciting new textures and flavors. For a truly decadent experience, a layer of rich chocolate ganache or a fruit compote, like raspberry or strawberry, can be spread between the cookie base and the frosting, adding an extra dimension of taste and visual appeal.
-
What are the best ways to decorate an Oreo Cookie Cake to make it festive?
Decorating this cake offers a fun opportunity to tailor it to any occasion. For birthdays, pipe rosettes or swirls of vanilla buttercream and then top generously with crushed Oreos and colorful sprinkles for a festive explosion of color and texture. You can also arrange whole Oreos around the top edge of the cake, or create a chocolate drip effect by drizzling melted dark chocolate or ganache down the sides. For holidays, consider using colored frosting or themed sprinkles that match the season, such as red and green for Christmas or pastels for Easter. Even a simple dusting of powdered sugar can create an elegant, snowy effect.
-
Is it possible to make this Oreo Cookie Cake gluten-free, and if so, what substitutions are needed?
Absolutely, you can transform this delightful Oreo cookie cake into a gluten-free treat with a few strategic substitutions. The most crucial change involves swapping out the all-purpose flour for a high-quality gluten-free all-purpose flour blend that is designed for cup-for-cup substitution. Ensure your chosen blend contains xanthan gum, as this acts as a binder and helps replicate the structure that gluten provides. You will also need to confirm that the Oreos you use are certified gluten-free, as standard varieties contain wheat. The rest of the ingredients, including butter, sugars, eggs, and vanilla, are typically gluten-free, but always double-check labels for cross-contamination warnings.