One Layer Coconut Cake
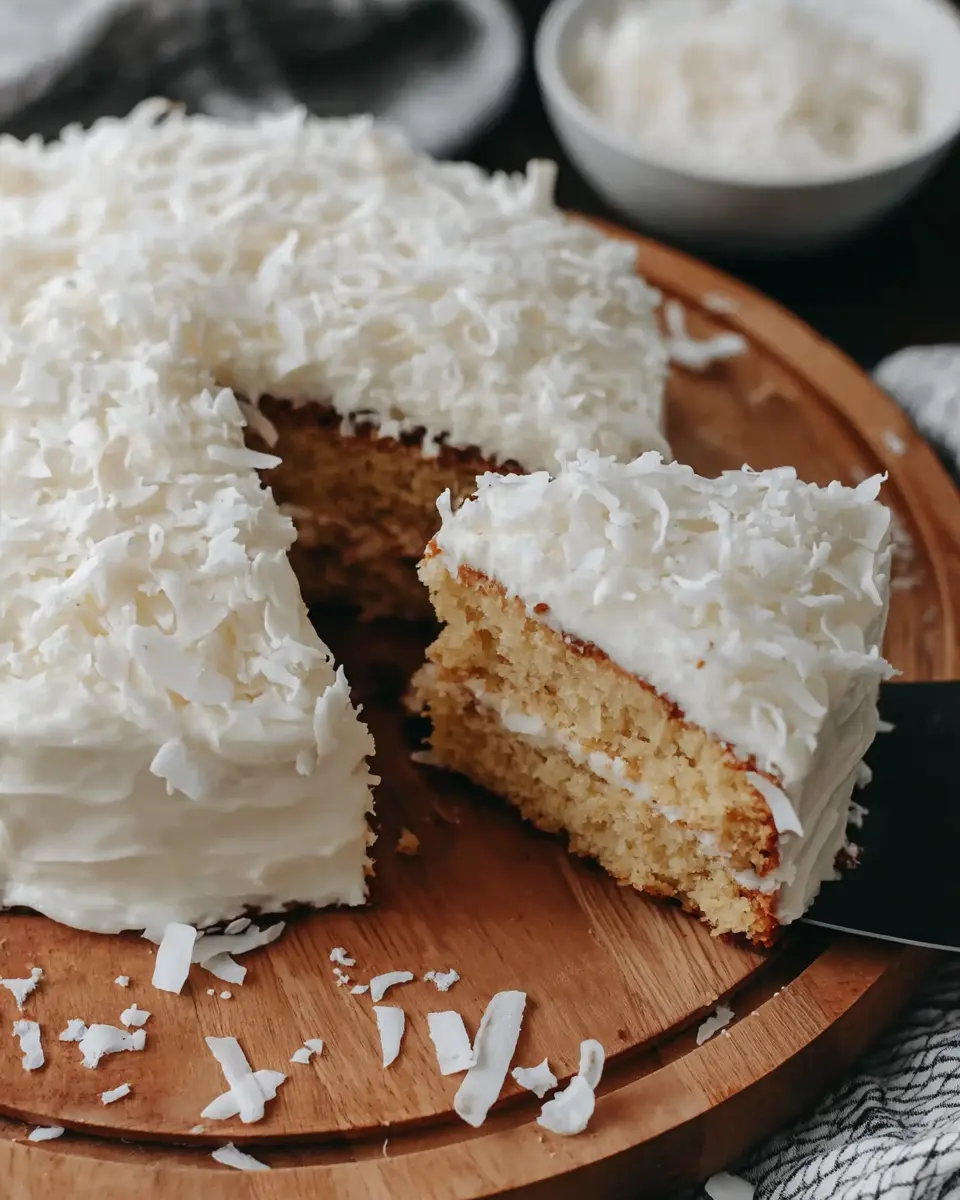
One Layer Coconut Cake is a tender, rich, small-batch dessert with deep coconut flavor, a soft crumb, and a creamy coconut buttercream finish.
It is a lovely choice when you want a simple single layer cake that still feels special and bakery-worthy.
Why You Will Love This Recipe
- Intense Coconut Flavor: Coconut milk in the batter, coconut extract, and toasted shredded coconut folded throughout ensure a prominent coconut taste in every bite.
- Delicate & Moist Crumb: Utilizes cake flour and whipped egg whites for a light, tender texture that melts in your mouth.
- Perfect Portion Size: This 6-inch cake is ideal for smaller gatherings, intimate celebrations, or when you desire a delightful treat without an abundance of leftovers.
- Bakery-Worthy Presentation: A smooth coconut buttercream frosting and a sprinkle of toasted coconut create an elegant finish that looks as good as it tastes.
- Relatively Quick to Prepare: While it requires careful steps, the overall process is manageable for home bakers seeking a rewarding dessert experience.
Ingredients You Need
Crafting this exquisite One Layer Coconut Cake begins with selecting high-quality ingredients to ensure the best possible flavor and texture. The combination of cake flour for tenderness, full-fat coconut milk for richness, and a hint of coconut oil enhances the tropical essence. Each component plays a vital role in creating a dessert that is both decadent and beautifully balanced, making it a standout treat for any occasion. The careful selection of these items is paramount to achieving the desired delicate crumb and aromatic coconut notes that define this special cake.
One Layer Coconut Cake

A tender, rich, small-batch dessert with deep coconut flavor, a soft crumb, and a creamy coconut buttercream finish. This single-layer cake feels special and bakery-worthy, perfect for quiet celebrations or weekend bakes.
- For the cake:
- 1 cup sifted cake flour
- 1/3 cup granulated white sugar
- 1/4 cup unsalted butter, softened
- 2 tablespoons coconut oil
- 1/3 cup full-fat unsweetened coconut milk
- 1 large egg yolk
- 1 large egg white
- 1 teaspoon coconut extract
- 1/2 teaspoon vanilla extract
- 1/2 teaspoon baking powder
- 1/2 teaspoon baking soda
- 1/8 teaspoon fine salt
- 1/8 teaspoon cream of tartar
- 1/3 cup sweetened shredded coconut, toasted and cooled
- For the frosting:
- 1/2 cup unsalted butter
- 2 1/3 cups powdered sugar, sifted
- 1/2 cup sweetened shredded coconut
- 2 tablespoons unsweetened coconut milk
- 1/2 teaspoon coconut extract
- 1Preheat the oven to 350°F (175°C). Coat a 6-inch round cake pan thoroughly with a flour-based baking spray, then set it aside.
- 2Place the sweetened shredded coconut for the cake in a small skillet over medium heat. Stir constantly until the coconut turns lightly golden. Remove it promptly from the heat to prevent scorching, then leave it to cool.
- 3In a medium mixing bowl, whisk together the sifted cake flour, baking powder, baking soda, and salt. Set this dry mixture aside.
- 4Using a hand mixer or a stand mixer fitted with the whisk attachment, beat the egg white with the cream of tartar on high speed for 2 to 3 minutes, or until stiff peaks form.
- 5In a separate bowl, using the paddle attachment, beat the softened butter, coconut oil, and sugar on medium speed until the mixture appears thoroughly blended. Add the egg yolk, coconut extract, vanilla extract, and coconut milk, then mix until fully incorporated.
- 6Add the dry ingredients gradually to the wet mixture, stirring only until combined. Fold in the whipped egg white gently, followed by the cooled toasted coconut, making sure the batter remains light and evenly mixed.
- 7Transfer the batter to the prepared cake pan and smooth the top. Bake for 30 to 35 minutes, or until a toothpick inserted into the center comes out clean.
- 8Remove the cake from the oven and allow it to cool completely on a wire rack before frosting.
- 9To prepare the frosting, beat the butter on medium-high speed until smooth and creamy. Reduce the mixer speed to low and add the sifted powdered sugar gradually. Add the coconut extract and coconut milk, then continue mixing until the frosting is smooth, cohesive, and well blended. Scrape down the bowl as needed, then stir or beat in the shredded coconut.
- 10Once the cake has cooled fully, spread the coconut frosting over the top and finish the cake evenly.
Keywords: Coconut Cake, One Layer Cake, Small Batch Cake, Buttercream Frosting, Tropical Dessert, Easy Baking
The precise measurements for all these ingredients, along with detailed instructions on their preparation, can be found within the accompanying recipe card, ensuring your baking success.
Variations
For those seeking a plant-based delight, a vegan twist on this coconut cake is delightfully achievable. Simply substitute the butter with a high-quality vegan butter alternative and use a flax egg or commercial egg replacer in place of the egg yolk and white. The coconut milk and coconut oil naturally lend themselves well to vegan baking, making this adaptation seamless. Ensure your powdered sugar is also vegan-friendly, and you will have a cruelty-free version that is just as moist and flavorful.
Adopting a low-carb lifestyle doesn’t mean you have to forgo this delightful cake. The primary adjustments would involve swapping the granulated and powdered sugars for your preferred low-carb sweeteners like erythritol or xylitol. You might also consider using almond flour or a coconut flour blend in place of the cake flour, although this will alter the texture slightly, making it denser. Adjusting the liquid amounts might be necessary due to the different absorbency of alternative flours.
Elevate your cake with an extra layer of tropical indulgence by infusing the buttercream with finely grated lime zest. This bright citrus note cuts through the sweetness of the coconut and sugar, offering a refreshing counterpoint that is both sophisticated and utterly delicious. It’s a subtle yet impactful change that transforms the cake into a more complex and zesty treat, perfect for a warm afternoon.
How to Prepare One Layer Coconut Cake
Step 1: Preparing the Cake Pan and Toasted Coconut
Begin by preheating your oven to the specified temperature, typically around 350°F (175°C). This ensures the oven is at the optimal heat when the cake is ready to bake, promoting even cooking and a good rise. A properly preheated oven is fundamental for achieving the desired cake texture and preventing issues like a dense or undercooked center.
Next, meticulously prepare your 6-inch round cake pan. A thorough greasing and flouring, or the use of a baking spray with flour, is crucial. This step is designed to prevent the cake from sticking to the pan, ensuring it releases cleanly after baking. A cake that sticks can be frustrating and may result in a damaged or unsightly appearance, undermining the efforts put into its creation.
Simultaneously, toast the shredded coconut that will be incorporated into the cake batter. Place the sweetened shredded coconut in a dry skillet over medium heat. Stir continuously, watching closely, as it can quickly transition from pale gold to a deep brown. The goal is a light, fragrant golden hue that enhances the coconut’s natural sweetness and nuttiness. Once toasted to perfection, promptly remove it from the skillet and set it aside to cool completely. This cooling period is vital; adding warm coconut to the batter could affect its texture and the overall integrity of the cake structure.
Step 2: Combining the Dry Ingredients
In a medium-sized mixing bowl, gather all the dry ingredients designated for the cake. This typically includes sifted cake flour, baking powder, baking soda, and salt. Sifting the cake flour is particularly important, as it aerates the flour and removes any lumps, contributing to a lighter, more tender crumb in the final cake. Cake flour has a lower protein content than all-purpose flour, which is key for achieving that delicate texture.
Whisk these dry ingredients together thoroughly. This blending process ensures that the leavening agents (baking powder and baking soda) and the salt are evenly distributed throughout the flour. Even distribution is critical for ensuring the cake rises uniformly and has a consistent flavor profile, avoiding pockets of saltiness or uneven baking. A good whisking action also further incorporates air, aiding in the cake’s eventual lightness.
Once the dry ingredients are well combined and free of lumps, set this bowl aside. This step prepares the foundation for the cake batter, ensuring that the dry components are ready to be incorporated seamlessly into the wet ingredients later in the process. Having the dry ingredients pre-mixed simplifies the subsequent steps and helps maintain the intended balance of the recipe.
Step 3: Whipping the Egg White
In a separate, meticulously clean bowl, place the egg white. The cleanliness of the bowl and any utensils used is paramount here, as even a trace of fat or yolk can prevent the egg white from whipping to its full potential. Any residual fat will inhibit the proteins in the egg white from forming the necessary structure to capture air.
Add the cream of tartar to the egg white. Cream of tartar is an acid that helps to stabilize the egg white foam, making it more robust and less likely to collapse. It also contributes to a brighter white color in the whipped egg whites. This ingredient is a secret weapon for achieving a lighter, fluffier texture, especially in delicate cakes.
Using a hand mixer or a stand mixer fitted with the whisk attachment, beat the egg white and cream of tartar on high speed. Continue beating for approximately 2 to 3 minutes, or until stiff peaks form. Stiff peaks mean that when you lift the whisk, the egg white stands up straight and does not curl over. This whipped egg white will be folded into the batter later, providing significant lift and an airy lightness to the finished cake. It’s this step that often distinguishes a truly delicate cake from a denser one.
Step 4: Creating the Wet Ingredient Base
In yet another bowl, typically a larger one to accommodate subsequent additions, begin by creaming together the softened unsalted butter, coconut oil, and granulated sugar. Ensure the butter is truly softened, not melted, as this allows it to incorporate air effectively. Creaming these ingredients together until they are light and fluffy is a critical step; it incorporates air into the mixture, which contributes to the cake’s overall lift and tender crumb.
Once the butter, oil, and sugar mixture is well creamed, introduce the egg yolk. The egg yolk adds richness, moisture, and a lovely golden hue to the cake batter. Beat it in until it is fully incorporated and the mixture remains smooth and emulsified. Following the egg yolk, add the coconut extract and vanilla extract. These extracts are essential for imparting the characteristic warm, aromatic flavors that define this coconut cake, ensuring a deeply satisfying taste experience.
Finally, incorporate the full-fat unsweetened coconut milk into the wet ingredients. Mix everything together until the entire wet mixture appears smooth, homogeneous, and fully combined. This thorough blending ensures that all the fats and liquids are in harmony, forming a stable base that will readily accept the dry ingredients. The quality of the coconut milk, specifically its full-fat nature, is important for moisture and flavor depth.
Step 5: Combining and Folding the Batter
Now it is time to bring the wet and dry components together to form the cake batter. Gradually add the pre-mixed dry ingredients to the wet ingredient mixture. It is advisable to add the dry ingredients in stages, perhaps in two or three additions, rather than all at once. This method helps prevent the development of gluten, which can lead to a tough cake, and ensures a smoother incorporation.
Mix the batter only until the ingredients are just combined. Overmixing at this stage can toughen the cake, so it’s essential to stop as soon as you no longer see streaks of dry flour. The batter might still have a few minor imperfections, and that is perfectly acceptable. The goal is to achieve a cohesive batter without overdeveloping the gluten structure that can result from excessive mixing.
Gently fold in the whipped egg white that you prepared earlier. Use a spatula and a light, lifting motion, working from the bottom of the bowl up and over. This folding technique is crucial for preserving the air that was incorporated into the egg whites, which is essential for the cake’s lightness. Be careful not to stir vigorously, as this will deflate the egg whites and reduce the cake’s rise. Following the egg white, gently fold in the cooled, toasted shredded coconut. This adds texture and an extra boost of coconut flavor to the cake, distributing it evenly throughout the batter.
Step 6: Baking and Cooling the Cake
Carefully transfer the prepared cake batter into the thoroughly greased and floured 6-inch round cake pan. Use your spatula to distribute the batter evenly within the pan. Gently smooth the top surface of the batter to create an even layer, which will promote uniform baking and a level cake once it cools. This even surface is also important for the subsequent frosting step, ensuring a beautiful finish.
Place the filled cake pan into the preheated oven. Bake for the time specified in the recipe, typically between 30 to 35 minutes. The exact baking time can vary slightly depending on your oven’s calibration and the specific pan used. You will know the cake is ready when the center is set and a toothpick inserted into the middle comes out clean, with no wet batter clinging to it.
Once baked to perfection, remove the cake from the oven. Allow the cake to cool in the pan on a wire rack for a short period, usually about 10-15 minutes. Then, carefully invert the cake onto the wire rack to cool completely. It is absolutely imperative that the cake is fully cooled before you attempt to frost it. Frosting a warm cake will cause the buttercream to melt, resulting in a messy, sliding layer of frosting that will not adhere properly. Patience during the cooling phase is key to a beautifully finished cake.
Step 7: Preparing and Applying the Coconut Buttercream
While the cake is cooling completely, you can prepare the luscious coconut buttercream frosting. Start by creaming the unsalted butter in a bowl until it is exceptionally smooth and creamy. This is typically done with an electric mixer, ensuring the butter is at a perfect softening point to incorporate air and create a light frosting base.
Gradually add the sifted powdered sugar to the creamed butter, mixing on a low speed initially. Sifting the powdered sugar is important to remove any lumps and ensure a silky smooth frosting texture. Continue to add the powdered sugar in stages, mixing thoroughly after each addition until it is well incorporated. This gradual addition helps prevent a cloud of sugar dust and ensures a cohesive frosting.
Once the butter and sugar are well combined, add the unsweetened coconut milk and the coconut extract. Mix these wet ingredients into the frosting until the mixture is smooth, cohesive, and has reached a spreadable consistency. Scrape down the sides of the bowl as needed to ensure everything is evenly incorporated. Finally, gently stir in the remaining sweetened shredded coconut for added texture and flavor. This coconut milk and extract will enhance the frosting’s tropical notes, making it the perfect complement to the cake.
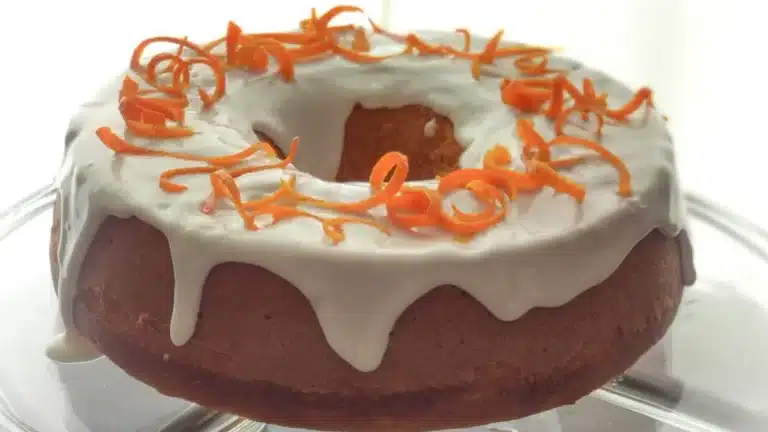
Once the cake has cooled entirely, it is time for the grand finale: frosting. Generously spread the prepared coconut buttercream evenly over the top of the cooled cake. Use an offset spatula or a butter knife to create a smooth, appealing surface. You can opt for a rustic, swirled look or a perfectly smooth finish, depending on your preference. The final flourish involves sprinkling additional sweetened shredded coconut over the frosting, creating a soft, snowy, and inviting appearance that truly showcases the cake’s delicious coconut essence.
Pro Tips for One Layer Coconut Cake
Toasting Coconut with Vigilance: Always toast your shredded coconut in a dry skillet over medium heat, stirring constantly. Coconut can go from perfectly golden to burnt in mere seconds, so keep a very close eye on it and remove it from the heat immediately once it reaches your desired light golden hue. This small but crucial step significantly enhances the depth of coconut flavor.
Absolute Cooling is Key: Resist the urge to frost your cake while it is still warm, even if it feels cool to the touch. For the smoothest, most stable buttercream, the cake must be thoroughly, completely cool. A warm cake will cause the frosting to soften and potentially slide off, ruining the pristine finish you’re aiming for. Patience here yields professional results.
Gentle Folding for Airiness: When folding the whipped egg whites into the batter, employ a light and gentle hand. Use a spatula to lift the batter from the bottom of the bowl and fold it over the egg whites. The objective is to incorporate the egg whites without knocking out the air you painstakingly whipped into them. This careful technique is what lends the cake its characteristic airy and delicate crumb.
Ingredient Temperature Matters: Ensure your butter for both the cake and the frosting is at the correct temperature—softened, but not melted. For the cake, this allows it to cream effectively with sugar, incorporating air for leavening. For the frosting, softened butter ensures it beats into a smooth, spreadable consistency without becoming greasy or oily.
Measure Flour Correctly: For the most accurate cake texture, measure your cake flour by spooning it lightly into the measuring cup and leveling it off with a straight edge, rather than scooping directly from the bag. This prevents compacting the flour, which can lead to using too much and resulting in a denser cake. The precise ratio of flour to other ingredients is foundational.
Serving Suggestions for One Layer Coconut Cake
Decoration
Elevate the visual appeal of your One Layer Coconut Cake with a variety of delightful decorative touches. A classic choice is to generously sprinkle additional toasted shredded coconut over the entire surface of the buttercream. This not only enhances the coconut theme but also adds a lovely texture contrast. For a touch of elegance, consider arranging fresh edible flowers, such as violets or pansies, artfully on top. You could also create a pattern using candied ginger slivers or thin slices of fresh coconut for an extra textural and visual element.
Consider piping simple decorative borders around the edge of the cake using a star tip or a plain round tip filled with more of the coconut buttercream. A dusting of powdered sugar through a doily or stencil can create a beautiful, intricate pattern, giving the cake a charming, vintage feel. Alternatively, a drizzle of white chocolate ganache or a sprinkle of toasted slivered almonds can add a different flavor dimension and visual interest, making your cake a true centerpiece.
Side Dishes
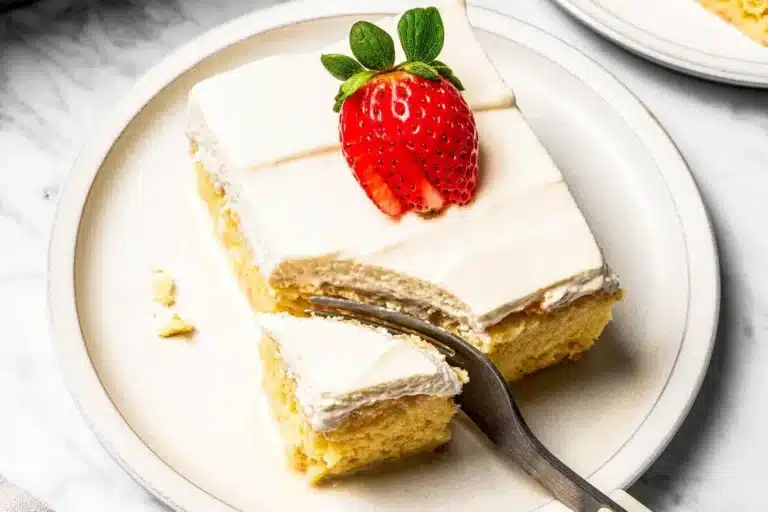
This delightful One Layer Coconut Cake pairs exceptionally well with a variety of complementary accompaniments. Fresh berries, such as ripe strawberries, raspberries, or blueberries, provide a burst of tartness and vibrant color that beautifully cuts through the richness of the cake and frosting. A simple dollop of whipped cream or a small scoop of vanilla bean or coconut ice cream also makes for a classic and satisfying pairing.
For a more sophisticated pairing, consider serving the cake with a light fruit compote, perhaps made from mango or pineapple, to further enhance the tropical theme. A small glass of chilled sweet wine, like a Moscato d’Asti, or a rich, aromatic coffee can also serve as excellent partners. The key is to choose sides that enhance, rather than overpower, the delicate coconut flavors of the cake itself.
Creative Serving Ideas
Transform your One Layer Coconut Cake into a dessert buffet centerpiece by serving individual slices alongside other small treats. Think mini passion fruit tarts, a platter of delicate shortbread cookies, or even a small bowl of toasted coconut flakes for guests to add as they please. This allows for a varied dessert experience that caters to different preferences.
For a more interactive presentation, consider deconstructing the cake slightly. Serve warm slices with a ramekin of coconut custard or a small pitcher of warm caramel sauce for guests to drizzle themselves. You could also offer a selection of exotic fruits that complement coconut, such as papaya, kiwi, or star fruit, allowing diners to create their own perfect bite. This approach adds an element of fun and personalization to the dessert experience.
Preparation & Storage
Storing Leftovers
Properly storing leftover One Layer Coconut Cake is essential to maintain its delightful texture and flavor. Because of the buttercream frosting, it is highly recommended to keep the cake covered in the refrigerator. A cake dome or an airtight container is ideal for this purpose, preventing the cake from drying out and protecting it from absorbing any unwanted odors from other foods.
When stored correctly in the refrigerator, this cake can maintain its freshness for up to 3 to 4 days. For the best eating experience, it is advisable to allow a slice of cake to sit at room temperature for about 20 to 30 minutes before serving. This short resting period allows the buttercream to soften to a creamy consistency and the cake’s crumb to become more tender, bringing it closer to its freshly baked state.
Freezing
For longer-term storage, the unfrosted cake layer can be frozen successfully. After the cake has baked and cooled completely, wrap it very tightly in plastic wrap, ensuring there are no gaps. Then, place the wrapped cake in a freezer-safe bag or container. This double-layer of protection helps prevent freezer burn and preserves the cake’s moisture.
An unfrosted cake layer stored this way can be kept in the freezer for up to 2 months. To thaw, transfer the frozen cake from the freezer to the refrigerator and allow it to defrost overnight. Once completely thawed and brought closer to room temperature, it is ready to be frosted as usual. Freezing the unfrosted cake ensures its structure remains intact for later enjoyment.
Freezing frosted slices is also an option, though it may slightly alter the texture of the frosting upon thawing. Wrap individual slices very well in plastic wrap, then in aluminum foil, or place them in freezer-safe containers. Frozen frosted slices are best consumed within about 1 month. When ready to enjoy, allow them to thaw in the refrigerator overnight, and then bring them to room temperature for about 30 minutes before eating.
Reheating
This One Layer Coconut Cake is best enjoyed at room temperature or slightly chilled, rather than reheated. The delicate crumb and creamy buttercream are designed to be savored at these temperatures. Applying heat can cause the butter in the frosting to melt, leading to a greasy texture and a loss of structural integrity in the cake. Thus, direct reheating is generally not recommended for this particular cake.
The most effective way to “reheat” or, more accurately, bring a chilled slice back to its optimal serving temperature is simply to let it sit out on the counter. As mentioned earlier, a resting period of 20 to 30 minutes should suffice. This allows the cake to gently warm through, the frosting to soften beautifully, and the flavors to meld together, providing the most pleasurable tasting experience. The natural moisture of the cake and frosting will ensure it is perfectly enjoyable without additional heat.
Frequently Asked Questions
-
Can I make this cake ahead of time and freeze it?
Yes, you absolutely can make this One Layer Coconut Cake ahead of time and freeze it for later enjoyment. The best approach for freezing is to bake the cake layer and allow it to cool completely. Once fully cooled, wrap it very securely in plastic wrap, followed by a layer of aluminum foil or by placing it in a freezer-safe bag or container. This double protection is crucial for preventing freezer burn and maintaining the cake’s moisture. Properly frozen, the unfrosted cake layer can be stored for up to two months. When you’re ready to use it, transfer the frozen cake from the freezer to the refrigerator to thaw overnight. After it has completely thawed and reached room temperature, you can then proceed with frosting it as usual.
-
Why is using full-fat unsweetened coconut milk important for this recipe?
The use of full-fat unsweetened coconut milk is paramount in this recipe because it contributes significantly to the cake’s texture and flavor profile. The higher fat content of full-fat coconut milk lends a richer, more luxurious moisture to the cake batter, resulting in a tender and incredibly moist crumb that is a hallmark of this dessert. It also provides a more pronounced and authentic coconut flavor compared to lighter versions or regular milk, which might dilute the intended tropical essence. While you might be able to substitute with a lower-fat option in a pinch, the final cake may not achieve the same depth of flavor, the same tender texture, or the same overall richness that makes this One Layer Coconut Cake so special and satisfying.
-
What happens if I overmix the batter after adding the dry ingredients?
Overmixing the cake batter after adding the dry ingredients can have several undesirable consequences that negatively impact the final cake. When flour is mixed with liquid, gluten begins to develop. If you mix for too long or too vigorously, you can overdevelop this gluten structure, which will result in a cake that is tough, chewy, and dense, rather than light and tender. This is particularly important in a cake that relies on delicate textures, like this coconut cake. For this recipe, it’s essential to mix only until the ingredients are just combined, and you no longer see streaks of dry flour, as overmixing will compromise the desired airy and soft crumb.