Irresistible Mini New York Style Cheesecakes – Perfectly Creamy

The irresistible aroma of freshly baked cheesecake is a sensory experience that instantly conjures images of bustling New York City bakeries and cozy evenings. If you’ve been yearning for a dessert that perfectly balances classic richness with charming portability, then these Mini New York Style Cheesecakes are an absolute must-try. They offer the quintessential creamy texture and delightful tang that defines New York cheesecake, all in a perfectly portioned, individual-sized package.
These little delights are far more than just a dessert; they are a testament to how simplicity can elevate an experience, proving that gourmet taste doesn’t require hours of complex preparation. Imagine the joy of presenting these elegant treats at your next gathering or simply enjoying one as a personal moment of indulgence, a welcome escape from the everyday. Their easy preparation means you can savor that authentic, indulgent cheesecake flavor without spending your entire day in the kitchen, making them a truly guilt-free pleasure.
Why You Will Love This Recipe
- Effortless Elegance: These mini cheesecakes deliver all the sophisticated charm of their larger counterparts, making them ideal for both casual enjoyment and special occasions without demanding advanced baking skills.
- Perfectly Portioned: Each individual cheesecake is a delightful treat, offering a satisfying serving that helps manage portions while still delivering a rich and decadent experience.
- Speedy Preparation: With a total time investment under an hour, you can whip up a batch of these delightful cheesecakes, ensuring a delicious dessert is always within reach, even for spontaneous cravings or last-minute guests.
- Versatile Delight: While classic in their New York style, these mini cheesecakes serve as a beautiful canvas for a myriad of toppings and variations, allowing for endless creative expression to suit any palate or theme.
- Impressive Presentation: Their petite size and creamy texture make them incredibly appealing, providing a visually stunning dessert that is always a crowd-pleaser and a delightful conversation starter.
Ingredients You Need
Crafting the perfect Mini New York Style Cheesecakes hinges on using high-quality ingredients that contribute to their signature creamy texture and balanced flavor profile. Each component plays a vital role, from the richness of the cream cheese to the satisfying crunch of the graham cracker crust. Ensuring these key elements are fresh and of good quality will make a noticeable difference in the final delightful outcome of your homemade treats.
Mini New York Style Cheesecakes
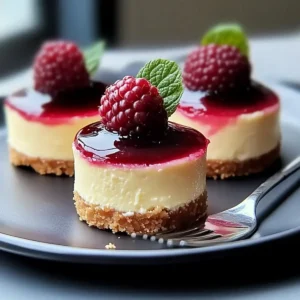
Delight in these Mini New York Style Cheesecakes, a perfect balance of simplicity and elegance for any occasion. They are creamy, delicious, quick, easy, versatile, and portion-controlled, making them ideal for sharing or a personal treat. Enjoy a guilt-free indulgence that saves you from boring fast-food alternatives.
- For the Cheesecake Filling:
- 16 oz cream cheese, softened
- 1/2 cup granulated sugar
- 2 large eggs, room temperature
- 1/2 cup sour cream (or Greek yogurt)
- 1 tsp vanilla extract (pure)
- For the Crust:
- 1/4 cup unsalted butter, melted
- 1 cup graham cracker crumbs
- 1 pinch salt
- 1Step 1: Preheat the OvenPreheat your oven to 325°F (163°C). Line a muffin tin with paper or silicone cups.
- 2Step 2: Prepare the CrustIn a mixing bowl, combine graham cracker crumbs with melted unsalted butter until it resembles wet sand. Press this mixture firmly into the bottom of the muffin tins to form an even layer.
- 3Step 3: Make the Cheesecake FillingIn a separate bowl, beat the cream cheese until completely smooth. Gradually mix in granulated sugar until fully dissolved. Add room temperature eggs, sour cream, and vanilla extract, mixing until the batter is silky and uniform.
- 4Step 4: Assemble the CheesecakesCarefully spoon the cheesecake filling over the prepared crusts in the muffin tins, filling each cup nearly to the top. Smooth the tops for a beautiful finish.
- 5Step 5: Bake the Mini CheesecakesPlace the muffin tin in the preheated oven and bake for 15-20 minutes, or until the centers are slightly jiggly and the edges appear set and lightly browned.
- 6Step 6: Cool and SetRemove the mini cheesecakes from the oven and let them cool in the tins for about 10 minutes. Then, transfer them to a wire rack to cool completely. Chill in the refrigerator for at least 2 hours before serving.
- 7Step 7: Serve and EnjoyCarefully remove the cheesecakes from the muffin tin. Serve plain or with your favorite toppings such as fresh berries or chocolate drizzle.
Keywords: cheesecake, mini cheesecake, new york style, dessert, baking, easy, quick, vegetarian, creamy
- cream cheese: softened, for that essential velvety richness.
- granulated sugar: to provide balanced sweetness and aid in texture development.
- large eggs: at room temperature to ensure seamless incorporation and a smooth filling.
- sour cream: for that characteristic tangy note and extra moisture, creating a luxuriously creamy texture.
- vanilla extract: pure vanilla extract to enhance the overall flavor and aroma.
- unsalted butter: melted, to bind the crust ingredients together perfectly.
- graham cracker crumbs: the classic base for a wonderfully crisp and buttery crust.
- salt: a tiny pinch to balance the sweetness and deepen the flavors.
The exact quantities for these delightful ingredients can be found within the detailed recipe card for your convenience.
Variations
Taking your Mini New York Style Cheesecakes to new heights of deliciousness is wonderfully achievable through creative variations that cater to diverse tastes and dietary needs. The beauty of these mini desserts lies in their adaptability, allowing you to transform a classic into something entirely new and exciting with simple ingredient swaps or additions.
For those seeking a dessert that aligns with a plant-based lifestyle, a vegan adaptation is straightforward. Utilize a high-quality vegan cream cheese and ensure your butter substitute is also plant-derived for the crust. Many excellent vegan sour cream alternatives are available, and flax eggs can effectively replace traditional eggs, resulting in a creamy, delicious treat that everyone can enjoy, proving that indulgence knows no bounds.
If you’re looking to embrace a lower-carbohydrate option, the crust can be wonderfully reinvented. Instead of graham crackers, consider using finely ground almonds or a blend of almond flour and coconut flour, bound together with melted butter or coconut oil. This provides a satisfying crunch and a nutty undertone that pairs beautifully with the creamy cheesecake filling, making it a smart choice for those mindful of their sugar intake.
Furthermore, the filling itself offers a playground for flavor exploration, much like the delightful combinations found in a berry tart. Infuse the batter with citrus zest, such as lemon or orange, for a bright, refreshing twist that cuts through the richness. Alternatively, consider adding a swirl of fruit puree, a decadent mocha essence, or even finely chopped chocolate for a truly personalized and memorable cheesecake experience.
How to Prepare Mini New York Style Cheesecakes
Step 1: Preparing the Foundation
The journey to crafting these exquisite Mini New York Style Cheesecakes begins with setting the stage for perfect baking. Preheat your oven to a precise 325°F (163°C), ensuring a gentle, consistent heat that will allow the cheesecakes to bake through without developing cracks or an overcooked texture. While the oven reaches its ideal temperature, take this time to meticulously gather all your ingredients and necessary baking equipment.
Lining your muffin tin is a crucial step for ensuring easy removal and a neat presentation. You can opt for traditional paper liners, which offer a convenient cleanup, or invest in reusable silicone muffin cups, which often provide a superior non-stick surface. Whichever you choose, ensure each cup is well-prepared to cradle the crust and filling, setting you up for a smooth baking process.
This initial phase is all about meticulous preparation; a well-organized setup not only streamlines the subsequent steps but also minimizes the potential for errors, laying a solid groundwork for success in creating these delectable mini treats.
Step 2: Crafting the Perfect Crust
The foundation of any great cheesecake is its crust, and for these Mini New York Style Cheesecakes, a buttery graham cracker base is paramount. In a medium mixing bowl, combine your graham cracker crumbs with the melted unsalted butter. This union of crumbs and butter creates a mixture that, when combined thoroughly, should resemble the consistency of wet sand, indicating it has just the right amount of moisture to bind together.
The next step involves pressing this crumb mixture firmly into the bottom of each prepared muffin tin cup. You can use your fingertips, which offer excellent tactile feedback, or the back of a spoon or a small measuring cup to ensure an even and compact layer. Aim for consistency across all the cups, creating a sturdy base that will support the creamy filling and provide that satisfying textural contrast with every bite.
It is essential to press this mixture down quite firmly. This compacting action is what prevents the crust from crumbling apart once baked and chilled, ensuring each mini cheesecake holds its shape beautifully. A well-pressed crust also contributes to a richer flavor, as the butter fully coats the crumbs, leading to a more cohesive and delicious base for your cheesecake.
Step 3: Mixing the Creamy Filling
With the crusts ready, attention turns to the heart of the cheesecake: the filling. In a separate, clean mixing bowl, begin by beating your softened cream cheese. It’s vital to ensure the cream cheese is at room temperature; this allows it to become completely smooth and free of any lumps, which is essential for achieving that signature silky texture in your Mini New York Style Cheesecakes. An electric mixer, either hand-held or stand mixer, is highly recommended for this step to achieve optimal smoothness.
Once the cream cheese is luxuriously smooth, gradually add the granulated sugar. Continue to mix until the sugar is fully incorporated and dissolved into the cream cheese mixture. This gradual addition prevents the sugar from creating a gritty texture and ensures even sweetness throughout the filling. Following this, incorporate the room temperature eggs, one at a time, mixing just until each egg is blended into the batter. Overmixing at this stage can introduce too much air, potentially leading to cracks.
Finally, gently stir in the sour cream and pure vanilla extract. Mix on a low speed until everything is just combined and the batter has a uniform, smooth, and creamy consistency. This delicate balance of ingredients and careful mixing technique is what guarantees the decadent, melt-in-your-mouth quality that defines a truly exceptional New York Style Cheesecake, even in its mini form.
Step 4: Assembling the Mini Masterpieces
Now comes the exciting part: bringing together the crust and the luscious filling. Carefully spoon the prepared cheesecake batter over the firm graham cracker crusts in each muffin tin cup. Aim to fill each cup generously, bringing the batter almost to the brim. This is because the cheesecakes will puff up slightly during baking and then settle down as they cool, ensuring you have a perfectly domed top after the chilling process.
Take a moment to smooth the tops of the filling in each cup. A small offset spatula or the back of a spoon can be used to create an even, flat surface. This attention to detail not only enhances the visual appeal of your finished Mini New York Style Cheesecakes but also provides a better canvas for any toppings you might wish to add later. A smooth surface ensures a professional and elegant presentation.
Ensure that you fill each cup to a similar level. This uniformity is key to having all your mini cheesecakes bake evenly and finish with consistent heights. Avoid overfilling, as this can lead to the filling overflowing during baking, creating a mess and potentially affecting the bake. The goal is a beautiful, even distribution of the creamy, rich filling atop its crunchy base.
Step 5: The Gentle Baking Process
With the mini cheesecakes assembled, it’s time to place them in the preheated oven. Carefully position the muffin tin into the center rack of your 325°F (163°C) oven. The baking time for these mini versions is relatively short, typically ranging from 15 to 20 minutes. This shorter duration is ideal for ensuring they cook through without overbaking, a common pitfall for cheesecakes.
You’ll know your Mini New York Style Cheesecakes are ready when the edges appear set and are just beginning to turn a lightly golden brown. The centers, however, should still retain a slight jiggle when the tin is gently nudged. This slight wobble is crucial; it signifies that the internal structure is still delicate and will continue to cook and firm up as the cheesecakes cool, resulting in that signature creamy texture.
It is important to keep a close eye on them during the final minutes of baking, as oven temperatures can vary. Overbaking is the enemy of creamy cheesecake, leading to a dry, crumbly texture and potential cracking. Therefore, remove them from the oven as soon as they reach that perfect state of set edges and jiggly centers. This precise moment ensures a tender, luscious result.
Step 6: The Essential Cooling and Setting Period
Once your Mini New York Style Cheesecakes have achieved that delicate bake, the next phase is just as critical: cooling. Remove the muffin tin from the oven and let the cheesecakes cool undisturbed within the tins for about 10 minutes. This initial cooling period allows them to firm up slightly, making them more stable and less prone to breaking when you move them.
After this brief rest in the tins, carefully transfer the cheesecakes to a wire cooling rack. Allow them to cool completely at room temperature. This gradual cooling process is essential for preventing sudden temperature changes that can cause cracking. A wire rack also promotes even air circulation, helping the cheesecakes cool efficiently from all sides.
Once they have reached room temperature, the final, and arguably most important, step for achieving that perfect cheesecake texture is chilling. Transfer the cooled cheesecakes to the refrigerator and let them chill for at least 2 hours, though overnight is even better. This extended chilling period allows the fats in the cream cheese to solidify and the structure to fully set, resulting in that dense, creamy, and utterly satisfying bite.
Step 7: The Grand Finale: Serving and Enjoying
Your delicious Mini New York Style Cheesecakes are now perfectly chilled and set, ready to be enjoyed. Carefully remove them from the muffin tin. If you used liners, simply peel them away. If they seem a bit stuck to the tin, gently run a thin, flexible knife or offset spatula around the edges to loosen them before lifting them out.
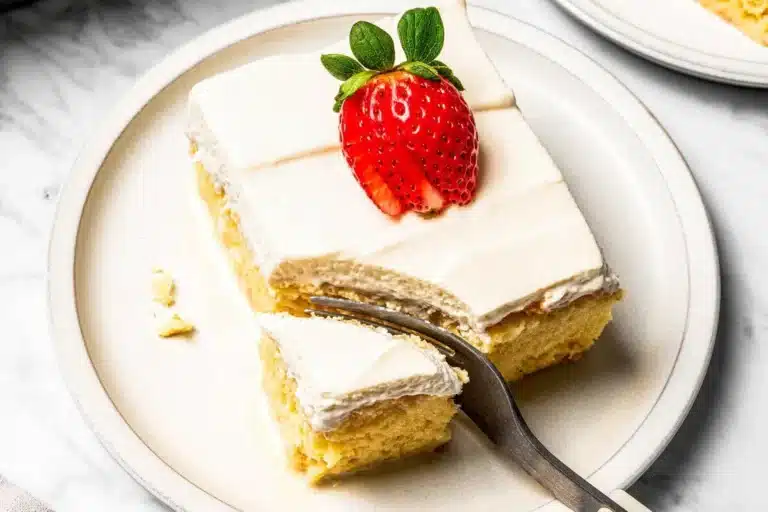
At this point, you can serve them exactly as they are, appreciating the pure, unadulterated New York cheesecake flavor. Alternatively, this is where you can let your creativity shine with simple yet elegant toppings. A dusting of powdered sugar, a dollop of fresh whipped cream, a scattering of fresh berries, or a delicate drizzle of chocolate or caramel sauce can transform these mini treats into personalized works of art.
Present them on a beautiful platter or individual dessert plates and watch them disappear. The delight they bring, whether served simply or adorned, is a testament to their classic appeal and the joy of homemade baking. Savor each creamy, tangy, and sweet bite – you’ve earned it!
Pro Tips for Mini New York Style Cheesecakes
Achieving cheesecake perfection, even in miniature form, often comes down to a few key techniques and considerations. By incorporating these expert tips, you can elevate your Mini New York Style Cheesecakes from good to absolutely spectacular, ensuring a consistently smooth, creamy, and delicious result every time you bake.
Beat Cream Cheese Properly: The absolute cornerstone of a lump-free cheesecake filling is starting with fully softened cream cheese and beating it until it is completely smooth and creamy before adding any other ingredients. This step is non-negotiable for achieving that signature velvety texture that New Yorkers know and love.
Gentle Baking is Key: Avoid the temptation to rush the baking process. Bake your mini cheesecakes just until the edges are set and the centers are still slightly jiggly. The residual heat will continue to cook them as they cool, ensuring a tender interior rather than a dry, rubbery one. Overbaking is the primary cause of cracked cheesecakes.
Room Temperature is Your Friend: For both the cream cheese, eggs, and sour cream, ensuring they are at room temperature is crucial for proper emulsification. Cold ingredients do not combine as smoothly, leading to a lumpy batter and a less desirable final texture. Allow them to sit out for at least 30-60 minutes before you begin.
Lining Prevents Sticking: Using paper or silicone liners in your muffin tins is highly recommended. These liners not only prevent the cheesecakes from sticking, making removal effortless, but they also help the mini cheesecakes bake more evenly and retain their shape beautifully.
Patience with Chilling: While it might be tempting to dive in immediately after baking, the chilling period is vital for the cheesecake to set properly. Allow at least 2 hours in the refrigerator, or ideally overnight, to achieve that dense, creamy, and perfect cheesecake consistency. This step truly finalizes the texture.
Serving Suggestions for Mini New York Style Cheesecakes
Decoration
The visual appeal of your Mini New York Style Cheesecakes can be as delightful as their taste. A simple dusting of confectioners’ sugar provides an elegant, classic finish that enhances their pristine appearance. Alternatively, a swirl of fresh, homemade whipped cream adds a touch of lightness and luxury, creating a beautiful contrast with the rich cheesecake base. For a pop of color and natural sweetness, top each mini cheesecake with a single fresh berry, such as a vibrant strawberry or a plump blueberry; this adds visual interest and a burst of complementary flavor.
Side Dishes
While these mini cheesecakes are delightful on their own, they also pair wonderfully with certain accompaniments that complement their rich flavor profile. A small scoop of vanilla bean ice cream served alongside offers a delightful temperature and textural contrast, enhancing the overall dessert experience. A small side of fresh fruit salad, featuring seasonal fruits, can provide a refreshing counterpoint to the cheesecake’s richness, cleansing the palate between bites. For a more beverage-focused pairing, consider serving a strong, freshly brewed coffee or a delicate herbal tea, which can beautifully balance the sweetness and creaminess of the cheesecake.
Creative Serving Ideas
Elevate your presentation by arranging the Mini New York Style Cheesecakes on a tiered dessert stand, creating an impressive centerpiece for any gathering. Consider a dessert bar where guests can customize their cheesecakes with a selection of toppings like raspberry coulis, chocolate ganache, or toasted chopped nuts, much like you might customize a slice of cake at a celebration. For themed parties, you could even arrange them as part of a larger dessert spread, perhaps alongside other small bites like mini tarts or decorative cookies, offering a diverse range of flavors and textures for your guests to explore.
Preparation & Storage
Storing Leftovers
Should you be fortunate enough to have any Mini New York Style Cheesecakes left over, proper storage is key to maintaining their delightful texture and flavor. It is essential to store them in an airtight container in the refrigerator. This prevents them from drying out and protects them from absorbing any unwanted odors from other foods in the fridge. Ensuring the container is truly airtight will help preserve their signature creamy consistency for up to 3-4 days after baking.
Freezing
These mini cheesecakes freeze remarkably well, making them an excellent option for preparing ahead of time. To freeze them, first ensure they are completely cooled and have been properly chilled in the refrigerator. Then, wrap each individual cheesecake securely in plastic wrap, making sure to remove as much air as possible. For added protection against freezer burn, place the wrapped cheesecakes in a freezer-safe container or a heavy-duty freezer bag. They can be stored in the freezer for up to 1 to 2 months, retaining their quality.
Reheating
The beauty of Mini New York Style Cheesecakes lies in their perfect serving temperature when chilled, so extensive reheating is generally not required or recommended. If you are serving cheesecakes that have been frozen, the best method is to transfer them from the freezer to the refrigerator and allow them to thaw completely overnight. This slow thawing process ensures they maintain their structure and creamy texture. Once thawed, they can be served directly from the refrigerator. For cheesecakes that have been stored in the fridge, simply bring them to room temperature for about 15-20 minutes before serving, or enjoy them cold for a refreshing dessert experience.
Frequently Asked Questions
-
What is the secret to achieving that perfectly smooth and creamy texture in Mini New York Style Cheesecakes?
The secret to a perfectly smooth and creamy texture lies in several key steps. Firstly, ensure your cream cheese is truly softened to room temperature; this is paramount for beating out any lumps. Secondly, avoid overmixing the batter once the eggs are added, as excessive air incorporation can lead to a porous texture and potential cracking. Gentle mixing until just combined is crucial. Finally, the extended chilling period in the refrigerator after baking is non-negotiable; it allows the fats to set and the structure to firm up, resulting in that dense, luxurious creaminess that defines a New York cheesecake. Patience during this cooling and setting phase is truly rewarded.
-
Why do my cheesecakes often crack, and how can I prevent it with this recipe?
Cheesecake cracking is a common concern, often stemming from a few culprits. Overbaking is the most frequent offender; baking too long causes the eggs to overcook and expand, leading to fissures as it cools. A slightly jiggly center is precisely what you want. Another cause is a rapid temperature change; avoid placing hot cheesecakes directly into a cold environment. For this recipe, ensuring you bake at the correct temperature (325°F/163°C) and remove them when the edges are set but the center is still slightly wobbly is key. Also, allowing them to cool gradually in the muffin tin for 10 minutes before transferring to a wire rack helps prevent thermal shock. Gentle mixing of the batter, especially after adding eggs, also minimizes air bubbles that can expand and cause cracks during baking.
-
Can I make these Mini New York Style Cheesecakes ahead of time for a party, and how should I store them?
Absolutely! Mini New York Style Cheesecakes are ideal for making ahead, which can significantly reduce stress on the day of your event. You can prepare them entirely, from crust to chilling, up to 24 hours in advance. Once they are fully chilled and set in the refrigerator, store them in an airtight container. For optimal freshness and to prevent any drying or absorbing of odors, ensure the container is well-sealed. They can also be frozen for longer storage. To do this, wrap each cooled cheesecake tightly in plastic wrap, then place them in a freezer-safe container or bag. Thaw them overnight in the refrigerator before serving to best preserve their texture and flavor, offering a convenient and delicious dessert solution.