Easy Mini Key Lime Cheesecakes Recipe

The vibrant tang of Key limes has always been a beacon for summer celebrations and refreshing treats. When the season arrives, my culinary compass points directly towards this iconic citrus, usually leading me to craft a classic Key lime tart, a dessert that truly encapsulates the essence of traditional Key lime pie.
This tart is a symphony of flavors – a delightful balance of tartness, sweetness, and an irresistibly creamy texture, perfect for savoring with a comforting cup of coffee. This year, however, my adventurous spirit called for something new, a delightful fusion of my two favorite desserts: Key limes and cheesecake. The result is a miniature cheesecake sensation that I’m incredibly excited to share.
Why You Will Love This Recipe
- Effortless Preparation: Designed for ease, these mini cheesecakes come together quickly, making them ideal for any occasion, whether it’s a planned gathering or an spontaneous craving for something sweet.
- Perfect Portions: Served in individual mini muffin cups, these cheesecakes are a delight to share and enjoy without the need for slicing, ensuring a neat and elegant presentation every time.
- Intense Flavor Profile: Experience the signature tartness of Key lime beautifully complemented by the rich, creamy foundation of classic cheesecake, creating a truly memorable taste sensation.
- Make-Ahead Marvel: These mini delights are perfect for preparing in advance, allowing you to save precious time on the day of your event and ensuring you can relax and enjoy your guests.
- Versatile Appeal: Whether served simply or adorned with elegant toppings, these mini Key lime cheesecakes are guaranteed to impress, offering a sophisticated yet approachable dessert option for any palate.
Ingredients You Need
The success of any great dessert hinges on the quality of its ingredients, and these mini Key lime cheesecakes are no exception. Opting for fresh, high-quality components will elevate the flavor and texture, transforming a good recipe into an exceptional one. We’re focusing on fresh citrus, rich dairy, and pantry staples that come together harmoniously.
Easy Mini Key Lime Cheesecakes
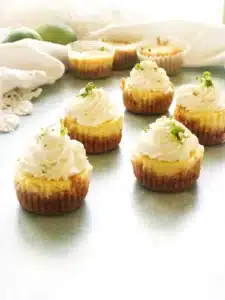
Mini Key lime cheesecakes that are tart, creamy, and sweet and made in a mini muffin tin for a great dessert anytime. Top with whipped cream or eat them just as is and either way, they will be delicious.
- For the Graham Cracker Crust:
- 2 tablespoon melted unsalted butter
- 1 ½ tablespoon granulated white sugar
- For the Key Lime Cheesecake Filling:
- 8 oz cream cheese, at room temperature
- 2 large eggs
- 1 ½ teaspoon vanilla extract
- 1Preheat oven to 350 degrees F (175 degrees C).
- 2Make the graham cracker crust: In a large bowl, combine graham cracker crumbs, melted butter, salt, and sugar. Mix well.
- 3Line a mini muffin tin with mini cupcake liners. Scoop one heaping teaspoon of the crust mixture into each well. Press the crust firmly into the wells and slightly up the sides of the liner using the end of a wooden spoon or similar object.
- 4Bake the crusts for 4-5 minutes. Remove from oven and let cool.
- 5Make the Key lime cheesecake filling: In a medium bowl, combine cream cheese, sour cream, sugar, eggs, vanilla extract, and Key lime juice. Mix until very smooth, about 2 minutes with a mixer or 4 minutes with a whisk.
- 6Spoon a heaping tablespoon of the cheesecake filling into each crust-lined well. If there is any filling left over, distribute it evenly among the wells.
- 7Bake: Bake for 16-18 minutes, or until the edges are set and the centers barely jiggle when the pan is gently shaken. Oven temperatures vary, so start checking at 16 minutes.
- 8Remove from the oven and let the cheesecakes cool completely in the pan.
- 9Once cooled to room temperature, refrigerate for at least 3 hours, or preferably overnight, to chill and set completely.
- 10Once chilled, remove from the pan and serve as is or with your favorite toppings.
Keywords: Key lime, cheesecake, mini cheesecake, dessert, tart, creamy, sweet, muffin tin, graham cracker crust, easy
You’ll find the precise quantities for each ingredient detailed within the recipe card, ensuring your baking success.
Variations
While the classic Key lime cheesecake is a triumph on its own, the beauty of this recipe lies in its adaptability. Feel free to explore these exciting variations to cater to different dietary needs or simply to satisfy a curious palate.
For those seeking a vegan alternative, the transformation begins with plant-based cream cheese and sour cream substitutes. You can achieve a delightful texture using cashew-based or coconut-based creams. The eggs can be replaced with a flax egg or a commercial egg replacer to bind the filling. The graham cracker crust can be made vegan by using a plant-based butter substitute and ensuring your graham crackers are free of animal products.
A low-carb approach is also entirely feasible. To reduce the carbohydrate count, you can swap the granulated sugar for a keto-friendly sweetener like erythritol or xylitol, adjusting the amount to your preferred sweetness level. For the crust, consider using almond flour or crushed pecans, bound together with melted butter and a touch of sweetener. This creates a wonderfully nutty base that complements the tart lime filling.
Adding a subtle berry twist can introduce another layer of flavor and visual appeal. Fresh or frozen raspberries or blueberries can be gently folded into the cheesecake batter before baking, or a small dollop of berry compote can be swirled on top just before it sets. This not only adds a fruity burst but also creates a beautiful marbled effect in each mini cheesecake.
How to Prepare mini key lime cheesecakes
Step 1: Crafting the Foundation – The Graham Cracker Crust
The journey to delicious mini Key lime cheesecakes begins with building a sturdy and flavorful graham cracker crust. This crucial first step sets the stage for the creamy filling that will crown it. We’ll be combining simple ingredients to create a crumbly yet cohesive base that bakes up to a perfect texture.
To start, gather your graham cracker crumbs. If you don’t have pre-crushed crumbs, you can easily make them by pulsing full-sized graham crackers in a food processor until they resemble fine breadcrumbs. Alternatively, place them in a sturdy zip-top bag and crush them with a rolling pin – a satisfyingly tactile process.
In a medium bowl, combine the graham cracker crumbs with melted unsalted butter, granulated white sugar, and a pinch of kosher salt. The butter acts as a binder, helping the crumbs adhere to each other, while the sugar adds a touch of sweetness and aids in browning. The salt enhances all the other flavors, preventing the crust from tasting flat.
Mix these ingredients thoroughly until the crumbs are evenly moistened by the butter, resembling wet sand. This ensures that when pressed into the mini muffin tin, the crust will hold its shape beautifully during baking and chilling. Proper moisture content is key to achieving a crust that is neither too dry and crumbly nor too greasy.
Step 2: Assembling the Mini Muffin Tin Liners and Crust
With your graham cracker crust mixture prepared, the next phase involves carefully lining your mini muffin tin and pressing the crust mixture into each well. This step requires a bit of attention to detail to ensure each mini cheesecake has a uniform base.
Begin by placing mini cupcake liners into each cavity of your mini muffin tin. This is a critical step for easy removal of the finished cheesecakes, preventing them from sticking and ensuring their perfect individual form. Using liners makes the entire process significantly cleaner and more manageable.
Once the liners are in place, spoon a generous teaspoon of the graham cracker crust mixture into each prepared liner. Aim for an even distribution so that each cheesecake receives an equal portion of the crust. This consistency will be important for the final presentation and taste experience.
Using the back of a small spoon, the end of a wooden dowel, or even your thumb, firmly press the graham cracker crumbs into the bottom of each liner. You want to create a compact and even layer that extends slightly up the sides of the liner. This firm pressing helps the crust hold together when baked and chilled, providing a delightful textural contrast to the creamy filling. A gentle, rotating motion can help encourage the crumbs to adhere well to the liner.
Step 3: Pre-Baking the Crust
Before introducing the creamy Key lime filling, the graham cracker crust needs a brief pre-bake. This initial baking period helps to set the crust, giving it a slightly crisp texture and a golden hue, and it also helps to lock in its structure, preventing it from becoming soggy later.
Preheat your oven to the specified temperature, typically around 350°F (175°C), ensuring it’s fully heated before the crust goes in. A consistently hot oven is essential for proper baking and even browning of the crust.
Carefully place the muffin tin filled with the crusts into the preheated oven. The crusts will bake for a short duration, usually between 4 to 5 minutes. This brief period is sufficient to toast the crumbs and melt the butter, binding everything together without overcooking or burning the delicate graham cracker mixture.
Once the pre-bake is complete, remove the muffin tin from the oven. Allow the crusts to cool slightly in the tin while you prepare the cheesecake filling. This cooling period allows the crust to firm up further, ready to embrace the luscious filling that awaits.
Step 4: Whipping Up the Luscious Key Lime Cheesecake Filling
Now comes the heart of our mini cheesecakes: the velvety smooth Key lime filling. This is where the signature tartness of the Key lime truly shines, perfectly balanced by the rich creaminess of the cheesecake base. It’s important to have your cream cheese at room temperature for this step.
In a medium mixing bowl, combine the softened cream cheese, granulated white sugar, sour cream, large eggs, vanilla extract, and Key lime juice. Using an electric mixer on medium speed, or a whisk for a more traditional approach, beat the ingredients together until the mixture is exceptionally smooth and silky. This process typically takes about 2 minutes with a mixer or about 4 minutes with a whisk. Ensure there are no lumps of cream cheese remaining; a smooth batter is paramount for a creamy final texture.
The sour cream contributes to the cheesecake’s signature tang and creamy consistency, while the eggs provide structure and richness. The vanilla extract adds a subtle depth of flavor that complements the bright citrus notes. Be sure to incorporate the Key lime juice gradually to ensure it’s evenly distributed throughout the filling.
Avoid overmixing once the eggs are incorporated, as this can introduce too much air, potentially leading to cracks in the cheesecakes during baking. The goal is a homogenous, smooth, and slightly thickened batter that will bake into a perfect, creamy delight.
Step 5: Filling the Crusts and Baking to Perfection
With both the crusts and filling ready, it’s time to assemble and bake these delightful mini Key lime cheesecakes. This is the stage where the magic truly happens, transforming simple ingredients into miniature works of art.
Carefully spoon a heaping tablespoon of the Key lime cheesecake filling into each of the pre-baked graham cracker crusts. Aim to fill each liner almost to the top, leaving a small amount of space for expansion as they bake. If you have any leftover filling, distribute it evenly among the mini muffin wells to ensure consistent portion sizes and baking times.
Once filled, gently transfer the muffin tin to the preheated oven. The cheesecakes will bake for approximately 16 to 18 minutes. The exact baking time can vary depending on your oven, so it’s wise to start checking them a couple of minutes before the minimum time stated. You’re looking for the edges to be set, while the very center should still have a slight jiggle when you gently nudge the pan.
Avoid the temptation to overbake, as this can lead to a dry or rubbery texture. A slight jiggle in the center is a good indicator that they will continue to cook and set as they cool. This gentle cooking process is crucial for achieving that characteristic creamy, melt-in-your-mouth cheesecake texture.
Step 6: Cooling, Chilling, and Achieving the Ultimate Texture
The baking process is complete, but the journey to perfect mini Key lime cheesecakes isn’t quite over yet. Cooling and chilling are absolutely essential steps to allow the cheesecakes to set properly and develop their ideal creamy texture.
Once removed from the oven, allow the cheesecakes to cool completely in the mini muffin tin. This gradual cooling process helps to prevent cracking and ensures the cheesecakes firm up evenly. Resist the urge to try one immediately; the transformation from molten to set is remarkable and worth the wait.
After they have reached room temperature, carefully transfer the muffin tin to the refrigerator. It’s crucial to chill the cheesecakes for at least 3 hours, or ideally overnight. This extended chilling period allows the cheesecake filling to fully set, firm up, and develop its signature creamy consistency. A properly chilled cheesecake will be firm yet yielding, with a smooth texture that melts in your mouth.
Once thoroughly chilled, you can gently remove the mini Key lime cheesecakes from their liners. They are now ready to be enjoyed in their pure, unadorned glory or adorned with your favorite toppings. The patience exercised during the cooling and chilling phases will be richly rewarded with every delightful bite.
Pro Tips for mini key lime cheesecakes
Room Temperature is Key: Always ensure your cream cheese is fully softened to room temperature before you begin. This is non-negotiable for achieving a smooth, lump-free filling that bakes evenly. Take it out of the refrigerator at least 30 minutes to an hour beforehand.
Full-Fat is Fantastic: For the creamiest texture, use full-fat cream cheese. Low-fat or fat-free versions can result in a less rich and potentially watery cheesecake, compromising the desired luxurious mouthfeel.
Gentle Mixing is Best: Once you add the eggs, mix the batter just until combined. Overmixing can incorporate too much air, leading to puffing and cracking during baking, which detracts from the smooth appearance.
Watch the Oven Closely: Ovens vary significantly. Begin checking the cheesecakes a few minutes before the recipe indicates. They are done when the edges are set and the center has a slight wobble; they will continue to firm up as they cool.
Patience with Cooling: Resist the urge to rush the cooling and chilling process. These steps are vital for developing the perfect cheesecake texture. A fully chilled cheesecake is a texture revelation.
Serving Suggestions for mini key lime cheesecakes
Decoration
Elevate the visual appeal of your mini Key lime cheesecakes with simple yet stunning decorative touches. A dollop of freshly whipped cream or a swirl of Cool Whip adds a cloud-like softness and a touch of sweetness that beautifully contrasts with the tart lime. For an extra burst of citrus essence and visual flair, a delicate sprinkle of fresh Key lime zest or a thin, elegant slice of Key lime perched atop the cream is simply divine. These small additions transform a delicious dessert into a truly artful presentation, making each mini cheesecake a feast for the eyes as well as the palate.
Side Dishes
While these mini Key lime cheesecakes are a complete dessert on their own, they can also be part of a larger dessert spread. Consider pairing them with other complementary treats for a delightful dessert buffet. Mini versions of other popular desserts, such as funfetti cookies or tiny chocolate lava cakes, offer a variety of textures and flavors. A fresh fruit salad, perhaps featuring berries and melon, provides a light and refreshing counterpoint to the richness of the cheesecake.
Creative Serving Ideas
Think outside the traditional dessert plate when serving these miniature delights. Present them on a tiered stand for a touch of elegance, perfect for parties or afternoon tea. Arrange them artfully on a rustic wooden board for a more casual, yet still charming, presentation. For a playful touch, especially for children’s parties, serve them with small, decorative umbrellas or colorful cocktail picks. They also make fantastic favors for events, placed in small cellophane bags tied with a ribbon.
Preparation & Storage
Storing Leftovers
These mini Key lime cheesecakes store remarkably well in the refrigerator, making them an excellent make-ahead dessert. Once completely cooled, transfer them to an airtight container, ensuring they are not tightly packed to avoid smushing. They can maintain their deliciousness in the fridge for up to a week, though the crust may soften slightly over time. For best results, I often aim to make them about 3 days in advance of when I plan to serve them.
Freezing
Yes, mini Key lime cheesecakes freeze beautifully, allowing you to enjoy their tangy goodness even longer. After the cheesecakes have fully cooled, arrange them in a single layer on a baking sheet or plate and place them in the freezer until solid, which usually takes about an hour. This pre-freezing step prevents them from sticking together. Once frozen, carefully transfer them into a freezer-safe bag or airtight container. They can be stored in the freezer for up to three months.
Reheating
These mini cheesecakes are best served chilled, so extensive reheating isn’t typically necessary. If they have been frozen, the easiest and most effective method is to transfer them from the freezer to the refrigerator and allow them to thaw gently overnight. This slow thawing process helps them retain their optimal texture and flavor without becoming watery. For a quicker thaw, you can place them on the counter for a couple of hours, but always ensure they are completely thawed before serving.
Frequently Asked Questions
-
What is the distinct flavor profile of Key lime cheesecake compared to a traditional Key lime pie?
Key lime cheesecake offers a wonderfully nuanced flavor experience that differs subtly yet significantly from a traditional Key lime pie. While the characteristic tartness of the Key lime is present and delightful, the creamy, rich base of the cheesecake mellows its intensity. This creates a more balanced profile, where the bright citrus notes are harmoniously interwoven with the luxurious smoothness of the cheesecake, resulting in a dessert that is less bracingly tart and more indulgently creamy. It’s a delightful fusion that offers the best of both worlds – the zesty zing of Key lime combined with the comforting richness of cheesecake.
-
Can these mini cheesecakes be successfully frozen and how should they be thawed for optimal texture?
Absolutely, these mini Key lime cheesecakes freeze exceptionally well, making them a fantastic option for advanced preparation or for keeping a sweet treat on hand. To freeze them, allow the baked cheesecakes to cool completely, then arrange them in a single layer on a baking sheet and freeze until firm. This initial freezing prevents them from sticking together. Once solid, transfer them to an airtight freezer-safe container or a heavy-duty freezer bag for storage, where they can remain delightful for up to three months. For thawing, the best method is to move the frozen cheesecakes from the freezer to the refrigerator and let them defrost slowly overnight. This gradual thawing process is crucial for maintaining their creamy texture and preventing any moisture issues that can arise from rapid thawing. Alternatively, they can be thawed on the counter at room temperature for a couple of hours if you need them sooner, but ensure they are fully defrosted before serving.
-
What are the most common issues encountered when making cheesecakes, and how can they be avoided to ensure a perfect result?
Several common pitfalls can affect cheesecake texture and appearance, but with a few key practices, they are easily avoidable. One frequent issue is cracking, often caused by overbaking or rapid temperature changes; to prevent this, avoid overbaking by removing the cheesecakes when the center still has a slight jiggle, and allow them to cool gradually in the oven with the door ajar before chilling. Another common problem is a lumpy filling, which is typically a result of not using room-temperature cream cheese; ensuring your cream cheese is fully softened is paramount for a silky-smooth batter. Additionally, overmixing after adding eggs can lead to puffing and subsequent cracking, so gentle mixing until just combined is recommended. Finally, water baths, while not strictly necessary for mini cheesecakes due to their size and baking time, can further help in achieving an exceptionally creamy texture and preventing cracks in larger cheesecakes by providing a moist, even heat environment.