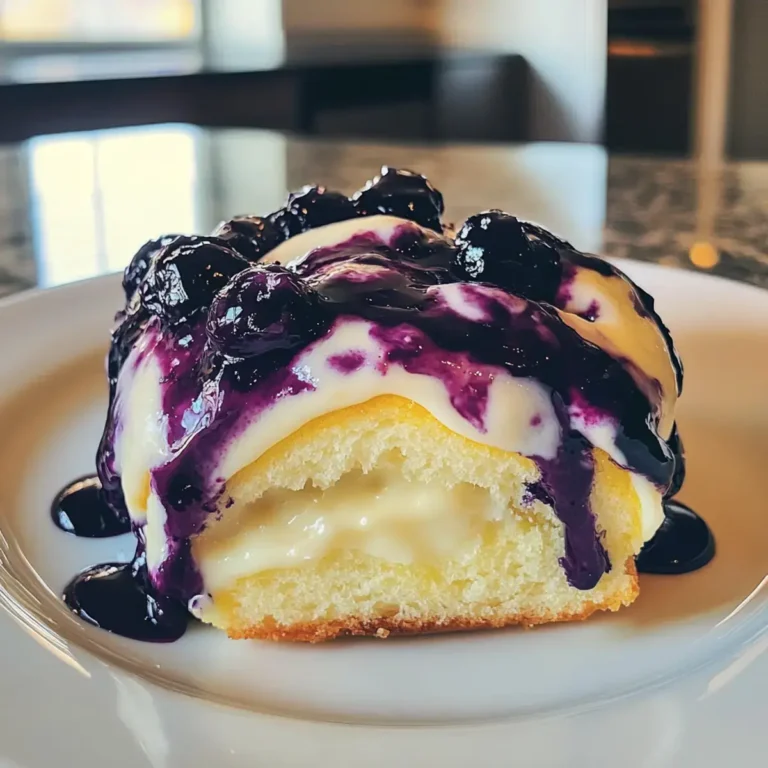
Easy Mini Cannoli Cups Delight

Mini Cannoli Cups Delight is the perfect way to indulge your sweet tooth without the fuss of traditional Italian pastries. Have you ever wanted to enjoy that rich, creamy filling enveloped in perfectly flaky pastry, but thought the process would be too complicated? Well, with this delightful recipe, you can enjoy all the iconic flavors of a classic cannoli while skipping the intricate, time-consuming steps usually required.
Imagine serving these elegant, bite-sized treats at your next family gathering, holiday party, or simply as a cozy weekend dessert. The vibrant flavors of fresh ricotta, combined with bright citrus zest and a sprinkle of chocolate or crushed pistachios, create a dish that feels both sophisticated and comforting. These mini cups provide a delightful contrast between the crunch of the pastry and the velvet smoothness of the filling, making every single bite a joyous experience.
Why You Will Love This Recipe
- Flavor Explosion: The beautiful harmony of creamy ricotta, fragrant citrus zest, and sweet chocolate creates a truly balanced profile.
- Quick Preparation: This recipe is incredibly efficient, allowing you to have a gourmet-style dessert on the table in under an hour.
- Versatile Ingredients: You can easily customize the filling with various toppings or flavor extracts to suit your specific personal tastes.
- Family-Friendly: Kids and adults alike will love these adorable bite-sized treats, making them a fantastic addition to any family lunch or evening meal.
- Impressive Presentation: These mini cups look like they came straight from a professional bakery, ensuring they shine as the centerpiece of your dessert table.
Ingredients You Need
To achieve the best results, always prioritize fresh, high-quality ingredients, especially when it comes to the cheese. Draining your ricotta properly is the secret to ensuring your filling remains thick and luxurious rather than runny. You can find the exact measurements and quantities for each item directly in the provided recipe card section.
Mini Cannoli Cups Delight

Enjoy the rich, creamy filling of classic cannolis in a simplified way with these easy and elegant mini cannoli cups. These delightful mini treats are perfect for any occasion, from family gatherings to holiday parties. They are quick to make, versatile, and always a crowd-pleaser.
- 425 g whole-milk ricotta cheese, drained (Opt for high-quality ricotta for the creamiest filling.)
- 60 g powdered sugar (Additional powdered sugar for dusting.)
- 25 g granulated sugar (Can be substituted with a sugar alternative.)
- 1 teaspoon finely grated orange or lemon zest (Use citrus of your choice.)
- 0.5 teaspoon vanilla extract
- 2 pieces refrigerated pie crusts, softened (Use gluten-free pie crusts for a gluten-free option.)
- 36 g turbinado sugar
- 1 teaspoon ground cinnamon
- 32 g miniature semisweet chocolate chips or finely chopped pistachios (Optional toppings.)
- 1Prepare Ingredients: Gather all your ingredients. Make sure your ricotta cheese is properly drained to avoid a watery filling. Preheat your oven to 220°C.
- 2Cook the Base: Lightly dust your work surface with flour. Unroll the refrigerated pie crusts and sprinkle them evenly with turbinado sugar and ground cinnamon. Use a rolling pin to gently roll the dough, ensuring the sugar mixture adheres well.
- 3Cut the Circles: Using a 6.5 cm round cookie cutter, cut circles from the prepared dough. You should aim for around 48 circles. Don’t forget to re-roll any leftover scraps to maximize your yield!
- 4Form the Cups: Take each circle and gently nestle it into an ungreased mini muffin tin. Make sure to press gently to form a cup shape.
- 5Bake the Cups: Place the muffin tin in the preheated oven and bake for about 10 minutes, or until the pastry is golden brown.
- 6Cool the Cups: Once baked, let the pastry cups cool in the tin for about 15 minutes. Then, transfer them to a wire rack to cool completely.
- 7Prepare the Filling: In a large mixing bowl, combine the drained ricotta, powdered sugar, granulated sugar, citrus zest, and vanilla extract. Beat the mixture on medium speed until it’s creamy and smooth.
- 8Chill the Filling: Transfer this delightful filling into a large zip-top bag. Seal it tightly and refrigerate until you’re ready to fill the cups.
- 9Pipe the Filling: When serving, snip off one corner of the zip-top bag. Pipe about 1 tablespoon of the creamy filling into each of the cooled pastry cups.
- 10Add Finishing Touches: Sprinkle with miniature chocolate chips or finely chopped pistachios, and dust lightly with additional powdered sugar just before serving.
Keywords: Baking, cannoli cups, Easy Dessert, mini cannoli, Sweet Treats
- ricotta cheese: use whole-milk varieties for the richest and creamiest possible texture.
- powdered sugar: helps sweeten the filling while maintaining a smooth, lump-free consistency.
- granulated sugar: adds a subtle sweetness and works perfectly when incorporated into the pastry dough.
- orange or lemon zest: provides a necessary burst of acidity and freshness to cut through the richness.
- vanilla extract: enhances the overall aroma and adds a classic depth to the sweet cream.
- refrigerated pie crusts: act as the convenient, flaky foundation for your delicious cannoli cups.
- turbinado sugar: adds a delightful caramel-like crunch and texture to the outer pastry shells.
- ground cinnamon: infuses the crust with a warm spice profile that pairs perfectly with the citrus filling.
- miniature semisweet chocolate chips: provide a classic bite and an iconic visual finish to your dessert.
- chopped pistachios: offer a nutty crunch that is a traditional hallmark of authentic Italian cannoli.
Variations
Vegan Adaptations: If you are looking to cater to plant-based diets, you can easily substitute the traditional ricotta with a high-quality vegan almond or soy ricotta. Ensure your pie crust is also made with plant-based fats to keep the entire dish strictly dairy-free.
Low Carb & Keto: For those following a low-carb lifestyle, swap the standard pie crust for a homemade almond flour-based dough. You can also replace the sugars with a high-quality erythritol or stevia blend to keep the sweetness intact without the extra glucose.
Creative Add-ins: Consider folding finely chopped candied orange peel or even a dash of espresso powder into your ricotta mixture for a bold twist. These small additions can transform the classic profile into something entirely new and exciting for your guests.
How to Prepare Mini Cannoli Cups Delight
Step 1: Proper Preparation
Preparation is key: Begin by gathering all your ingredients and ensuring your ricotta is thoroughly drained of any excess liquid. A dry, firm ricotta ensures your filling pipes cleanly and stays stable inside the cups.
Preheat your oven to 220°C to ensure the pastry crusts bake quickly and achieve the perfect golden-brown crispness. Having everything organized beforehand, much like preparing for a breakfast brunch, will make the process move much faster.
Step 2: Crafting the Pastry Base
Lightly dust your clean work surface with a small amount of flour to prevent the dough from sticking during the preparation. Unroll your softened pie crusts and sprinkle them evenly with the turbinado sugar and ground cinnamon mixture.
Use a rolling pin to gently press the sugar and cinnamon into the dough, creating a flavorful and crunchy crust. The sugar will caramelize beautifully in the oven, providing that signature snap that every good cannoli needs.
Step 3: Cutting and Shaping
Use a 6.5 cm round cookie cutter to stamp out circles from your prepared dough sheets. You should aim to get approximately 48 circles in total to make the most of your crusts.
Gather the leftover dough scraps, roll them out once more, and cut additional circles until you have used all the available pastry. This ensures minimal waste while maximizing the number of treats you can serve to your guests.
Step 4: Forming the Mini Cups
Take each individual dough circle and gently nestle it into the cavities of an ungreased mini muffin tin. Use your fingers to press the dough into the bottom and up the sides to create a structured cup.
Ensure the dough is evenly distributed so that each cup holds its shape during the baking process. If the dough starts to get too warm, pop the tin in the fridge for a few minutes before putting it into the oven.
Step 5: Baking to Perfection
Place your filled muffin tin into the preheated oven and bake for approximately 10 minutes. Watch them closely, as the sugar in the crust can darken very quickly once it reaches the golden-brown stage.
Once they reach that perfect toasted color, remove them from the oven immediately. Allow the cups to cool directly in the muffin tin for about 15 minutes before transferring them to a wire rack to finish cooling completely.
Step 6: Filling and Serving
While the cups cool, combine the drained ricotta, sugars, zest, and vanilla in a bowl, beating until the texture is silky smooth. Transfer this mixture into a large zip-top bag, seal it, and keep it chilled until the exact moment you are ready to assemble.
Snip a small corner off the bag and pipe the filling into your cooled, crisp cups. Top each one with chocolate chips or crushed pistachios and a light dusting of powdered sugar to finish your [https://www.pinterest.com/easycookfeed/](Pinterest)-worthy dessert.
Pro Tips for Mini Cannoli Cups Delight
Drain Carefully: The most common mistake is using wet ricotta cheese, which leads to soggy cups. Place your ricotta in a cheesecloth-lined sieve over a bowl for at least two hours—or ideally overnight—to remove all excess moisture.
Temperature Control: Always ensure your pastry cups are completely cool to the touch before adding the ricotta filling. If the cups are even slightly warm, the fat in the ricotta will soften the crust, destroying the desired crispy texture.
Fresh Zest: Use a microplane to zest your citrus fruits right before adding them to the mixture. This releases the essential oils, providing a much brighter and more potent flavor than store-bought extracts ever could.
Clean Piping: To achieve professional-looking swirls, try to use a piping bag with a star tip if you have one available. If not, a sturdy zip-top bag works perfectly fine, and you can simply trim the corner to adjust the flow.
Serving Suggestions for Mini Cannoli Cups Delight
Decoration
For a beautiful visual display, place your finished cups on a tiered serving tray. Dust them with a light coating of additional powdered sugar using a fine-mesh strainer to create a snowy, elegant look. You can also add a single candied cherry or an edible flower to each cup for a pop of vibrant color that elevates the overall presentation.
Side Dishes
Since these cannoli cups are rich and creamy, they pair beautifully with tart or acidic items. Serve them alongside a plate of fresh berries like raspberries or strawberries to balance the sweetness of the filling. A small side of dark chocolate shavings or even a light lemon sorbet can also help cleanse the palate between bites.
Creative Serving Ideas
Try creating a “Cannoli Bar” where guests can choose their own toppings like chopped hazelnuts, dried cranberries, or toasted coconut. This interactive approach is perfect for parties and allows everyone to customize their treat exactly how they like it. Pair the entire display with a warm, bold espresso or a glass of chilled Prosecco for a truly authentic Italian dining experience.
Preparation & Storage
Storing Leftovers
If you have any leftovers, it is best to store the unfilled pastry cups and the ricotta filling in separate airtight containers. The pastry shells will remain crisp at room temperature for up to two days. The ricotta mixture must be kept in the refrigerator and consumed within 48 hours to ensure the highest quality and safety.
Freezing
The empty, baked pastry shells can be frozen successfully for up to three months. Place them in a freezer-safe container with parchment paper between layers to prevent them from breaking. When you are ready to use them, let them come to room temperature and then crisp them up in a 180°C oven for five minutes before filling.
Reheating
If your pastry cups have lost their crunch, you can easily revive them by placing them in an oven preheated to 180°C for 5 to 7 minutes. Watch them very carefully to prevent the sugar in the crust from burning. Never attempt to reheat these in the microwave, as the moisture will turn the pastry soft and unappealing.
Frequently Asked Questions
- Can I prepare the components ahead of time for a party?
Yes, preparing ahead is highly encouraged for this recipe. You can bake the pastry shells up to two days in advance and store them in an airtight container at room temperature. The filling can be prepared, placed in a piping bag, and stored in the refrigerator up to 24 hours before you plan to assemble and serve. - How do I prevent the shells from becoming soggy after filling?
The sogginess is usually caused by the moisture in the ricotta migrating into the shell over time. To avoid this, always wait to pipe the filling into the cups until just a few minutes before serving. This ensures that the contrast between the crunchy exterior and the creamy interior remains perfectly intact for your guests. - Are there any specific ricotta brands that work better than others?
While many grocery store brands are sufficient, looking for “whole-milk” and “fresh” ricotta is the most important factor. Authentic Italian-style ricotta that is sold in containers without excess water is often superior to the more mass-produced, watery varieties. If you only have access to standard brands, the extra step of straining the ricotta through a cheesecloth is absolutely mandatory for success.