Antipasto Salad with Grilled Chicken – Easy Summer Salad Recipe!

Embark on a culinary journey that brings the vibrant essence of Italy right to your table with this exquisite antipasto salad featuring perfectly grilled chicken. This dish is more than just a meal; it’s a celebration of fresh, bold flavors and delightful textures, designed to impress even the most discerning palate.
Imagine a symphony of ripe tomatoes, creamy mozzarella, tangy pepperoncini, and succulent grilled chicken, all brought together by a zesty homemade basil pesto vinaigrette that’s as delightful as it is versatile. It’s an ideal choice for a light yet satisfying lunch or a captivating starter that promises to leave a lasting impression.
Why You Will Love This Recipe
- Vibrant Italian Flavors: Experience the authentic taste of Italy with every bite, featuring classic ingredients like tomatoes, mozzarella, and pepperoncini. This salad is a direct gateway to the heart of Mediterranean cuisine, offering a refreshing and robust profile.
- Versatile Dressing and Marinade: The homemade basil pesto vinaigrette is a culinary marvel, serving a dual purpose by not only dressing the salad beautifully but also infusing the chicken with incredible flavor as a marinade. This efficiency in flavor creation is a hallmark of thoughtful recipe design.
- Customizable to Your Liking: While the core recipe is divine, it’s incredibly adaptable. Feel free to swap ingredients, add your favorite cured meats, or experiment with different greens to make it uniquely yours. This flexibility ensures it can cater to various dietary needs and personal preferences.
- Effortless Preparation: Despite its gourmet appeal, this antipasto salad is surprisingly easy to assemble, especially when using pre-made pesto. It’s perfect for busy weeknights or when you need a show-stopping dish without spending hours in the kitchen. The straightforward steps make it accessible for cooks of all skill levels.
- Visually Stunning Presentation: The riot of colors from the fresh ingredients makes this salad a feast for the eyes as well as the palate. Its attractive appearance is sure to enhance any dining occasion, making it ideal for entertaining guests or simply elevating your everyday meals.
Ingredients You Need
The success of any great dish hinges on the quality of its ingredients, and this antipasto salad is no exception. Opting for the freshest produce and the finest mozzarella will elevate the overall taste and texture of your creation. High-quality olive oil and a vibrant basil pesto are also key to achieving that authentic Italian flair.
Italian Antipasto Salad with Grilled Chicken
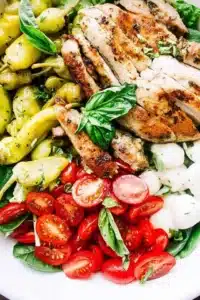
This fresh and delicious antipasto salad is packed with grilled chicken, mozzarella cheese, tomatoes, and pepperoncini, tossed in a homemade basil pesto vinaigrette that doubles as a chicken marinade.
- For the Vinaigrette Dressing: ½ cup store-bought Basil Pesto, ¼ cup extra virgin olive oil, 3 tablespoons white wine vinegar, 1 tablespoon fresh lemon juice, Salt and fresh ground pepper, to taste
- For the Chicken: 1 pound (4 pieces) boneless skinless chicken breasts
- For the Salad: 4 cups chopped Romaine lettuce, 1 cup cherry tomatoes (halved), 8 ounces fresh mozzarella cheese balls, 1 cup pickled pepperoncini
- 1Make the dressing: In a bowl, combine pesto, olive oil, vinegar, and lemon juice; add salt and pepper to taste, and whisk until combined. Pour half of the dressing into a ziploc bag. Place the other half in the fridge.
- 2Marinate the chicken: Add the chicken breasts to the ziploc bag, seal it, and shake it all up until well combined. Place the chicken in the fridge for 30 minutes, or for up to 2 hours.
- 3Prepare to grill: When you're ready to cook your chicken, preheat the grill to 400ºF. Brush grill grates with olive oil.
- 4Grill the chicken: Remove the chicken breasts from the marinade and place them on the hot grill. Cook without touching until the chicken breasts start getting some grill marks, about 5 minutes. Turn the chicken breasts over, cover the grill, and let them finish cooking, about 7 more minutes, depending on the thickness of the chicken. Chicken is done when a meat thermometer registers 165ºF.
- 5Rest: Remove the chicken from the grill. Cover and let it rest for 5 minutes before slicing.
- 6Assemble the Salad: Start with lettuce. In the meantime, prepare the salad and transfer the chopped lettuce to a large salad bowl.
- 7Add antipasto: Next, top the lettuce with tomatoes, cheese, and pepperoncini.
- 8Add the chicken: Cut the chicken breasts into strips and add them to the salad.
- 9Dress the salad: Pour the remaining basil pesto dressing over the salad; toss to combine.
- 10Serve.
Keywords: antipasto salad, grilled chicken, Italian, summer salad, pesto dressing
For a comprehensive understanding of the precise amounts required for each component, please refer to the detailed recipe card provided.
Variations
To cater to diverse dietary preferences and to expand the flavor horizons of this delightful antipasto salad, several exciting variations can be explored. These adaptations ensure that everyone can enjoy a delicious and satisfying version of this classic Italian-inspired dish, proving its remarkable versatility.
For those following a dinner menu that emphasizes plant-based eating, transforming this salad into a vegan masterpiece is wonderfully achievable. Simply omit the mozzarella cheese and grilled chicken. Instead, incorporate an abundance of marinated artichoke hearts, sun-dried tomatoes packed in oil, and perhaps some roasted bell peppers for added depth and sweetness. You could also introduce grilled or roasted firm tofu, seasoned with Italian herbs, as a protein substitute. A sprinkle of toasted pine nuts would add a delightful crunch and nutty flavor, enhancing the vegan experience.
A low-carb lifestyle doesn’t mean missing out on this flavorful salad. The key is to focus on the non-starchy vegetables and protein sources while moderating or eliminating any carby additions. Load up on plenty of mixed greens, cucumber slices, bell peppers, and olives. For protein, the grilled chicken remains an excellent choice, or consider adding some hard-boiled eggs or grilled shrimp. Ensure your pepperoncini are plain pickled peppers without added sugar. A creamy avocado dressing or a simple olive oil and red wine vinegar dressing would complement the low-carb profile perfectly.
To introduce a completely different protein dynamic, consider swapping the chicken for grilled shrimp or even calamari. Seafood brings a delicate, briny flavor that pairs beautifully with the Mediterranean ingredients. Ensure the seafood is cooked just until opaque to maintain tenderness. This variation transforms the salad into a more sophisticated and lighter meal, perfect for a warm evening. The subtle sweetness of the seafood harmonizes wonderfully with the tang of the pepperoncini and the freshness of the tomatoes.
How to Prepare antipasto salad with grilled chicken
Step 1: Crafting the Exquisite Vinaigrette and Marinade
Begin your culinary adventure by preparing the star of the show – the basil pesto vinaigrette. In a medium-sized bowl, combine the robust flavor of store-bought basil pesto with the smooth richness of extra virgin olive oil. Introduce a bright, tangy note with three tablespoons of white wine vinegar, and enhance it further with the zesty essence of one tablespoon of fresh lemon juice. Season generously with salt and freshly ground black pepper, tasting as you go to achieve your preferred flavor balance.
Whisk these components together with enthusiasm until the mixture is beautifully emulsified and all the ingredients are thoroughly incorporated. This aromatic blend will serve as both the dressing for your vibrant salad and the flavorful marinade for your succulent grilled chicken. Its versatility is a testament to the power of simple, high-quality ingredients harmonizing perfectly.
Once your vinaigrette is perfectly mixed, it’s time to divide its deliciousness. Carefully pour approximately half of this glorious mixture into a sealable zip-top bag. This portion is designated to lovingly embrace and tenderize the chicken, infusing it with its captivating Italian essence. The remaining half should be transferred to a clean, airtight container and placed in the refrigerator. This reserved portion will await its destiny as the crowning dressing for your assembled antipasto salad.
Step 2: Marinating the Chicken for Ultimate Flavor
Now, introduce the boneless, skinless chicken breasts into the zip-top bag containing half of your prepared basil pesto vinaigrette. Ensure each piece of chicken is thoroughly coated in the marinade, allowing the vibrant flavors to begin their work of tenderizing and seasoning the meat. Seal the bag tightly, pressing out any excess air to prevent oxidation and ensure optimal contact between the chicken and the marinade.
Gently shake the bag to distribute the marinade evenly, ensuring every surface of the chicken is kissed by the zesty pesto blend. Place the sealed bag containing the marinated chicken into the refrigerator. For the most impactful flavor infusion, aim for a marinating time of at least 30 minutes. This duration allows the acidic components of the vinaigrette to penetrate the chicken, breaking down muscle fibers and imparting a deep, herby, and tangy flavor profile.
While the chicken marinates, it’s important to be mindful of the time. While marinating is crucial for flavor, leaving the chicken in the acidic marinade for too long, typically beyond two hours, can begin to negatively affect the texture of the meat. The acidity can start to “cook” the chicken on the surface, leading to a mushy or stringy texture once grilled. Therefore, adhering to the recommended marinating window is key to achieving perfectly tender and juicy results.
Step 3: Preparing the Grill and the Chicken
As your chicken reaches its marinating prime, it’s time to prepare your grilling station for optimal results. Preheat your grill to a steady medium-high heat, aiming for a temperature of around 400°F (200°C). This consistent heat is crucial for achieving those desirable grill marks and ensuring the chicken cooks evenly without burning.
Once the grill is hot and ready, take a moment to lightly oil the grill grates. This simple step is incredibly important for preventing the marinated chicken from sticking to the grates. Sticking can lead to tearing the chicken when you try to flip it, making for a less visually appealing presentation and potentially uneven cooking. A quick brush of olive oil or cooking spray on the hot grates is all it takes to create a non-stick surface.
Carefully remove the chicken breasts from the marinating bag, allowing any excess marinade to drip back into the bag for a moment. Do not discard this marinade yet, but be mindful of its raw chicken contact. Place the chicken breasts onto the hot, oiled grill grates. Immediately after placing them down, resist the urge to move or press them. Allow them to sear undisturbed for approximately 5 minutes.
Step 4: Grilling the Chicken to Perfection
After the initial searing period of about 5 minutes, you should observe distinct and appealing grill marks developing on the bottom side of the chicken breasts. This is the opportune moment to perform the crucial flip. Using a good pair of tongs or a spatula, carefully turn each chicken breast over to expose the un-grill-marked side to the direct heat.
Once all the chicken breasts have been flipped, close the grill lid. This action traps the heat and steam inside the grill, creating an oven-like environment that helps the chicken cook through evenly and remain exceptionally juicy. Continue to cook the chicken with the lid closed for an additional 7 to 10 minutes. The exact cooking time will depend on the thickness of your chicken breasts.
The key to knowing when your chicken is perfectly cooked is to use a meat thermometer. Insert it into the thickest part of the chicken breast, ensuring it doesn’t touch any bone if present. The chicken is done and safe to consume when it registers an internal temperature of 165°F (74°C). Overcooking can lead to dry, tough chicken, so pulling it off the grill at the precise moment is essential for that tender, juicy result.
Step 5: Resting the Chicken and Assembling the Salad
Once the chicken has reached its perfect internal temperature of 165°F, carefully remove the breasts from the grill. Place them on a clean cutting board or a plate. It is absolutely vital to allow the grilled chicken to rest for at least 5 minutes before slicing. This resting period is critical because it allows the juices, which have been driven to the center of the meat during cooking, to redistribute throughout the chicken.
Skipping this resting step will result in those delicious juices running out onto the cutting board when you slice the chicken, leaving you with drier meat. While the chicken is resting, you can begin to prepare the salad base. Take a large, attractive salad bowl and add the chopped Romaine lettuce. Ensure the lettuce is well-dried after washing to prevent a watery salad.
Next, it’s time to add the vibrant antipasto components. Artfully arrange the halved cherry tomatoes, the fresh mozzarella balls, and the tangy pickled pepperoncini over the bed of lettuce. These ingredients provide a beautiful contrast in color, texture, and flavor. Once the chicken has rested, slice the breasts into strips or bite-sized pieces. Arrange these succulent grilled chicken strips attractively over the top of the salad, ensuring an even distribution.
Step 6: Dressing the Salad and Final Touches
With all the beautiful components assembled in the salad bowl, it’s time to bring everything together with the reserved basil pesto vinaigrette. Slowly drizzle the remaining half of the vinaigrette over the entire salad. Ensure you aim for an even distribution so that every ingredient gets a touch of that delicious dressing.
Gently toss the salad to combine all the ingredients. Use large salad spoons or tongs to carefully lift and mix the lettuce, tomatoes, mozzarella, pepperoncini, and chicken. The goal is to coat everything lightly with the dressing without bruising the delicate lettuce or breaking apart the cheese. The movement should be a gentle fold rather than a vigorous stir.
Once tossed and beautifully coated, your antipasto salad with grilled chicken is ready to be served. Present it immediately to your eager diners. The combination of warm, freshly grilled chicken with the cool, crisp salad ingredients creates a delightful temperature contrast. This dish is a testament to how simple steps and quality ingredients can create a truly memorable and satisfying meal.
Pro Tips for antipasto salad with grilled chicken
Quality Matters: For the most authentic and delightful antipasto salad, always opt for the freshest ingredients you can find. Ripe, juicy cherry tomatoes, creamy, fresh mozzarella (pearls or small balls are ideal), and good quality pepperoncini will make a significant difference in the final taste. Don’t shy away from using extra virgin olive oil for its superior flavor and beneficial properties; it’s a cornerstone of Mediterranean cooking.
Don’t Over-Marinate: While marinating infuses the chicken with fantastic flavor, remember that the pesto vinaigrette contains acidic elements like vinegar and lemon juice. These can break down the chicken’s protein too quickly if left for an excessive amount of time, potentially leading to a mushy texture. Stick to the recommended 30 minutes to 2 hours for perfectly tender and flavorful chicken.
Perfect Grilling Technique: When grilling the chicken, the key is to resist the urge to move it too often. Let it sear undisturbed on each side to develop beautiful grill marks and a slight crust. Flipping only once ensures that the chicken cooks evenly and retains its moisture, resulting in a juicy and tender outcome. A meat thermometer is your best friend here to guarantee it’s cooked through without being overdone.
Taste and Adjust: Seasoning is paramount. Before dressing the salad, take a moment to taste the vinaigrette and adjust the salt and pepper levels as needed. The tanginess of the vinegar, the richness of the pesto, and the potential saltiness of other ingredients like pepperoncini can vary. A quick taste test ensures the dressing perfectly complements all the elements of the salad.
Leftover Marinade Caution: It cannot be stressed enough: never reuse marinade that has come into contact with raw chicken as a salad dressing. The risk of foodborne illness is significant. Always set aside a portion of the dressing *before* adding the chicken to the marinade. This separate portion is the only one safe to use on the finished salad.
Serving Suggestions for antipasto salad with grilled chicken
Decoration
Elevate the visual appeal of your antipasto salad with thoughtful garnishes. A sprinkle of freshly torn basil leaves adds a burst of green and an aromatic flourish that echoes the pesto. Consider a light dusting of grated Parmesan or Pecorino Romano cheese for an extra layer of savory depth. A few whole pepperoncini peppers placed strategically can also add visual interest and indicate the tangy flavor profile within.
Side Dishes
This antipasto salad is hearty enough to be a main course, but it also pairs wonderfully with complementary side dishes. Crusty Italian bread or focaccia is perfect for sopping up any leftover dressing. For a more substantial meal, consider serving it alongside a simple lentil soup or a light minestrone. A side of roasted vegetables, like zucchini and bell peppers, would also complement the salad’s fresh flavors beautifully.
Creative Serving Ideas
Transform this salad into an elegant appetizer by serving it in individual martini glasses or small bowls. Layer the ingredients artfully for a stunning presentation. Another idea is to serve it deconstructed: arrange the lettuce, chicken, cheese, tomatoes, and pepperoncini separately on a large platter and let guests build their own perfect bite. You could also serve it as a filling for hollowed-out bell peppers for a fun, edible serving vessel.
Preparation & Storage
Storing Leftovers
If you happen to have any antipasto salad with grilled chicken leftover, proper storage is key to maintaining its freshness. It’s best to store the components separately if possible, especially the lettuce. If the salad is already combined, store it in an airtight container in the refrigerator. The dressing can cause the lettuce to wilt over time, so it’s ideal to dress the salad just before serving or storing.
For optimal results, store the undressed salad ingredients and the chicken in separate containers. The vinaigrette should also be stored in its own sealed container in the refrigerator. This method allows you to revive the salad by gently tossing the components with fresh dressing when you’re ready to enjoy it again. Aim to consume leftovers within 2-3 days for the best quality and safety.
When storing the chicken separately, ensure it is cooled completely before placing it in an airtight container. This prevents condensation from forming, which can make the chicken soggy. Keeping the chicken chilled will also help preserve its texture and flavor until you’re ready to add it back to a freshly dressed salad.
Freezing
Freezing antipasto salad with grilled chicken is generally not recommended due to the delicate nature of the fresh ingredients. The lettuce will become limp and watery upon thawing, and the mozzarella will lose its creamy texture, becoming rubbery. While the grilled chicken could potentially be frozen, the overall salad is best enjoyed fresh.
The vinaigrette, however, can often be frozen, though its texture might change slightly upon thawing. It may separate, requiring a good whisking to recombine. If you choose to freeze components, focus on the more resilient items like the grilled chicken or perhaps the pepperoncini. It is always best to prepare and consume this salad shortly after making it for the best dining experience.
If you absolutely must freeze components, ensure they are in airtight, freezer-safe containers. Label them clearly with the contents and the date. However, prioritize enjoying this vibrant salad at its peak by making only what you anticipate consuming within a few days.
Reheating
This antipasto salad is designed to be served chilled or at room temperature, so reheating is generally not required or advisable. If you have leftover grilled chicken that you wish to warm slightly before adding to a fresh salad, do so gently. You can briefly warm it in a skillet over low heat or in a microwave for a very short duration, just until warmed through, being careful not to overcook it.
The salad itself should not be reheated. Instead, if you are serving leftovers that have been refrigerated, simply take them out of the refrigerator about 20-30 minutes before serving to allow them to come closer to room temperature. If the chicken was stored separately, add it to the salad just before serving and toss with a bit of fresh dressing to liven it up.
The goal is to preserve the crispness of the lettuce and the freshness of the other ingredients. Overheating any part of the salad would compromise its delightful texture and vibrant flavors. Enjoying this dish as intended, with its cool, crisp components, is the ultimate way to experience its deliciousness.
Frequently Asked Questions
-
Can I make this antipasto salad ahead of time?
Yes, you can prepare many components of this antipasto salad ahead of time, which can save you time when you’re ready to serve. The basil pesto vinaigrette can be made up to 3 days in advance and stored in an airtight container in the refrigerator. The chicken can also be grilled and then sliced or cubed and stored separately in the refrigerator for up to 2 days. However, it’s best to assemble the salad components, including the lettuce, tomatoes, mozzarella, and pepperoncini, just before serving to ensure maximum freshness and prevent the lettuce from becoming wilted. You can also keep the dressing separate until you are ready to toss everything together.
-
What kind of chicken is best for this recipe? Can I use other proteins?
Boneless, skinless chicken breasts are ideal for this recipe because they grill quickly and evenly, and they absorb the marinade beautifully. You can also use chicken thighs, though they may require a slightly longer grilling time. If you prefer not to use chicken, this salad is incredibly versatile. Grilled shrimp, calamari, or even firm tofu marinated in a similar pesto base would make excellent substitutions. For a vegetarian option, consider grilled eggplant or halloumi cheese. Even leftover rotisserie chicken can be shredded or chopped and used in a pinch, though it won’t have the same grilled flavor infusion.
-
What are some ways to make the basil pesto more flavorful or customize it?
While store-bought basil pesto is convenient and often very good, you can certainly enhance its flavor or create your own homemade version for an even more exceptional taste. To boost the flavor of store-bought pesto, consider stirring in a little extra fresh basil, a pinch of red pepper flakes for a touch of heat, or a tiny bit of grated Parmesan cheese. If making pesto from scratch, you can experiment with different nuts like walnuts or almonds instead of pine nuts, or incorporate other herbs like parsley or arugula along with the basil for a more complex flavor profile. Adding a clove of finely minced garlic or a squeeze of lemon juice directly into your homemade pesto can also amplify its vibrant taste.