Ultimate Hot Chocolate Cookie Cups

Imagine cozying up on a chilly evening with a warm mug of hot chocolate, the rich aroma hugging you like a soft blanket. Now, what if you could enjoy that delightful experience in a cookie? Enter Hot Chocolate Cookie Cups, the perfect fusion of cookie and cocoa that will warm your heart and delight your senses.
These delicious treats are not only a feast for the eyes but also a delightful indulgence that transports you back to childhood memories of chilly winter days filled with cocoa and laughter. What makes them truly special is their unique shape and flavor combination, offering a taste of pure comfort with every bite.
Why You Will Love This Recipe
- Decadent Flavor: Each cookie cup bursts with rich chocolate flavor, complemented by velvety ganache and sweet marshmallows for a truly indulgent experience.
- Easy to Make: The recipe combines simple ingredients and straightforward steps, making it accessible for bakers of all levels and ensuring success even for beginners.
- Versatile Treat: Perfect for holidays, celebrations, or a cozy night in, these cookie cups fit any occasion, adding a touch of magic to any gathering.
- Family-Friendly: Kids will love helping with the creation process and of course, indulging in the delicious results, making it a wonderful activity for the whole family.
- Customizable: You can easily adapt the flavors, toppings, and mix-ins to cater to different tastes and dietary needs, allowing for endless creativity.
Ingredients You Need
The magic of these Hot Chocolate Cookie Cups lies in the quality and simplicity of the ingredients used. By selecting fresh, high-quality components, you ensure that each cookie cup delivers an unparalleled depth of flavor and a perfect texture.
Hot Chocolate Cookie Cups
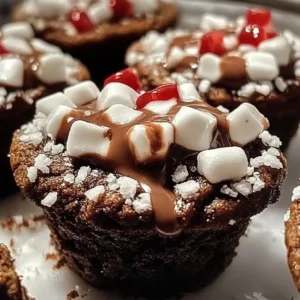
Delightful cookie cups filled with rich chocolate ganache and topped with fluffy mini marshmallows, perfect for cozy gatherings or special occasions. These treats capture the essence of hot chocolate in a fun, edible form.
- 1 cup unsalted butter, softened
- 1 cup brown sugar
- 1/2 cup granulated sugar
- 2 large eggs
- 2 teaspoons vanilla extract
- 3 cups all-purpose flour
- 1 teaspoon baking soda
- 1/2 teaspoon salt
- 1 cup chocolate chips
- 1 cup heavy cream
- 1/2 cup chocolate chips (for ganache)
- Mini marshmallows (for topping)
- 1Gather all ingredients.
- 2In a large bowl, cream together the softened butter, brown sugar, and granulated sugar until smooth and fluffy.
- 3Beat in the eggs, one at a time, then stir in the vanilla extract.
- 4In another bowl, whisk together the all-purpose flour, baking soda, and salt.
- 5Gradually stir the dry mixture into the creamed butter mixture until just combined.
- 6Gently fold in the chocolate chips.
- 7Scoop the dough into a greased muffin tin, pressing it down to form little cookie cups.
- 8Bake in a preheated oven at 350°F (175°C) for 10-12 minutes, or until the edges are lightly golden.
- 9While the cookie cups are cooling, heat the heavy cream in a saucepan over medium heat until it just begins to simmer. Remove from heat and add the chocolate chips, stirring until melted and smooth.
- 10Fill each cookie cup with the chocolate ganache and top with mini marshmallows. Allow them to set at room temperature before serving.
Keywords: Baking, Chocolate, Cookies, dessert cups, Hot Chocolate, Ganache, Marshmallows
- unsalted butter, softened: Creamy butter forms the rich base of the cookie dough, ensuring a tender and flavorful outcome.
- brown sugar: Adds moisture and a delightful caramel undertone to the cookie cups.
- granulated sugar: Contributes to the structure and sweetness of the cookies.
- large eggs: Bind the ingredients together and add richness to the dough.
- vanilla extract: Enhances the overall chocolate flavor and adds a comforting aroma.
- all-purpose flour: Provides the necessary structure for the cookie cups.
- baking soda: Acts as a leavening agent, helping the cookies rise and achieve a lighter texture.
- salt: Balances the sweetness and amplifies the chocolate notes.
- chocolate chips: Melted into the dough for bursts of chocolatey goodness.
- heavy cream: Used to create a smooth and decadent chocolate ganache filling.
- chocolate chips (for ganache): The key ingredient for a rich, luscious, and melt-in-your-mouth ganache.
- mini marshmallows (for topping): The classic hot chocolate topping, providing a soft, gooey, and sweet finish.
The precise quantities for these ingredients can be found within the detailed recipe card provided.
Variations
Elevate your Hot Chocolate Cookie Cups with creative twists that cater to different tastes and dietary preferences. These variations ensure there’s a perfect version for everyone to enjoy.
For a refreshing minty delight, consider incorporating a touch of peppermint extract into the cookie dough or drizzling a peppermint-infused ganache over the top. Crushed candy canes also make for a festive and crunchy topping, perfect for the holiday season.
If you’re aiming for a healthier option, explore low-carb alternatives. You can experiment with almond flour or coconut flour for the cookie base and use a sugar substitute like erythritol or stevia. Sugar-free chocolate chips are also readily available to maintain that rich chocolate flavor without the added sugar.
For a sophisticated twist, try infusing the ganache with a hint of espresso or a splash of your favorite liqueur, like rum or Kahlúa. A sprinkle of sea salt on top of the ganache can also enhance the chocolate flavor and add a delightful sweet and salty contrast.
How to Prepare Hot Chocolate Cookie Cups
Step 1: Gathering and Preparing Your Ingredients
The foundation of any successful bake begins with meticulous preparation. Before you even think about mixing, take the time to gather all the necessary ingredients and equipment. This ensures that once you start, the process flows smoothly and without interruption, allowing you to focus solely on creating your delicious cookie cups. Having everything at hand prevents last-minute scrambles and minimizes the risk of errors.
Ensure your butter and eggs are at room temperature; this is crucial for achieving the right consistency in your cookie dough. Room temperature ingredients emulsify better, leading to a smoother dough and ultimately, a better texture in your finished cookies. Properly softened butter creams effectively with sugar, creating the airy base that is characteristic of well-made cookies.
Preheat your oven and prepare your muffin tin by greasing it thoroughly. A well-greased tin is essential to prevent the cookie dough from sticking, ensuring that your cookie cups pop out cleanly and retain their beautiful shape. You can use butter, baking spray, or line the tin with paper liners for an extra layer of assurance. This initial step sets the stage for a hassle-free baking experience.
Step 2: Crafting the Cookie Dough Base
Begin by creaming together the softened unsalted butter with both the brown sugar and granulated sugar in a large mixing bowl. Use an electric mixer on medium speed to beat them until the mixture is light, fluffy, and pale in color. This process, often called creaming, incorporates air into the dough, which is vital for the cookies’ texture and lift; aim for at least 2-3 minutes of continuous mixing.
Once you have a beautifully creamy sugar and butter mixture, it’s time to introduce the wet ingredients. Beat in the large eggs one at a time, ensuring each egg is fully incorporated into the batter before adding the next. Following the eggs, gently stir in the pure vanilla extract, which will add its warm, inviting aroma and flavor to the dough.
In a separate medium-sized bowl, whisk together your dry ingredients: the all-purpose flour, baking soda, and salt. Whisking them together beforehand ensures that the leavening agent and salt are evenly distributed throughout the flour, preventing any pockets of saltiness or uneven rising in your baked cookies. Gradually add this dry mixture to the creamed butter and sugar mixture, mixing on low speed until just combined. Be careful not to overmix at this stage; overmixing can develop the gluten in the flour too much, leading to tough cookies.
Step 3: Incorporating Chocolate and Shaping the Cups
Now for the star ingredient that truly makes these cookie cups hot chocolate-inspired: the chocolate chips! Gently fold in one cup of chocolate chips into the cookie dough using a spatula or wooden spoon. Distribute them evenly throughout the dough, ensuring that every cookie cup will have delightful pockets of melted chocolate. Resist the urge to mix vigorously; a gentle fold preserves the air you incorporated earlier.
The next critical step is forming the cookie cups. Take approximately 2-3 tablespoons of dough for each cup and place it into the prepared muffin tin. Using your fingers or the back of a spoon, firmly press the dough down into the bottom of each muffin cup and then press it up the sides. You are essentially creating a small edible bowl or cup shape, which will hold the delicious ganache later on.
Ensure the walls of the cookie cups are of a relatively even thickness. This consistency in thickness will help them bake uniformly. Pay attention to creating a well in the center that is deep enough to hold the ganache but not so deep that it compromises the structural integrity of the cookie. Proper shaping is key to both the appearance and the delightful eating experience of these cookie cups.
Step 4: Baking the Cookie Cups to Perfection
Place the filled muffin tin into your preheated oven, set at 350°F (175°C). The baking time will typically range from 10 to 12 minutes. You’ll know they’re ready when the edges of the cookie cups are lightly golden brown, and the centers appear set, though they might still look slightly soft.
Keep a close eye on the cookie cups during the last few minutes of baking. Ovens can vary, and over-baking can lead to dry, crumbly cookie cups. The goal is a cookie that is cooked through but still retains a tender, slightly chewy texture, making it the perfect vessel for the decadent filling. A slightly underbaked center is preferable to an overbaked edge, as they will continue to cook slightly as they cool.
Once baked, remove the muffin tin from the oven and let the cookie cups cool in the tin for about 5-10 minutes. This allows them to firm up slightly, making them easier to remove without breaking. After this initial cooling period, carefully transfer the cookie cups to a wire rack to cool completely. Ensuring they are fully cooled is essential before filling them with the ganache to prevent it from melting prematurely.
Step 5: Preparing the Luscious Chocolate Ganache
While the cookie cups are cooling on the wire rack, it’s time to prepare the rich and velvety chocolate ganache that will fill them. In a medium saucepan, gently heat one cup of heavy cream over medium heat. You want the cream to reach a point just before simmering; look for small bubbles forming around the edges of the pan and steam rising. Do not let it come to a rolling boil, as this can cause the cream to curdle.
Once the cream is sufficiently heated, remove the saucepan from the heat immediately. Add the 1/2 cup of chocolate chips for the ganache to the hot cream. Let the mixture sit undisturbed for about 5 minutes. This resting period allows the heat from the cream to gently melt the chocolate chips from the inside out.
After the resting period, stir the mixture gently with a whisk or spatula until the chocolate chips are completely melted and the ganache is smooth, glossy, and uniformly combined. The consistency should be thick enough to hold its shape but still pourable. If it seems too thick, you can stir in a tiny bit more warm cream; if it’s too thin, let it sit for a few more minutes to thicken further. This decadent ganache is what truly transforms these cookie cups into a hot chocolate experience.
Step 6: Filling, Topping, and Enjoying
With your cookie cups cooled and your chocolate ganache perfectly smooth, the final assembly is just moments away. Carefully spoon the warm chocolate ganache into each of the cooled cookie cups. Fill them generously, allowing the rich ganache to create a luscious pool within the chocolate cookie shell. Ensure you distribute the ganache evenly among all the cookie cups for a consistent treat.
The classic topping for hot chocolate is, of course, marshmallows! Gently place a few mini marshmallows on top of the ganache in each cookie cup. You can arrange them artfully or simply sprinkle them on for that quintessential hot chocolate look and feel. The residual warmth from the ganache will slightly toast the marshmallows, adding another delightful layer of texture and flavor.
Allow the filled cookie cups to sit at room temperature for at least 15-20 minutes. This resting period allows the ganache to set and firm up slightly, making the cookie cups easier to handle and enjoy. Once the ganache has achieved a pleasing consistency, your Hot Chocolate Cookie Cups are ready to be savored. They are best enjoyed shortly after making, allowing you to experience the full impact of their warm, comforting flavors and textures.
Pro Tips for Hot Chocolate Cookie Cups
Achieving perfection with these Hot Chocolate Cookie Cups involves a few key insights that can elevate your baking game. Paying attention to these details will ensure consistently delicious results.
Room Temperature Ingredients Are Key: Always ensure your butter and eggs are at room temperature before you begin. This is non-negotiable for achieving a properly creamed butter-sugar mixture, which is fundamental for a tender cookie texture. Cold ingredients will not emulsify correctly, leading to a dense or greasy dough.
Don’t Overmix the Dough: Once the flour is added, mix the dough only until it just comes together. Overmixing develops the gluten in the flour, resulting in tough and unpleasantly chewy cookie cups instead of tender ones. A few streaks of flour remaining are perfectly fine at this stage.
Grease Your Muffin Tin Generously: A well-greased muffin tin is crucial. Use butter, baking spray, or even a touch of shortening to ensure that the cookie dough doesn’t stick. This step guarantees that your cookie cups will release cleanly, maintaining their beautiful shape and making for effortless removal.
Watch the Baking Time Closely: Ovens vary, so start checking the cookie cups around the 10-minute mark. They should be lightly golden on the edges but still appear slightly soft in the center. Over-baking will result in dry and hard cookie cups, so err on the side of slightly underbaked, as they will continue to cook as they cool.
Allow for Proper Cooling: Let the cookie cups cool in the muffin tin for a few minutes before transferring them to a wire rack. This initial cooling period allows them to set up enough to be handled without breaking. Complete cooling on the rack prevents the bottoms from becoming soggy.
Ganache Temperature Matters: Ensure your cookie cups are completely cool before filling with ganache. If the cups are still warm, the ganache will melt and become too runny, making it difficult to set properly. Patience here is rewarded with a beautifully set filling.
Serving Suggestions for Hot Chocolate Cookie Cups
Decoration
Transforming these cookie cups into edible works of art is part of the fun. Beyond the standard mini marshmallows, consider a dusting of cocoa powder over the ganache for an intensified chocolate flavor and visual appeal. A light sprinkle of edible glitter or gold dust can add a touch of magic, especially for festive occasions or celebrations.
Drizzling the tops with melted white chocolate, dark chocolate, or even a colorful candy melt adds a professional and appealing finish. You can create stripes, swirls, or even intricate patterns depending on your artistic inclination. For a festive holiday touch, consider adding a few crushed candy canes to the ganache before it sets, or sprinkle them on top for a peppermint crunch.
Edible flowers, crystallized ginger pieces, or even a tiny dash of sea salt can offer unique flavor profiles and visual interest. The key is to complement the existing chocolate flavor without overpowering it, creating a treat that is as pleasing to the eye as it is to the palate.
Side Dishes
While these cookie cups are a complete dessert on their own, they can be delightfully paired with other treats to create a more elaborate dessert spread. A simple scoop of high-quality vanilla bean ice cream or a refreshing raspberry sorbet offers a wonderful contrast in temperature and flavor to the rich chocolate.
A glass of chilled milk or a warm mug of robust coffee makes for an excellent beverage accompaniment. The milk cuts through the richness of the chocolate, while the coffee’s bitterness can enhance the chocolate notes, creating a sophisticated flavor experience. For a truly indulgent pairing, consider serving them alongside a slice of fluffy cheesecake or a light and airy fruit tart.
If serving at a brunch or a tea party, a selection of fresh berries, such as raspberries, strawberries, or blueberries, can add a bright, fresh element to the dessert table. The tartness of the berries provides a refreshing counterpoint to the sweet, decadent cookie cups.
Creative Serving Ideas
Think beyond the standard presentation and get creative with how you serve your Hot Chocolate Cookie Cups. Arrange them on a tiered dessert stand for a visually stunning display at parties or gatherings. Each tier can showcase different toppings or variations, adding an element of surprise for your guests.
For a more rustic and charming presentation, serve them in small paper cups or tins on a wooden board, perhaps garnished with cinnamon sticks or star anise. This approach adds a cozy, artisanal feel to the dessert, making it feel even more special. Consider creating a “hot chocolate bar” where guests can customize their cookie cups with various toppings like whipped cream, chocolate shavings, caramel drizzle, or even small chocolate-covered pretzels.
If you’re hosting a children’s party, consider placing each cookie cup in a small cellophane bag tied with a festive ribbon, making them perfect party favors. This also helps keep them fresh and prevents them from getting smudged before they are enjoyed. For a romantic evening, present a single cookie cup on a small dessert plate with a delicate dusting of powdered sugar and a single raspberry.
Preparation & Storage
Storing Leftovers
To keep your delicious Hot Chocolate Cookie Cups tasting their best, proper storage is essential. The most straightforward method is to place them in an airtight container at room temperature. This will help to maintain their texture and prevent them from becoming stale or drying out too quickly.
When stored this way, the cookie cups should remain fresh and enjoyable for up to 3 days. Ensure the container is sealed tightly to prevent any air from getting in, which can accelerate the staling process. If your kitchen is particularly warm or humid, it might be better to store them in a slightly cooler part of your home.
It’s important to note that the ganache may soften slightly in warmer temperatures, but it will firm up again as it cools. For the best eating experience, try to consume them within this 3-day window. If you find they are losing some of their moisture, you can briefly warm them before serving, but be cautious not to overheat.
Freezing
For longer-term storage, freezing your Hot Chocolate Cookie Cups is an excellent option, allowing you to enjoy them at your convenience. It’s best to freeze the baked cookie cups before they are filled with the ganache and topped with marshmallows. This prevents the filling from becoming watery or affecting the cookie’s texture adversely during the freezing and thawing process.
Arrange the cooled, unfrosted cookie cups on a baking sheet lined with parchment paper. Ensure they are not touching each other. Freeze them on the baking sheet for about 1-2 hours, or until they are solid. This pre-freezing step, known as flash freezing, prevents the cookie cups from sticking together in the freezer.
Once frozen solid, transfer the cookie cups into a freezer-safe airtight container or a heavy-duty freezer bag. Using a quality freezer bag with as much air removed as possible will prevent freezer burn. They can be stored in the freezer for up to 2 months. When you are ready to enjoy them, remove them from the freezer and allow them to thaw completely at room temperature before proceeding with filling and topping.
Reheating
If your cookie cups have been stored at room temperature and you’d like to enjoy them slightly warmed, or if you are reheating frozen ones after thawing, a gentle warming can enhance their flavor and texture. The microwave is the quickest way to achieve this.
Place the cookie cup (preferably after it has been filled with ganache and topped with marshmallows) on a microwave-safe plate. Heat it in short intervals of 10-15 seconds. Be extremely careful not to overheat, as this can cause the cookie to become tough or the ganache to melt excessively. You are aiming for a gentle warmth that brings out the flavors, not to cook it further.
Another method for a slightly warmer cookie is to place them on a baking sheet in a low oven (around 250°F or 120°C) for about 5-7 minutes. This method provides a more even warmth than the microwave, especially if you are reheating multiple cookie cups. Ensure you keep a close watch to prevent any overcooking.
Frequently Asked Questions
-
Can I make the cookie dough ahead of time and refrigerate it?
Yes, absolutely! The cookie dough can be made up to 2 days in advance and stored in an airtight container in the refrigerator. The chilling process can actually improve the flavor and texture of the cookies, as it allows the ingredients to meld together. When you’re ready to bake, let the dough sit at room temperature for about 15-20 minutes to soften slightly, making it easier to scoop and shape into cookie cups.
-
What is the best way to ensure the ganache is perfectly smooth and glossy?
The key to a smooth and glossy ganache lies in the quality of the chocolate and the technique. Ensure you use good quality chocolate chips or finely chopped chocolate bars. Heat the heavy cream until it just begins to simmer, then remove it from the heat promptly. Allowing the hot cream to sit with the chocolate for about 5 minutes before stirring allows the chocolate to melt gently. Stirring initially with a whisk and then finishing with a spatula ensures no lumps remain and creates a beautiful, emulsified shine.
-
Can I substitute the chocolate chips in the cookie dough with something else?
Certainly! While chocolate chips are classic, you can certainly get creative. Consider using chopped chocolate bars for larger, meltier pockets of chocolate. For a twist, you could also add chopped nuts like walnuts or pecans, or even dried cranberries for a bit of tartness. If you’re feeling adventurous, small pieces of toffee or caramel can add another layer of flavor and texture to your cookie cups.