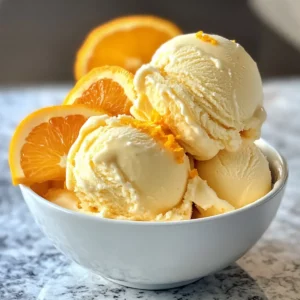
Irresistible Homemade Orange Creamsicle Ice Cream Delight

The sun dipped low in the evening sky as laughter filled the air, the scent of fresh oranges wafting from my kitchen—a warm reminder that summer is here. There’s nothing quite like the taste of homemade Orange Creamsicle Ice Cream to transport you back to carefree childhood days spent chasing ice cream trucks.
This delightful treat is a perfect choice for those who crave a rich, creamy dessert without any artificial flavors. With both churned and no-churn options, this recipe makes whipping up a refreshing treat a breeze, perfect for dazzling guests or indulging in some well-deserved self-care. Plus, using freshly squeezed orange juice means you can enjoy that bright, zesty flavor guilt-free! Are you ready to make your summer days unforgettable with a bowl of this nostalgic ice cream?
Why You Will Love This Recipe
- Nostalgic Flavor: Close your eyes, and you’ll be whisked back to summers past, evoking memories of carefree days with every bite of this classic taste.
- Simple Preparation: Both churned and no-churn options provide hassle-free ways to satisfy your ice cream cravings, making it accessible for all skill levels.
- Natural Ingredients: Enjoy the peace of mind that comes from using fresh oranges and no artificial flavors—perfect for those who cherish homemade goodness and wholesome treats.
- Versatile Options: Mix in chocolate chips or fruit chunks for a unique twist, tailoring it to everyone’s preferences and creating endless flavor possibilities.
- Guaranteed Crowd-Pleaser: Impress guests at your next gathering with this vibrant dessert that will have everyone creamier and happier, a guaranteed hit for any occasion.
Ingredients You Need
Get ready to whip up a delightful summer treat that sings of sunshine and pure joy. The quality of your ingredients directly influences the final taste and texture, so selecting fresh, vibrant components is key to achieving that perfect creamsicle essence. Opting for ripe oranges will lend a more intense and authentic citrus flavor to your ice cream, making each spoonful a true delight.
Homemade Orange Creamsicle Ice Cream
Delight in the nostalgic taste of homemade Orange Creamsicle Ice Cream, perfect for summer with fresh oranges and rich creaminess. This recipe offers both churned and no-churn options for a hassle-free, refreshing treat.
- For the Creamy Base: 2 cups Heavy Whipping Cream (for richness and creaminess), 1 cup Whole Milk (for a creamy base), 1 cup Fresh Orange Juice (from about 3 oranges), 3/4 cup Sugar, 1 tablespoon Vanilla Extract, 1/4 teaspoon Salt
- For Enhanced Flavor: 1 teaspoon Orange Extract, 1 tablespoon Fresh Orange Zest (optional, for extra zest)
- For Color (Optional): 1 drop Food Coloring
- 1Whisk the Base: In a large mixing bowl, combine heavy whipping cream, sugar, fresh orange juice, whole milk, orange extract, vanilla extract, and salt. Whisk until the sugar is dissolved and the mixture is smooth, about 2-3 minutes.
- 2Add Food Coloring (Optional): If desired, stir in a few drops of food coloring until evenly distributed.
- 3Churn the Ice Cream: Pour the mixture into an ice cream maker and churn according to the manufacturer's instructions for about 20-25 minutes, or until it reaches a soft-serve consistency.
- 4Freeze for Firmness: Transfer the churned ice cream to an airtight container, smoothing the top. Cover tightly with plastic wrap and freeze for 4-6 hours until firm.
- 5Soften and Serve: Let the ice cream sit at room temperature for 5-10 minutes before scooping for easier serving.
Keywords: Orange Creamsicle Ice Cream, Homemade Ice Cream, Summer Dessert, No Churn Ice Cream, Natural Flavors, Citrus Ice Cream, Nostalgic Treat
- heavy whipping cream: adds unparalleled richness and a velvety smooth texture, forming the luxurious base of your ice cream.
- whole milk: provides a creamy foundation that balances the richness of the cream, contributing to a perfectly scoopable consistency.
- fresh orange juice: the star ingredient, delivering a bright, zesty, and authentic citrus punch that defines the creamsicle flavor profile.
- sugar: sweetens the mixture, balancing the tartness of the orange and enhancing the overall flavor complexity.
- vanilla extract: a classic companion to citrus, adding depth and a warm, aromatic undertone that rounds out the flavor.
- salt: a tiny pinch magically enhances all the other flavors, preventing the sweetness from becoming cloying and adding a subtle savory note.
- orange extract (optional): provides an intensified orange flavor boost, perfect for those who want an extra powerful citrus kick.
- fresh orange zest (optional): adds fragrant oils from the orange peel, contributing a wonderfully aromatic and zesty dimension to the ice cream.
- food coloring (optional): a few drops can enhance the visual appeal, giving it that iconic creamsicle look, though the natural color of the orange juice is also beautiful.
The precise quantities for these ingredients can be found within the recipe card for your convenience.
Variations
Feel free to let your creativity shine and personalize this delightful ice cream to your taste buds, exploring a world of exciting flavor combinations. This recipe is a fantastic canvas for experimentation, allowing you to craft a unique frozen treat every time.
For a Vegan Delight: Substitute the heavy whipping cream and whole milk with full-fat coconut milk and coconut cream. The natural richness of coconut milk provides a wonderfully creamy texture, and its subtle tropical notes pair beautifully with the orange. Ensure your sweetener is also vegan, and you’ll have a completely plant-based frozen treat.
Embrace a Low-Carb Lifestyle: Reduce the sugar content significantly by using a sugar substitute like erythritol or xylitol (be cautious if you have pets, as xylitol is toxic to dogs). You can also lean more heavily on natural sweetness from the oranges and perhaps a touch of stevia for a lower-sugar version without compromising too much on flavor.
Add a Berry Burst: Just before churning or during the final stages of the no-churn method, gently fold in a handful of fresh or frozen raspberries or strawberries. Their tartness and vibrant color create a stunning contrast with the orange, offering a delightful fruity surprise in every bite.
Introduce Chocolatey Indulgence: For a decadent twist, stir in mini chocolate chips or a swirl of your favorite chocolate fudge sauce during the last few minutes of churning. The combination of creamy orange and rich chocolate is a classic for a reason, offering a sophisticated and utterly irresistible flavor pairing.
Spice it Up: For an unexpected warmth and complexity, consider adding a pinch of cinnamon or a whisper of cardamom to the base mixture. These warming spices can add a surprising depth to the citrus notes, making the ice cream feel comforting and intriguing, especially if you’re serving it during cooler evenings.
A Tropical Getaway: Incorporate a bit of pineapple juice along with the orange juice, or add finely diced mango chunks near the end of the churning process. This fusion of tropical fruits with orange creates a vibrant, exotic flavor profile reminiscent of a vacation. You could even add a touch of shredded coconut for extra texture and tropical flair.
Citrus Symphony: Don’t be afraid to blend the orange with other citrus fruits. A splash of lime or grapefruit juice can add a delightful tang and complexity, creating a more sophisticated layered citrus experience. Experiment with different combinations to find your perfect balance of sweet and tart.
These variations demonstrate the incredible versatility of this homemade Orange Creamsicle Ice Cream, proving it can be tailored to suit virtually any dietary need or flavor preference. It’s a truly adaptable recipe for endless enjoyment.
How to Prepare Homemade Orange Creamsicle Ice Cream
Step 1: Whisk the Base
In a large mixing bowl, gather your primary ingredients for the creamy foundation of your ice cream. Combine the heavy whipping cream, granulated sugar, freshly squeezed orange juice, and whole milk. Ensure you use a whisk to thoroughly mix everything together until the sugar is completely dissolved, which typically takes about two to three minutes of steady whisking.
The mixture should start to achieve a beautifully smooth and slightly thickened consistency. As you whisk, you’ll notice the liquid taking on a lovely pale orange hue, signaling that the flavors are beginning to meld. This initial blending is crucial for ensuring a smooth texture and even flavor distribution throughout the finished ice cream, preventing any grainy sugar deposits.
Next, incorporate the flavor enhancers: the pure vanilla extract and a delicate pinch of salt. If you’re opting for an extra orange punch, now is also the time to add the orange extract and fresh orange zest. Whisk these in gently until they are fully incorporated into the creamy base, ensuring every component is harmoniously blended.
Step 2: Add Food Coloring (Optional)
If you’re aiming for that iconic, vibrant creamsicle aesthetic, this step is where you can introduce a touch of visual magic. Carefully add a few drops of your preferred food coloring to the orange mixture in the bowl. Start with a small amount, as a little goes a long way in achieving the desired hue.
Using your whisk, gently blend the food coloring into the base until it is evenly distributed. Continue stirring until you achieve a uniform, cheerful orange color that evokes the classic ice cream treat. The goal is to create a visually appealing ice cream that is as delightful to look at as it is to eat, reminiscent of childhood summer days.
Observe the transformation as the liquid takes on a more intense and playful orange shade. This optional step is purely for aesthetic enhancement, allowing you to tailor the visual appeal to your liking. If you prefer a more natural look, simply skip this step, and the inherent beautiful color of the orange juice will still create a wonderful dessert.
Step 3: Churn the Ice Cream
Once your ice cream base is perfectly blended and, if desired, colored to perfection, it’s time to transform it into frozen deliciousness using your ice cream maker. Carefully pour the entire mixture into the pre-chilled bowl of your ice cream maker, ensuring you don’t overfill it, as the ice cream will expand as it churns.
Follow the specific instructions provided by your ice cream maker’s manufacturer for optimal results. Generally, you’ll let it churn for approximately 20 to 25 minutes. During this process, the machine will agitate the mixture, incorporating air while simultaneously freezing it, which is essential for creating a smooth, creamy texture.
As the churning progresses, you will witness the mixture gradually thicken. It will transform from a liquid to a soft-serve consistency, becoming wonderfully fluffy and nearly doubling in volume. This stage indicates that the ice cream is adequately frozen and aerated, preparing it for the final hardening process in the freezer.
Step 4: Freeze for Firmness
After the churning cycle is complete, the ice cream will have a delightfully soft-serve texture, but it needs a bit more time to firm up to a scoopable consistency. Carefully scrape the churned ice cream from the ice cream maker’s bowl into a freezer-safe, airtight container. Use a spatula to gently smooth the top surface, ensuring an even layer for consistent freezing.
To further protect your homemade creation from developing ice crystals, which can affect the texture, press a layer of plastic wrap directly onto the surface of the ice cream before sealing the container tightly. This creates a barrier that minimizes air exposure. You can also add the lid on top of the plastic wrap for an extra secure seal.
Place the tightly sealed container into the freezer. Allow the ice cream to freeze for a minimum of four to six hours, or until it reaches your desired firmness for easy scooping. The longer it freezes, the firmer it will become, so adjust the time based on your preference for how hard or soft you like your ice cream.
Step 5: Soften and Serve
The moment of truth has arrived – your homemade Orange Creamsicle Ice Cream is ready to be enjoyed! However, for the absolute best scooping experience and texture, it’s recommended to let the ice cream sit at room temperature for a short period before serving. This brief thawing period, typically between five to ten minutes, will slightly soften the ice cream, making it much easier to scoop cleanly.
As it softens, you’ll notice the rich, creamy texture that you worked so hard to achieve. Digging your spoon in will reveal a wonderfully smooth consistency that perfectly captures that nostalgic summer flavor. The delightful combination of bright orange and sweet cream is now ready to be savored.
Serve your delicious homemade Orange Creamsicle Ice Cream in bowls, waffle cones, or any vessel you prefer. For an extra touch of visual appeal and freshness, consider garnishing each serving with a thin slice of fresh orange or a sprig of mint. This simple addition enhances the presentation and offers a delightful burst of freshness alongside the creamy ice cream.
Pro Tips for Homemade Orange Creamsicle Ice Cream
Achieving the perfect homemade ice cream is all about attention to detail and using the right techniques. Here are some expert tips to ensure your Orange Creamsicle Ice Cream is nothing short of spectacular.
- Perfect Creaminess: Always opt for heavy whipping cream for the base of your ice cream. Its higher fat content is crucial for creating that luxuriously rich and velvety smooth texture that defines premium ice cream. Lighter creams may result in an icier or less substantial final product.
- Zesty Flavor Blast: Don’t underestimate the power of fresh orange zest! It’s a game-changer for infusing your ice cream with an authentic and intensely bright natural orange flavor that goes far beyond just juice. The essential oils in the zest provide an aromatic depth you can’t get otherwise.
- Avoid Ice Crystals (No-Churn Method): If you’re making this without an ice cream maker, whip the heavy cream to stiff peaks *before* folding it into the rest of your base ingredients. This incorporates enough air to prevent a dense, icy texture and ensures a smoother, more satisfying Orange Creamsicle Ice Cream.
- Chill Out Before Serving: Patience is a virtue, especially with homemade ice cream. Allow the ice cream to soften briefly at room temperature for about 5-10 minutes before scooping. This slight thawing makes it much easier to serve and enhances the overall creamy mouthfeel.
- Seal It Right for Storage: Proper storage is key to maintaining texture and preventing freezer burn. Always store your ice cream in an airtight container. For an extra layer of protection, press a piece of plastic wrap or aluminum foil directly onto the surface of the ice cream before sealing the lid, creating a barrier against air.
- The Importance of Cold: Ensure all your dairy ingredients (cream, milk) and your ice cream maker’s bowl are thoroughly chilled before you begin. Starting with cold components helps the ice cream freeze more efficiently, leading to smaller ice crystals and a smoother texture.
- Juice Fresh: While store-bought orange juice can work in a pinch, using freshly squeezed juice from ripe, juicy oranges will yield a significantly more vibrant and authentic flavor. Strain the juice to remove any pulp for a smoother ice cream base.
- Taste and Adjust: Before churning, taste your ice cream base. Is it sweet enough? Does the orange flavor come through? This is your last chance to adjust the sweetness or flavor intensity before it freezes.
Serving Suggestions for Homemade Orange Creamsicle Ice Cream
Decoration
Elevate the visual appeal of your homemade Orange Creamsicle Ice Cream with simple yet stunning decorative touches. A delicate drizzle of homemade chocolate sauce or a light dusting of edible glitter can add a touch of elegance and sparkle to any scoop.
Consider garnishing with a thin, elegant curl of orange zest or a fresh sprig of mint for a pop of color and aroma. A few candied orange peel pieces also provide a delightful chewy texture and an intensified citrus burst.
For a truly whimsical presentation, serve in chilled martini glasses and top with a miniature dollop of whipped cream and a Maraschino cherry. These small details transform a simple dessert into a festive treat, perfect for special occasions or just a delightful indulgence.
Side Dishes
The bright, creamy flavor of Orange Creamsicle Ice Cream pairs wonderfully with a variety of complementary side dishes. Crispy, light waffles or delicate shortcake biscuits offer a delightful textural contrast to the smooth ice cream.
Consider serving alongside a fresh, vibrant fruit salad featuring berries and melon for a refreshing counterpoint. For those who love a richer pairing, mini cheesecake bites or a slice of moist pound cake provide a luxurious complement.
Even simple, classic mint chocolate chip cookies can offer a surprising and delightful flavor synergy. The cool mint cuts through the sweetness, creating a complex and satisfying flavor profile that will have everyone reaching for seconds.
Creative Serving Ideas
Move beyond the traditional bowl and cone with some imaginative serving ideas for your Orange Creamsicle Ice Cream. Create delightful ice cream sandwiches by layering scoops between crisp meringue cookies or soft, homemade sugar cookies.
Whip up refreshing orange creamsicle floats by combining the ice cream with sparkling orange soda or cream soda. This bubbly concoction is a fun, festive, and incredibly satisfying treat for a warm afternoon. You can also blend it into a thick, luscious milkshake for an on-the-go indulgence.
For a more sophisticated presentation, layer scoops of the ice cream with cubes of fresh orange segments and a drizzle of honey in clear glasses. This creates a beautiful, deconstructed dessert that highlights the fresh, vibrant flavors of the orange and cream, perfect for impressing guests at any gathering.
Preparation & Storage
Storing Leftovers
If you find yourself with any leftover homemade Orange Creamsicle Ice Cream, proper storage is essential to maintain its quality and deliciousness. Transfer any remaining ice cream to a freezer-safe, airtight container. It’s crucial that the container seals tightly to prevent air from entering, which can lead to freezer burn and alter the texture.
For an extra layer of protection against ice crystals, press a piece of plastic wrap directly onto the surface of the ice cream before sealing the container with its lid. This creates a barrier that minimizes direct contact with air, helping to preserve the creamy consistency of your treat for future enjoyment.
Stored correctly, your homemade ice cream can be enjoyed for up to one month from its initial preparation. While it remains safe to eat beyond this period, the texture and flavor may begin to degrade slightly, so it’s best enjoyed within this timeframe for optimal taste.
Freezing
The key to successful freezing of homemade ice cream lies in minimizing exposure to air and maintaining a consistent, low temperature. Once your Orange Creamsicle Ice Cream has been churned and transferred to its storage container, ensure it is sealed as tightly as possible.
The plastic wrap directly on the surface is highly recommended, as it significantly reduces the chances of freezer burn. This technique helps to keep the ice crystals small and evenly distributed, preserving the smooth, creamy texture that you worked hard to achieve during the churning process.
Place the container in the coldest part of your freezer, away from the door where temperatures fluctuate more frequently. Allowing it to freeze undisturbed for at least four to six hours will ensure it reaches a firm, scoopable consistency, ready to be savored.
Reheating
While you don’t “reheat” ice cream in the traditional sense, there’s a crucial step to ensure it’s perfectly ready to serve, especially if it has been frozen solid. If your Orange Creamsicle Ice Cream is too hard to scoop directly from the freezer, the “reheating” process simply involves a brief period of tempering at room temperature.
Remove the container from the freezer and let it sit on your countertop for approximately five to ten minutes. This short resting period allows the ice cream to soften just enough to become easily scoopable without melting into a liquid state. It’s a simple but vital step that transforms a rock-hard frozen block into a delightfully creamy dessert.
During this brief softening time, the ice crystals will relax slightly, contributing to a smoother, more pleasant mouthfeel when you take your first bite. This simple adjustment ensures you can enjoy your homemade ice cream at its absolute best, with the perfect texture every single time.
Frequently Asked Questions
-
What type of oranges should I use for the best flavor?
Absolutely! For the most vibrant and refreshing taste, opt for navel oranges. They are known for being sweet, juicy, and particularly well-suited for juicing, providing that essential bright citrus flavor. Avoid using overly ripe or bruised oranges, as these can sometimes impart a slightly bitter or off-flavor to your ice cream, detracting from the pure creamsicle essence.
-
How should I store my Orange Creamsicle Ice Cream?
I recommend storing your homemade ice cream in an airtight container, and to further prevent freezer burn, layer it with plastic wrap pressed directly onto the surface before sealing. This double protection helps maintain the creamy texture for longer. While it can last in the freezer for up to one month, it truly tastes best when consumed within the first two weeks for optimal flavor and texture.
-
Can I freeze any leftover Orange Creamsicle Ice Cream?
Yes, absolutely! If you have any remaining portions of this delightful ice cream, simply transfer it to a tightly sealed container suitable for freezing. To protect it even further from developing freezer burn, press a piece of plastic wrap directly onto the surface of the ice cream before putting the lid on. This simple step will help it stay fresh and delicious for about a month.
-
Why does my homemade ice cream have ice crystals?
Ice crystals often form due to exposure to air during the freezing process or improper freezing techniques. To avoid this, ensure the mixture is well-churned in your ice cream maker, as this incorporates air and creates a smoother base. When transferring to the freezer, always use an airtight container, and pressing plastic wrap directly onto the surface helps seal out air. If you are using the no-churn method, whipping the cream to stiff peaks before folding it in is crucial for a smoother texture and fewer ice crystals.
-
Is this Orange Creamsicle Ice Cream safe for people with dairy allergies?
I often get this question, and unfortunately, this specific recipe as written contains dairy ingredients, namely heavy whipping cream and whole milk. However, it is quite adaptable! You can easily make a dairy-free version by substituting the heavy cream with full-fat coconut cream and the whole milk with almond milk or another plant-based milk alternative. Just ensure any other flavorings or ingredients you add are also free from dairy and other allergens specific to your needs.
-
Can I make this Orange Creamsicle Ice Cream without an ice cream maker?
Absolutely! You can achieve a wonderfully creamy texture even without specialized equipment. For a no-churn version, prepare the base mixture as instructed. Then, pour it into ice cube trays and freeze overnight until solid. Once frozen, break up the frozen cubes and blend them until smooth and creamy in a food processor or a high-speed blender. This method requires a little more manual effort but yields a silky-smooth, delicious result that you can enjoy anytime.