Grilled Chicken Without Beer
Fast to prep and full of deep savory-sweet flavor, Grilled Chicken Without the Beer gives you the same upright-can cooking method with fragrant citrus, herbs, and wine instead of beer.
It is juicy, dependable, and ideal for oven roasting or low-and-slow smoking, offering a delightful alternative to traditional beer-can chicken that is both delicious and impressive.
Why You Will Love This Recipe
- Juicy and Tender: The upright cooking method allows heat to circulate evenly around the entire bird, resulting in exceptionally moist meat and crispy skin.
- Deep Flavor Profile: A carefully crafted rub featuring brown sugar, garlic, and poultry seasoning, combined with aromatic wine and citrus, creates a complex and satisfying taste.
- Versatile Cooking Options: This recipe is perfectly adaptable for both conventional ovens and smokers, giving you flexibility based on your equipment and desired flavor depth.
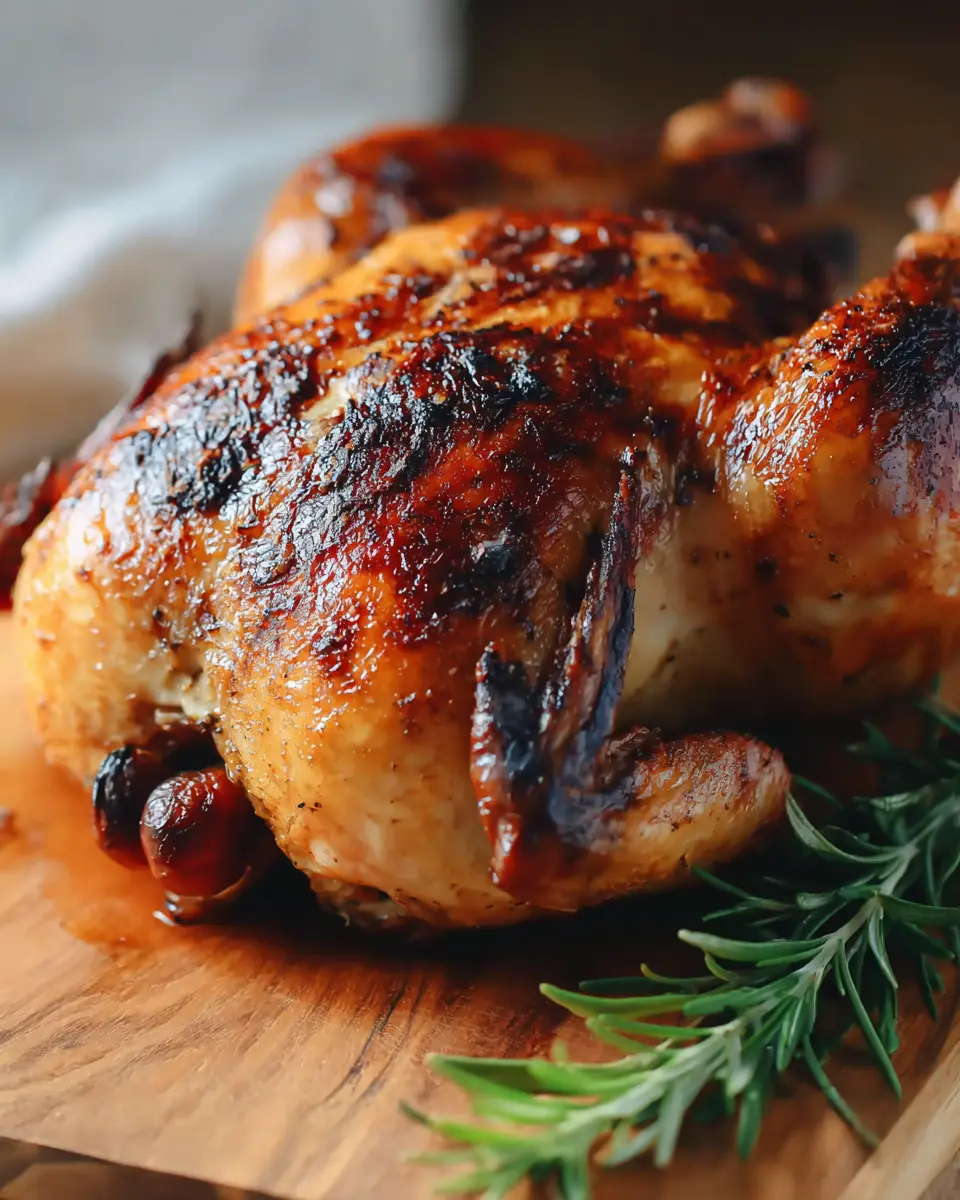
- Impressive Presentation: Serving a whole, beautifully roasted chicken is always a centerpiece-worthy dish that looks as good as it tastes.
- Easy Preparation: Despite its impressive results, the preparation is straightforward, making it accessible for cooks of all skill levels.
Ingredients You Need
The success of this grilled chicken hinges on the quality of your ingredients. Selecting a fresh, plump chicken and using fragrant aromatics will significantly enhance the final flavor profile.
Grilled Chicken Without the Beer

A whole roasting chicken is seasoned with a sweet-savory spice mixture, filled with fragrant aromatics, and cooked upright on a prepared soda can for deeply flavorful, tender meat. This method works in either a smoker or a conventional oven, with optional higher heat at the end for a darker, caramelized finish.
- 1/2 cup white wine
- 1 large shallot
- 1/4 cup lemon juice
- orange peel
- 2 sprigs fresh rosemary
- 1 large sprig fresh rosemary
- 1 cup packed brown sugar
- 3 tablespoons poultry seasoning blend
- 2 tablespoons black pepper
- 1/4 cup salt
- 3 tablespoons granulated garlic
- 1 large whole roasting chicken (about 6 pounds, fully thawed)
- olive oil (as needed)
- 1Combine the brown sugar, black pepper, granulated garlic, poultry seasoning blend, and salt in a bowl, mixing well to create the dry rub.
- 2Prepare a soda can, such as a La Croix can, for the upright cooking method. Using a funnel, pour in any remaining liquid along with the white wine, lemon juice, orange peel, rosemary, shallot, and any extra dry rub you do not want to waste. The aromatic combination may be adjusted to suit your preference.
- 3Once the chicken is fully thawed, rinse it inside and out, pat it thoroughly dry, and let it air dry briefly.
- 4Rub the chicken all over, inside and outside, with olive oil. Season the cavity generously with the spice mixture, then tuck rosemary beneath the skin. Coat the exterior thoroughly with the remaining rub and fold the wing tips underneath the bird.
- 5Carefully fit the chicken onto the prepared soda can. For easier handling and to prevent spills, position the bird close to the grill, smoker, or oven before setting it upright.
- 6Preheat your cooking equipment. For a smoker, maintain a low smoking temperature of about 225°F. For an oven, set the temperature to 350°F.
- 7Place the chicken upright in the smoker or oven. If using the oven, set a baking dish underneath to catch the drippings. In a smoker, allow the drippings to collect in a drip pan.
- 8Cook the chicken with minimal disturbance. In a smoker, check the color after 1 hour, then continue cooking for about 4 hours at the low smoke setting. In an oven, roast for 1 to 2 hours, or until the internal temperature reaches 165°F.
- 9For a more caramelized exterior, raise the heat to 400°F during the final 15 to 20 minutes of cooking, if desired.
- 10Once the chicken reaches the proper internal temperature, remove it from the smoker or oven and let it rest for about 10 minutes.
- 11Carefully lift the chicken off the can. If it begins to fall apart, that is completely fine.
- 12Serve hot. When cooked in the oven, the remaining liquid from the can may be used to prepare gravy. Cucumber salad and sweet potato fries make suitable accompaniments.
Keywords: Grilled Chicken Without the Beer, upright chicken, roasted chicken, oven chicken, smoker chicken, aromatic chicken
Quantities and specific measurements for each ingredient can be found within the detailed recipe card above.
Variations
While the provided recipe is superb, adventurous cooks can explore delightful variations to suit different palates and dietary needs.
For a vibrant, herb-forward twist, consider infusing the filling liquid with extra fresh dill and a touch of minced chives. These additions bring a delicate freshness that beautifully complements the savory notes of the chicken, offering a lighter yet equally flavorful experience.
A low-carb option can be achieved by omitting the brown sugar from the rub and increasing the savory spices. You could also introduce a bit of smoked paprika for a deeper, smoky essence without the sweetness, ensuring a rich taste that still adheres to a lower carbohydrate intake.
For a spicier kick, experiment with adding a pinch of cayenne pepper or red pepper flakes to the dry rub. A few finely diced jalapeños or a dash of hot sauce added to the liquid within the can can also transform this dish into a fiery delight for those who love a little heat.
How to Prepare Grilled Chicken Without the Beer
Step 1: Crafting the Perfect Dry Rub
Begin by meticulously combining the components for your dry rub in a medium-sized mixing bowl. Ensure you use a whisk or fork to break up any clumps, especially within the brown sugar, to achieve a smooth, uniform texture.
This blend of brown sugar, salt, black pepper, granulated garlic, and poultry seasoning is designed to create a sweet yet savory crust that caramelizes beautifully during cooking. The balanced proportions are key to ensuring that no single flavor overpowers the others.
Take your time to stir until all the spices are evenly distributed; this thorough mixing guarantees consistent flavor distribution across the entire surface of the chicken.
Step 2: Preparing the Aromatic Infusion
In a separate, smaller container, such as a sturdy glass or a small pitcher, assemble the ingredients that will create the fragrant steam inside the chicken. This step is crucial for infusing the meat with moisture and complementary aromas from the inside out.
Pour in the white wine, which will provide a delicate liquid base and a subtle, sophisticated flavor. Add the freshly squeezed lemon juice for a bright, zesty counterpoint to the richness of the chicken and the sweetness of the rub.
Next, incorporate the orange peel, finely minced shallot, and fresh rosemary sprigs. These aromatics will gently steam as the chicken cooks, perfuming the meat with classic, comforting flavors that are both refreshing and deeply savory.
Step 3: Seasoning the Chicken with Precision
Before applying any rubs or aromatics, it is absolutely vital to ensure the chicken is completely dry, both inside and out. Use paper towels to pat it thoroughly, then allow it to air dry for at least 15-20 minutes, or even longer in a cool place. This step is paramount for achieving crispy skin and helping the rub adhere effectively.
Once dry, generously coat the entire exterior of the chicken with olive oil. The oil acts as a binder for the dry rub and promotes even browning. Season the cavity first with a portion of your spice mixture. Then, carefully loosen the skin over the breast and thighs using your fingers and tuck some of the fresh rosemary sprigs underneath; this allows the herb’s flavor to penetrate directly into the meat.
Finally, coat the outside of the chicken liberally with the remaining dry rub, making sure every inch of the skin is covered. The goal is a thick, even layer that will transform into a delicious crust during cooking, ensuring flavor in every bite and a visually appealing presentation.
Step 4: Setting Up for Upright Cooking
Prepare your chosen vessel for upright cooking by carefully placing it into the chicken’s cavity. For this recipe, a cleaned, empty soda can serves as the primary support. Ensure the can is sturdy and free of any sharp edges.
The liquid mixture you prepared in Step 2 should now be carefully poured into the can. This liquid will slowly heat and vaporize as the chicken cooks, infusing the meat with its fragrant aroma and moisture. This is the core of what replaces the beer in this recipe, delivering a sophisticated flavor.
Carefully position the seasoned chicken onto the prepared can, ensuring it stands upright and is stable. Gently tuck the wing tips underneath the body of the chicken; this prevents them from burning prematurely and helps the chicken maintain a more compact shape during cooking.
Step 5: The Cooking Process: Oven or Smoker
Preheat your cooking apparatus to the recommended temperature. For oven roasting, aim for a consistent 350°F (175°C). If you are using a smoker, a temperature of around 225°F (107°C) is ideal for a low-and-slow cook that develops deep flavor and tender meat.
Place a sturdy pan or baking dish beneath the chicken to catch any drippings. This not only makes cleanup significantly easier but also captures flavorful juices that can be used for making a sauce or gravy later. Ensure the pan is large enough to accommodate the potential flow of fats and liquids.
Carefully place the upright chicken into the preheated oven or smoker. Resist the urge to open the oven or smoker door frequently, as this can disrupt the cooking temperature and extend the overall cooking time. Allow the chicken to cook undisturbed for the majority of the cooking period.
Step 6: Achieving Perfection and Resting
The chicken is considered fully cooked when an instant-read thermometer inserted into the thickest part of the thigh (without touching the bone) registers 165°F (74°C). This temperature ensures the chicken is safely cooked and wonderfully juicy.
If you desire a darker, more caramelized exterior, you can increase the oven temperature to around 400°F (200°C) for the final 15-20 minutes of cooking. This final blast of heat will intensify the color of the rub and create a beautifully crispier skin without overcooking the meat.
Once the chicken reaches the target temperature, carefully remove it from the oven or smoker. Let it rest, uncovered, on a clean cutting board or a warm platter for at least 10-15 minutes. This resting period is crucial as it allows the juices to redistribute throughout the meat, ensuring maximum tenderness and flavor with every slice.
Pro Tips for Grilled Chicken Without the Beer
Achieving Crispy Skin: The secret to perfectly crispy skin lies in thorough drying and a good coating of oil. Don’t skimp on patting the chicken dry; moisture is the enemy of crispiness.
Even Rub Distribution: Ensure the dry rub is applied evenly across the entire surface of the chicken, including the legs and wings. This guarantees consistent flavor and a beautiful, golden-brown finish.
Temperature Monitoring: Always use a reliable meat thermometer. It’s the most accurate way to determine doneness and prevent over or undercooking, ensuring a perfectly cooked bird every time.
Resting is Essential: Allowing the chicken to rest after cooking is non-negotiable. This vital step allows the juices to settle back into the meat, resulting in a more moist and flavorful final product.
Utilize Drippings: Collect the flavorful drippings from the pan underneath the chicken. These can form the base for an exceptional pan sauce or gravy, adding another layer of deliciousness to your meal.
Serving Suggestions for Grilled Chicken Without the Beer
Decoration
Enhance the visual appeal of your grilled chicken by garnishing the platter with fresh herbs. Sprigs of rosemary, thyme, or parsley add a pop of color and a fresh aroma that complements the roasted flavors.
Consider arranging colorful, complementary vegetables around the chicken, such as roasted cherry tomatoes, blanched asparagus, or vibrant bell pepper strips. These add visual interest and a fresh counterpoint to the rich chicken.
A sprinkle of toasted sesame seeds or flaky sea salt over the carved meat just before serving can provide a subtle textural contrast and an extra touch of elegance.
Side Dishes
A crisp, refreshing cucumber and dill salad makes an excellent accompaniment, its coolness cutting through the richness of the chicken beautifully. The dill ties in nicely with the herbs used in the chicken’s preparation, creating a harmonious flavor profile.
Sweet potato fries are another fantastic pairing, their natural sweetness echoing the brown sugar in the rub and offering a satisfying textural contrast. The earthy sweetness of the potatoes complements the savory notes of the chicken perfectly.
For a heartier meal, consider serving the chicken with a side of creamy mashed potatoes or a flavorful wild rice pilaf. These classic sides provide a comforting base and absorb any extra juices from the chicken.
Creative Serving Ideas
Carve the chicken and serve it family-style on a large platter, allowing everyone to help themselves. This fosters a warm, communal dining experience and lets guests appreciate the golden-brown skin and juicy meat.
For a more elegant presentation, carefully slice the breast meat and arrange it fanned out on individual plates. Drizzle with any accumulated pan juices or a simple lemon-herb vinaigrette for a restaurant-quality look.
Leftover chicken is incredibly versatile. Shred or dice it and use it in sandwiches, wraps, or vibrant salads for delicious second-day meals that are just as satisfying as the original.
Preparation & Storage
Storing Leftovers
Once the chicken has cooled completely, store any leftovers in an airtight container in the refrigerator. It is best to store the chicken whole or in larger pieces to help it retain moisture.
Leftovers will remain fresh and safe to eat for up to 3 to 4 days when stored properly. Ensure the container is well-sealed to prevent the chicken from drying out.
If you plan to use the leftovers in dishes that require shredded or diced chicken, it is easier to carve or pull the meat apart after it has been refrigerated and is slightly chilled.
Freezing
For longer-term storage, cooked chicken can be frozen. It is recommended to carve or shred the chicken before freezing, as this makes it easier to thaw and use in smaller portions later.
Wrap the chicken portions tightly in plastic wrap or aluminum foil, then place them inside a freezer-safe bag or container. This double layer of protection helps prevent freezer burn and maintains the quality of the meat.
Frozen chicken will retain its best quality for up to 3 months. Beyond this period, it is still safe to consume, but the texture and flavor may begin to degrade.
Reheating
To reheat leftover chicken while keeping it moist, place the pieces in a baking dish with a small amount of liquid, such as chicken broth or water. Cover the dish tightly with foil and warm it in a preheated oven at a low temperature, around 300-325°F (150-160°C), until heated through.
Alternatively, you can reheat individual portions in the microwave. Use short intervals of 30-60 seconds, stirring or turning the chicken between intervals, to ensure even heating and prevent it from drying out or becoming rubbery.
If you are reheating to achieve crispy skin again, a few minutes under a broiler or in a very hot oven (around 400°F/200°C) after initial warming can help crisp it up, but be vigilant to avoid burning.
Frequently Asked Questions
-
Can I substitute the white wine with something else if I don’t have it or prefer not to use alcohol?
Absolutely! If you prefer to avoid alcohol or simply don’t have white wine on hand, you can easily substitute it with chicken broth or an equal amount of additional lemon juice mixed with a little water. Some people also use white grape juice for a touch of sweetness without fermentation, though this will alter the flavor profile slightly. The goal is to provide a flavorful liquid base that will steam and infuse the chicken.
-
What is the best way to ensure the chicken skin gets extra crispy, especially if I’m not using a smoker?
Achieving supremely crispy chicken skin in an oven primarily relies on two factors: dryness and heat. Ensure the chicken is meticulously dried with paper towels and allowed to air dry for as long as possible before applying oil and rub. During the cooking process, consider increasing the oven temperature significantly for the last 15-20 minutes of cooking, as outlined in the recipe, to achieve that desirable golden-brown crispness. Some cooks also find that basting with the rendered fat in the pan towards the end of cooking can contribute to crispier skin.
-
How can I adapt this recipe for smaller cuts of chicken, like breasts or thighs, instead of a whole bird?
You can definitely adapt this recipe for chicken pieces, though the cooking times and method will need adjustment. For chicken breasts or thighs, you’d skip the can method and likely bake or grill them directly after applying the rub and oil. Marinating the pieces in a mixture similar to the aromatic liquid used for the whole bird could infuse them with flavor. Cooking times will be considerably shorter; chicken breasts might take 20-30 minutes at 400°F (200°C), and thighs a bit longer, around 35-45 minutes, depending on their size and the cooking temperature. Always ensure internal temperatures reach a safe 165°F (74°C).