Garlic Butter Pan Seared Pork Chops – Amazing Weeknight Delight

Garlic Butter Pan Seared Pork Chops represent the ultimate intersection of culinary simplicity and gourmet indulgence. This classic dish creates a succulent, restaurant-quality center-of-the-plate experience that fits perfectly into even the busiest dinner schedules.
The secret lies in the golden, caramelized crust paired with a luxurious bath of aromatic garlic butter. Whether you are a novice cook or a seasoned kitchen pro, this recipe guarantees a tender result that will leave your family asking for seconds. You can easily navigate more ideas for your next lunch or breakfast planning on our site.
Why You Will Love This Recipe
- Quick Preparation: You can have a complete, high-protein meal ready for your family in under 20 minutes from start to finish.
- Flavor Packed: The infusion of fresh garlic and rich butter creates a savory depth that turns a basic cut of meat into a masterpiece.
- One-Pan Wonder: Cleanup is remarkably efficient since the entire searing and basting process occurs in a single skillet.
- Versatile Pairing: These chops are incredibly adaptable, working harmoniously with everything from crisp seasonal vegetables to hearty grains.
- Customizable Seasoning: You have the creative freedom to adjust heat levels with chili flakes or aromatic profiles with dried herbs to suit your specific cravings.
Ingredients You Need
Success in the kitchen always begins with high-quality ingredients, especially when preparing simple pan-seared dishes where every component counts. For the best flavor, choose pork chops with a bit of marbling and ensure your garlic is fresh rather than jarred. Exact measurements for these ingredients can be found in our comprehensive recipe card at the bottom of the page.
Garlic Butter Pan Seared Pork Chops
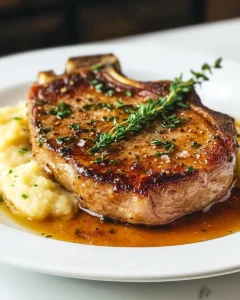
Garlic Butter Pan Seared Pork Chops are the perfect blend of simplicity and flavor. This dish offers a delightful crispy crust while keeping the pork chops juicy and tender. In under 30 minutes, you can serve a restaurant-quality meal.
- 2 pork chops (bone-in or boneless, about 1 inch thick)
- 3 cloves garlic (minced)
- 2 tbsp unsalted butter
- 1 tbsp olive oil
- Salt and pepper (to taste)
- 1 tsp smoked paprika (optional)
- Fresh herbs for garnish (optional)
- 1Pat the pork chops dry, then season both sides with salt, pepper, and smoked paprika if using.
- 2Heat olive oil in a skillet over medium-high heat until shimmering.
- 3Sear the pork chops for 4-5 minutes on each side until golden brown.
- 4Lower the heat to medium-low; add butter and minced garlic to the skillet.
- 5Baste the chops with the melted butter for an additional 2-3 minutes.
- 6Remove from heat, let rest briefly, and garnish with fresh herbs before serving.
Keywords: pork chops, garlic butter, dinner, quick meal, pan seared
- pork chops: bone-in or boneless, ideally one inch thick for optimal searing.
- garlic: fresh cloves, finely minced to release maximum aromatic oils.
- unsalted butter: high-quality dairy butter for the perfect basting consistency.
- olive oil: a light cooking oil to help achieve a high-heat sear without burning.
- salt and pepper: essential seasonings to enhance the natural profile of the pork.
- smoked paprika: an optional addition that provides a subtle, woody depth of color.
- fresh herbs: sprigs of parsley or thyme for a bright, professional finish.
Variations
The Vegan Twist: While pork is the star here, you can substitute the protein with thick-cut cauliflower steaks or firm tofu medallions. Use a high-quality vegan butter substitute and ensure your garlic is sautéed until just golden to avoid bitterness.
The Low Carb Approach: This recipe is naturally very friendly for keto and low-carb lifestyles. Skip any starchy sides and pair these chops with sauteed spinach or zucchini noodles tossed in the remaining garlic butter from the pan.
The Herb-Infused Variation: If you enjoy complex botanical flavors, introduce fresh rosemary or sage during the butter-basting stage. For a slightly spicy kick, incorporate a teaspoon of crushed red pepper flakes into your initial seasoning rub.
How to Prepare Garlic Butter Pan Seared Pork Chops
Step 1: Preparing the Meat for the Perfect Sear
Moisture Control: The most critical step for achieving a restaurant-style sear is removing excess surface moisture. Use clean paper towels to pat the pork chops completely dry before adding any seasoning.
Seasoning Strategy: Once the meat is dry, coat both sides evenly with kosher salt and freshly cracked black pepper. If you are using smoked paprika, massage it gently into the meat to ensure the flavor penetrates the outer layer.
Temperature Matters: Allow your seasoned pork to sit at room temperature for about 15 minutes before cooking. This simple step ensures the protein cooks evenly from the center out, preventing the dreaded cold-center effect.
Step 2: Heating the Skillet Properly
Choosing the Vessel: A heavy-bottomed cast iron skillet is the gold standard for this recipe because it holds heat exceptionally well. If you do not have cast iron, a stainless steel pan also works perfectly for developing a deep brown crust.
The Oil Phase: Add your olive oil to the pan over medium-high heat. Wait patiently for the oil to shimmer; this indicates that it has reached the ideal temperature for searing without reaching the smoke point.
Testing the Pan: A quick way to check if your pan is ready is to flick a single drop of water into the skillet. If it dances and evaporates instantly, you are ready to begin the searing process.
Step 3: Achieving the Golden Sear
Gentle Placement: Carefully place your seasoned chops into the hot skillet, ensuring they are not touching one another. Overcrowding the pan can drop the temperature rapidly, causing the meat to steam rather than sear.
The Patience Factor: Let the pork cook undisturbed for 4 to 5 minutes on the first side. This duration allows the Maillard reaction to occur, resulting in that deep, mahogany-colored crust that locks in juices.
Flipping Technique: Use your kitchen tongs to flip the chops once the edges look beautifully browned. Cook for another 4 minutes on the second side, adjusting slightly based on the thickness of your specific cuts.
Step 4: The Garlic Butter Baste
Lowering the Flame: Reduce your heat to medium-low immediately after flipping to prevent your aromatics from scorching. Add the unsalted butter and minced garlic into the empty spaces of the pan.
Basting Magic: Tilt your pan slightly so that the melting butter pools at the bottom with the garlic. Use a large metal spoon to repeatedly pour this foaming, garlic-infused liquid over the pork chops.
Deep Flavor Infusion: Basting for the final 2 to 3 minutes allows the garlic flavor to seep into the meat. The bubbling butter acts as a flavor conductor, ensuring every bite is rich, nutty, and savory.
Step 5: Resting and Serving
The Crucial Wait: Remove the skillet from the heat and transfer the pork chops to a clean cutting board or warm plate. Let the meat rest for at least 5 minutes before serving or slicing into it.
Retaining Juices: Resting allows the muscle fibers to relax and reabsorb the flavorful juices. If you cut into the pork too early, those precious liquids will run out, leaving your meat dry and unappealing.
Final Presentation: Garnish your chops with freshly chopped parsley or thyme just before bringing them to the table. For a truly elegant presentation, pour a small amount of the remaining garlic butter from the pan over the resting meat.
Pro Tips for Garlic Butter Pan Seared Pork Chops
Use a Meat Thermometer: The most reliable way to guarantee juicy pork is to monitor the internal temperature. Aim for 145°F (63°C), which is the sweet spot for tenderness according to modern food safety guidelines.
Don’t Rush the Sear: If you find the meat is sticking to the pan, it usually means the sear is not finished yet. Let the meat form its natural crust, as it will release easily from the pan once the searing process is complete.
Quality of Ingredients: Freshly minced garlic is significantly more potent and fragrant than pre-minced or jarred versions. Taking the extra minute to mince your own cloves will drastically improve the final flavor profile of your sauce.
Cooking in Batches: If you are serving a larger group, resist the urge to squeeze extra chops into the pan. Cooking in batches ensures every single piece of meat receives direct heat for a consistent, professional sear.
Serving Suggestions for Garlic Butter Pan Seared Pork Chops
Decoration
A sprinkle of vibrant green herbs provides a beautiful contrast to the deep golden-brown crust of the pork. For a touch of acidity that cuts through the rich butter, consider a light squeeze of fresh lemon juice just before serving. This brightens the heavy, savory notes of the garlic and butter perfectly.
Side Dishes
Because the pork is so rich, pairing it with something slightly earthy or acidic creates a balanced plate. You might consider serving these chops alongside baked lemon chicken sides or perhaps something more indulgent like classic mashed potatoes. If you prefer a lighter route, roasted asparagus or steamed broccoli works wonderfully to soak up any excess butter sauce.
Creative Serving Ideas
If you have leftovers, you can thinly slice the pork and serve it over a crisp salad or turn it into an elevated sandwich. For a decadent brunch idea, try pairing these chops with a side of german pancake recipe creations. You can find more inspiration by checking out our Pinterest page for visual plating techniques.
Preparation & Storage
Storing Leftovers
If you find yourself with leftovers, allow the pork to cool completely before placing it in an airtight container. It will keep in the refrigerator for up to 3 days. To maintain moisture, you can add a small splash of broth to the container to prevent the meat from drying out during storage.
Freezing
For longer-term storage, wrap each individual chop tightly in plastic wrap followed by a layer of heavy-duty aluminum foil. Place these wrapped portions into a freezer-safe zip-top bag to prevent freezer burn. They can be safely stored in the freezer for up to 3 months.
Reheating
The best way to reheat is in the oven at 350°F (175°C) with a tablespoon of water or broth added to the pan to steam the meat slightly. If you must use a microwave, use the lowest power setting to prevent the proteins from toughening. For the best texture, a quick reheat in a hot skillet with a tiny dab of butter is always the superior method.
Frequently Asked Questions
- How do I prevent the pork from becoming dry?
The primary reason for dry pork is overcooking, which is why using a meat thermometer is non-negotiable for success. By pulling the chops off the heat at 145°F and allowing them to rest, you lock in the juices that would otherwise evaporate during the cooking process. - Can I use a different type of fat for the searing process?
While olive oil is recommended for its high smoke point, avocado oil or even clarified butter (ghee) are excellent alternatives. Avoid using butter for the initial sear, as the milk solids will burn rapidly at the high temperatures required to build a crust. - Are bone-in or boneless chops better for this recipe?
Bone-in chops generally offer more flavor and retain moisture better during the high-heat searing process. However, boneless chops are more convenient to eat and cook slightly faster, so choose based on your preference for convenience versus deep, bone-enhanced flavor.