Easy Garlic Butter Oven Baked Tilapia – Quick & Delicious!
Discover the simple elegance of Garlic Butter Oven Baked Tilapia, a dish that proves healthy eating can be incredibly flavorful and remarkably quick to prepare. This recipe is designed to bring a touch of gourmet simplicity to your weeknight dinners, using readily available ingredients and straightforward techniques.
Imagine a flaky, tender piece of tilapia, bathed in a rich garlic butter sauce with a bright hint of lemon, all coming together with minimal effort. It’s the perfect solution when you’re craving something delicious but short on time, offering a satisfying meal without the fuss.
Why You Will Love This Recipe
- Effortless Preparation: This recipe is incredibly straightforward, requiring minimal chopping and just a few minutes of active cooking time.
- Quick Cooking Time: From preheating the oven to serving, this delicious meal is ready in under 30 minutes, perfect for busy evenings.
- Healthy & Wholesome: Tilapia is a lean protein source, and the simple butter-garlic-lemon sauce keeps this dish light and nutritious.
- Minimal Cleanup: Often, this entire dish can be prepared and cooked in a single baking dish, making cleanup a breeze.
- Adaptable Flavor: While delicious as is, the simple flavor profile lends itself well to adding other herbs or spices if you wish to customize it.
Ingredients You Need
The beauty of this Garlic Butter Oven Baked Tilapia lies in its simplicity, relying on high-quality, fresh ingredients to shine. We recommend using good quality tilapia fillets, whether fresh or properly frozen, as they form the tender base of this dish. Opt for fresh garlic and vibrant lemons for the most impactful flavor infusion in the butter sauce. The quality of your butter will also play a role in the richness of the sauce, so choose a good unsalted variety.
Garlic Butter Oven Baked Tilapia

Light, nutritious tilapia fillets are seasoned with garlic, butter, and lemon and baked to perfection. This easy recipe comes together in under 20 minutes and is perfect for a weeknight dinner.
- 4 tilapia fillets
- Salt and freshly ground black pepper, to taste
- 4 tablespoons butter, melted
- 4 cloves garlic, minced
- 2 tablespoons lemon juice
- 1 lemon, sliced into rounds, for garnish
- Red pepper flakes, for garnish
- Chopped fresh parsley, for garnish
- Lemon slices, for garnish
- 1Preheat oven to 400°F.
- 2Season tilapia with salt, pepper, paprika, thyme, and oregano; arrange fish in a 9x13 baking dish.
- 3In a mixing bowl, whisk together melted butter, garlic, lemon juice, and lemon zest; pour over tilapia.
- 4Bake tilapia for 10 to 12 minutes, or until fish flakes and is fork-tender.
- 5Garnish with pepper flakes, parsley, and lemon slices. Serve.
Keywords: tilapia, baked fish, garlic butter, lemon, oven baked, seafood, dinner, quick, easy, low carb, gluten free, keto
- tilapia fillets: four medium-sized fillets are the perfect foundation for this dish, providing a lean and flaky protein.
- salt and pepper: essential for enhancing the natural flavors of the fish and the aromatic sauce.
- paprika: a touch of mild paprika adds a beautiful color and subtle depth to the seasoning blend.
- dried thyme: offers a classic herbaceous note that pairs wonderfully with fish and garlic.
- dried oregano: complements the thyme with its slightly peppery and earthy undertones.
- butter: four tablespoons of unsalted butter, melted, create the luscious sauce that coats the tilapia.
- fresh garlic: four cloves, minced, are crucial for infusing the butter with its characteristic pungent aroma and flavor.
- fresh lemon juice: two tablespoons of juice provide a bright, zesty counterpoint to the richness of the butter and garlic.
- lemon zest: a quarter teaspoon of zest amplifies the lemon’s aromatic qualities, adding another layer of citrus fragrance.
- lemon slices: for garnish, adding a visual appeal and a hint of fresh citrus aroma.
- red pepper flakes: for garnish, offering a pop of color and a subtle warmth for those who enjoy a little heat.
- chopped fresh parsley: for garnish, bringing a fresh, vibrant green and a delicate herbal finish.
Specific quantities for these ingredients are readily available within the detailed recipe card, ensuring you have everything you need for perfect execution.
Variations
While this Garlic Butter Oven Baked Tilapia is a classic for a reason, exploring variations can introduce exciting new dimensions to this simple yet satisfying dish. Think about how different flavor profiles can elevate the tender tilapia and complement the garlic butter base.
For a delightful vegetarian twist, consider replacing the tilapia with thick slices of firm tofu or large portobello mushroom caps. Marinate these in a similar garlic-lemon-herb mixture, adjusting the baking time as needed to ensure they are perfectly cooked and tender. This approach maintains the core flavor concept while making the dish suitable for a wider audience, offering a robust and flavorful meat-free option that’s surprisingly hearty.
If you’re aiming for a low-carbohydrate or ketogenic approach, this recipe is already a fantastic starting point. You can further enhance its keto-friendliness by ensuring your side dishes are also low in carbs, such as cauliflower rice, sautéed spinach with garlic, or a fresh green salad with an olive oil vinaigrette. Adding a sprinkle of nutritional yeast to the garlic butter mixture can also impart a cheesy flavor without dairy if desired, further diversifying the taste profile.
Another creative avenue is to introduce international flair. Consider adding a dash of soy sauce or tamari to the butter mixture for an umami boost, perhaps with a hint of ginger for an Asian-inspired take. Alternatively, incorporate some sundried tomatoes and a sprinkle of Parmesan cheese (if not strictly dairy-free) in the last few minutes of baking for a Mediterranean-inspired variation that offers a delightful tang and richness.
How to Prepare Garlic Butter Oven Baked Tilapia
Step 1: Preparing the Tilapia Fillets
Begin by preheating your oven to a consistent 400°F (200°C). This initial step is crucial for ensuring the tilapia cooks evenly and develops a beautiful, flaky texture. Take your four medium-sized tilapia fillets and gently pat them dry with paper towels. This simple action helps to remove excess moisture, which will allow the seasonings to adhere better and the fish to achieve a more desirable texture during baking.
Next, arrange the dried tilapia fillets in a single layer within a 9×13 inch baking dish. It’s important that they have a little space around them; overcrowding can lead to steaming rather than baking, affecting the final outcome. Season each fillet generously on both sides with salt and freshly ground black pepper. These foundational seasonings are vital for bringing out the natural flavors of the fish and balancing the richness of the sauce.
Now, it’s time to build the flavor base by creating the garlic butter mixture. In a separate small mixing bowl, combine the melted butter, minced fresh garlic, fresh lemon juice, and lemon zest. Whisk these ingredients together thoroughly until they are well emulsified. The aroma at this stage will already be wonderfully inviting, a testament to the simplicity and potency of these core ingredients.
Step 2: Seasoning and Arranging the Fish
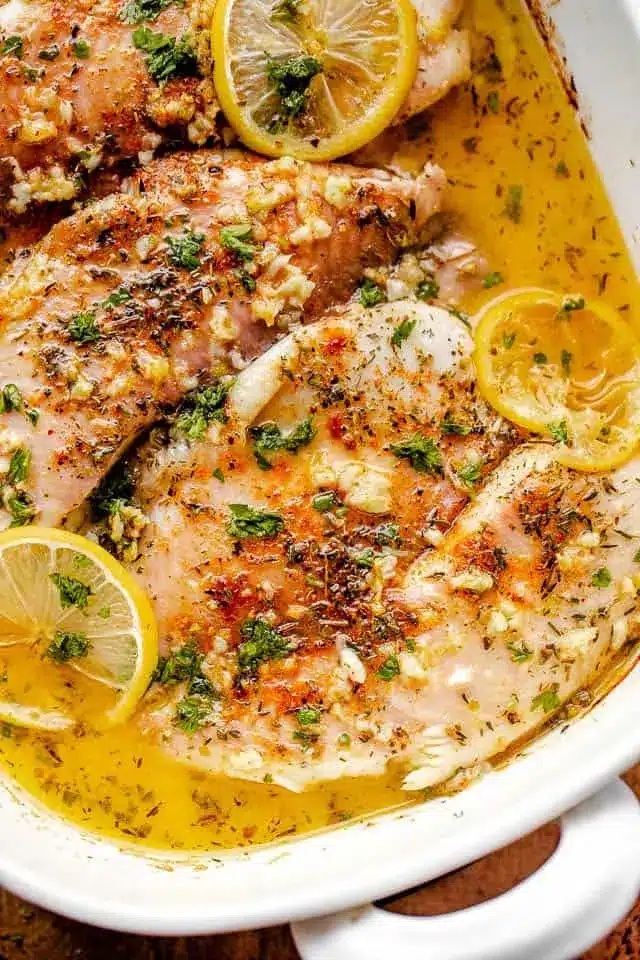
With the tilapia fillets neatly arranged in your baking dish, it’s time to apply the dry seasonings. Sprinkle the paprika, dried thyme, and dried oregano evenly over the surface of each tilapia fillet. Ensure a light and even distribution to impart a balanced flavor and a visually appealing hue to the fish. The paprika will contribute a gentle warmth and a lovely reddish-orange tint, while the herbs will introduce aromatic complexity.
After seasoning, carefully pour the prepared garlic butter mixture over the top of the tilapia fillets. Make sure to get an even coating across all the pieces, allowing the liquid to seep down the sides and pool slightly at the bottom of the dish. This basting action is key to infusing the fish with the rich, savory garlic and bright lemon flavors. The butter will melt further in the oven, creating a delicious sauce that the fish will cook in.
Once the fish is seasoned and sauced, it’s ready for its time in the oven. Ensure your oven is fully preheated to the specified 400°F (200°C). Place the baking dish on the center rack of the oven. This central placement guarantees uniform heat distribution, which is essential for achieving perfectly cooked fish. The initial preparation is now complete, paving the way for the transformation that heat will bring.
Step 3: Baking the Tilapia
Place the baking dish containing the seasoned and sauced tilapia fillets into the preheated oven. Set a timer for approximately 10 minutes. It’s important to start checking for doneness around this time, as ovens can vary in temperature and tilapia fillets can differ slightly in thickness.
During the baking process, the garlic butter sauce will bubble and begin to caramelize slightly around the edges of the fillets. This creates wonderfully concentrated pockets of flavor. The fish will start to turn opaque, a visual cue that it is cooking through. Keep a close eye on it to prevent overcooking, which can result in dry, less palatable fish.
After 10 minutes, gently open the oven and check the tilapia. The fish is perfectly cooked when it flakes easily with a fork, indicating that the proteins have firmed up and separated nicely. If the thickest part of a fillet is still translucent or does not flake readily, return it to the oven for another 2-4 minutes, checking frequently. The goal is fork-tender, not dry and crumbly, so precise timing is key.
Step 4: Achieving Perfect Flakiness and Tenderness
The indicator of perfectly baked tilapia is its texture. When a fork is inserted into the thickest part of a fillet and gently twisted, the fish should separate into distinct, flaky layers. This signifies that the protein has reached its optimal cooked state without becoming tough or dry. This is the true measure of success for this simple preparation method.
If you are using a meat thermometer for precision, the internal temperature of the tilapia should read 145°F (63°C) when inserted into the thickest part of the fillet. This temperature ensures that the fish is safely cooked and at its most palatable. However, for delicate fish like tilapia, visual and textural cues are often just as reliable and can prevent overcooking that a thermometer might miss if left in too long.
Should the fish appear to be cooking too quickly on the top surface before it’s fully cooked through, you can loosely tent the baking dish with aluminum foil for the remaining baking time. This will shield the top from direct heat and allow the interior to finish cooking gently. Remember that the residual heat will continue to cook the fish for a few minutes even after it’s removed from the oven.
Step 5: Garnishing for Presentation and Flavor
Once the tilapia is perfectly cooked and flaky, carefully remove the baking dish from the oven. The aroma filling your kitchen at this point will be incredibly enticing, a fragrant blend of garlic, lemon, and butter. Allow the fish to rest in the dish for a minute or two before garnishing; this allows the juices to redistribute slightly.
Now, it’s time to add the final touches that enhance both the appearance and taste of the dish. Sprinkle a pinch of red pepper flakes over the fillets for a hint of color and a subtle kick of heat that complements the richness of the garlic butter. This addition is entirely optional, but it adds a delightful complexity for those who enjoy a touch of spice.
Finally, garnish generously with fresh chopped parsley and artfully arrange the lemon slices around the fillets. The vibrant green of the parsley adds a beautiful contrast to the golden fish, while the fresh lemon slices not only look appealing but also offer a visual promise of the bright flavors within. Serve immediately to enjoy the tilapia at its absolute best, hot and bursting with flavor.
Step 6: Serving the Culinary Masterpiece
Your Garlic Butter Oven Baked Tilapia is now ready to be presented and savored. The flaky, tender fish, bathed in its glistening garlic butter sauce, is a testament to how simple ingredients can create something truly special. Each bite offers a harmonious blend of savory, zesty, and aromatic notes that are incredibly satisfying.
Serve the tilapia fillets directly from the baking dish, spooning some of the delicious pan sauce over each portion. This sauce is packed with flavor and is an integral part of the dish’s appeal, so don’t skimp on it. The presentation with the fresh garnishes makes it suitable for both casual family dinners and more elegant gatherings.
This dish pairs beautifully with a variety of sides, creating a complete and balanced meal. The light and flavorful nature of the tilapia means it can be served alongside heavier starches or lighter vegetable preparations, offering incredible versatility for any occasion. Enjoy the delightful experience of this wonderfully simple yet profoundly delicious baked fish.
Pro Tips for Garlic Butter Oven Baked Tilapia
Use Fresh Garlic: While pre-minced garlic or garlic powder can be used in a pinch, fresh garlic cloves, finely minced, offer a far superior aroma and flavor intensity. The difference is truly remarkable and worth the small extra effort.
Don’t Overcrowd the Pan: Ensure your tilapia fillets have adequate space between them in the baking dish. Overcrowding can lead to steaming, which will prevent the fish from achieving that lovely flaky texture and can result in a watery sauce. Give each fillet room to breathe and bake properly.
Watch Closely for Doneness: Tilapia cooks very quickly, and overcooking is the most common pitfall. Start checking for flakiness and tenderness around the 10-minute mark. The fish should easily pull apart with a fork but still be moist. It’s better to slightly undercook and return to the oven for a minute or two than to overcook and have dry fish.
Adjust Lemon to Your Taste: The lemon juice and zest are crucial for balancing the richness of the butter and garlic. If you are a big fan of citrus, feel free to increase the amount of lemon juice or zest slightly. Conversely, if you prefer a milder lemon flavor, you can reduce it a bit.
Consider the Thickness of Fillets: The baking time will vary depending on the thickness of your tilapia fillets. Thinner fillets will cook faster, while thicker ones may require a few extra minutes. Always rely on the visual cues of flakiness and the fork-tender test rather than strictly adhering to the timer.
Serving Suggestions for Garlic Butter Oven Baked Tilapia
Decoration
Enhance the visual appeal of your Garlic Butter Oven Baked Tilapia with thoughtful garnishes. A sprinkle of vibrant chopped fresh parsley adds a pop of color and a hint of herbaceous freshness. Thinly sliced lemon rounds, fanned out artfully around the fish or placed directly on top, not only look appealing but also release a subtle, inviting citrus aroma as the dish rests. For those who enjoy a touch of heat, a delicate scattering of red pepper flakes provides a visually striking contrast and a promise of subtle warmth.
Side Dishes
This delightful tilapia dish pairs wonderfully with a variety of accompaniments to create a complete and satisfying meal. Consider serving it alongside a generous portion of Crispy Parmesan Smashed Potatoes or simple steamed asparagus for a classic combination. A light and refreshing green salad tossed with a vinaigrette offers a crisp counterpoint to the richness of the garlic butter sauce. For a grain-inclusive option, fluffy rice or quinoa are excellent choices that absorb the delicious pan juices beautifully.
Creative Serving Ideas
Elevate your tilapia presentation with creative serving ideas that suit any occasion. For an impressive individual presentation, plate each fillet with its accompanying sauce and a selection of carefully chosen sides. You could also create a stunning buffet-style presentation by arranging the fillets on a large platter, drizzled with extra sauce and garnished generously. Another delightful approach is to serve the tilapia as part of a larger seafood dinner, perhaps alongside grilled shrimp or baked salmon for a seafood feast.
Preparation & Storage
Storing Leftovers
To store any leftover Garlic Butter Oven Baked Tilapia, allow the fish to cool completely at room temperature before transferring it to an airtight container. Ensure the container is sealed tightly to prevent moisture loss and to maintain the delicate texture of the fish. Refrigerate the leftovers promptly. Properly stored, the tilapia will remain fresh and delicious in the refrigerator for up to 3 days, retaining much of its original flavor and moisture.
Freezing
If you need to store the tilapia for a longer period, freezing is an excellent option. After the fish has cooled completely, arrange the fillets in a single layer on a baking sheet lined with parchment paper. Place the baking sheet in the freezer until the fillets are frozen solid, which usually takes about 1 to 2 hours. Once frozen, transfer the individual fillets into heavy-duty freezer bags, pushing out as much air as possible before sealing them tightly. Frozen tilapia can be stored for up to 3 weeks.
Reheating
When you’re ready to enjoy your stored tilapia, the reheating process is straightforward. If the fish was frozen, allow it to thaw completely in the refrigerator overnight or by placing it on the counter for a short period. Preheat your oven to 350°F (175°C). Arrange the thawed tilapia fillets in a clean baking dish and cover the dish loosely with aluminum foil. Bake for 8-10 minutes, or until the fish is heated through. Be cautious not to overheat, as this can dry out the fish.
Frequently Asked Questions
-
Can I use frozen tilapia fillets instead of fresh ones?
Absolutely! Frozen tilapia fillets are a perfectly acceptable alternative to fresh ones, and in many cases, they can be of comparable or even higher quality due to rapid freezing processes after catching. If using frozen fillets, ensure they are thawed completely before proceeding with the recipe. You can thaw them overnight in the refrigerator or, for a quicker method, place them in a sealed bag submerged in cold water for about 30-60 minutes, changing the water periodically. Pat the thawed fillets dry thoroughly with paper towels before seasoning and baking to ensure the best texture and adherence of the sauce.
-
What is the best way to tell if the tilapia is cooked through without overcooking it?
The most reliable method to determine if your tilapia is perfectly cooked is to use a fork to gently test the flesh. Insert a fork into the thickest part of a fillet and twist gently. If the fish flakes easily into opaque, distinct layers, it is done. It should be tender and moist, not dry or crumbly. Another precise method is to use an instant-read thermometer inserted into the thickest part of the fillet; the internal temperature should reach 145°F (63°C). It’s important to remember that tilapia cooks very quickly, and residual heat will continue to cook the fish for a few minutes after it’s removed from the oven, so it’s often best to pull it out just before it reaches the absolute target temperature.
-
Can I add other vegetables to the baking dish with the tilapia?
Yes, you can certainly add other vegetables to the baking dish alongside the tilapia to create a more complete one-pan meal. Quick-cooking vegetables such as asparagus spears, thin green beans, broccoli florets, or cherry tomatoes are excellent choices. Ensure that the vegetables are cut into bite-sized pieces and tossed with a little olive oil, salt, and pepper before being arranged around the tilapia fillets in the baking dish. Keep in mind that denser vegetables like potatoes or carrots will require a head start in the oven before adding the fish to ensure they cook through simultaneously. For asparagus or broccoli, they can often be added during the last 8-10 minutes of the tilapia’s cooking time.