Easy Garlic Butter Oven Baked Tilapia – Quick & Delicious!
Craving a simple yet incredibly flavorful seafood dish that can be on your table in under half an hour? Look no further than this Garlic Butter Oven Baked Tilapia recipe. It’s the perfect answer for those busy weeknights when you need a healthy and delicious meal without spending hours in the kitchen.
This recipe is a testament to how a few high-quality ingredients and straightforward cooking techniques can create something truly special. The delicate flavor of tilapia is beautifully enhanced by the aromatic garlic, rich butter, and bright citrus notes of lemon, making every bite a delightful experience.
Why You Will Love This Recipe
- Speedy Preparation: Get a restaurant-quality meal on your table in approximately 20 minutes from start to finish, ideal for any busy schedule.
- Simple Ingredients: Relies on a few pantry staples and fresh aromatics, making it accessible and easy to shop for.
- Healthy & Flavorful: This dish is naturally low in carbohydrates, gluten-free, and keto-friendly, without compromising on taste.
- Versatile: Easily adaptable to different dietary needs and preferences, making it a crowd-pleaser for various eaters.
- Minimal Cleanup: Baked directly in a single dish, this recipe ensures that post-meal tidying is a breeze.
Ingredients You Need
The beauty of this Garlic Butter Oven Baked Tilapia lies in its simplicity and the emphasis on fresh, vibrant flavors. Using high-quality ingredients is key to achieving the best possible taste. Fresh tilapia fillets should be firm and have a mild, pleasant aroma. The garlic should be pungent and fresh, and the lemon vibrant with a fragrant zest. Opting for good quality butter will lend a richer flavor to the sauce, and using fresh herbs, if available, will elevate the overall profile. The combination of these core elements is what makes this dish so incredibly satisfying and universally loved.
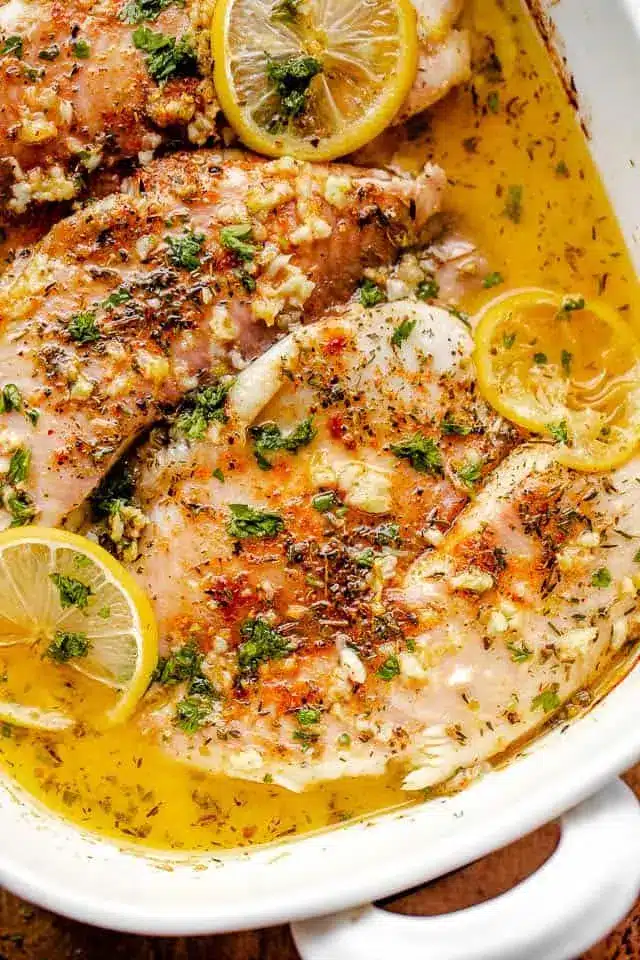
Garlic Butter Oven Baked Tilapia

Light, nutritious tilapia fillets are seasoned with garlic, butter, and lemon and baked to perfection. A quick and easy seafood dinner that's flavorful and low-carb.
- 4 tilapia fillets
- Salt and freshly ground black pepper, to taste
- ½ teaspoon paprika
- ½ teaspoon dried thyme
- ½ teaspoon dried oregano
- 4 tablespoons butter, melted
- 4 cloves garlic, minced
- 2 tablespoons lemon juice
- ¼ teaspoon lemon zest
- 1 lemon, sliced into rounds, for garnish
- Red pepper flakes, for garnish
- Chopped fresh parsley, for garnish
- Lemon slices, for garnish
- 1Preheat oven to 400°F (200°C).
- 2Season tilapia fillets with salt, pepper, paprika, thyme, and oregano. Arrange the seasoned fillets in a 9x13 baking dish.
- 3In a small bowl, whisk together the melted butter, minced garlic, lemon juice, and lemon zest.
- 4Pour the butter mixture evenly over the tilapia fillets.
- 5Bake for 10 to 12 minutes, or until the fish flakes easily with a fork and is cooked through.
- 6Garnish with red pepper flakes, fresh parsley, and lemon slices before serving.
Keywords: tilapia, baked fish, garlic butter, lemon, easy dinner, seafood, low carb, gluten free
The specific quantities for these delicious ingredients are detailed within the recipe card, ensuring you have precisely what you need for perfect results every time.
Variations
For those following a vegan lifestyle, transforming this dish is quite achievable. Substitute the tilapia fillets with thick slices of seasoned cauliflower or large portobello mushrooms. The garlic butter sauce can be recreated using a generous amount of vegan butter, finely minced garlic, lemon juice, and lemon zest. You might also consider adding a pinch of nutritional yeast to the dry seasonings for a subtle cheesy depth, and perhaps a sprinkle of smoked paprika to mimic the color and subtle smokiness often associated with baked fish. This vegan adaptation maintains the spirit of a simple, flavorful baked dish, making it suitable for everyone at the table and offering a delightful dinner option.
If you’re navigating a low-carb or ketogenic diet, this recipe is already a fantastic starting point. Tilapia itself is naturally very low in carbohydrates. To further enhance its keto-friendliness and add a decadent touch, consider topping the fillets with a sprinkle of almond flour mixed with a little extra garlic powder and paprika before baking. You could also serve it alongside a creamy avocado salsa or a rich cauliflower mash. These additions provide healthy fats and fiber, keeping you satisfied and within your macronutrient goals, showcasing how adaptable seafood can be.
For an added layer of complexity and visual appeal, consider incorporating different herbs and spices. A touch of dill or chives can be wonderfully complementary to the fish and lemon. For a mild heat, a pinch of red pepper flakes can be added directly to the butter sauce before baking. Alternatively, for a bolder flavor profile, you could marinate the tilapia briefly in a mixture of lemon juice, olive oil, and a hint of Dijon mustard before proceeding with the garlic butter. Experimenting with different citrus, like lime or orange zest, can also introduce subtle but delightful twists, making each preparation uniquely yours and offering a new take on a classic preparation.
How to Prepare Garlic Butter Oven Baked Tilapia
Step 1: Preheat and Prepare the Baking Dish
The foundation of a perfectly baked dish begins with proper preparation of your cooking environment. Preheating your oven to 400°F (200°C) is crucial; a consistently hot oven ensures even cooking and helps develop a delightful texture on the fish. A properly preheated oven allows the fish to start cooking immediately upon placement, preventing it from steaming rather than baking. This precise temperature is ideal for tilapia, as it cooks through quickly without drying out.
Select a suitable baking dish, a 9×13 inch (23×33 cm) pan is generally recommended for four fillets. Ensure the dish is clean and dry. You can choose to lightly grease the dish with a little olive oil or cooking spray to prevent any sticking, although the butter in the sauce will also provide a natural non-stick coating. Arrange the tilapia fillets in a single layer within the prepared dish, ensuring they have a little space between them. This allows the heat to circulate effectively around each fillet, promoting uniform cooking and a better final texture.
Take a moment to visually inspect the fillets, making sure they are relatively uniform in thickness. This helps guarantee that they will all be perfectly cooked at the same time. If you have one significantly thicker fillet, you might consider tucking the thinner end under itself slightly. This simple adjustment ensures that all pieces of fish will reach that ideal flaky, fork-tender stage simultaneously, avoiding the need to remove some while others continue to cook.
Step 2: Season the Tilapia
The art of seasoning is where flavor truly begins to develop. For this recipe, we’ll be using a classic combination of dried herbs and spices that beautifully complement the mild flavor of tilapia. Start by ensuring your tilapia fillets are patted dry with paper towels; this step is surprisingly important as it helps the seasonings adhere better and encourages a slightly firmer surface on the fish.
Generously season each fillet on all sides with salt and freshly ground black pepper. The salt enhances the natural flavors of the fish, while the pepper adds a subtle, warming spice. Next, sprinkle the fillets with paprika. Use regular paprika, not smoked or hot, to impart a beautiful reddish-gold hue and a mild, slightly sweet undertone. Follow this with dried thyme and dried oregano, two classic herbs that offer an earthy and slightly floral aroma, respectively. Ensure an even distribution of these dried herbs across the entire surface of each fillet.
Don’t be shy with the seasonings; they form the initial flavor layer that will permeate the fish as it bakes. The combination of these simple spices creates a flavorful crust that adds depth and character. The heat of the oven will then activate the essential oils in the dried herbs, releasing their wonderful aromas and infusing the tilapia with their distinct essences. This foundational seasoning step is critical for building a delicious and memorable dish that is far more than just plain baked fish.
Step 3: Prepare the Garlic Butter Sauce
The magic of this dish truly comes alive with the preparation of the luscious garlic butter sauce. In a small mixing bowl, combine the melted butter. Ensure your butter is fully melted and smooth, providing a rich and creamy base for the sauce. Adding the butter while it’s still warm helps to meld the flavors more effectively. The richness of the butter is essential for tenderizing the fish and carrying all the aromatic components.
Next, incorporate the fresh garlic. Mince it very finely or use a garlic press to extract its potent flavor. Fresh garlic is paramount here, as its sharp aroma and pungent taste will mellow beautifully during the baking process, transforming into a sweet, complex flavor. Add the fresh lemon juice to the bowl. The acidity of the lemon juice will brighten the entire dish, cutting through the richness of the butter and adding a zesty, refreshing note. It also helps to tenderize the fish further.
Finally, add the lemon zest. Zesting the lemon directly into the bowl releases its fragrant oils, providing an intense, pure lemon aroma and flavor that is more pronounced than the juice alone. Whisk all these ingredients together vigorously until they are well combined and emulsified. The mixture should look smooth and inviting, with the garlic and zest evenly dispersed throughout the buttery, lemony liquid. This simple sauce is the key to the dish’s signature flavor profile.
Step 4: Assemble and Pour
Now it’s time to bring together the seasoned tilapia and the aromatic garlic butter sauce. Carefully take the prepared garlic butter mixture and evenly pour it over the seasoned tilapia fillets nestled in the baking dish. Ensure that the sauce generously coats each fillet, allowing it to seep into the crevices and begin its tenderizing and flavoring work immediately. Don’t leave any of that precious sauce behind in the mixing bowl; every drop contributes to the final deliciousness.
Use a spoon or a brush to gently spread the sauce over the top and sides of each fillet, ensuring complete coverage. This not only distributes the flavor but also helps to create a moist environment during baking. The butter will melt further and baste the fish as it cooks, keeping it incredibly succulent. The garlic and lemon zest will begin to infuse into the fish from the very moment the sauce makes contact, starting the transformation process.
Visually inspect the dish to confirm that each piece of tilapia is sufficiently coated. If any areas seem to have less sauce, use your spoon to redistribute it. This step is crucial for ensuring that every bite of your Garlic Butter Oven Baked Tilapia is infused with that delightful garlicky, buttery, and lemony essence. The visual appeal of the sauce pooling around the fish is also an indicator of the rich flavors to come.
Step 5: Bake to Perfection
Place the assembled baking dish into the preheated 400°F (200°C) oven. The intense heat will immediately begin to cook the tilapia. Set a timer for 10 to 12 minutes. This initial baking time is an estimate, and the exact duration can vary depending on the thickness of your tilapia fillets and the calibration of your oven. It’s always best to start checking for doneness around the 10-minute mark.
To check if the tilapia is perfectly cooked, insert a fork into the thickest part of a fillet and gently twist. If the fish flakes easily and the flesh is opaque all the way through, it is done. It should not appear translucent or have a raw, pinkish center. Another reliable method is to use an instant-read thermometer; insert it horizontally into the thickest part of the fillet. The internal temperature should reach 145°F (63°C). Be careful not to overcook the fish, as this can lead to a dry and rubbery texture, diminishing its delicate appeal.
Once cooked, carefully remove the baking dish from the oven using oven mitts. The aroma that will fill your kitchen at this point is absolutely incredible, a testament to the simple yet powerful combination of ingredients. Let the fish rest in the baking dish for just a minute or two before garnishing and serving. This brief resting period allows the juices to redistribute throughout the fillets, ensuring maximum moisture and tenderness. This attention to detail ensures each bite is as flavorful and moist as the last.
Step 6: Garnish and Serve
The final flourish to your Garlic Butter Oven Baked Tilapia involves a few vibrant garnishes that add both visual appeal and an extra layer of freshness. Once the fish is out of the oven and has rested for a moment, artfully arrange fresh lemon slices on top of the fillets or around the edges of the baking dish. The bright yellow of the lemon slices adds a pop of color and offers guests the option to squeeze extra fresh lemon juice over their fish for an added burst of citrusy flavor.
Next, sprinkle a pinch of red pepper flakes over the fish. These tiny flakes provide a subtle hint of heat that beautifully contrasts with the richness of the butter and the tang of the lemon, creating a more complex flavor profile without overwhelming the delicate taste of the tilapia. Use sparingly if you prefer a milder dish, or add a bit more for those who enjoy a gentle kick.
Finally, generously sprinkle freshly chopped parsley over the entire dish. The vibrant green of the parsley adds a fresh, herbaceous note and a beautiful visual contrast to the golden-baked fish. The parsley not only looks appealing but also contributes a delicate, fresh flavor that ties all the elements of the dish together. Serve immediately while piping hot, perhaps with a squeeze of extra lemon, to fully enjoy the delightful textures and flavors of this quick and easy seafood masterpiece.
Pro Tips for Garlic Butter Oven Baked Tilapia
Quality Matters: Always opt for the freshest tilapia fillets you can find. Look for firm flesh and a mild, ocean-fresh scent. If using frozen, ensure it was frozen quickly after being caught to preserve quality.
Don’t Skimp on Zest: The lemon zest carries the essential oils of the lemon, providing a more intense and fragrant citrus aroma than juice alone. Grate it finely to avoid bitter pith.
Pat it Dry: Before seasoning, thoroughly pat the tilapia fillets dry with paper towels. This removes excess moisture, allowing the seasonings to adhere better and promoting a more desirable texture on the surface of the fish.
Even Thickness: If your fillets vary significantly in thickness, try to trim or fold the thicker parts to ensure more even cooking. This prevents some pieces from becoming overcooked and dry while others are still raw.
Watch the Clock: Tilapia cooks very quickly. Start checking for doneness around the 10-minute mark to avoid overcooking, which can render the fish dry and less enjoyable. Use the fork-test or a thermometer for accuracy.
Serving Suggestions for Garlic Butter Oven Baked Tilapia
Decoration
The visual appeal of this dish is enhanced by thoughtful garnishes. Fresh lemon slices, arranged elegantly on or around the tilapia, provide a burst of color and offer a zesty finishing touch. A sprinkle of vibrant green chopped fresh parsley adds a refreshing contrast and an herbaceous aroma. For a hint of sophistication and subtle heat, a scattering of red pepper flakes can be applied with a light hand. These simple additions transform the presentation from ordinary to extraordinary, making the dish as pleasing to the eye as it is to the palate.
Side Dishes
This delicate tilapia pairs wonderfully with a variety of complementary sides. Consider serving it alongside lighter carbohydrate options such as fluffy rice pilaf or quinoa. For a low-carb option, a creamy cauliflower mash or a vibrant zucchini noodle sauté makes an excellent choice. A crisp, fresh green salad with a light vinaigrette offers a refreshing counterpoint to the richness of the butter sauce. Roasted asparagus, tender green beans, or steamed broccoli also make perfect accompaniments, adding color and essential nutrients to your meal.
Creative Serving Ideas
Elevate your meal by transforming this simple baked tilapia into something more elaborate. You could serve individual fillets nestled atop a bed of wilted spinach or a creamy lemon risotto for an elegant presentation. Another idea is to create small, individual parchment paper packets, layering the tilapia with fresh vegetables like cherry tomatoes, bell peppers, and asparagus, then baking them together for a self-contained, flavorful meal with minimal cleanup. For a casual gathering, deconstruct the dish by flaking the cooked tilapia and serving it in warm tortillas with a fresh slaw and avocado crema, creating delicious fish tacos.
Preparation & Storage
Storing Leftovers
To store leftover Garlic Butter Oven Baked Tilapia, allow the cooked fish to cool completely at room temperature. This is a crucial step to prevent condensation, which can lead to sogginess and bacterial growth. Once cooled, transfer the tilapia fillets into an airtight container. Ensure the container has a tight-fitting lid to seal in freshness and prevent odors from escaping or permeating other foods in the refrigerator. Store the container in the refrigerator for up to 3 days.
For best results when storing, try to avoid stacking the fillets directly on top of each other if possible, though if you must, placing a piece of parchment paper between layers can help maintain texture. If the fish is mixed with any sauce or juices from the baking dish, include those as well, as they can help keep the fish moist. Always check the leftovers for any signs of spoilage before consuming, such as off-odors or a slimy texture.
It’s important to note that while properly stored, the fish will remain safe to eat, its texture may be slightly drier or softer upon reheating compared to when it was freshly baked. This is a natural consequence of refrigeration and reheating processes for delicate proteins like fish. Plan to consume any leftovers within the recommended timeframe to ensure optimal taste and quality.
Freezing
If you have more leftovers than you can consume within a few days, freezing is an excellent option to preserve the tilapia for longer. Start by ensuring the fish is completely cool. Place the individual tilapia fillets in a single layer on a baking sheet or a platter that fits in your freezer. This initial freezing step, known as flash-freezing, prevents the fillets from clumping together into one large mass once they are in a freezer bag. Allow them to freeze until solid, which typically takes about 1 to 2 hours.
Once the fillets are frozen solid, carefully transfer them into a heavy-duty freezer bag. As you place them in the bag, gently press out as much air as possible before sealing it tightly. Removing excess air minimizes the risk of freezer burn, which can degrade the texture and flavor of the fish. Label the freezer bag with the date and contents, and store it in your freezer. Properly frozen tilapia can maintain good quality for up to 3 weeks.
When you’re ready to use the frozen tilapia, it’s best to thaw it gradually in the refrigerator overnight. Avoid thawing at room temperature or using a microwave, as this can lead to uneven thawing and impact the texture. Once thawed, it can be reheated using the methods described below. Freezing is a practical way to enjoy this delicious dish even when you haven’t planned a meal for it immediately.
Reheating
Reheating this delightful baked tilapia requires a gentle approach to maintain as much moisture and tenderness as possible. First, if your fish was frozen, ensure it is fully thawed in the refrigerator. Once thawed, allow the fillets to come to room temperature for about 15-20 minutes while you preheat your oven to 350°F (175°C). Bringing the fish closer to room temperature helps it heat through more evenly.
Arrange the tilapia fillets in a clean baking dish. To help keep the fish moist during reheating, cover the dish tightly with aluminum foil. This traps steam and prevents the surface of the fish from drying out. Place the covered dish in the preheated oven and bake for approximately 8 to 10 minutes. The goal is to heat the fish through without cooking it further, which could make it tough.
Carefully remove the dish from the oven and remove the foil. Check if the fish is heated through by gently flaking it with a fork. The internal temperature should reach around 145°F (63°C) if you are using a thermometer. Be cautious not to overcook it. While reheating will never quite replicate the texture of freshly baked fish, this method minimizes the loss of moisture and ensures you can still enjoy a tender and flavorful portion of your Garlic Butter Oven Baked Tilapia. You can also add a tiny splash of water or broth to the dish before covering for added moisture.
Frequently Asked Questions
- Can I use other types of white fish instead of tilapia?
Absolutely! This recipe is wonderfully versatile and works beautifully with other mild white fish fillets such as cod, haddock, or flounder. The key is to select fish that have a similar thickness and cooking time to tilapia. If you’re using a thicker cut of fish, you may need to slightly increase the baking time. Similarly, thinner fillets might cook a little faster, so keeping a close eye on them is essential to prevent overcooking. The garlic butter and lemon sauce will complement a wide range of delicate fish flavors, making it a dependable base for various seafood preparations.
- What can I do if my tilapia fillets are very thin?
If your tilapia fillets are quite thin, they will cook much faster than thicker ones. In this case, it’s crucial to monitor them very closely to avoid drying them out. Start checking for doneness around the 6-8 minute mark after placing them in the oven. They are ready when they flake easily with a fork and are opaque throughout. You might also consider slightly reducing the oven temperature to 375°F (190°C) to give you a little more buffer room and prevent them from cooking too rapidly. The goal is to achieve that perfect flaky texture without any dryness.
- How can I make the garlic butter sauce richer or more flavorful?
To make the garlic butter sauce even richer and more flavorful, consider a few enhancements. You can add a tablespoon of heavy cream or a splash of white wine to the melted butter before whisking in the garlic, lemon juice, and zest; this adds a luxurious mouthfeel and a more complex flavor base. For an extra depth of savory flavor, you could sauté the minced garlic in a little bit of the butter for a minute or two before adding the other ingredients; this mellows the garlic’s sharpness and brings out its sweetness. Additionally, incorporating a pinch of Dijon mustard into the sauce can add a subtle tang and emulsifying quality. Finally, using browned butter (butter that has been heated until it turns a nutty brown color) instead of plain melted butter will impart a wonderfully deep, toasty flavor.