Delicious Low-Carb Italian Sub Wrap: Snack Smart and Satisfy
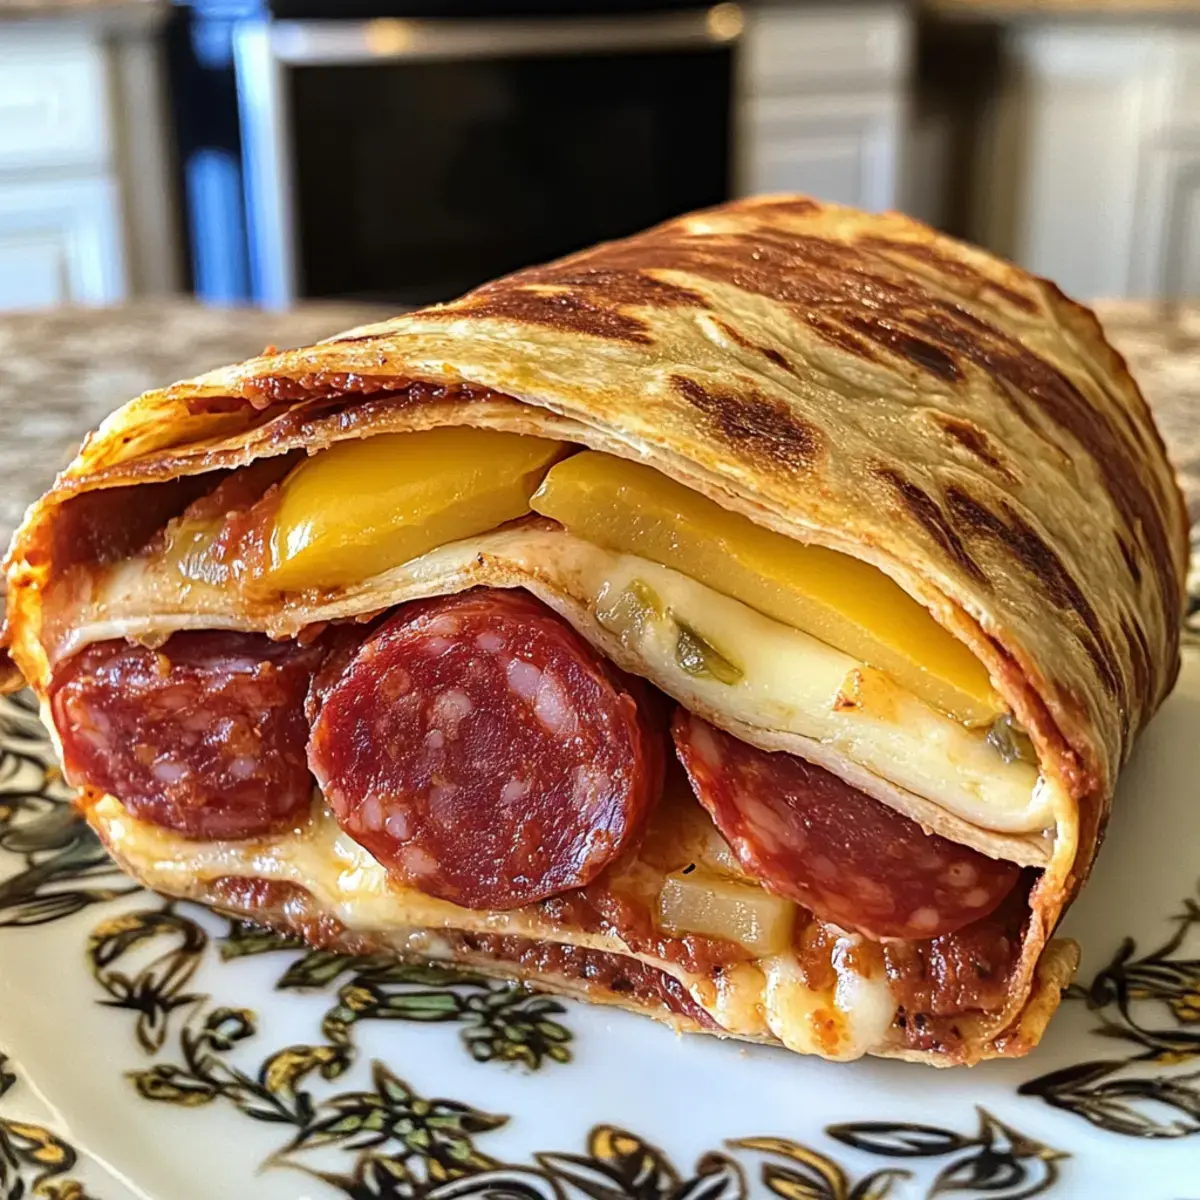
The sizzling sound of a skillet filled my kitchen as I prepared to create a wrap that would whisk me back to the Italian delis of my youth. Today, I’m excited to share my Low-Carb Italian Sub Wrap, a delightful fusion of spicy salami, zesty banana peppers, and gooey provolone—all nestled inside a crispy low-carb tortilla.
This recipe isn’t just a quick lunch; it’s a guilt-free way to savor those familiar comforts while sticking to a healthier lifestyle. With every bite, you’ll find yourself indulging in familiar flavors without straying from your low-carb goals. So, who’s ready to roll up their sleeves and dive into this delicious, easy-to-make wrap?
Why You Will Love This Recipe
- Crispy Texture: The low-carb tortilla creates a satisfying crunch that mimics traditional wraps without the extra carbs, offering a delightful textural contrast to the soft fillings.
- Savory Fillings: Each bite bursts with the delicious flavors of salami, pepperoni, and provolone cheese, ensuring you never miss out on the classic Italian sub experience.
- Quick Preparation: Ready in just minutes, this wrap is perfect for busy days when you need a satisfying meal without a long cooking process, making it ideal for lunches or quick dinners.
- Versatile Options: Customize it with your favorite ingredients—try turkey or fresh veggies for endless variety, allowing you to adapt the recipe to your personal preferences and what you have on hand.
- Guilt-Free Indulgence: Enjoying this wrap means savoring Italian deli flavors while aligning with your healthy eating goals, providing a delicious treat that supports your wellness journey.
Ingredients You Need
The foundation of an exceptional dish lies in the quality of its ingredients. For this Low-Carb Italian Sub Wrap, we’re focusing on fresh, flavorful components that come together harmoniously to create a truly satisfying experience. Sourcing the best possible items will elevate the final taste and texture, ensuring each bite is a delight.
Low-Carb Italian Sub Wrap

A delightful fusion of spicy salami, zesty banana peppers, and gooey provolone, all nestled inside a crispy low-carb tortilla. This recipe is a guilt-free way to savor familiar comforts while sticking to a healthier lifestyle.
- 1 piece Low-Carb Tortilla (Look for high-fiber options to reduce net carbs.)
- 3 slices Salami (Adds a rich, spicy flavor; substitute with turkey or chicken for a lighter option.)
- 3 slices Pepperoni (Contributes greasiness and spice; can be replaced with more salami or another deli meat.)
- 2 slices Provolone Cheese (Melts beautifully to bind the filling; feel free to swap for mozzarella or cheddar.)
- 1-2 tbsp Banana Peppers (Provides tang and crunch; swap with jalapeños for heat or omit for mild.)
- 1-2 tsp Italian Dressing (Adds moisture and zesty flavor; use homemade dressing for a lighter option.)
- 1Heat a non-stick skillet over medium heat for about 2 minutes until hot but not smoking.
- 2Place a low-carb tortilla flat in the pan. On one half, layer 2 slices of provolone cheese, followed by 3 slices of salami and 3 slices of pepperoni. Sprinkle 1-2 tablespoons of banana peppers over the meat.
- 3Drizzle 1-2 teaspoons of Italian dressing over the layered fillings.
- 4Carefully fold the tortilla over the fillings to create a half-moon shape. Gently press down with a spatula. Toast for 2-3 minutes until the bottom is golden brown and the cheese starts to melt.
- 5Flip the wrap and cook the other side for an additional 2-3 minutes until golden and crispy, and the cheese is melted.
- 6Remove the wrap from the skillet, let it rest for a minute, then slice it in half and serve hot.
Keywords: low carb, italian sub, wrap, healthy, quick lunch, easy recipe, keto
- low-carb tortilla: look for high-fiber options to reduce net carbs, providing a sturdy yet flexible base.
- salami: adds a rich, spicy flavor; substitute with turkey or chicken for a lighter option if desired.
- pepperoni: contributes greasiness and spice; can be replaced with more salami or another deli meat for a personalized touch.
- provolone cheese: melts beautifully to bind the filling; feel free to swap for mozzarella or cheddar based on your preference.
- banana peppers: provides tang and crunch; swap with jalapeños for heat or omit for a milder experience.
- italian dressing: adds moisture and zesty flavor; for a lighter option, use homemade dressing or mix with cream cheese for creaminess.
The specific quantities for these ingredients are detailed within the provided recipe card for your convenience.
Variations
The beauty of this Low-Carb Italian Sub Wrap lies in its inherent adaptability. Whether you’re catering to specific dietary needs or simply looking to introduce new flavor profiles, numerous exciting variations await your culinary creativity. This flexibility ensures that the wrap can be enjoyed by everyone, regardless of their preferences.
For those adhering to a vegan lifestyle, a delightful plant-based alternative can be crafted. Consider using a sturdy lunch wrap filled with a medley of roasted vegetables like zucchini, bell peppers, and onions, paired with a generous portion of vegan cheese. This hearty and satisfying option is bursting with color and flavor, proving that vegan wraps can be just as delicious and fulfilling.
If carbohydrate intake is a primary concern, transforming this into a low-carb masterpiece is exceptionally straightforward. Focus on high-fiber tortillas and ensure your chosen meats and cheeses are in line with your carbohydrate goals. You can even explore adding extra leafy greens like spinach or arugula for added volume and nutrients without significantly impacting the carb count.
Adding a spicy kick is another fantastic way to personalize this wrap. For those who crave a bit of heat, incorporating thinly sliced jalapeños or a dash of your favorite hot sauce into the filling will transform the wrap into a fiery fiesta of flavors. This simple addition can dramatically alter the experience, making it a thrilling choice for spice enthusiasts.
How to Prepare Low-Carb Italian Sub Wrap
Step 1: Prepare the Cooking Surface
Begin by selecting a high-quality non-stick skillet. Place it over medium heat and allow it to preheat for approximately two minutes. This crucial step ensures that the skillet reaches an optimal temperature, neither too hot to scorch the tortilla nor too cool to achieve the desired crispiness. A properly heated skillet is the first secret to a perfectly golden-brown wrap.
Maintaining consistent medium heat is paramount throughout the cooking process. Too high a heat will result in a burnt exterior with an un-melted interior, while too low a heat will produce a soggy, limp wrap. Patience during this initial heating phase sets the stage for success and guarantees that your wrap will have that satisfying toasted texture we’re aiming for.
Step 2: Layering the Heart of the Wrap
Once your skillet is perfectly heated, lay a single low-carb tortilla flat within its confines. This immediate placement ensures that the tortilla begins to warm and slightly toast from the moment it hits the pan. This initial contact with the heat is essential for creating a pliable base that will hold all the delicious fillings securely without tearing.
On one half of this warm tortilla, meticulously arrange your chosen fillings. Start with two slices of provolone cheese, ensuring they cover a good portion of the surface, creating a melty foundation. Next, evenly distribute three slices of salami and three slices of pepperoni over the cheese. Finally, scatter one to two tablespoons of banana peppers across the meats, adding that signature tangy crunch and zest that defines an Italian sub.
Take care to layer the ingredients thoughtfully, avoiding over-stuffing which can lead to leakage or uneven cooking. The goal is to create a cohesive unit where each component contributes to the overall flavor profile and textural experience of the wrap. Proper layering also helps the cheese melt evenly, binding everything together into a delightful package.
Step 3: The Flavor Infusion
With the delicious layers of meat, cheese, and peppers expertly arranged, it’s time to introduce the unifying element: the dressing. Drizzle one to two teaspoons of your preferred Italian dressing evenly over the fillings. It is vital to be judicious with the amount of dressing used at this stage.
An excess of dressing can lead to a soggy wrap, undermining the crispy exterior we are working so hard to achieve. A light, even drizzle is sufficient to impart moisture and that characteristic zesty flavor that complements the savory ingredients. This controlled addition ensures that the flavors meld beautifully without compromising the integrity of the tortilla.
Consider using a homemade Italian dressing if you are particularly health-conscious or wish to control the ingredient list. Alternatively, a touch of cream cheese mixed with a vinaigrette can create a creamy binder that still provides a burst of flavor. Whichever dressing you choose, ensure it is applied sparingly to maintain the desired crispiness.
Step 4: The First Toast and Fold
Now comes the transformative step: folding the wrap and initiating the toasting process. Carefully fold the unfilled half of the tortilla over the filled half, creating a perfect half-moon shape. Gently press down on the folded wrap with a heat-resistant spatula. This action helps to seal the edges and encourages the ingredients inside to meld together as they heat.
Allow the folded wrap to toast undisturbed in the skillet for approximately two to three minutes. During this time, the bottom side of the tortilla will begin to turn a beautiful golden brown. You will also start to notice the irresistible aroma of toasting tortilla and melting cheese, a sure sign that the magic is happening. This initial toast is critical for developing that sought-after crispy exterior.
Keep a watchful eye on the tortilla during this toasting phase. The goal is a perfect golden hue, not a burnt one. Adjust the heat slightly if you notice it browning too quickly. The melting cheese will also begin to ooze slightly, further helping to bind the wrap together.
Step 5: Achieving Golden Perfection
Once the first side of your wrap has achieved a beautiful golden-brown crispness and the cheese is beginning to melt, it’s time to flip it. Using your spatula, carefully and confidently flip the wrap over. This maneuver requires a bit of dexterity to ensure the wrap remains intact and lands smoothly back in the skillet.
Allow the second side to cook for an additional two to three minutes. Continue to monitor its progress closely, aiming for the same golden-brown crispiness achieved on the first side. The cheese inside should now be fully melted and gooey, creating a delightful interior texture that contrasts wonderfully with the crispy shell. This ensures that every part of the wrap is heated through and delicious.
This double-sided toasting process is what transforms a simple tortilla and fillings into a culinary delight. The heat not only crisps the tortilla but also melds the flavors of the salami, pepperoni, and cheese, creating a harmonious blend that is truly satisfying. The goal is a wrap that is warm, gooey, and delightfully crispy all over.
Step 6: The Grand Finale – Slice and Serve
With both sides of your Low-Carb Italian Sub Wrap perfectly toasted and the cheese beautifully melted, it’s time for the final presentation. Carefully remove the wrap from the skillet and place it on a clean cutting board. Allowing it to rest for just one minute before slicing is a small but important step; it lets the molten cheese settle slightly, preventing an uncontrolled spill when cut.
Using a sharp knife, slice the wrap cleanly in half. This reveals the enticing layers of savory meats, melted cheese, and zesty peppers nestled within the crispy tortilla. The visual appeal is just as important as the taste, and a clean slice showcases the craftsmanship of your creation. This immediate reveal of the interior is part of the satisfying experience.
Serve your Low-Carb Italian Sub Wrap immediately while it is hot and at its crispiest. It makes for a complete and satisfying meal on its own, or can be elevated further by pairing it with a fresh side salad or your favorite low-carb dipping sauce. The warmth and texture are at their peak when served fresh from the skillet, offering a truly delightful culinary moment.
Pro Tips for Low-Carb Italian Sub Wrap
To ensure your Low-Carb Italian Sub Wrap reaches its full potential, consider these expert tips. They are designed to enhance texture, flavor, and overall enjoyment of this versatile dish, making every preparation a success.
Tortilla Selection is Key: When choosing your low-carb tortillas, prioritize those that boast a high fiber content. This not only contributes to a better texture, making the tortilla more pliable and less prone to tearing, but also significantly lowers the net carbohydrate count. Always check the nutritional labels to ensure they align with your dietary goals and preferences.
Master Heat Control: Maintaining a consistent medium heat on your skillet is absolutely crucial. A heat that is too high will quickly burn the exterior of the tortilla before the cheese has a chance to melt properly, resulting in a tough, unpleasant wrap. Conversely, a heat that is too low will prevent the tortilla from crisping up adequately, leading to a soggy outcome.
Layering for Success: Thoughtful layering of your fillings is essential for both flavor distribution and structural integrity. Ensure that the meats, cheese, and peppers are spread relatively evenly across the tortilla, leaving a small border around the edge. This even distribution prevents some areas from being overstuffed while others are bare, and it helps the wrap seal properly.
The Art of the Slice: After allowing the wrap to rest for a brief moment, use a very sharp knife for slicing. A dull knife can tear the tortilla and squish the fillings. A clean, decisive cut will showcase the beautiful layers within the wrap, making it more appealing and easier to eat.
Embrace Customization: Don’t be afraid to experiment and make this wrap your own! Feel free to swap out the traditional deli meats for grilled chicken or turkey breast, or add a variety of fresh vegetables like spinach, arugula, or thinly sliced tomatoes. These additions can introduce new textures and flavors, further enhancing your Low-Carb Italian Sub Wrap experience and making it a truly personalized meal.
Serving Suggestions for Low-Carb Italian Sub Wrap
Decoration
Elevate the visual appeal of your Low-Carb Italian Sub Wrap with simple yet effective garnishes. A sprinkle of fresh parsley or chopped chives over the sliced wrap adds a vibrant touch of green and a hint of fresh aroma. For an extra pop of color and a slightly peppery note, a few fresh arugula leaves artfully placed alongside can be quite striking.
Consider a delicate drizzle of balsamic glaze over the top for a touch of elegance and a sweet-tart counterpoint to the savory fillings. This adds a visual richness and a sophisticated flavor dimension. Even a simple twist of black pepper can enhance the presentation, adding texture and visual interest to the plated dish.
Side Dishes
Complement the satisfying flavors of your wrap with a selection of low-carb side dishes that enhance the meal without overwhelming it. A crisp, refreshing lunch salad featuring mixed greens, cucumber slices, and a light vinaigrette is an excellent choice. The freshness of the salad provides a lovely contrast to the richness of the wrap.
For those seeking a bit more crunch, consider serving your wrap with a side of oven-baked zucchini fries or jicama sticks. These offer a satisfying texture and can be seasoned to complement the Italian flavors of the wrap. Alternatively, a small bowl of marinated olives or a portion of grilled asparagus can add a delightful savory element to the meal.
Creative Serving Ideas
Transform your Low-Carb Italian Sub Wrap into a more substantial or interactive meal with a few creative serving ideas. Cut the wrap into smaller, bite-sized pinwheels and serve them as an appetizer or part of a larger charcuterie board. This presentation is perfect for gatherings and allows guests to sample multiple flavors.
Consider serving the wrap alongside a hearty bowl of low-carb tomato soup or a creamy broccoli cheddar soup for a comforting and complete meal. For a fun twist, present the wrap deconstructed, with all the fillings served separately alongside the toasted tortilla, allowing diners to assemble their own perfect bite. This interactive approach adds an element of engagement to the dining experience.
Preparation & Storage
Storing Leftovers
If you find yourself with leftover Low-Carb Italian Sub Wrap, proper storage is key to maintaining its quality. It is best to store the wrap tightly wrapped in plastic wrap or placed in an airtight container. This helps to prevent the tortilla from drying out and keeps the fillings fresh for as long as possible.
For optimal freshness and texture, it is recommended to consume leftovers within two days. While the wrap can be stored for longer, the tortilla may begin to lose its crispness over time, becoming softer. If possible, storing the wrap whole rather than sliced can help maintain its structural integrity.
Freezing
Freezing the assembled Low-Carb Italian Sub Wrap is generally not recommended, as the tortilla tends to become soggy upon thawing, compromising its desirable crisp texture. The best approach for freezing is to prepare the components separately. Slice your meats and peppers, and portion out your cheese and dressing into individual airtight containers or bags.
These individual components can then be frozen for up to a month. When you are ready to enjoy a wrap, simply thaw the components in the refrigerator overnight, then assemble and cook as per the recipe instructions. This method ensures you can have a fresh, crispy wrap whenever the craving strikes without sacrificing quality.
Reheating
To reheat a leftover Low-Carb Italian Sub Wrap and restore its delightful crispness, avoid using the microwave, as this will only make the tortilla soft and chewy. Instead, the best method is to gently reheat the wrap in a skillet over medium heat. Place the wrap in a dry, non-stick skillet and cook for about 5-7 minutes, flipping it halfway through.
This process will help to re-crisp the tortilla and warm the fillings through. Keep a close eye on it to prevent burning. If the cheese needs a little extra encouragement to melt, you can cover the skillet for the last minute or two of reheating. The goal is to achieve a warm, satisfying wrap with a perfectly toasted exterior.
Frequently Asked Questions
-
How do I choose the right low-carb tortilla?
Absolutely! When selecting a low-carb tortilla, look for options that are high in fiber, as they typically have lower net carbs. Brands that specifically label themselves as “low-carb” generally provide better nutritional profiles. Always check the ingredient list too; aim for tortillas using whole ingredients without preservatives and minimal added sugars. Some excellent choices include those made with almond flour, coconut flour, or psyllium husk.
-
How long can I store the assembled Low-Carb Italian Sub Wrap?
You can store your assembled Low-Carb Italian Sub Wrap tightly wrapped in plastic wrap or in an airtight container in the fridge for up to 2 days. Just keep in mind that the longer it’s stored, the more it may become soggy, so try to enjoy it as fresh as possible for the best texture. If you anticipate not eating it within 24 hours, consider storing it disassembled as mentioned in the freezing section for optimal results.
-
Can I freeze the Low-Carb Italian Sub Wrap?
Very! For freezing, I suggest you store the unassembled ingredients separately in airtight bags or containers. This includes slicing your meats, peppers, and grating cheese if preferred. The components can be frozen for up to 1 month. When you’re ready to enjoy, simply thaw the ingredients in the fridge overnight, assemble, and cook as directed in the recipe to retain that delightful crunch and fresh flavor profile.
-
What should I do if my wrap doesn’t get crispy?
It’s a common challenge, but no worries! To achieve that perfect crispy texture, ensure your skillet is at medium heat and let the first side cook until it’s golden brown before flipping. If the cheese isn’t melting yet, you might need to lower the heat slightly to allow more time without burning the wrap, but don’t go too low. Also, remember to keep an eye on the amount of dressing to avoid excess moisture, as too much liquid is the main culprit for a soggy wrap.
-
Are there any dietary considerations for pets or allergies?
Yes, indeed! If you have pets, avoid giving them any parts of the wrap, especially the deli meats like salami and pepperoni, as they can contain preservatives, high sodium, and spices that are harmful to pets. Additionally, be cautious of any cheese or dressing allergies; opt for lactose-free cheese or a dairy-free dressing if necessary. Always check labels carefully to ensure you’re sticking to your specific dietary preferences and restrictions for both human and animal family members.
-
Can I use different vegetables or sauces?
Of course! The beauty of the Low-Carb Italian Sub Wrap is its incredible versatility and the freedom it offers for customization. Feel free to get creative! Spinach, arugula, or even roasted bell peppers can add freshness, flavor, and texture. For sauces, consider a homemade pesto, a spicy garlic aioli, or even a light avocado spread to elevate the taste while adhering to your low-carb lifestyle. The more options you explore, the more enjoyable your wraps will become!