Delicious Creamy Chicken Caesar Dip – The Ultimate Party Pleaser
As I stirred the bubbling mix of creamy cheese and zesty dressing, a wave of nostalgia washed over me, reminding me of unforgettable gatherings filled with laughter and good food.
This Creamy Chicken Caesar Dip is my go-to appetizer that blends the beloved flavors of Caesar salad into a hearty, crowd-pleasing dish, perfect for game days and parties.
Why You Will Love This Recipe
- Irresistible Flavor: The perfect blend of creamy cheeses, zesty dressing, and tender chicken creates a flavor explosion that keeps everyone coming back for more, making it a true crowd-pleaser.
- Quick Preparation: With just a few simple steps and minimal active cooking time, you can whip this dip up in no time, making it a fantastic option for last-minute gatherings or unexpected guests.
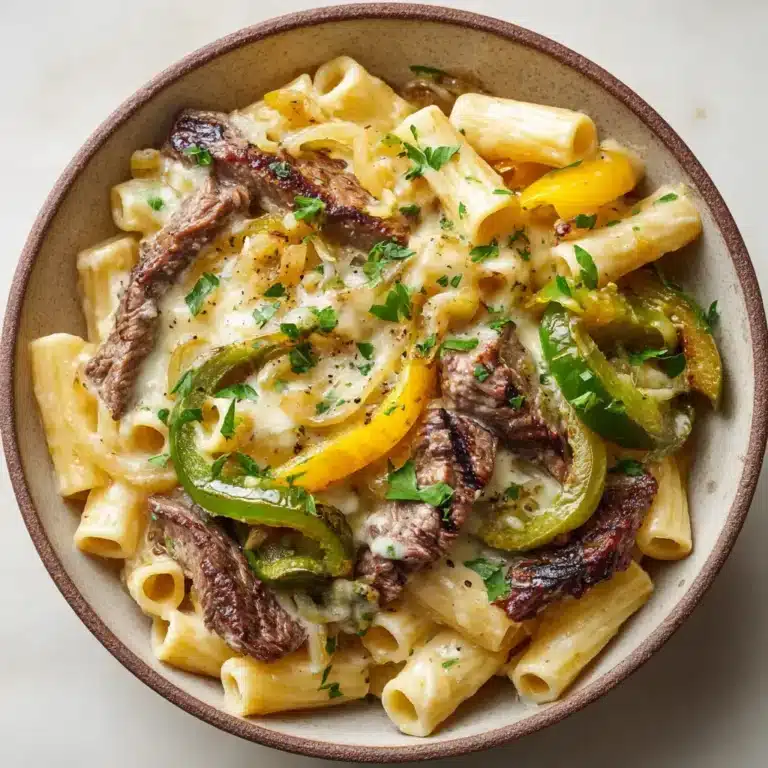
- Versatile Base: Feel free to swap ingredients like using shredded beef or adding a spicy kick with buffalo sauce to tailor it to your preferences.
- Perfect for Any Occasion: Whether it’s game day, a cozy get-together, or a potluck, this Creamy Chicken Caesar Dip is guaranteed to impress with its comforting and familiar flavors.
Ingredients You Need
Crafting this Creamy Chicken Caesar Dip is a celebration of simple, quality ingredients that come together harmoniously. Choosing fresh, high-quality components will ensure the best possible flavor and texture for your appetizer. The magic lies in the combination of creamy elements, savory chicken, and the tangy kick of Caesar dressing, all coming together in a warm, bubbling delight that’s perfect for sharing. Remember, the foundation of any great dish lies in the freshness and quality of what you put into it, and this dip is no exception; it’s a testament to how straightforward ingredients can create something truly spectacular.
Creamy Chicken Caesar Dip

This Creamy Chicken Caesar Dip is a crowd-pleaser that blends classic Caesar salad flavors into a hearty dip perfect for any gathering. It's quick to prepare and incredibly versatile, making it a go-to appetizer for game days and parties.
- 1 whole Rotisserie Chicken, shredded into small pieces
- 1 cup American Cheese, shredded
- 0.5 cup Parmesan Cheese, grated
- 8 oz Cream Cheese, room temperature
- 1.5 cups Caesar Dressing
- 0.25 cup Chopped Green Onions, for garnish
- 0.25 cup Extra Parmesan, for topping
- Fresh Herbs, parsley or basil for garnish (optional)
- 1Preheat your oven to 350°F (175°C) and generously grease an 8x8 inch baking dish.
- 2Shred the rotisserie chicken into bite-sized pieces using two forks or your hands. Place the shredded chicken evenly at the bottom of the prepared baking dish.
- 3Drizzle 0.5 cup of Caesar dressing over the chicken, ensuring every piece is well-coated.
- 4In a large mixing bowl, combine the shredded American cheese, grated Parmesan cheese, cream cheese, and 1 cup of Caesar dressing. Using a hand mixer, blend these ingredients together until creamy and smooth.
- 5Gently spoon the cheese mixture over the shredded chicken layer in the baking dish. Use a spatula to spread it out evenly.
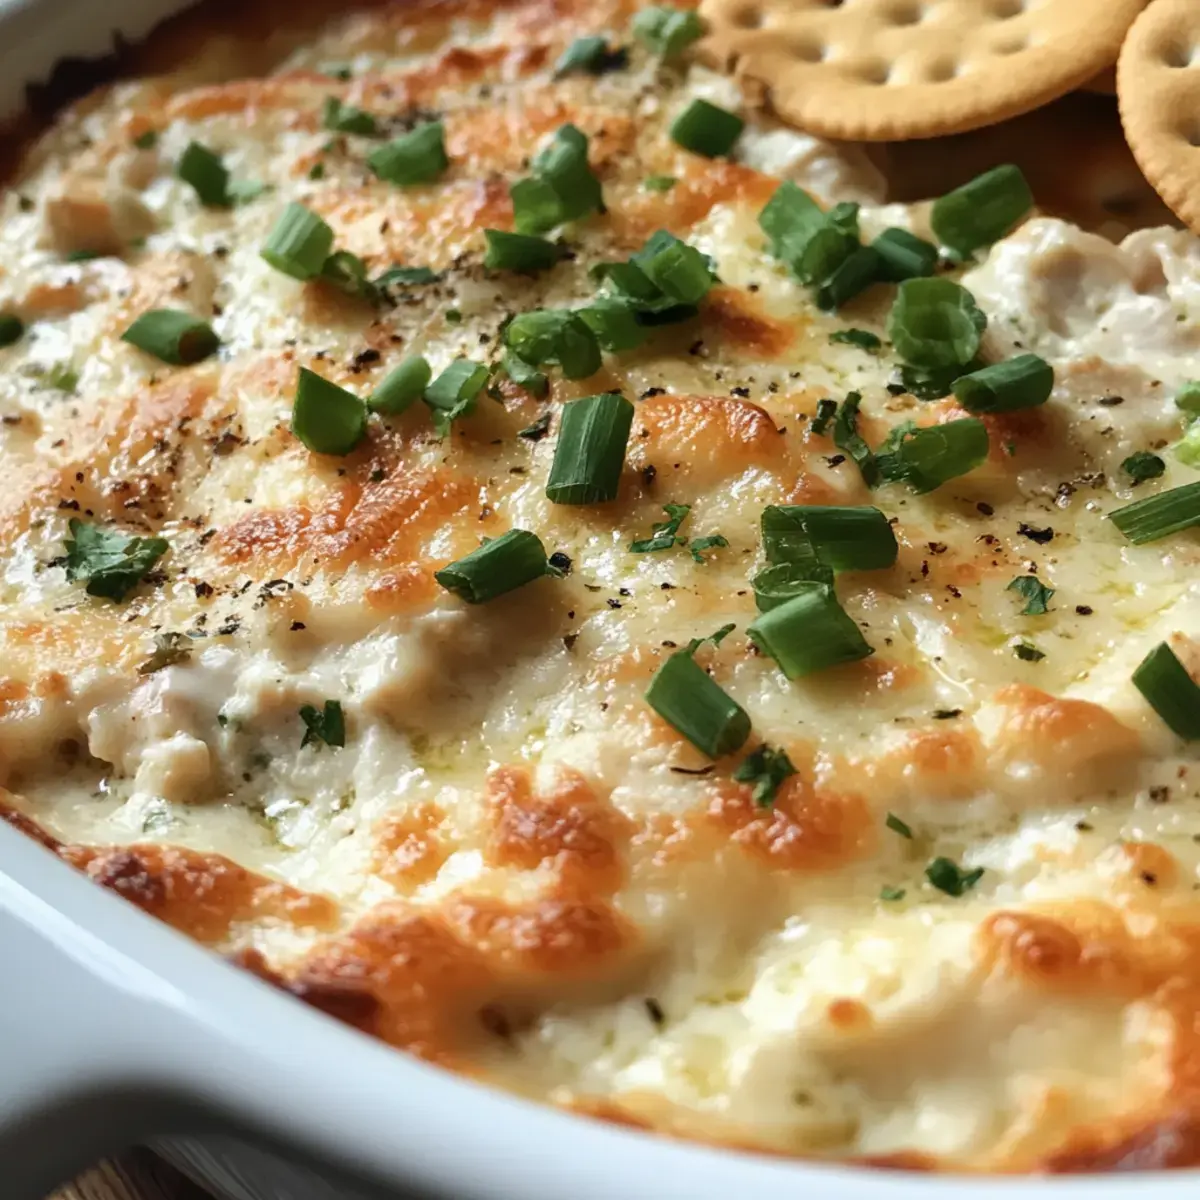
- 6Slide the baking dish into the preheated oven and bake for 25-30 minutes, or until the dip is bubbly and turns a lovely golden brown on top. For an extra crisp finish, you can broil for about 2 minutes, watching carefully to prevent burning.
- 7Once baked, carefully remove the dip from the oven. Sprinkle the remaining 0.25 cup Parmesan cheese and chopped green onions over the top. Garnish with fresh herbs if desired.
- 8Serve your Creamy Chicken Caesar Dip immediately, paired with crispy chips or fresh veggies.
Keywords: Chicken, Caesar, Dip, Appetizer, Party, Creamy, Cheesy, Easy, Quick
- rotisserie chicken: shredded into small pieces for easy incorporation and a tender texture.
- american cheese: shredded, it provides exceptional creaminess and a perfect melt, forming the gooey base of the dip.
- parmesan cheese: grated, this adds a sharp, nutty, and salty depth that is characteristic of Caesar flavors.
- cream cheese: softened to room temperature, it contributes a luxurious richness and smooth texture to the dip.
- caesar dressing: a key component for infusing that iconic zesty flavor throughout the entire dip.
- green onions: chopped, these offer a fresh, mild oniony bite and a beautiful pop of color as a garnish.
- extra parmesan: a sprinkle on top adds a delightful crispy texture and intensifies the savory notes.
- fresh herbs: such as parsley or basil, chopped for garnish to add brightness and visual appeal.
The precise quantities for these delightful ingredients are readily available in the accompanying recipe card, ensuring you have all the measurements needed for a perfect batch.
Variations
Elevate your Creamy Chicken Caesar Dip with a few exciting twists that cater to different tastes and dietary needs. These variations ensure that this beloved appetizer can be enjoyed by a wider audience without compromising on flavor or its inherent comforting appeal. Get ready to experiment and find your new favorite version!
Spicy Buffalo Kick: For those who love a bit of heat, simply swap out the traditional Caesar dressing for a good quality buffalo sauce. You’ll still achieve that wonderful creamy texture, but with an added tangy and spicy punch that is utterly addictive. This variation transforms the dip into a zesty sensation, perfect for game days or when you’re craving something with a bit more fire.
Hearty Beef or Turkey: If chicken isn’t your preference, or you simply want to switch things up, consider using shredded beef or shredded turkey. These meats offer a different savory depth that complements the creamy cheese base beautifully. The texture remains satisfyingly tender, and the overall flavor profile becomes richer and more robust, offering a delightful alternative.
Vegetarian Delight: To create a delicious vegetarian option, replace the shredded chicken with sautéed mushrooms and spinach. The mushrooms provide an earthy, umami richness, while the spinach adds a fresh, slightly bitter contrast. This combination creates a satisfyingly savory and textured filling that perfectly absorbs the creamy cheese mixture.
How to Prepare Creamy Chicken Caesar Dip
Step 1: Preheat and Prepare the Baking Dish
Your culinary journey begins with preparing the stage for this delectable dip. Preheat your oven to a moderate 350°F (175°C), ensuring it reaches the optimal temperature for baking. While the oven is diligently warming up, take a moment to prepare your 8×8 inch baking dish. Generously grease its interior with butter or a good quality non-stick cooking spray.
This crucial step of greasing the dish serves a vital purpose: it guarantees that your Creamy Chicken Caesar Dip will slide out effortlessly after baking. A well-greased dish prevents sticking, allowing you to serve your dip with ease and preserving its beautiful presentation. You’ll achieve a beautifully golden crust that practically beckons you to dive in, making the entire serving experience much more enjoyable and visually appealing.
The importance of a properly preheated oven cannot be overstated; it ensures even cooking and that desirable bubbling effect from the moment the dish enters. A baking dish that is well-prepared will also prevent any potential scorching on the bottom, contributing to a more uniform and appealing finish for your appetizer. This simple preparation is the first step towards creating a truly memorable dip that will impress all your guests with its delightful texture and flavor.
Step 2: Shred the Chicken
Now, it’s time to prepare the star protein of your dip: the chicken. Take your rotisserie chicken, which is already cooked and seasoned to perfection, and begin shredding it. You can easily do this using two forks, pulling the meat apart into small, bite-sized pieces, or even using your hands for a more tactile approach.
Once shredded, evenly distribute these tender chicken pieces across the bottom of your prepared baking dish. This forms the substantial base layer of your Creamy Chicken Caesar Dip, providing both texture and savory flavor. Next, gently drizzle about ½ cup of your chosen Caesar dressing directly over the shredded chicken. Ensure that every single piece of chicken is well-coated with this tangy dressing.
This initial dressing of the chicken is vital for infusing flavor right from the start, ensuring that the chicken itself is moist and delicious. It sets the stage perfectly for the creamy, cheesy layers to come, promising a dip where every bite is packed with complementary flavors. The even coating means the dressing’s zesty notes will permeate the chicken as it bakes, creating a more integrated and satisfying taste experience.
Step 3: Mix the Cheesy Ingredients
In a large mixing bowl, it’s time to bring together the elements that will create the luscious, creamy heart of your dip. Combine the shredded American cheese, the finely grated Parmesan cheese, and the softened cream cheese. These three ingredients are the foundation of the dip’s rich, decadent texture and savory profile.
To this delightful cheese medley, add approximately 1 cup of Caesar dressing. This dressing not only binds the cheeses together but also imbues the entire mixture with that signature tangy and herbaceous Caesar flavor. Using a hand mixer, or even a sturdy whisk if you prefer, blend these components together until the mixture achieves a state of perfect creaminess and smoothness.
This tantalizing mixture is truly the essence of your Creamy Chicken Caesar Dip, creating a rich, hearty, and unbelievably smooth filling that promises pure indulgence. The cream cheese ensures a velvety texture, the American cheese melts into gooey perfection, and the Parmesan adds a delightful sharpness, all harmonized by the Caesar dressing.
Step 4: Spread the Cheese Mixture
With your creamy cheese mixture perfectly blended and smooth, it’s time to incorporate it into the layered dip. Gently spoon this luscious cheese concoction directly over the shredded chicken layer that you’ve already arranged in the baking dish. Distribute it as evenly as possible across the entire surface of the chicken.
Once the mixture is in place, use a spatula or the back of a spoon to carefully spread it out. Aim for a smooth, even layer that covers the chicken completely. This smooth, luscious top is what will bake into a beautifully melted, irresistible topping for your dip, promising a delightful textural contrast.
This step is absolutely essential for creating that dreamy, cheesy layer that everyone will adore. Ensuring an even spread guarantees that every scoop of your dip will contain the perfect ratio of chicken, cheese, and dressing, creating a harmonious balance of flavors and textures in every single bite.
Step 5: Bake to Perfection
Now for the moment of transformation: baking. Carefully slide the prepared baking dish into your preheated oven. Allow the dip to bake undisturbed for approximately 25 to 30 minutes. During this time, the ingredients will meld together, the cheeses will melt into gooey perfection, and the dip will develop a wonderfully inviting aroma.
Your Creamy Chicken Caesar Dip is ready when you observe it bubbling invitingly around the edges and its surface begins to turn a lovely golden brown. This visual cue indicates that the dip has reached its peak of deliciousness, with the flavors fully integrated and the texture wonderfully creamy and heated through. For those who crave an extra layer of texture and visual appeal, you can take it a step further.
To achieve an exceptionally crisp finish on top, carefully place the dish under a broiler for about 2 minutes. However, it is absolutely critical to stay close and keep a watchful eye on the dip during this brief broiling period to prevent any burning. This extra step is well worth the effort for that perfect, golden-brown crust.
Step 6: Garnish and Serve
Once your Creamy Chicken Caesar Dip has achieved its perfect state of golden-brown bubbliness, it’s time for the finishing touches. Carefully remove the baking dish from the hot oven, placing it on a heat-resistant surface. The aroma filling your kitchen at this point is simply divine, a testament to the deliciousness that awaits.
To add a final flourish of flavor and visual appeal, generously sprinkle the remaining grated Parmesan cheese over the hot surface of the dip. This additional cheese will melt slightly, adding another layer of savory goodness and a hint of crispiness. Follow this by scattering the chopped fresh green onions over the top, which provides a vibrant splash of color and a fresh, mild oniony bite.
Serve your Creamy Chicken Caesar Dip immediately while it is piping hot and at its most decadent. Pair it with your favorite dippers, such as crispy tortilla chips, toasted baguette slices, or a medley of fresh, crunchy vegetables for an irresistible appetizer experience that guests will rave about.
Pro Tips for Creamy Chicken Caesar Dip
Room Temperature Cream Cheese: For the smoothest, most homogenous cheese mixture, ensure your cream cheese is truly at room temperature before you begin mixing. Cold cream cheese is notoriously difficult to incorporate fully, which can lead to an uneven texture with small lumps in your final dip. Allowing it to soften on the counter for about an hour will make a significant difference in achieving that luxuriously creamy consistency.
Layering Flavors: To elevate the depth and complexity of your dip, consider infusing the cheese mixture with additional aromatic elements. Adding a clove or two of finely minced garlic or a tiny splash of fresh lemon juice can introduce subtle yet impactful nuances. These additions enhance the overall Caesar profile and provide a brighter, more sophisticated flavor that makes your dip stand out.
Watch the Broiler: When you decide to broil the dip for that coveted crispy topping, vigilance is key. Broilers are extremely powerful, and it can take the dip from perfectly golden to sadly charred in mere seconds. Always stay directly in front of the oven, keeping a close eye on the surface and rotating the dish if necessary for even browning. Patience and observation are your best friends here.
Make It Ahead: Planning is a cook’s best friend, and this dip is wonderfully amenable to advance preparation. You can fully assemble the dip, layering the chicken and the cheese mixture in the baking dish, up to a day in advance. Cover it tightly with plastic wrap and refrigerate. When you’re ready to serve, simply remove the plastic wrap and bake as usual, perhaps allowing a few extra minutes for it to heat through properly. This makes hosting significantly less stressful.
Versatile Swap: Don’t hesitate to get creative with the protein element. If you’re looking for a richer, more robust flavor, shredded beef is an excellent substitute for chicken. Alternatively, shredded turkey offers a lighter yet still satisfying option. These substitutions allow you to tailor the dip to your liking or to use up leftovers, proving the recipe’s inherent flexibility.
Serving Suggestions for Creamy Chicken Caesar Dip
Decoration
Enhance the visual appeal of your Creamy Chicken Caesar Dip with thoughtful garnishes. A final sprinkle of extra grated Parmesan cheese adds texture and a golden hue as it slightly melts into the warm dip. Freshly chopped green onions provide a vibrant contrast of color and a fresh, mild oniony bite that cuts through the richness.
Consider adding a scattering of finely chopped fresh parsley or basil for an aromatic lift and an additional pop of green. These herbs not only look beautiful but also contribute a subtle herbaceous note that complements the savory dip beautifully. For those who enjoy a bit of crunch, a very light dusting of paprika can add a warm color and a hint of smoky flavor, making the dip look as inviting as it tastes.
Side Dishes
The perfect accompaniments can transform your Creamy Chicken Caesar Dip into a complete culinary experience. Crispy tortilla chips offer a satisfying salty crunch that contrasts wonderfully with the dip’s creamy texture. For a healthier alternative, a vibrant platter of fresh, crisp vegetables like carrot sticks, cucumber slices, bell pepper strips, and celery sticks provides a refreshing balance.
Warm, lightly toasted pita bread wedges offer a delightful chewiness and a touch of comforting warmth that pairs exceptionally well with the dip’s flavors. Garlic breadsticks are another excellent choice, their savory aroma and soft texture making them perfect for scooping up every last bit of the delicious dip. Stuffed mini peppers, filled with cream cheese or feta, add a burst of flavor and a fun, bite-sized addition to your spread.
If you’re aiming for a slightly more substantial offering, consider serving alongside classic potato chips or even small, well-seasoned potato wedges. The variety of textures and flavors from these side dishes ensures that your guests have plenty of delightful options to complement the star of the show.
Creative Serving Ideas
Move beyond the traditional bowl and impress your guests with innovative serving presentations. For a more elegant affair, try serving individual portions in small ramekins or oven-safe mini dishes, garnished with a single fresh herb sprig on top. This not only looks sophisticated but also ensures everyone gets their own perfect portion.
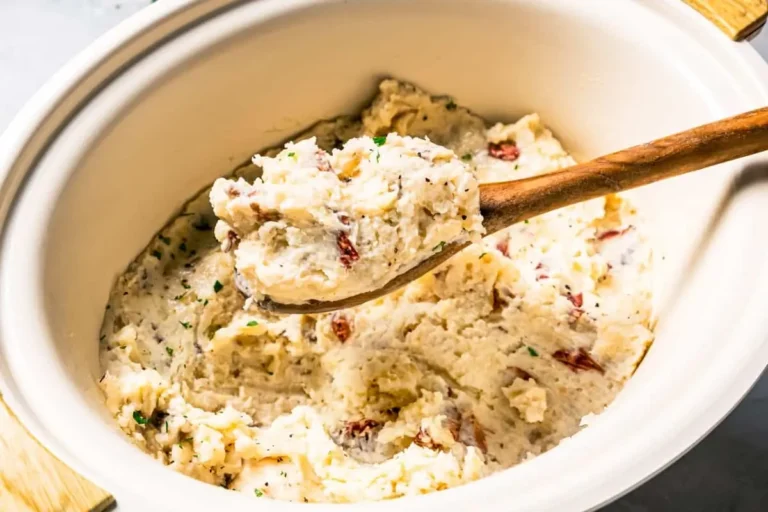
Consider spooning the dip into a hollowed-out crusty bread bowl, creating a rustic and interactive centerpiece that guests can tear into. Alternatively, for a fun, party-friendly option, serve the dip warm in a small, attractive slow cooker set to the “warm” setting. This keeps the dip perfectly heated throughout your gathering, allowing guests to help themselves at their leisure.
Another creative idea is to pipe or dollop the cooled dip into mini pastry shells or on top of small crostini for elegant, bite-sized appetizers. This transforms the dip into a more composed canapé, perfect for cocktail parties or events where guests will be mingling and standing. You could also serve it alongside a small charcuterie board, allowing guests to combine the creamy dip with meats, cheeses, and fruits.
Preparation & Storage
Storing Leftovers
Should you be fortunate enough to have any Creamy Chicken Caesar Dip remaining, proper storage is key to maintaining its delightful quality. Ensure any leftovers are cooled down to room temperature before attempting to store them. Transfer the cooled dip into an airtight container, making sure the lid seals securely to prevent air exposure.
Refrigerated properly in an airtight container, this delicious dip can be stored for up to 3 days. This duration ensures that you can still enjoy the creamy, savory flavors in the days following your event. Storing it in this manner helps to preserve its texture and prevents it from absorbing any unwanted odors from other foods in the refrigerator.
Always check the dip for any signs of spoilage before reheating and consuming it again. Look for any unusual smells, changes in texture, or the presence of mold. If in doubt, it’s always best to discard it to ensure food safety.
Freezing
For longer-term storage and the convenience of having this dip on hand, freezing is an excellent option. It’s advisable to let the dip cool completely before you begin the freezing process. Once cooled, transfer the dip into a freezer-safe container. For optimal protection against freezer burn, tightly wrap the container’s contents first in a layer of plastic wrap, and then in a layer of heavy-duty aluminum foil.
When frozen properly using this method, your Creamy Chicken Caesar Dip can maintain its quality for up to 2 months. This allows you to prepare it in advance for future parties or gatherings, saving you time and effort when needed. The double layer of protection is crucial for preserving the dip’s creamy texture and preventing the development of ice crystals.
Before you plan to reheat and serve, it’s essential to allow the dip to thaw completely. The best and safest way to do this is by transferring it from the freezer to the refrigerator and letting it thaw overnight. This gradual thawing process helps maintain the integrity of the dip’s texture.
Reheating
When you’re ready to enjoy your previously frozen or leftover Creamy Chicken Caesar Dip, reheating it is a simple and straightforward process. Preheat your oven to a moderate 350°F (175°C), the same temperature used for the initial baking. If reheating from frozen, ensure the dip has thawed completely in the refrigerator first; reheating directly from frozen may lead to uneven cooking.
Place the dip in an oven-safe dish if it’s not already in one and warm it in the preheated oven for approximately 20 to 25 minutes. The goal is to heat it through until it is hot and bubbly once again, restoring its delectable warmth and creamy consistency. During this reheating time, it’s a good idea to stir the dip once or twice.
Stirring the dip during reheating helps to ensure that it heats evenly throughout, preventing any hot spots or cooler areas. This simple step guarantees that every spoonful is perfectly warmed and ready to be enjoyed. If the dip seems a bit too thick after reheating, you can easily loosen it with a splash of milk or a little extra Caesar dressing.
Frequently Asked Questions
-
How do I choose the right rotisserie chicken?
When selecting a rotisserie chicken, look for one that presents a visually appealing golden-brown skin, which typically indicates it has been cooked to perfection and is moist within. Avoid chickens that exhibit numerous dark spots or a dull appearance, as these can sometimes suggest spoilage or uneven cooking. A fresh rotisserie chicken will emit an appetizingly savory aroma; trust your senses to guide you toward a good choice. The meat should feel firm to the touch, and if you’re buying pre-packaged, check the “sell by” date to ensure maximum freshness for your dip.
-
How should I store leftover dip?
To maintain the optimal freshness and creamy texture of your Creamy Chicken Caesar Dip, it’s essential to store any leftovers properly. After the dip has cooled down to room temperature, transfer it into an airtight container. Ensuring the container is completely sealed will prevent the dip from drying out or absorbing unwanted odors from other foods in your refrigerator. Stored this way, leftovers will remain delicious for up to 3 days. When you’re ready to enjoy them again, simply reheat the dip in a preheated oven at 350°F (175°C) until it’s hot and bubbly; it will taste almost as fresh as the first time.
-
Can I freeze Creamy Chicken Caesar Dip?
Absolutely, Creamy Chicken Caesar Dip freezes beautifully, making it a convenient option for future cravings or unexpected guests. To freeze it, ensure the dip has cooled down completely. Then, wrap it tightly first in plastic wrap, pressing it down to eliminate air pockets, and then follow with a layer of heavy-duty aluminum foil for maximum protection against freezer burn. When properly packaged, the dip can be frozen for up to 2 months. Before you plan to serve it, allow it to thaw overnight in the refrigerator to ensure the creamy texture remains intact and the flavors are preserved.