Coconut Cake with Coconut Milk
There’s a certain magic that happens when familiar flavors get a delightful twist, and this Coconut Cake Made with Coconut Milk is a perfect example. It takes the beloved comfort of a classic cake and infuses it with the tropical, subtle sweetness of coconut milk, transforming it into an experience that is both comforting and excitingly new.
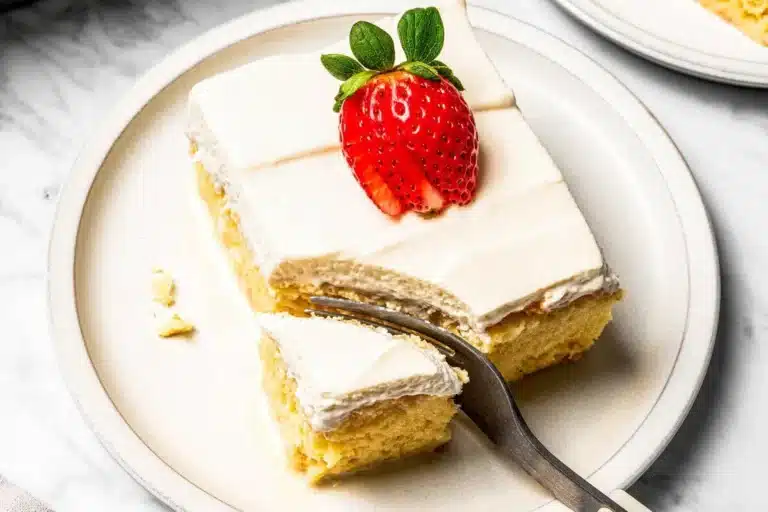
Imagine tender, moist cake layers, subtly perfumed with coconut, sandwiched with a sweet, chewy filling and enveloped in a velvety smooth frosting. This isn’t just a cake; it’s an invitation to a moment of pure indulgence, designed to impress without demanding hours of painstaking effort in the kitchen. It’s the kind of dessert that makes an ordinary day feel like a celebration.
Why You Will Love This Recipe
- Unforgettable Coconut Flavor: Unlike cakes that only hint at coconut, this recipe uses multiple elements, from coconut milk to solids and flavoring, to create a deep, authentic taste in every bite. This ensures a truly immersive tropical experience that satisfies a coconut craving perfectly.
- Incredibly Moist Texture: The use of full-fat coconut milk is the secret weapon here, guaranteeing that each cake layer remains exceptionally tender, soft, and moist for days, avoiding any dryness that can plague other cakes. This moisture retention is key to its delightful chew and overall richness.
- Elegant Presentation: With its potential for three distinct layers and a smooth, luscious frosting, this cake naturally lends itself to a sophisticated presentation, making it ideal for special occasions like birthdays, holidays, or elegant dinner parties. The visual appeal is as satisfying as the taste.
- Make-Ahead Convenience: This recipe is designed with busy bakers in mind, allowing you to bake the layers and prepare the filling and frosting in advance. This makes assembly on the day of serving a breeze, reducing stress and allowing you to enjoy your guests.
- Versatile & Customizable: While delicious as is, this cake serves as a wonderful base for creativity. Whether you want to add different frostings, fillings, or garnishes, it readily adapts to your preferences and the theme of your event.
Ingredients You Need
The quality of your ingredients plays a crucial role in the final outcome of this delightful cake. Using fresh, high-quality components, especially the coconut milk and flavorings, will ensure the most authentic and vibrant taste. Opting for full-fat coconut milk is particularly important for achieving that signature moistness and richness that defines this recipe.
Coconut Cake Made with Coconut Milk

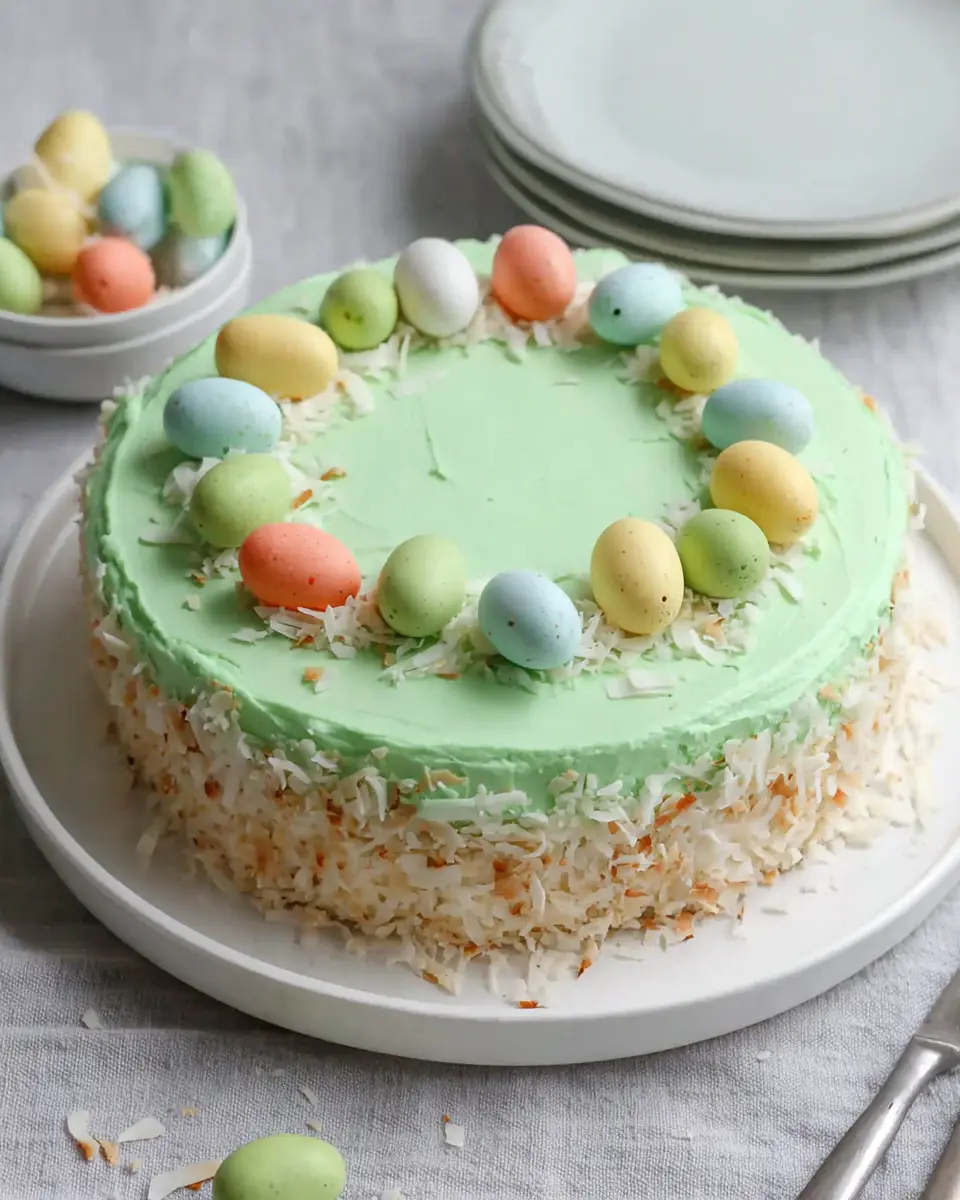
A rich, tender layer cake prepared with coconut milk, coconut milk solids, and coconut flavoring, then filled with a sweet coconut center and finished with a creamy coconut-cream cheese frosting. Optional toasted coconut and chocolate eggs provide an elegant decorative finish.
- For the cake: 2 cups all-purpose flour
- 1 cup unsweetened full-fat coconut milk
- 1 teaspoon baking soda
- 1 teaspoon lemon juice
- 2 cups granulated white sugar
- 1 cup butter, softened to room temperature
- 4 egg yolks
- 4 egg whites
- 1/4 teaspoon salt
- 1/2 cup water
- 1/4 cup coconut milk solids
- 1 1/2 teaspoons coconut flavoring
- For the filling: 2 1/2 cups sweetened coconut flakes
- 1/3 cup powdered sugar
- 1/3 cup sweetened condensed milk
- 3 tablespoons butter, melted
- For the frosting: 1 1/2 cups unsalted butter, softened
- 4 ounces cream cheese, softened
- 8 cups powdered sugar, sifted
- 2 teaspoons coconut essence
- 2 to 4 tablespoons coconut milk
- 1 pinch salt
- Optional food color gel
- For the garnish (optional): 1 cup toasted shredded coconut
- 1 cup chocolate eggs
- 1Preheat the oven to 350°F (175°C). Line the bases of three 8-inch round cake pans with parchment paper, then coat the pans with baking spray.
- 2Place the lemon juice into a measuring cup, then add unsweetened coconut milk until the liquid reaches the full 1-cup mark. Set aside.
- 3In a medium bowl, combine the flour, baking soda, and salt by whisking thoroughly.
- 4In a large mixing bowl, beat the softened butter with the granulated sugar until pale and fluffy. Add the egg yolks one at a time, mixing well after each addition.
- 5Blend in the water, coconut milk solids, and coconut flavoring until evenly incorporated. Add the flour mixture and the prepared coconut milk mixture in alternating additions, beginning and ending with the dry ingredients. Mix only until the batter comes together.
- 6In a separate bowl, beat the egg whites until stiff peaks form. Fold them gently into the batter.
- 7Distribute the batter evenly among the prepared cake pans and smooth the tops. Bake for about 30 minutes, or until the cake layers spring back lightly when touched.
- 8Let the cakes rest in their pans on wire racks for 5 minutes. Turn them out, remove parchment paper, and allow to cool completely.
- 9To prepare the filling, stir together the sweetened coconut flakes, melted butter, sweetened condensed milk, and powdered sugar until fully combined.
- 10For the frosting, beat the softened butter and cream cheese until light and airy. Add the coconut essence, a pinch of salt, and 2 tablespoons of coconut milk, then mix until smooth. Gradually incorporate the sifted powdered sugar and continue beating, adding additional coconut milk as needed to reach the desired consistency. Blend in food color gel if using.
- 11To assemble, place one cooled cake layer on a serving plate and spread a portion of the coconut filling over the top. Repeat with the next layer, then position the final cake layer on top.
- 12Cover the top and sides of the cake with the coconut frosting in an even layer. Finish with toasted shredded coconut and chocolate eggs, if desired.
Keywords: Coconut Cake, Coconut Milk Cake, Layer Cake, Cream Cheese Frosting, Dessert
The specific quantities for all these wonderful ingredients are detailed within the provided recipe card, ensuring you have everything you need for a perfect bake.
Variations
Taking this already delightful coconut cake and transforming it is a fun culinary adventure. One popular direction is to create a vegan version. For this, you would substitute the butter with a plant-based butter alternative, use a flax egg or commercial egg replacer for the yolks and whites, and ensure your condensed milk and cream cheese for the filling and frosting are also vegan options, readily available in most health food stores and larger supermarkets.
For those following a low-carb lifestyle, significant adjustments are needed. You would replace the all-purpose flour with almond flour or coconut flour, and use a sugar substitute like erythritol or stevia for the granulated sugar and powdered sugar. Coconut milk can be used, but be mindful of its carb count; unsweetened varieties are best. The sweetened coconut flakes in the filling would also need to be substituted with unsweetened shredded coconut, and the condensed milk would be omitted or replaced with a sugar-free alternative. This requires careful recipe adaptation to maintain structure and flavor.
Another creative twist could be a “Toasted Coconut Delight” variation. This involves lightly toasting the shredded coconut before incorporating it into the cake batter itself, as well as for the filling and garnish. This adds a deeper, nuttier dimension to the coconut flavor profile. You could also introduce a hint of lime zest into the frosting for a refreshing citrus counterpoint that beautifully complements the coconut. This elevates the tropical theme even further and adds a bright, zesty note that makes the cake incredibly refreshing.
How to Prepare Coconut Cake Made with Coconut Milk
Step 1: Preparing the Cake Pans and Oven
The very first step in creating this exquisite coconut cake involves meticulously preparing your baking equipment and preheating your oven. This ensures that the batter can be baked without delay once it’s ready, preserving the air incorporated into the egg whites. For this recipe, you’ll need three 8-inch round cake pans, which provide the perfect dimensions for a classic three-layer cake structure.
Line the bottom of each of these pans with parchment paper; this is crucial for preventing the delicate cake layers from sticking. After lining, lightly grease the parchment and the sides of the pans, and then dust them with a bit of flour or fine cake crumbs. This triple protection guarantees that your perfectly baked layers will release effortlessly, maintaining their beautiful shape.
Simultaneously, set your oven to preheat to 350°F (175°C). It’s vital that the oven reaches this temperature fully before the cake pans go in, as consistent heat is key to even baking and achieving that desirable tender crumb. A properly preheated oven prevents temperature fluctuations that can cause cakes to sink or bake unevenly.
Step 2: Creating the Coconut Milk Mixture and Combining Dry Ingredients
Next, you will prepare the essential coconut milk liquid that imbues the cake with its signature moisture and flavor. In a measuring cup, combine one teaspoon of fresh lemon juice with unsweetened full-fat coconut milk. You’ll need to add enough coconut milk to reach a total volume of exactly one cup. The lemon juice reacts with the coconut milk, creating a delightful tang and helping to tenderize the cake structure.
This prepared coconut milk mixture will be incorporated into the cake batter later, contributing significantly to its moist, tender texture. It’s the foundation of that rich, creamy mouthfeel that makes this cake so special. Ensure you use full-fat coconut milk for the best results, as ‘light’ versions will not yield the same richness and moisture.
In a separate, medium-sized mixing bowl, carefully combine all of your dry ingredients for the cake. This typically includes the all-purpose flour, baking soda, and salt. Whisk these ingredients together thoroughly until they are evenly distributed. This ensures that the leavening agents and salt are uniformly spread throughout the flour, which will lead to an even rise and consistent flavor in your baked cake layers.
Step 3: Creaming Butter and Sugar, and Incorporating Wet Ingredients
Now, in a large mixing bowl, begin the process of creaming the softened butter with the granulated white sugar. Use an electric mixer on medium speed to beat these ingredients together for several minutes until the mixture becomes noticeably pale yellow and appears light and fluffy. This creaming process incorporates air into the batter, which is crucial for the cake’s final texture and lift.
Once the butter and sugar are perfectly creamed, add the egg yolks one at a time. Beat well after each addition to ensure each yolk is fully incorporated before adding the next. This gradual incorporation helps create a stable emulsion and adds richness and structure to the cake layers. You will notice the mixture becoming even more luscious and smooth as the yolks are integrated.
Following the egg yolks, add the water, coconut milk solids (if using – these add an extra boost of coconut flavor and density), and the coconut flavoring. Mix these wet ingredients into the creamed butter and sugar mixture until everything is smoothly and uniformly combined. This stage builds the flavorful, moist base of your cake batter, ensuring that the coconut essence is well distributed throughout.
Step 4: Alternating Dry and Wet Ingredients
This is a critical step for achieving the perfect cake texture, so pay close attention to the mixing process. Begin by adding about one-third of the whisked dry ingredients (the flour, baking soda, and salt mixture from Step 2) to the wet ingredients in the large mixing bowl. Mix on low speed or by hand until just barely combined.
Next, add half of the prepared coconut milk mixture (from Step 2) to the bowl. Again, mix on low speed or gently by hand until it’s just incorporated. The key here is to avoid overmixing, which can develop the gluten in the flour too much, resulting in a tough cake. You want a tender crumb, so gentle mixing is paramount.
Continue alternating the additions: add another third of the dry ingredients, followed by the remaining half of the coconut milk mixture, and finally, the last third of the dry ingredients. Mix only until the batter comes together after each addition, stopping as soon as you no longer see streaks of flour. The final batter should look smooth but not overworked.
Step 5: Folding in Whipped Egg Whites
This step is where the cake truly gains its light, airy, and delicate crumb. In a separate, impeccably clean bowl, beat the four egg whites until they form stiff peaks. This means when you lift the whisk, the peaks of the egg whites stand straight up without curling over. Ensure there is absolutely no yolk in the egg whites, as fat inhibits them from whipping properly.
Take a large spatula and gently fold about one-third of the whipped egg whites into the cake batter. Use an under-and-over motion, cutting through the center of the batter and bringing the edges up and over the whites. The goal is to lighten the batter without deflating the precious air that you’ve whipped into the egg whites.
Once that first portion of egg whites is mostly incorporated, gently fold in the remaining whipped egg whites in two more additions. Continue folding until no large streaks of egg white remain visible, but be careful not to overmix. The batter should look uniformly fluffy and airy. This gentle incorporation of air is what gives the coconut cake its signature soft texture, making it feel incredibly light and almost cloud-like with every bite.
Step 6: Baking and Cooling the Cake Layers
Once your batter is ready and the egg whites are perfectly folded in, it’s time to divide it evenly among the three prepared 8-inch cake pans. Use a spatula to gently smooth the top of the batter in each pan. This ensures that the cakes bake up with relatively flat surfaces, making them easier to stack and frost later.
Place the filled pans into your preheated 350°F (175°C) oven. Bake for approximately 30 minutes. The cake is done when the tops spring back lightly when gently touched with your fingertip, and a wooden skewer or toothpick inserted into the center comes out clean. Avoid overbaking, as this can lead to dry cake layers, which is the opposite of what we aim for with this recipe.
Once baked, remove the pans from the oven and let them rest on wire racks for about 5 minutes. This brief resting period allows the cakes to firm up slightly before you attempt to remove them. Then, carefully invert the cakes onto the wire racks, remove the parchment paper from the bottoms, and allow them to cool completely. Ensuring the layers are fully cool before proceeding to fill and frost is essential for a stable and beautifully finished cake.
Step 7: Preparing the Filling and Frosting
While the cake layers are cooling, you can prepare the delightful filling and the creamy frosting. For the filling, in a medium bowl, stir together the sweetened coconut flakes, melted butter, sweetened condensed milk, and powdered sugar. Mix these ingredients until they are thoroughly combined and form a cohesive, spreadable paste. This filling will provide a sweet, slightly chewy layer of coconut goodness between your cake layers, enhancing the overall coconut experience.
Next, prepare the frosting. In a large bowl, beat together the softened unsalted butter and softened cream cheese until they are light, fluffy, and well combined, which should take about 5 minutes with an electric mixer. This creates a wonderfully smooth and rich base for your frosting, offering a slight tang from the cream cheese to balance the sweetness.
Add the coconut essence, a pinch of salt, and about 2 tablespoons of coconut milk to the butter and cream cheese mixture. Mix until smooth. Gradually add the sifted powdered sugar, beating continuously until the frosting is smooth, creamy, and reaches your desired spreading consistency. If it seems too thick, add a little more coconut milk, one tablespoon at a time. If it becomes too soft, beat in a bit more sifted powdered sugar. This frosting is key to binding the layers and providing a luscious outer coating for the cake.
Step 8: Assembling and Decorating the Cake
With your cake layers completely cooled and your filling and frosting prepared, you’re ready for the final assembly. Place one of the cooled cake layers onto your serving plate or cake stand. Spread a generous portion of the prepared coconut filling evenly over the top of this first layer. This is where the magic starts to happen, creating distinct flavor and texture zones within the cake.
Carefully place the second cake layer on top of the filling. Spread another portion of the coconut filling over this second layer, ensuring even coverage. Finally, position the third and final cake layer on top of the filling. You can place this layer either right-side up or upside down, depending on which provides the flattest surface for frosting.
Now, cover the entire cake – the top and the sides – with the prepared coconut frosting. Use an offset spatula to create a smooth, even layer of frosting all around. For a professional finish, you can smooth the sides and top. If desired, you can then garnish the cake. A classic choice is to press toasted shredded coconut onto the sides and top, and perhaps add some decorative chocolate eggs for a festive touch, making it look like a beautiful bakery creation.
Pro Tips for Coconut Cake Made with Coconut Milk
- Ingredient Temperature is Key: Always ensure your butter, egg yolks, and cream cheese are at room temperature before you begin mixing. This is absolutely vital for achieving smooth, homogenous batters and frostings, preventing lumps, and allowing ingredients to emulsify correctly, leading to a superior texture.
- Gentle Folding Technique: When incorporating the whipped egg whites, use a light hand and a spatula for folding rather than vigorous stirring or beating. This preserves the air bubbles that give the cake its tender, fluffy crumb. Think of it as gently lifting and turning the batter, not mixing it forcefully.
- Don’t Overmix the Batter: Once you start adding the dry ingredients to the wet, mix only until just combined. Overmixing develops gluten, which can make your cake tough and dense instead of soft and tender. Stop as soon as you no longer see streaks of flour.
- Cool Completely Before Frosting: Resist the urge to frost a warm cake. Warm layers will melt the frosting, leading to a messy, sliding disaster. Patience is a virtue here; allow the layers to cool completely on wire racks to ensure a stable and beautiful final product.
- Adjust Frosting Consistency Carefully: When making the frosting, add the coconut milk gradually. It’s easier to add more liquid than to take it away. Aim for a consistency that is smooth, spreadable, and holds its shape without being too stiff or too loose.
Serving Suggestions for Coconut Cake Made with Coconut Milk
Decoration
The visual appeal of this coconut cake can be as simple or as elaborate as you desire. A classic and highly effective decoration involves generously coating the frosted sides and top with toasted shredded coconut. Toasting the coconut beforehand, either in a dry skillet over medium heat or in a low oven (around 300°F/150°C), brings out its nutty aroma and adds a beautiful golden-brown hue and delightful crunch.
For a more festive or celebratory look, consider adding edible flowers, such as violets or pansies, which complement the cake’s tropical theme. Chocolate elements, like shavings, curls, or even elegant chocolate Easter eggs if serving around that time, can provide a lovely contrast in color and flavor. A dusting of powdered sugar can also create a snowy, elegant finish, especially when combined with a few fresh berries.
Alternatively, you can create decorative swirls or rosettes with the frosting using piping bags and different tips. A simple drizzle of a complementary sauce, like a mango or passion fruit coulis, can add both visual interest and an extra layer of fruity flavor that pairs wonderfully with coconut. Don’t be afraid to experiment; the cake is a beautiful canvas.
Side Dishes
While this cake is a substantial dessert on its own, serving it with certain accompaniments can enhance the overall dining experience. Fresh berries are a perennial favorite; their bright, slightly tart flavors cut through the sweetness of the cake beautifully and add a refreshing contrast. Think of plump raspberries, juicy strawberries, or a mix of colorful blueberries and blackberries.
A small scoop of creamy vanilla bean ice cream or a light coconut sorbet can be a delightful addition, especially on a warm day. The cool, smooth texture of ice cream provides a wonderful counterpoint to the cake’s tender crumb, and a coconut sorbet amplifies the tropical theme. Consider a dollop of lightly sweetened whipped cream if you prefer something less dense than ice cream.
For a more sophisticated pairing, a small side of exotic fresh fruit salad featuring pineapple, mango, and kiwi can echo the cake’s tropical notes and add a refreshing, palate-cleansing element. This combination is especially fitting for brunches or lighter dessert courses where you want a balance of richness and freshness. The vibrant colors of the fruit salad also make for a visually appealing presentation.
Creative Serving Ideas
Move beyond the traditional slice and explore more imaginative ways to serve this exquisite coconut cake. Consider transforming individual slices into elegant dessert parfaits. Layer crumbled cake pieces with the coconut filling, frosting, and perhaps some fresh fruit or a tropical compote in clear glasses or jars. This presentation is visually stunning and offers a delightful mix of textures.
Another creative idea is to serve the cake as part of a dessert board. Alongside slices of the cake, include elements like miniature coconut macarons, chocolate-covered pretzels, a small bowl of candied ginger, and some fresh tropical fruits. This allows guests to mix and match flavors and textures, creating their own perfect dessert combination and making the cake the centerpiece of a larger sweet spread.
For a truly special occasion, individual mini cakes or cupcakes can be made using the same batter and frosting. Decorate these small treats with miniature toasted coconut flakes and a single perfect berry or a swirl of frosting. This makes for charming, easy-to-handle portions that are perfect for parties, showers, or as elegant favors. You can also bake the cake into fun shapes, like bundt cakes or madeleine pans, for a unique presentation.
Preparation & Storage
Storing Leftovers
Because this delicious coconut cake contains cream cheese in its frosting, it’s essential to store any leftovers properly in the refrigerator to maintain freshness and food safety. Once the cake has been assembled and frosted, cover it loosely with plastic wrap or transfer it to an airtight cake container. This prevents the cake from drying out and also protects it from absorbing odors from other foods in the refrigerator.
When you are ready to serve chilled leftovers, it’s highly recommended to let the cake sit at room temperature for about 20 to 30 minutes before slicing. This allows the frosting to soften slightly, enhancing its creamy texture and making the coconut flavor more pronounced. The cold can mute flavors, so this brief warming period makes a significant difference in enjoyment.
Properly stored in the refrigerator, this cake should remain fresh and delicious for about 4 to 5 days. The moistness from the coconut milk helps keep the cake tender for longer than many traditional cakes, making it a great make-ahead option for gatherings where you want dessert ready to go.
Freezing
Freezing this coconut cake is best done with the unfrosted layers. Once the cake layers have been baked and cooled completely, wrap each layer tightly in several layers of plastic wrap. After the plastic wrap, add a final layer of aluminum foil or place the wrapped layers in a freezer-safe bag or container. This thorough wrapping protects the cake from freezer burn and helps retain its moisture.
Unfrosted cake layers can be stored in the freezer for up to 2 months. When you’re ready to use them, the best way to thaw them is to transfer the wrapped layers from the freezer to the refrigerator and let them thaw slowly overnight. This gradual thawing helps prevent condensation from forming on the cake, which could affect its texture.
Frosted cake slices or the entire frosted cake can also be frozen, though the appearance of the frosting may be slightly compromised upon thawing. To freeze slices, place them on a baking sheet until firm, then wrap them individually and place them in a freezer container. Thaw in the refrigerator overnight. While not as pristine as unfrosted layers, it’s still a viable option for long-term storage.
Reheating
Reheating this coconut cake is generally not recommended in the traditional sense, as applying direct heat can dry out the cake and melt the frosting, ruining its texture and appearance. Instead, the goal is to bring the cake back to an ideal serving temperature after refrigeration or thawing from being frozen.
As mentioned in the storage section, the best method for serving leftover cake, especially if it has been refrigerated, is to allow it to come to room temperature naturally. Place the slices on a plate and let them sit on the counter for about 20 to 30 minutes. This allows the butter in the frosting to soften, making it creamy and spreadable, and also allows the coconut flavor to bloom, providing the best tasting experience.
If you are in a real pinch for time and need to speed up the warming process slightly, you can briefly microwave a slice on very low power for no more than 10-15 seconds. However, this should be done with extreme caution, as it’s very easy to overdo it and end up with a warm, potentially slightly gummy cake. For optimal results, patience and room temperature thawing are truly the best approach.
Frequently Asked Questions
-
Can I make this cake with regular milk instead of coconut milk?
While you can substitute regular dairy milk for coconut milk in a pinch, the cake will lose a significant amount of its unique flavor and moisture. Full-fat coconut milk is crucial for achieving the characteristic tender, moist crumb and subtle tropical taste that defines this recipe. If you must substitute, use whole milk, but be aware that the final result will be different, and you might need to adjust other elements to compensate for the lack of coconut richness. It’s best to stick to the recipe’s recommendation for the most authentic and delicious outcome.
-
Why is my coconut cake dry or dense?
Dryness or density in a cake can often be attributed to a few common issues. Overmixing the batter after adding the flour is a primary culprit, as it develops gluten and makes the cake tough. Another reason could be overbaking; always rely on visual cues like the spring-back test and a clean toothpick rather than just the timer. Ensuring all ingredients, especially butter and eggs, are at room temperature also plays a vital role in creating a light, tender crumb. Finally, not properly incorporating the whipped egg whites, or over-folding them, can lead to a denser cake.
-
How can I make the coconut flavor even stronger in this cake?
This recipe already incorporates several layers of coconut flavor, but if you desire an even more intense coconut experience, consider a few additions. You could try adding a bit more coconut flavoring extract to both the cake batter and the frosting, but be cautious not to overdo it, as extracts can become overpowering. Using toasted shredded coconut in the batter itself, in addition to the filling and garnish, will impart a deeper, nuttier coconut taste. Some bakers also opt for using coconut cream instead of just coconut milk for an even richer coconut profile, though this might require slight adjustments to other liquid measurements to maintain batter consistency.