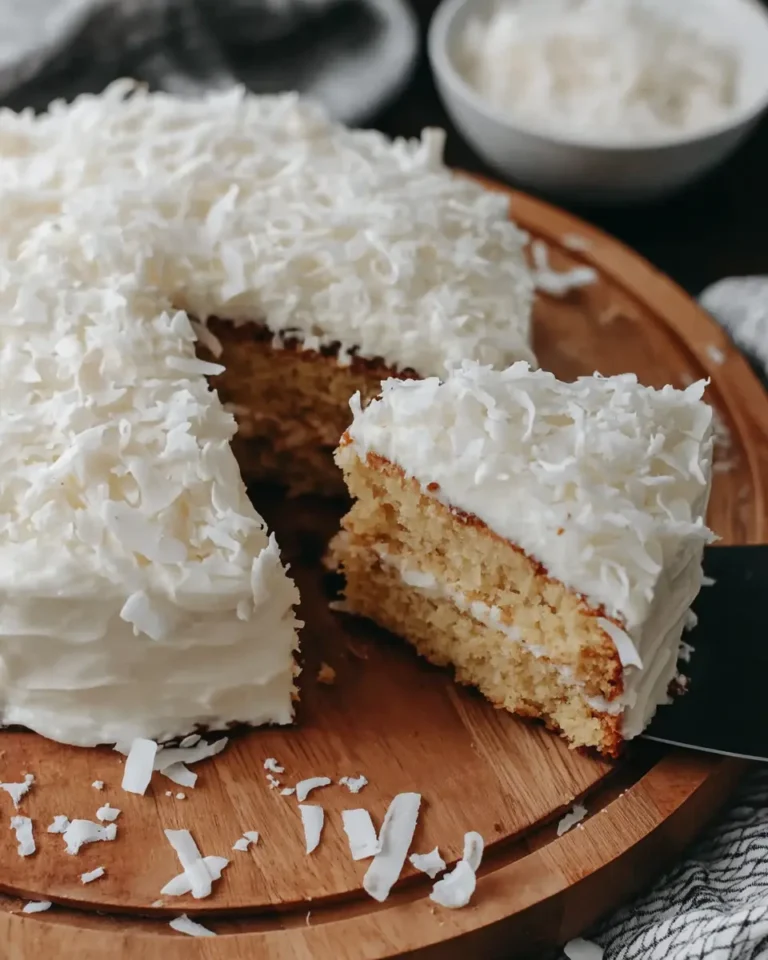
Coconut Cake with Buttercream Frosting
Coconut Cake with Buttercream Frosting is a truly special dessert, perfect for any celebration or just when you crave a slice of pure comfort. Its incredibly tender crumb and rich coconut flavor make it a standout choice that always impresses.
This cake achieves a delightful balance of sweetness and delicate texture, ensuring every bite is a moment of pure bliss. The smooth buttercream frosting, infused with coconut, adds another layer of indulgence that perfectly complements the moist cake.
Why You Will Love This Recipe
- Exceptional Texture: The use of cake flour, egg whites, and sour cream creates an incredibly light, airy, and tender crumb that melts in your mouth.
- Rich Coconut Flavor: From the canned coconut milk in the cake to the toasted coconut topping and frosting, every element is infused with delicious coconut goodness.
- Beautiful Presentation: With its smooth frosting and decorative toasted coconut finish, this cake is a showstopper that looks as good as it tastes.
- Moist and Tender: Even after chilling, the cake layers remain wonderfully moist and soft, thanks to the combination of ingredients like coconut milk and sour cream.
- Versatile Celebration Cake: It’s ideal for birthdays, holidays, or any gathering where a classic, crowd-pleasing dessert is needed.
Ingredients You Need
The success of any great cake lies in the quality of its ingredients, and this coconut cake is no exception. Using the freshest, highest-quality components will ensure the best possible flavor and texture in your final baked creation. Pay close attention to details like using full-fat coconut milk and cream cheese, as these contribute significantly to the cake’s richness and smooth consistency.
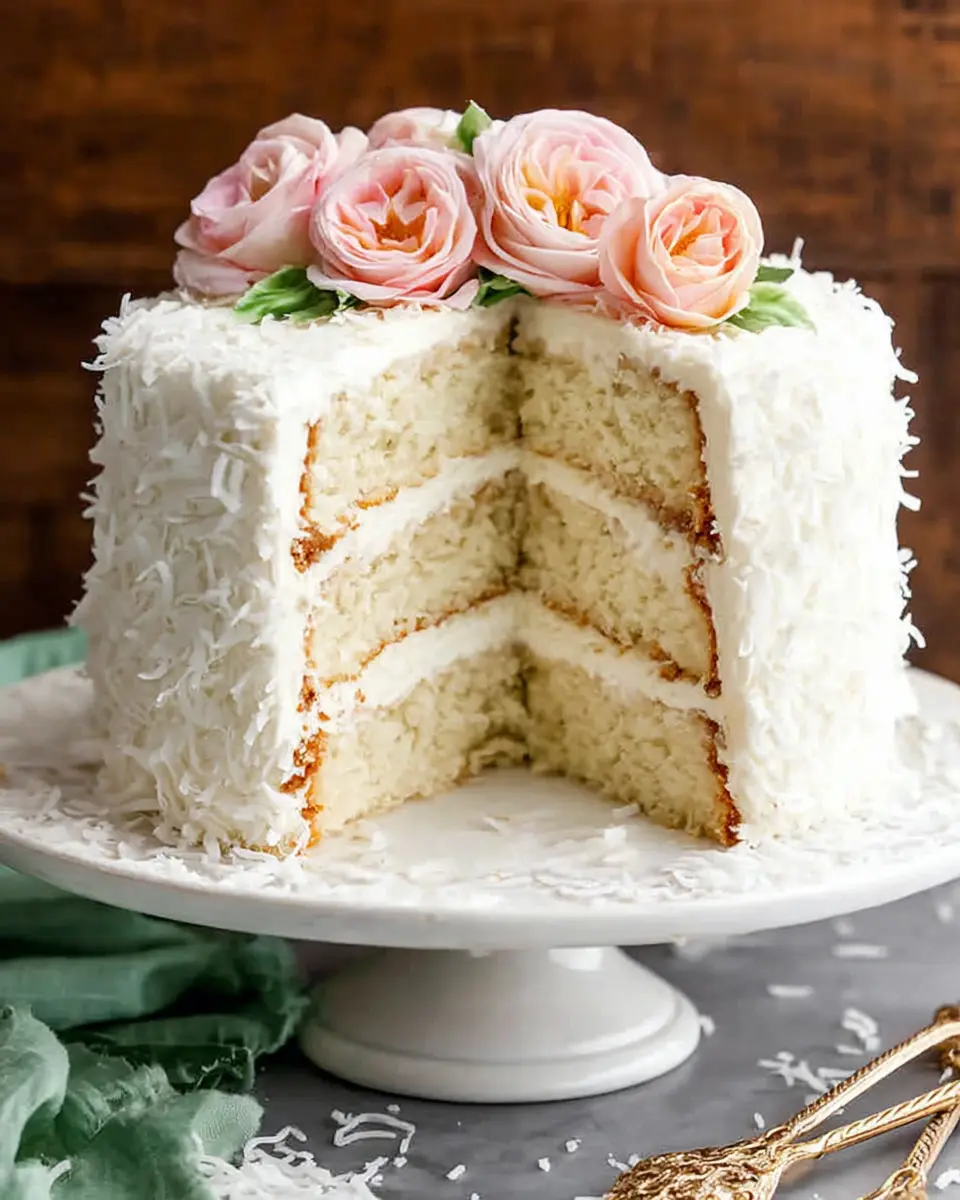
Coconut Cake with Buttercream Frosting

A tender, richly flavored coconut layer cake prepared with canned coconut milk, sweetened shredded coconut, and egg whites for a soft, airy crumb. The layers are finished with a smooth coconut-vanilla frosting and coated with lightly toasted coconut for added texture and aroma.
- For the cake: 3/4 cup unsalted butter, softened to room temperature
- 1 cup sweetened shredded coconut
- 1 teaspoon fine salt
- 2 teaspoons baking powder
- 1/2 teaspoon baking soda
- 5 large egg whites
- 1/2 cup full-fat sour cream
- 2 teaspoons vanilla essence
- 1 cup canned unsweetened coconut milk (using the higher-fat variety rather than refrigerated coconut beverage)
- 1 2/3 cups granulated sugar
- 2 1/2 cups cake flour (preferably King Arthur for dependable texture)
- 1 teaspoon coconut flavoring
- For the frosting: 5 cups powdered sugar, sifted
- 1 cup unsalted butter, softened
- 8 ounces full-fat cream cheese, softened
- 2 tablespoons canned coconut milk
- 1/8 teaspoon salt
- 1/2 teaspoon vanilla essence
- 1/2 teaspoon coconut flavoring (preferably Schwartz)
- For the topping: 2 cups sweetened shredded coconut, lightly toasted
- 1Heat the oven to 350°F (177°C). Grease three 9-inch round cake pans, place parchment rounds in the bases, and lightly grease the parchment as well so the layers release cleanly after baking.
- 2In a medium bowl, whisk together the cake flour, baking powder, baking soda, and salt. Set the dry mixture aside.
- 3In a large mixing bowl, beat the softened butter with the granulated sugar on medium-high speed for about 2 minutes, until the mixture is pale and creamy. Scrape down the bowl as needed.
- 4Add the egg whites and beat just until incorporated. Mix in the sour cream, vanilla essence, and coconut flavoring. The batter may look slightly curdled at this stage, which is normal.
- 5With the mixer on low speed, add the dry ingredients and the coconut milk gradually, alternating as needed, and mix until combined. Fold in the shredded coconut by hand, making sure the batter is evenly blended and no pockets of butter remain. The finished batter should be somewhat thick.
- 6Divide the batter evenly among the prepared pans. Bake for 21 to 23 minutes, or until a toothpick inserted into the center comes out clean.
- 7Leave the cake layers in their pans to cool completely on a wire rack. Do not frost the cake until all layers are fully cooled.
- 8To make the frosting, beat the butter and cream cheese together on medium speed for about 2 minutes, until smooth and creamy.
- 9Add the sifted powdered sugar, coconut milk, vanilla essence, coconut flavoring, and salt with the mixer on low speed. Once incorporated, increase to high speed and beat for 3 minutes, until light and spreadable.
- 10Adjust the frosting only if needed. Add a little more powdered sugar if it seems too soft, or a small amount of coconut milk if it feels too firm. Taste and add a tiny extra pinch of salt if the sweetness needs balancing.
- 11If the cake layers have domed tops, level them carefully with a large serrated knife to create flat surfaces for stacking.
- 12Place the first cake layer on a serving plate or cake stand and spread about 1 1/2 cups of frosting over the top. Set the second layer over it and repeat with another layer of frosting. Add the final cake layer, then spread the remaining frosting over the top and sides of the cake.
- 13Scatter the toasted shredded coconut over the top and gently press additional coconut onto the sides so it adheres to the frosting.
- 14Refrigerate the finished cake for at least 20 minutes before slicing. This resting time helps the layers hold their shape neatly when served.
Keywords: Coconut Cake, Buttercream Frosting, Layer Cake, Celebration Cake, Tropical Dessert, Homemade Cake
The precise quantities for all the delightful components are detailed within the recipe card. This ensures you have everything you need for a perfect bake.
Variations
To make this delightful cake even more inclusive and adaptable to different dietary preferences or flavor profiles, consider these wonderful variations. Each offers a unique twist while maintaining the essence of a celebratory coconut cake, ensuring everyone can enjoy a slice of this delightful creation.
For a delightful vegan interpretation, the substitutions are quite straightforward. You would replace the unsalted butter with a high-quality vegan butter alternative and use a flax egg or commercial egg replacer for the egg whites. The sour cream can be substituted with a rich, unsweetened vegan yogurt, and ensure your coconut milk and extracts are dairy-free. The cream cheese in the frosting can be swapped for a good quality vegan cream cheese to maintain that essential creamy texture and tangy profile, resulting in a wonderfully moist and flavorful vegan coconut cake that appeals to a broader audience.
Embracing a low-carb approach requires a few more strategic ingredient swaps, but the result is still a decadent treat. For the cake, you’ll want to replace the granulated sugar with a granular sugar substitute like erythritol or a blend, and use almond flour or a coconut flour blend instead of cake flour to reduce the carbohydrate count. The sweetened shredded coconut can be replaced with unsweetened shredded coconut, and you might need a touch more fat from butter or coconut oil to compensate for the texture change. The frosting can be made with a sugar-free powdered sweetener and a touch more cream cheese or coconut cream to thicken it, allowing for a rich, satisfying dessert without the sugar spike.
Another exciting avenue is to infuse additional tropical flavors into the cake and frosting. Imagine adding a teaspoon of passion fruit puree to the cake batter along with the coconut milk for a delightful tropical tang. You could also swirl in some mango puree into the frosting or layer it between the cake tiers for a vibrant burst of flavor and color. A hint of lime zest in the frosting offers a refreshing counterpoint to the sweetness, creating a sophisticated flavor profile that truly transports you to a sunny locale, making this cake perfect for summer gatherings.
How to Prepare Coconut Cake with Buttercream Frosting
Step 1: Preparing the Pans and Dry Ingredients
Begin by preheating your oven to the specified temperature of 350°F (177°C), ensuring it’s fully heated and ready to bake. This initial step is crucial for an even bake and proper rise, so don’t rush it. Properly greasing your three 9-inch round cake pans is also paramount; use butter or baking spray, and line the bottoms with parchment paper rounds.
Lightly grease the parchment paper as well to guarantee the cake layers release cleanly from the pans without sticking or tearing. This preparation step is a cornerstone of successful cake baking, preventing the frustration of a damaged cake. After preparing the pans, take a medium bowl and whisk together your dry ingredients: cake flour, baking powder, baking soda, and fine salt.
Whisking these ingredients thoroughly ensures they are evenly distributed throughout the mixture. This even distribution is vital for the leavening agents to work effectively, promoting a uniform rise and consistent texture throughout the cake layers. Setting this bowl aside means the dry components are ready to be incorporated into the wet ingredients at the appropriate stage of the recipe.
Step 2: Creaming Butter and Sugar, and Incorporating Wet Ingredients
In a large mixing bowl, combine the softened unsalted butter and granulated sugar. Beat these together using an electric mixer on medium-high speed for approximately two minutes. This creaming process is essential as it incorporates air into the mixture, which contributes significantly to the cake’s light and fluffy texture. You’re looking for a pale yellow, creamy consistency.
Once the butter and sugar are beautifully creamed, it’s time to add the egg whites. Beat them in gradually, ensuring each addition is just incorporated before moving on. Next, mix in the sour cream and the vanilla and coconut flavorings. Don’t be alarmed if the mixture appears slightly curdled at this point; this is a common occurrence when combining these particular ingredients and will smooth out in the next step.
The curdled appearance is often due to the fat in the butter and sour cream separating slightly when introduced to the egg whites. However, as the dry ingredients and liquid are added, the emulsion will re-form, resulting in a cohesive and smooth batter. This technique ensures all the richness and moisture are perfectly integrated into the cake’s structure, preparing it for its transformation in the oven.
Step 3: Combining Wet and Dry Mixtures, and Adding Shredded Coconut
Now, with your electric mixer set to low speed, begin gradually adding the dry ingredient mixture to the creamed butter and sugar base. Alternate this with the canned unsweetened coconut milk, adding a portion of the dry ingredients, then a portion of the coconut milk, and continuing this pattern until everything is incorporated. This gradual addition helps prevent the gluten in the flour from becoming overdeveloped, which can lead to a tough cake.
The goal here is to mix just until the batter comes together, avoiding overmixing at all costs. Overmixing can toughen the cake, diminishing that desirable tender crumb we’re aiming for. Once the batter is mostly combined, remove the mixer and fold in the sweetened shredded coconut by hand using a spatula or large spoon.
Folding the shredded coconut in gently ensures it is evenly distributed throughout the batter without being broken down or overworked. This manual incorporation also helps maintain the delicate texture of the batter. The finished batter should be somewhat thick but still pourable, with the coconut flecks adding delightful texture and flavor throughout.
Step 4: Baking and Cooling the Cake Layers
Carefully divide the prepared cake batter evenly among the three prepared 9-inch round cake pans. Ensuring an equal distribution of batter across all pans is key to having layers that are the same height and bake uniformly. Smooth the tops slightly with a spatula to ensure an even surface.
Place the pans into the preheated oven and bake for approximately 21 to 23 minutes. The exact baking time may vary slightly depending on your oven’s calibration and the moisture content of your ingredients. You’ll know the cakes are done when a toothpick inserted into the center comes out clean, with no wet batter clinging to it.
Once baked to perfection, remove the cake layers from the oven and let them cool in their pans on a wire rack for about 15 to 20 minutes. This initial cooling period in the pans allows the cakes to firm up slightly, making them easier to handle. After this brief period, carefully invert the cake layers onto the wire rack to cool completely before attempting to frost them.
Step 5: Preparing the Creamy Buttercream Frosting
While the cake layers are cooling, you can prepare the luscious buttercream frosting. In a clean, large mixing bowl, beat together the softened unsalted butter and the softened full-fat cream cheese. Use your electric mixer on a medium speed and beat for about two minutes until the mixture is thoroughly smooth and creamy, ensuring there are no lumps of butter or cream cheese.
Next, add the sifted powdered sugar, canned coconut milk, vanilla essence, coconut flavoring, and a pinch of salt. Begin mixing on a low speed to incorporate the powdered sugar without creating a cloud of dust. Once the ingredients are just combined, increase the mixer speed to high and beat for an additional three minutes.
This vigorous beating at high speed is what creates the light, fluffy, and perfectly spreadable consistency of the buttercream. If the frosting seems a bit too firm, you can add a teaspoon or two more of coconut milk, mixing well after each addition. Conversely, if it feels too soft, add a tablespoon or two more of sifted powdered sugar until you achieve the desired texture. Taste and adjust the salt if needed to balance the sweetness.
Step 6: Assembling and Decorating the Coconut Cake
Once the cake layers are completely cool, it’s time to assemble your masterpiece. If the tops of your cake layers have domed significantly during baking, you may wish to level them using a large serrated knife. This creates flat surfaces, making it much easier to stack the layers evenly and achieve a professional finish.
Place the first cake layer onto your serving plate or cake stand. Spread a generous amount of the prepared buttercream frosting evenly over the top of this layer, aiming for about 1 1/2 cups. Carefully set the second cake layer on top of the frosting, then repeat the process, spreading another layer of frosting over it.
Add the final cake layer on top. Now, using the remaining frosting, cover the entire cake, including the top and sides, ensuring a smooth and even coating. Once the cake is fully frosted, scatter the lightly toasted shredded coconut all over the top and gently press additional coconut onto the sides of the cake so it adheres beautifully to the frosting. Chill the assembled cake for at least 20 minutes before slicing; this chilling period helps the layers set neatly for clean cuts.
Pro Tips for Coconut Cake with Buttercream Frosting
- Toast Coconut Wisely: When toasting the shredded coconut for the topping, aim for a light golden hue. Avoid toasting it too deeply, as this can result in a bitter flavor and an overly dark appearance that detracts from the cake’s delicate aesthetic.
- Room Temperature is Key: Ensure all your dairy ingredients, including butter, cream cheese, and sour cream, are at room temperature before you begin. This significantly aids in achieving a smoother cake batter and a silkier frosting without any unincorporated lumps.
- Chill Before Slicing: For the cleanest, most professional-looking slices, refrigerate the fully assembled and frosted cake for at least 20-30 minutes before cutting. This firming step prevents the layers from sliding and the frosting from smearing, making for beautiful presentation.
- Don’t Overmix the Batter: Once you add the dry ingredients, mix only until just combined. Overmixing can develop the gluten too much, leading to a tougher cake. Gentle folding of the shredded coconut is also crucial for maintaining the tender crumb.
- Adjust Frosting Consistency: The humidity and ingredient variations can sometimes affect frosting consistency. Have a little extra powdered sugar or a splash of coconut milk on hand to adjust if your frosting is too stiff or too soft, ensuring it’s perfectly spreadable.
Serving Suggestions for Coconut Cake with Buttercream Frosting
Decoration
The toasted shredded coconut is the star of the show for decorating this beautiful cake, providing a delicate crunch and warm, nutty aroma. Gently press additional toasted coconut onto the sides of the cake after frosting to create a cohesive and inviting look. For an extra touch of elegance, consider adding a few edible flowers, like pansies or violets, around the base of the cake or on top for a pop of color. A light dusting of powdered sugar over the top, or a delicate drizzle of melted white chocolate, can also add a sophisticated finish without overpowering the coconut theme.
Side Dishes
Fresh berries, such as sliced strawberries, plump raspberries, or vibrant blueberries, offer a wonderful burst of tartness and freshness that beautifully contrasts the cake’s sweetness and richness. A simple fruit salad featuring tropical fruits like pineapple chunks, mango cubes, and kiwi slices would enhance the cake’s tropical theme and provide a refreshing accompaniment. For a warm beverage pairing, a robust hot coffee or a soothing cup of black tea works exceptionally well, their slight bitterness cutting through the sweetness of the cake and frosting.
Creative Serving Ideas
Serve individual slices alongside a small scoop of coconut or vanilla bean ice cream for an extra decadent dessert experience. You could also present slices with a small dollop of whipped cream infused with a hint of coconut extract for added flavor. For a more formal presentation, consider serving a sliver of cake as part of a dessert tasting trio, perhaps alongside a berry tart and a rich chocolate mousse. This cake is also fantastic when paired with a tropical fruit smoothie or a light, sparkling prosecco for a celebratory toast.
Preparation & Storage
Storing Leftovers
To keep your Coconut Cake with Buttercream Frosting fresh and delicious, store any leftovers tightly covered in the refrigerator. The cake can be stored this way for up to 5 days. The frosting, containing cream cheese, requires refrigeration to maintain its quality and safety. Properly sealed, the cake layers will remain moist and the frosting will hold its structure beautifully.
Freezing
For longer-term storage, freezing is an excellent option. You can freeze individual slices of the cake or even entire unfrosted layers. Ensure they are wrapped very well in plastic wrap, followed by a layer of aluminum foil or placed in an airtight freezer-safe container. Frozen cake layers or slices can be kept for up to 2 months.
Reheating
This cake is typically best served cool or at room temperature, so direct reheating isn’t usually necessary. However, if you prefer a slightly softer frosting, you can let a slice sit on the counter for about 15 to 20 minutes before serving. This brief warming period will gently soften the frosting and enhance the release of the coconut aroma and flavor. If serving from frozen, thaw slices overnight in the refrigerator before allowing them to come to room temperature.
Frequently Asked Questions
-
Can I make this cake a day ahead?
Absolutely, this coconut cake is an excellent make-ahead dessert. In fact, preparing it a day in advance often enhances its flavors and textures, as the coconut milk and other moist ingredients have more time to meld. You can bake the cake layers, allow them to cool completely, and then frost and assemble the cake. Refrigerate the assembled cake overnight; it will remain wonderfully soft and the frosting will firm up nicely, making it ready for slicing and serving the next day.
-
Why should I use canned coconut milk instead of refrigerated coconut drink?
Canned coconut milk, especially the full-fat variety, is essential for achieving the rich flavor and moist texture that defines this cake. It contains a significantly higher fat content and a more concentrated coconut flavor compared to the thinner, often water-based refrigerated coconut drinks, which are typically found in the dairy or beverage aisle. Using a thin coconut beverage can result in a less flavorful cake and a potentially drier or less tender crumb. The higher fat content in canned coconut milk also contributes to the overall richness and stability of the cake batter.
-
Can I toast the coconut in advance for the topping?
Yes, toasting the coconut for the topping well in advance is a very smart preparation step. Once the shredded coconut has been toasted until it’s lightly golden and fragrant, allow it to cool completely. Store the cooled toasted coconut in an airtight container at room temperature. This way, it will be ready and waiting when you’re ready to decorate the cake, saving you time during the final assembly and ensuring it remains crisp and flavorful until it’s artfully applied to your frosted masterpiece.