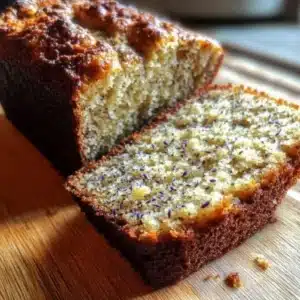
Easy and Deliciously Moist Lavender Banana Bread
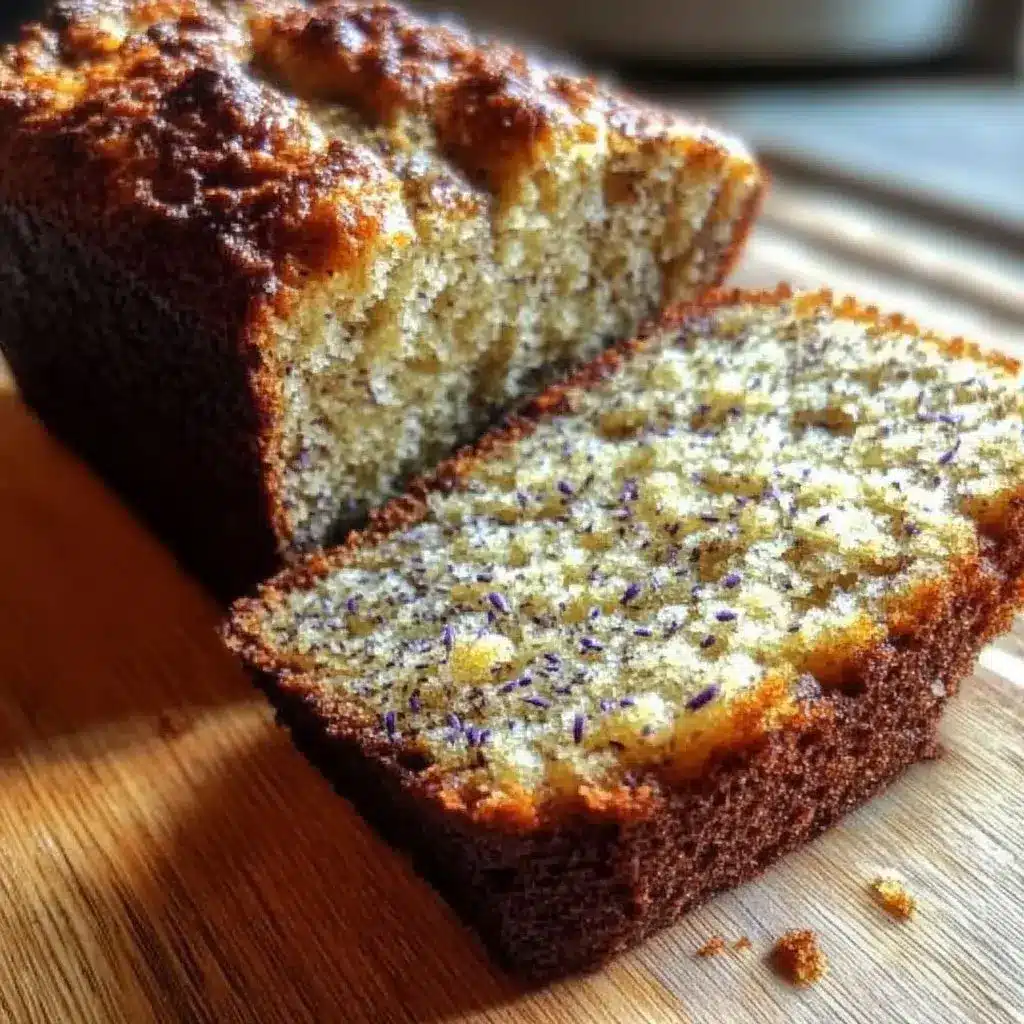
Imagine pulling a warm loaf of freshly baked bread from the oven, the enticing aroma of ripe bananas mingling with the subtle floral notes of lavender wafting through your kitchen. This is the delight you’ll experience when you make Deliciously Moist Lavender Banana Bread.
A comforting classic with a twist, this recipe combines the sweetness of bananas with the unique taste of culinary lavender, creating a harmonious balance of flavors that will amaze your tastebuds. The appeal of this bread lies not only in its unique flavor but also in its simplicity, making it a truly special treat.
Why You Will Love This Recipe
- Unique Flavor Combination: The delicate floral essence of culinary lavender perfectly complements the sweet, comforting taste of ripe bananas, creating an unforgettable flavor profile that elevates traditional banana bread to gourmet status.
- Incredible Moistness: Achieved through perfectly ripe bananas and balanced ingredients, this loaf boasts a tender, moist crumb that is a pleasure to bite into with every single serving.
- Simple to Prepare: Despite its sophisticated taste, this recipe uses straightforward techniques and readily available ingredients, making it accessible for bakers of all skill levels to achieve impressive results.
- Versatile Enjoyment: This lavender banana bread is a delightful treat for any time of day, whether served warm for breakfast, as an afternoon snack with tea, or as an elegant dessert with a dollop of cream.
- Beautifully Aromatic: The baking process fills your home with a wonderfully soothing and inviting aroma, combining the familiar comfort of banana bread with the calming fragrance of lavender.
Ingredients You Need
Crafting this exceptional lavender banana bread begins with selecting the finest ingredients, each contributing to its unique flavor and texture. Using very ripe bananas is paramount, as they provide the natural sweetness and moisture that defines this beloved quick bread. The culinary lavender, when finely chopped, imparts a subtle yet distinct floral note that beautifully balances the sweetness of the bananas, transforming a simple treat into something extraordinary.
Deliciously Moist Lavender Banana Bread
A comforting classic banana bread infused with the unique taste of culinary lavender, creating a delightful and moist loaf perfect for any occasion.
- 3 ripe bananas, mashed (Use yellow and speckled bananas for sweetness.)
- 1/3 cup melted butter
- 1 teaspoon baking soda
- a pinch salt
- 3/4 cup sugar (Consider substitutes like honey or erythritol.)
- 1 large egg, beaten (For vegan option, use a flax egg.)
- 1 teaspoon vanilla extract
- 1 cup all-purpose flour (Can substitute with gluten-free flour.)
- 1 tablespoon culinary lavender, finely chopped (Use culinary grade lavender for best results.)
- 1Gather all your ingredients and preheat the oven to 350°F (175°C). Grease your 4×8 inch loaf pan.
- 2In a mixing bowl, blend the melted butter and mashed ripe bananas to create a creamy base.
- 3Stir in the baking soda and a pinch of salt to the banana-butter mixture.
- 4Introduce the sugar to the mixture, folding it in gently until combined.
- 5Mix in the beaten egg and vanilla extract until well incorporated.
- 6Gradually add the all-purpose flour and finely chopped lavender, gently folding until just combined.
- 7Pour the batter into the greased loaf pan and smooth the top with a spatula.
- 8Place the loaf in the preheated oven and bake for 50-60 minutes or until a toothpick inserted into the center comes out clean.
- 9Allow the freshly baked bread to cool in the pan for a few minutes before transferring it to a wire rack.
- 10Once cooled completely, slice and serve.
Keywords: Banana Bread, Lavender Bread, moist banana bread
- ripe bananas, mashed: Use bananas that are yellow with plenty of brown spots for maximum sweetness and moisture.
- melted butter: Provides richness and helps create a tender crumb.
- baking soda: Acts as a leavening agent, ensuring a good rise.
- salt: Enhances all the other flavors in the bread.
- sugar: Adds sweetness; consider alternatives like honey or maple syrup for a different flavor profile.
- large egg, beaten: Binds the ingredients and adds richness; for a vegan version, use a flax egg.
- vanilla extract: A classic flavor enhancer that complements both banana and lavender.
- all-purpose flour: The base of our bread structure.
- culinary lavender, finely chopped: Ensure it’s culinary grade and finely chopped to distribute evenly.
The precise quantities for each ingredient are detailed within the accompanying recipe card, ensuring you have all the necessary measurements for success.
Variations
Elevating your Deliciously Moist Lavender Banana Bread even further is wonderfully simple with a few creative twists. Consider adding a handful of toasted walnuts or pecans to the batter for a delightful crunch that contrasts beautifully with the soft cake. This addition not only enhances the texture but also introduces a lovely nutty undertone that complements the banana and lavender notes.
For chocolate lovers, a generous scattering of semi-sweet or dark chocolate chips will transform your loaf into a decadent dessert bread. The melting chocolate chips create pockets of gooey goodness within the moist crumb, offering a delightful sweet surprise in every slice. This is particularly wonderful when served warm, allowing the chocolate to become even more luscious.
To introduce a brighter, more zesty dimension, incorporating the zest of one lemon or orange into the batter is a fantastic idea. The citrus zest cuts through the sweetness and adds a refreshing aroma that pairs exceptionally well with the floral notes of lavender, creating a sophisticated flavor pairing.
A touch of spice can also add another layer of complexity and warmth to this already delightful bread. Adding a quarter teaspoon of ground cinnamon or a pinch of cardamom to the dry ingredients can lend a cozy, autumnal feel, making it perfect for cooler weather or festive occasions. These subtle spice additions can truly redefine the overall character of the bread.
How to Prepare lavender banana bread
Step 1: Gather and Prepare Your Ingredients
The journey to creating your Deliciously Moist Lavender Banana Bread begins with careful preparation. First, preheat your oven to a steady 350 degrees Fahrenheit (175 degrees Celsius), ensuring it reaches the optimal temperature for baking. This is a crucial step for even cooking and achieving that perfect golden crust.
Next, meticulously grease a standard 4×8 inch loaf pan with butter or non-stick cooking spray. Properly greasing the pan is essential to prevent the delicate bread from sticking, ensuring it slides out smoothly once baked. Having your pan ready and your oven preheated saves valuable time and prevents any potential rush during the mixing process.
Finally, gather all your measured ingredients and arrange them within easy reach. This includes your perfectly ripe, mashed bananas, melted butter, baking soda, salt, sugar, beaten egg, vanilla extract, flour, and the star ingredient – finely chopped culinary lavender. Having everything at hand minimizes the chance of forgetting an ingredient and streamlines the entire baking experience, allowing you to focus on the art of combining them.
Step 2: Create the Creamy Banana Base
In a generously sized mixing bowl, introduce the melted butter. This foundational fat will contribute to the bread’s tenderness and rich flavor profile. Carefully pour the melted butter into the bowl, ensuring you capture all the liquid goodness.
To this, add the mashed ripe bananas. The riper the bananas, the sweeter and more moist your bread will be. Mash them thoroughly until they form a relatively smooth, creamy consistency, free of large lumps. This banana mixture is the heart of your banana bread, providing its signature flavor and moisture.
Gently stir these two components together until they are well combined. The goal is to create a homogeneous, creamy base where the butter and banana are fully integrated, forming a smooth, appealing mixture ready for the subsequent steps of this delightful baking endeavor.
Step 3: Incorporate Dry Leavening Agents
To the creamy banana-butter mixture, now it’s time to add the baking soda. Baking soda is a chemical leavener that reacts with acidic components in the batter (like the bananas themselves) and heat in the oven to produce carbon dioxide gas. This gas is what causes the bread to rise and become light and airy, preventing it from becoming dense and heavy.
Following the baking soda, add a pinch of salt. Salt plays a critical role in baking, not just for adding a subtle savory note, but more importantly, for enhancing and balancing all the other flavors present in the bread. It amplifies the sweetness of the bananas and sugar, and it rounds out the overall taste profile, making the bread more complex and satisfying.
Whisk these dry ingredients into the wet mixture until they are evenly distributed. It’s important to ensure the baking soda and salt are fully incorporated to guarantee uniform leavening and flavor throughout the entire loaf. Proper integration at this stage sets the stage for a beautifully risen and flavorful banana bread.
Step 4: Introduce Sweetness and Flavor Depth
Now, it’s time to add the sugar to your banana mixture. Sugar is not just for sweetness; it also contributes to the browning of the crust and helps tenderize the crumb by interfering with gluten development. Pour the specified amount of sugar into the bowl containing the banana, butter, baking soda, and salt.
Gently fold the sugar into the wet ingredients using a spatula or a wooden spoon. The aim is to incorporate the sugar until it’s mostly dissolved and evenly distributed throughout the batter. Avoid vigorous mixing at this point; a gentle folding motion is sufficient to combine everything without overdeveloping the gluten, which could result in a tougher bread.
Observe how the mixture begins to change slightly as the sugar dissolves, becoming a bit glossier. This step is crucial for achieving the perfect balance of sweetness and texture that makes this banana bread so irresistible. The subtle sweetness of the sugar will beautifully complement the natural fruitiness of the bananas.
Step 5: Enrich with Egg and Vanilla
Into the increasingly sweet and fragrant banana mixture, add the beaten egg. The egg serves multiple vital functions in baking: it acts as a binder, holding the ingredients together; it contributes moisture, making the bread tender; and the egg yolk adds richness and color to the final product. Ensure your egg is well beaten before adding it to the batter for seamless integration.
Next, measure and add the vanilla extract. Vanilla is a classic aromatic ingredient that enhances and rounds out the flavors of most baked goods. It has a wonderful way of making the banana flavor pop and also complements the subtle floral notes of the lavender that will be added later, creating a more complex and pleasing aroma and taste.
Gently whisk these additions into the batter until everything is just combined. It’s important not to overmix once the egg is added, as this can lead to a tougher texture in the finished bread. The goal is a homogenous batter where the egg and vanilla are evenly distributed, preparing the mixture for the dry ingredients.
Step 6: Fold in Flour and the Star Ingredient: Lavender
Now, it’s time to introduce the flour to your wet ingredients. Gradually add the all-purpose flour to the banana mixture. Flour provides the structure for your bread, forming the gluten network that gives it its shape. It’s best to add it in stages to make mixing easier and to prevent lumps from forming.
Along with the flour, now add the finely chopped culinary lavender. Ensure your lavender is indeed culinary grade and has been finely chopped. This is what gives your banana bread its unique and sophisticated floral note. If the lavender pieces are too large, they can create an overpowering flavor in certain bites, so finely chopping is key.
Using a spatula or a wooden spoon, gently fold the flour and lavender into the wet ingredients. Continue folding until the flour is just incorporated and no dry streaks remain. It is critically important not to overmix the batter at this stage; overmixing develops gluten too much, resulting in a dense, tough loaf of bread. A few small lumps of flour are acceptable, as they will disappear during baking.
Step 7: Transfer Batter to the Loaf Pan
Once your batter is thoroughly, yet gently, mixed, it’s ready to be transferred into the prepared loaf pan. Carefully spoon the thick batter into the greased 4×8 inch loaf pan. Ensure you scrape all the delicious batter from the mixing bowl using your spatula to maximize your yield and minimize waste.
After filling the pan, use your spatula to smooth the top of the batter. Gently spread it evenly across the surface of the pan, creating a relatively flat top. This even distribution will promote uniform baking, ensuring that the bread cooks evenly from the center to the edges and results in a visually appealing loaf with a consistent texture.
Taking a moment to ensure the batter is level in the pan is a small but significant step that contributes to the overall presentation and quality of your finished lavender banana bread. This visual tidiness before baking promises a beautiful result once it emerges from the oven.
Step 8: Bake to Golden Perfection
With your loaf pan filled and the oven preheated, it’s time to bake your Deliciously Moist Lavender Banana Bread. Carefully place the filled loaf pan into the center rack of your preheated 350°F (175°C) oven. Placing it in the center ensures that it receives even heat from all sides, promoting consistent cooking.
Bake for approximately 50 to 60 minutes. The exact baking time can vary slightly depending on your oven’s calibration and the moisture content of your bananas. You’ll know the bread is done when the top is a beautiful golden brown and a toothpick, when inserted into the deepest part of the center, comes out clean or with just a few moist crumbs attached. If it comes out with wet batter, it needs more time.
Avoid the temptation to open the oven door frequently during the baking process, especially in the first 30-40 minutes, as this can cause the bread to collapse. Patience during this stage is key to a well-risen loaf. The aroma filling your kitchen will be a delightful indicator of the deliciousness to come.
Step 9: The Crucial Cooling Phase
Once your lavender banana bread has achieved that perfect golden-brown hue and passes the toothpick test, carefully remove the loaf pan from the oven. The bread will be very hot and somewhat delicate at this stage. Allow it to cool in the loaf pan for about 10 to 15 minutes.
This initial cooling period in the pan is essential. It allows the bread to set up slightly, firming its structure and making it easier to handle. Cooling directly on a wire rack immediately after baking can sometimes lead to a soggy bottom if steam is trapped. The brief time in the pan helps mitigate this.
After this short period, carefully invert the loaf pan to release the bread onto a wire cooling rack. Allow the bread to cool completely on the wire rack. This allows air to circulate all around the loaf, preventing condensation and ensuring the crust remains crisp and the interior stays perfectly moist. Resist the urge to slice it while it’s still warm for the best texture.
Step 10: Slice and Savor Your Creation
With your Deliciously Moist Lavender Banana Bread fully cooled on the wire rack, it’s finally time to enjoy the fruits of your labor. Using a serrated knife works best for slicing through quick breads, ensuring clean, even cuts without squashing the loaf. Gently saw through the bread, creating slices of your desired thickness.
Present a slice on a plate and savor its unique aroma and flavor. This bread is absolutely delicious enjoyed on its own, allowing the subtle lavender and sweet banana to shine through. The moist texture makes it a comforting and satisfying treat, a testament to the simple yet magical combination of ingredients.
For an extra touch of indulgence, consider adding a smear of butter, a drizzle of honey, or a dollop of cream cheese to your slice. This simple pleasure is the perfect way to cap off the baking experience, transforming an already wonderful treat into something truly spectacular. Enjoy every last crumb of your homemade masterpiece!
Pro Tips for lavender banana bread
Use Very Ripe Bananas: For the ultimate sweetness and moisture, choose bananas that are heavily speckled with brown spots. These bananas are at their peak ripeness, offering the most flavor and natural sugars, which are crucial for a delicious banana bread. Overripe bananas are key to avoiding a dry loaf and achieving that signature moist texture.
Measure Lavender Carefully: Culinary lavender has a potent flavor, so it’s important to use it judiciously. Finely chopping the lavender ensures it distributes evenly throughout the batter. Start with the recommended amount and consider adding a tiny bit more if you’re already familiar with its flavor profile; it’s easier to add than to take away.
Don’t Overmix the Batter: Overmixing develops the gluten in the flour, which can lead to a tough and dense bread. Mix the ingredients until they are just combined, especially after adding the flour. A few small lumps are perfectly fine and will disappear during baking, resulting in a tender crumb.
Cool Completely Before Slicing: Allowing the bread to cool completely on a wire rack is vital for texture. Slicing too early can result in a gummy interior as the structure hasn’t fully set. Patience here ensures each slice is perfectly formed and moist, showcasing the bread’s best qualities.
Infuse the Butter (Optional): For an extra boost of lavender flavor, you can gently warm the butter with a teaspoon of lavender buds (strained before melting) and let it infuse for about 15 minutes. This adds a subtle depth to the overall flavor profile, though it’s an advanced step that requires careful attention.
Serving Suggestions for lavender banana bread
Decoration
A light dusting of powdered sugar can add a touch of elegance and sweetness without overpowering the delicate flavors. For a more rustic charm, a few extra lavender buds sprinkled artistically on top before baking can serve as a beautiful visual cue. Consider a very light glaze made from powdered sugar and a touch of milk or lemon juice for a subtle sheen and added flavor dimension.
Side Dishes
This lavender banana bread pairs wonderfully with a dollop of fresh whipped cream or a spoonful of Greek yogurt for a touch of creamy richness. A side of mixed berries, such as blueberries or raspberries, provides a refreshing contrast to the bread’s sweetness and texture. For a beverage pairing, a delicate herbal tea, such as chamomile or mint, or a classic cup of coffee enhances the overall sensory experience.
Creative Serving Ideas
Transform slices of cooled bread into delightful bread pudding by cubing them and baking in a custard mixture. French toast is another fantastic option; dip thick slices into a batter of egg, milk, and vanilla, then pan-fry until golden brown. Serve mini loaves or muffins dusted with lavender sugar for individual treats perfect for parties or as charming edible gifts.
Preparation & Storage
Storing Leftovers
To keep your Deliciously Moist Lavender Banana Bread fresh, store it in an airtight container at room temperature for up to three days. Ensure the container is truly airtight to prevent the bread from drying out. If you live in a very warm or humid climate, refrigerating it can prolong its shelf life, but be aware that refrigeration may slightly alter the texture, making it a bit drier.
Freezing
This banana bread freezes exceptionally well, making it convenient to have on hand. For best results, allow the bread to cool completely, then wrap individual slices tightly in plastic wrap, followed by a layer of aluminum foil or placing them in a freezer-safe bag. Properly stored, it can remain frozen for up to 2 to 3 months without significant loss of quality.
Reheating
When you’re ready to enjoy a slice from the freezer or simply want to warm up leftover bread, there are a few easy methods. For a lightly warmed slice, a few seconds in the microwave are usually sufficient. Alternatively, you can gently toast slices in a toaster oven or under a broiler for a few minutes until warmed through, which can help revive a slightly drier texture.
Frequently Asked Questions
- What can I do if I don’t have culinary lavender available for this recipe?
If culinary lavender is unavailable, you can achieve a wonderful flavor profile by substituting it with lemon zest or orange zest. The citrus zest will provide a bright, aromatic counterpoint to the banana, offering a refreshing alternative. Alternatively, a slightly increased amount of vanilla extract can also boost the aroma and overall sweetness of the bread, though it won’t replicate the floral notes.
- Is it possible to make this lavender banana bread gluten-free, and if so, how?
Yes, you can absolutely adapt this recipe to be gluten-free. The most common approach is to use a high-quality gluten-free all-purpose flour blend in place of the regular flour. You may need to adjust the liquid content slightly, as gluten-free flours can sometimes absorb moisture differently. Consider adding an extra tablespoon or two of mashed banana or a small amount of yogurt to ensure adequate moisture for a tender crumb.
- How should I store this banana bread to maintain its optimal freshness and flavor, and for how long can it be kept?
For best results, store your Deliciously Moist Lavender Banana Bread in an airtight container at room temperature. This method will keep it fresh for up to three days. If your environment is particularly humid or warm, refrigeration is an option to extend its life further, though it may slightly affect the texture. Always ensure the container is sealed tightly to prevent air exposure.